Chicken Caesar Pasta Salad Delightful and Fresh Meal

Looking for a quick meal that’s both delicious and fresh? You’ve found it! My Chicken Caesar Pasta Salad is perfect for lunch or dinner. With tender chicken, crisp romaine, and savory Caesar dressing, it’s a crowd-pleaser. In this post, I’ll guide you through easy steps for a great dish, plus tips for customizing it to fit your taste. Let’s dive into this delightful recipe together!
Why I Love This Recipe
- Quick and Easy: This Chicken Caesar Pasta Salad can be prepared in just about 30 minutes, making it perfect for busy weeknights.
- Flavorful Ingredients: The combination of tender chicken, crunchy romaine, and tangy Caesar dressing creates a delicious flavor profile that everyone will enjoy.
- Versatile Dish: This salad can be served as a main dish or a side, and it’s easily customizable with your favorite veggies or additional toppings.
- Great for Meal Prep: Make it ahead of time and store it in the fridge; it tastes even better after the flavors have melded together!
Ingredients
List of Ingredients
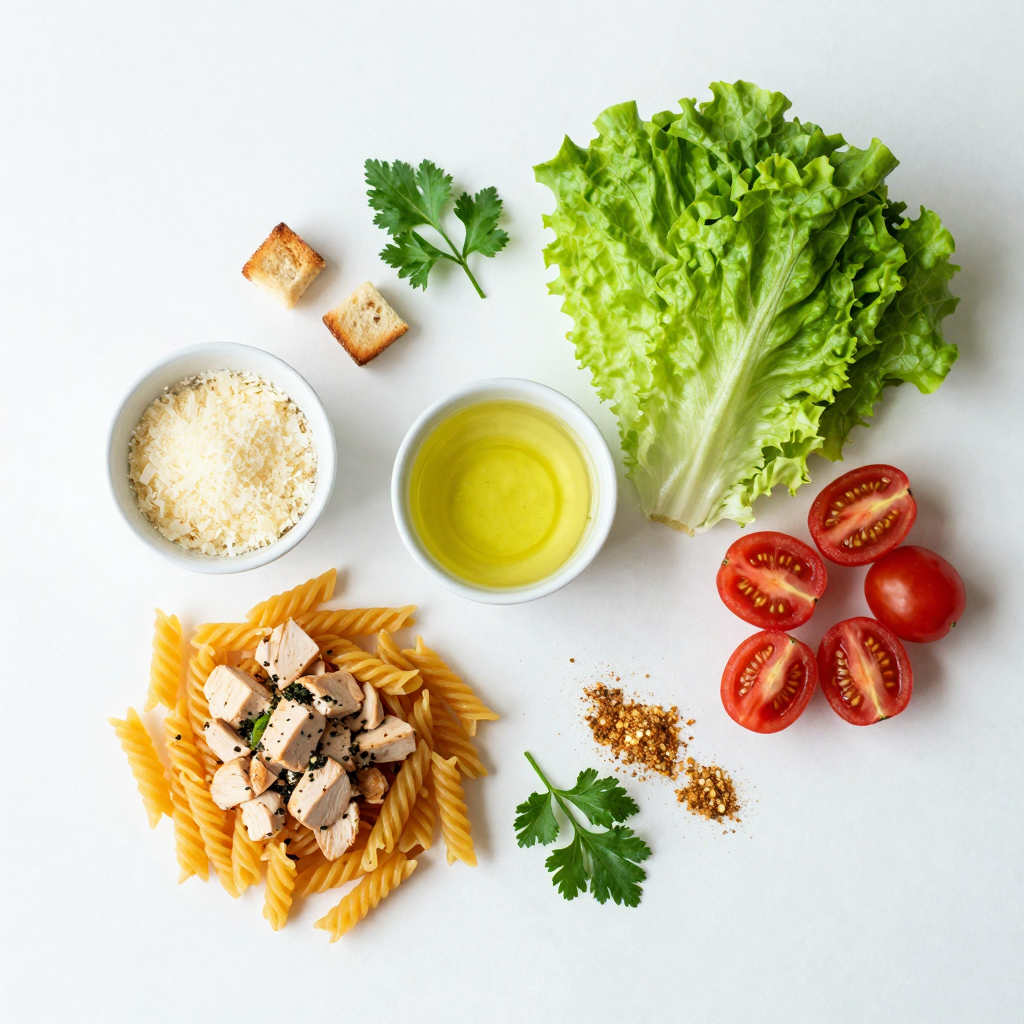
To make Chicken Caesar Pasta Salad, you will need:
- 8 oz rotini pasta
- 2 cups cooked chicken breast, diced
- 4 cups romaine lettuce, chopped
- 1/2 cup cherry tomatoes, halved
- 1/4 cup grated Parmesan cheese
- 1/2 cup Caesar dressing (store-bought or homemade)
- 1/2 cup croutons
- 1 tablespoon olive oil
- 1 teaspoon garlic powder
- Salt and pepper to taste
- Fresh parsley for garnish
Substitutions for Ingredients
You can swap some ingredients if needed:
- Use penne or fusilli pasta instead of rotini.
- Any cooked chicken works, like grilled or rotisserie.
- Spinach or kale can replace romaine for a different taste.
- Try feta cheese instead of Parmesan for a new flavor.
- Use ranch or Italian dressing instead of Caesar.
- Gluten-free pasta is a good option for gluten-free diets.
Nutritional Information per Serving
Each serving of Chicken Caesar Pasta Salad has:
- Calories: 450
- Protein: 30g
- Carbohydrates: 35g
- Fat: 20g
- Fiber: 3g
- Sugar: 2g
This meal is balanced with protein, healthy fats, and carbs. Enjoying it gives you energy and keeps you full.

Step-by-Step Instructions
Preparation of Pasta
First, gather your ingredients. You need 8 oz of rotini pasta. Bring a pot of water to a boil. Add the pasta and cook it until it is al dente. This usually takes about 8-10 minutes. Once done, drain the pasta. Rinse it under cold water to stop the cooking. This helps keep the pasta firm and fresh.
Sautéing the Chicken
Next, take 2 cups of cooked chicken breast and dice it into small pieces. Heat 1 tablespoon of olive oil in a large skillet over medium heat. Add the chicken to the skillet. Sprinkle with 1 teaspoon of garlic powder, salt, and pepper. Sauté for about 5-7 minutes. You want the chicken to be warm and slightly crispy. This step adds great flavor to your salad.
Combining Ingredients
Now, it’s time to mix everything. In a big bowl, combine the cooled pasta, 4 cups of chopped romaine lettuce, and 1/2 cup of halved cherry tomatoes. Add in the sautéed chicken. Drizzle 1/2 cup of Caesar dressing over the top. Toss everything gently to mix. Finally, add 1/4 cup of grated Parmesan cheese and 1/2 cup of croutons. Toss again to combine. You can adjust the seasoning if needed. For the best taste, serve immediately or chill for about 30 minutes. This lets the flavors blend beautifully.
Pro Tips
- Cook Pasta Al Dente: For the best texture, ensure your rotini pasta is cooked al dente. This will keep it firm and prevent it from becoming mushy when mixed with the dressing.
- Use Fresh Ingredients: Fresh romaine lettuce and cherry tomatoes enhance the salad’s flavor and crunch. Opt for high-quality ingredients for the best results.
- Chill Before Serving: Allowing the salad to chill in the refrigerator for about 30 minutes before serving will help meld the flavors together, making each bite more delicious.
- Customize Your Dressing: Feel free to adjust the amount of Caesar dressing to your taste. You can also add additional seasonings or herbs to personalize the flavor profile.
Tips & Tricks
Best Practices for Cooking Pasta
To cook pasta well, start with a big pot of water. Add a pinch of salt. This helps the pasta taste better. Bring the water to a rolling boil before adding the pasta. Stir the pasta once in a while to keep it from sticking. For rotini, cook it for about 8-10 minutes. Test it by biting into a piece; it should be firm but not hard. After cooking, drain the pasta and rinse it under cold water. This stops the cooking and cools it down.
Enhancing Flavor with Seasonings
Seasoning is key to a tasty dish. While sautéing the chicken, I use garlic powder, salt, and pepper. These simple spices boost the flavor without overwhelming it. You can also add lemon juice for a zesty kick. If you want more flavor, try fresh herbs like basil or parsley. They add brightness and freshness to your Chicken Caesar Pasta Salad.
Making Ahead for Meal Prep
If you plan to eat this salad later, make it ahead. You can cook the pasta and chicken the night before. Store them separately in the fridge. Mix the salad in the morning when you’re ready to eat. This keeps everything fresh and crisp. You can also pack it for lunch. It tastes great after sitting in the fridge for a while, allowing the flavors to blend.

Variations
Vegetarian Option
You can easily make a vegetarian version of this dish. Replace the chicken with chickpeas or grilled tofu. Both options add protein and flavor. Use a creamy vegan Caesar dressing to keep it tasty. Add extra veggies like bell peppers or cucumbers for crunch.
Gluten-Free Version
To make this salad gluten-free, use gluten-free pasta. There are many great options made from rice, quinoa, or lentils. Check the labels to ensure they are certified gluten-free. You can also use gluten-free croutons or skip them altogether for a lighter dish.
Add-In Suggestions
You can make this salad even more fun with tasty add-ins. Try adding ripe avocado for creaminess. Crispy bacon bits also bring a nice crunch and flavor. You might add roasted red peppers or sun-dried tomatoes for extra color and taste. Each add-in can change the flavor and make it your own.
Storage Info
How to Store Leftovers
Store your Chicken Caesar Pasta Salad in an airtight container. It keeps well in the fridge. Make sure it cools down before sealing. This will help keep it fresh for up to three days. If you want to keep the croutons crunchy, store them separately.
Reheating Instructions
To reheat, add the salad to a skillet over low heat. Stir gently until warm. You can also microwave it for about one minute. Just don’t heat it too long. You want to keep the freshness of the salad intact.
Freezing Tips for Long-Term Storage
Freezing is not the best option for this salad. The lettuce will become soggy once thawed. If you must freeze it, leave out the lettuce and croutons. Store the pasta and chicken mix in a freezer-safe bag. It can last for about one month. Just remember to thaw it in the fridge before serving. For the best taste, prepare fresh salad ingredients when you are ready to eat.
FAQs
Can I make Chicken Caesar Pasta Salad in advance?
Yes, you can make Chicken Caesar Pasta Salad ahead of time. It actually tastes better after chilling. Just prepare the salad without the dressing. Store it in the fridge for up to two days. When you are ready to serve, add the dressing. This keeps the lettuce crisp.
What dressing can be used instead of Caesar?
If you want a change, try ranch or Italian dressings instead of Caesar. These dressings bring different flavors. A yogurt-based dressing is a great option for a lighter version. Experiment to find your favorite taste.
How can I make this recipe healthier?
To make this recipe healthier, use whole wheat pasta. You can also add more veggies like cucumbers or bell peppers. Reduce the amount of cheese or croutons too. Use a light or homemade dressing to cut down on fat.
What can I serve with Chicken Caesar Pasta Salad?
Chicken Caesar Pasta Salad pairs well with grilled chicken or fish. You can also serve it with a light soup. Garlic bread or a fresh baguette can be great sides too. This meal is filling and satisfying on its own!
This blog post covered how to make a delicious Chicken Caesar Pasta Salad. We went over key ingredients, substitutions, and nutrition facts. I shared easy step-by-step instructions. You learned tips for cooking pasta and adding more flavor. We also discussed healthy variations, storage info, and answered common questions.
Embrace your creativity when making this dish. Don’t hesitate to try new flavors or ingredients. Enjoying tasty meals can be fun and satisfying. Happy cooking!

Chicken Caesar Pasta Salad
Ingredients
8 oz rotini pasta
2 cups cooked chicken breast, diced
4 cups romaine lettuce, chopped
1/2 cup cherry tomatoes, halved
1/4 cup grated Parmesan cheese
1/2 cup Caesar dressing (store-bought or homemade)
1/2 cup croutons
1 tablespoon olive oil
1 teaspoon garlic powder
Salt and pepper to taste
Fresh parsley for garnish
Instructions
Cook the rotini pasta according to package instructions until al dente. Drain and rinse under cold water to cool.
In a large skillet, heat the olive oil over medium heat. Add the diced cooked chicken and sprinkle with garlic powder, salt, and pepper. Sauté for 5-7 minutes until the chicken is slightly crispy and warm.
In a large bowl, combine the cooled pasta, chopped romaine lettuce, halved cherry tomatoes, and sautéed chicken.
Drizzle the Caesar dressing over the salad and toss gently to combine all the ingredients evenly.
Add the grated Parmesan cheese and croutons, tossing again to mix. Adjust seasoning with more salt and pepper if needed.
Serve immediately or refrigerate for about 30 minutes to let the flavors meld together. Garnish with fresh parsley before serving.
Prep Time: 15 min | Total Time: 30 min | Servings: 4

Chicken Caesar Pasta Salad
Ingredients
- 8 oz rotini pasta
- 2 cups cooked chicken breast, diced
- 4 cups romaine lettuce, chopped
- 1 2 cherry tomatoes, halved
- 1 4 cup grated Parmesan cheese
- 1 2 cup Caesar dressing
- 1 2 cup croutons
- 1 tablespoon olive oil
- 1 teaspoon garlic powder
- to taste salt and pepper
- for garnish fresh parsley
Instructions
- Cook the rotini pasta according to package instructions until al dente. Drain and rinse under cold water to cool.
- In a large skillet, heat the olive oil over medium heat. Add the diced cooked chicken and sprinkle with garlic powder, salt, and pepper. Sauté for 5-7 minutes until the chicken is slightly crispy and warm.
- In a large bowl, combine the cooled pasta, chopped romaine lettuce, halved cherry tomatoes, and sautéed chicken.
- Drizzle the Caesar dressing over the salad and toss gently to combine all the ingredients evenly.
- Add the grated Parmesan cheese and croutons, tossing again to mix. Adjust seasoning with more salt and pepper if needed.
- Serve immediately or refrigerate for about 30 minutes to let the flavors meld together. Garnish with fresh parsley before serving.


![Here’s what you need for the Greek Yogurt Chicken Salad: - 2 cups cooked chicken breast, shredded - 1 cup plain Greek yogurt - 1/2 cup celery, diced - 1/2 cup red grapes, halved - 1/4 cup walnuts, toasted and chopped - 1/4 cup red onion, finely chopped - 2 tablespoons fresh dill, chopped - 1 tablespoon lemon juice - Salt and pepper to taste Each ingredient adds flavor and texture to this tasty salad. The chicken gives protein, while Greek yogurt makes it creamy. The celery brings crunch, and the grapes add a sweet touch. Walnuts give a nice bite, and dill adds freshness. I always prefer fresh ingredients for my salads. Fresh celery makes the dish crisp. Fresh dill offers a bright flavor that dried can't match. Use fresh grapes for sweetness. Dried ingredients can work in some recipes, but not here. They lack the same flavor and texture. You can swap some ingredients to fit your taste. Try using plain yogurt if you don't have Greek yogurt. For a nut-free version, leave out the walnuts. You can also use chicken thighs for a richer taste. Add other fruits like apples or berries to mix it up. This recipe is flexible, so feel free to get creative! Check the Full Recipe for more ideas. Start by gathering your ingredients. You need cooked chicken, Greek yogurt, and some fresh veggies. In a large bowl, add 2 cups of shredded chicken and 1 cup of plain Greek yogurt. Mix them well until the chicken gets fully coated. Next, toss in 1/2 cup of diced celery, 1/2 cup of halved red grapes, and 1/4 cup of toasted walnuts. Add 1/4 cup of finely chopped red onion and 2 tablespoons of fresh dill. Lastly, drizzle in 1 tablespoon of lemon juice and sprinkle with salt and pepper. Gently fold the mix together. Make sure everything is blended well. Shredding chicken can be simple. First, use cooked chicken breasts for the best taste. You can use two forks to pull apart the chicken. Alternatively, you can shred it with your hands for a quicker method. If you have a stand mixer, it can shred chicken in seconds. Just place the chicken in the bowl and mix on low speed. This will save time and give you perfect shreds. Chilling your chicken salad is key. After mixing, cover the bowl with plastic wrap or a lid. Place it in the refrigerator for at least 30 minutes. This helps the flavors blend well. The chill makes every bite refreshing. Once chilled, serve your salad on leafy greens. You can also wrap it in whole grain wraps. Enjoy your tasty Greek yogurt chicken salad! For the full recipe, check out the details above. To season your Greek yogurt chicken salad, start with salt and pepper. These basics bring out the flavors. You can add a squeeze of lemon juice for a fresh taste. Fresh dill adds a nice herby note. Mix and taste as you go. Adjust the seasoning to suit your preference. Remember, seasoning makes all the difference. For the best flavor, use fresh ingredients. Fresh celery and grapes add crunch and sweetness. Toast the walnuts before adding them. This step brings out their rich flavor. Mixing the salad and letting it chill helps the flavors blend. A cold salad is refreshing and tasty. Consider adding a splash of vinegar for extra zing. One common mistake is over-seasoning. It’s easy to add too much salt or spice. Start with a little, and taste it first. Another mistake is not chilling the salad long enough. The flavors need time to meld. Lastly, avoid using dry chicken. Always use moist, cooked chicken for a better texture. For the full recipe, check out the Greek Yogurt Chicken Salad with a Twist. {{image_2}} Greek yogurt is a great ingredient for this salad. It is thick and creamy. It has less sugar and more protein than regular yogurt. This means it helps you feel full longer. Greek yogurt also has probiotics. These good bacteria can aid digestion. Using Greek yogurt instead of mayo makes the dish healthier. It cuts down on fat while adding flavor. Plus, it adds calcium, which is good for bones. Each serving of Greek yogurt chicken salad gives you balanced nutrition. Here’s what you get: - Calories: About 300 - Protein: Around 30 grams - Fat: About 15 grams - Carbohydrates: Roughly 20 grams - Fiber: 2 grams The chicken provides lean protein. The yogurt adds healthy fats. The fruits and veggies offer fiber and vitamins. This makes it a nutritious choice for lunch or dinner. Traditional chicken salad often uses mayo. This adds more fat and calories. In contrast, Greek yogurt chicken salad is lighter. It has less saturated fat and more protein. This means it is better for your heart. You can enjoy it without feeling guilty. Greek yogurt chicken salad also has a fresh taste. It’s a fun twist on a classic dish. You get all the flavor without the heaviness. Try this recipe [Full Recipe] for a refreshing meal! You can change up your Greek yogurt chicken salad by adding more veggies. Try these options for a fresh twist: - Cucumbers: Diced cucumbers add crunch and hydration. - Bell Peppers: Use red, yellow, or green for color and sweetness. - Carrots: Grated carrots add a nice texture and a hint of sweetness. - Spinach: Chopped spinach can boost the nutrition and flavor. Mixing in different vegetables will keep your salad exciting and tasty. You can swap the chicken for other proteins too. Here are some ideas: - Turkey: Use shredded turkey for a leaner option. - Chickpeas: For a vegetarian choice, add canned chickpeas. They’re full of protein. - Tuna: Try canned tuna for a seafood twist. It pairs well with Greek yogurt. - Hard-Boiled Eggs: Chopped hard-boiled eggs can add creaminess and protein. These changes can make your dish unique and fun. Experimenting with flavors can elevate your Greek yogurt chicken salad. Here are some tasty combinations: - Curry Powder: Add a teaspoon for a warm and spicy kick. - Honey Mustard: Mix in a tablespoon for sweetness and tang. - Smoked Paprika: A pinch can add depth and a smoky flavor. - Fresh Herbs: Experiment with parsley, basil, or cilantro for freshness. These combinations can make your salad more exciting and delicious. For the full recipe, check out the Greek Yogurt Chicken Salad with a Twist. Yes, you can make Greek yogurt chicken salad ahead of time. This salad tastes even better after chilling. The flavors mix well when it sits. I suggest making it a day before you plan to serve it. Just keep it in the fridge until you're ready. You can serve Greek yogurt chicken salad in many ways. Here are some great ideas: - On a bed of leafy greens - In whole grain wraps - With whole-grain crackers - Alongside fresh veggies Each option adds a nice touch to your meal. Store any leftover Greek yogurt chicken salad in an airtight container. It can last up to three days in the fridge. If you see any signs of spoilage, like an off smell or change in texture, toss it out. Always check before eating to stay safe. For the best taste, enjoy it fresh! For the full recipe, check above. In this post, we explored the best ingredients for Greek yogurt chicken salad, differentiating between fresh and dried options. I shared step-by-step instructions for preparation. You learned tips for shredding chicken and chilling before serving. We discussed ways to season and enhance flavors, plus common mistakes to avoid. This salad is a healthy choice, thanks to Greek yogurt. With numerous variations, you can customize it to your taste. Now, you can create a delicious and nutritious meal that everyone will love. Enjoy your cooking!](https://dailydishlab.com/wp-content/uploads/2025/06/31d756a5-2ed8-48b3-ac28-3df00374ee45-768x768.webp)

