Chimichurri Steak Salad Fresh and Flavorful Delight

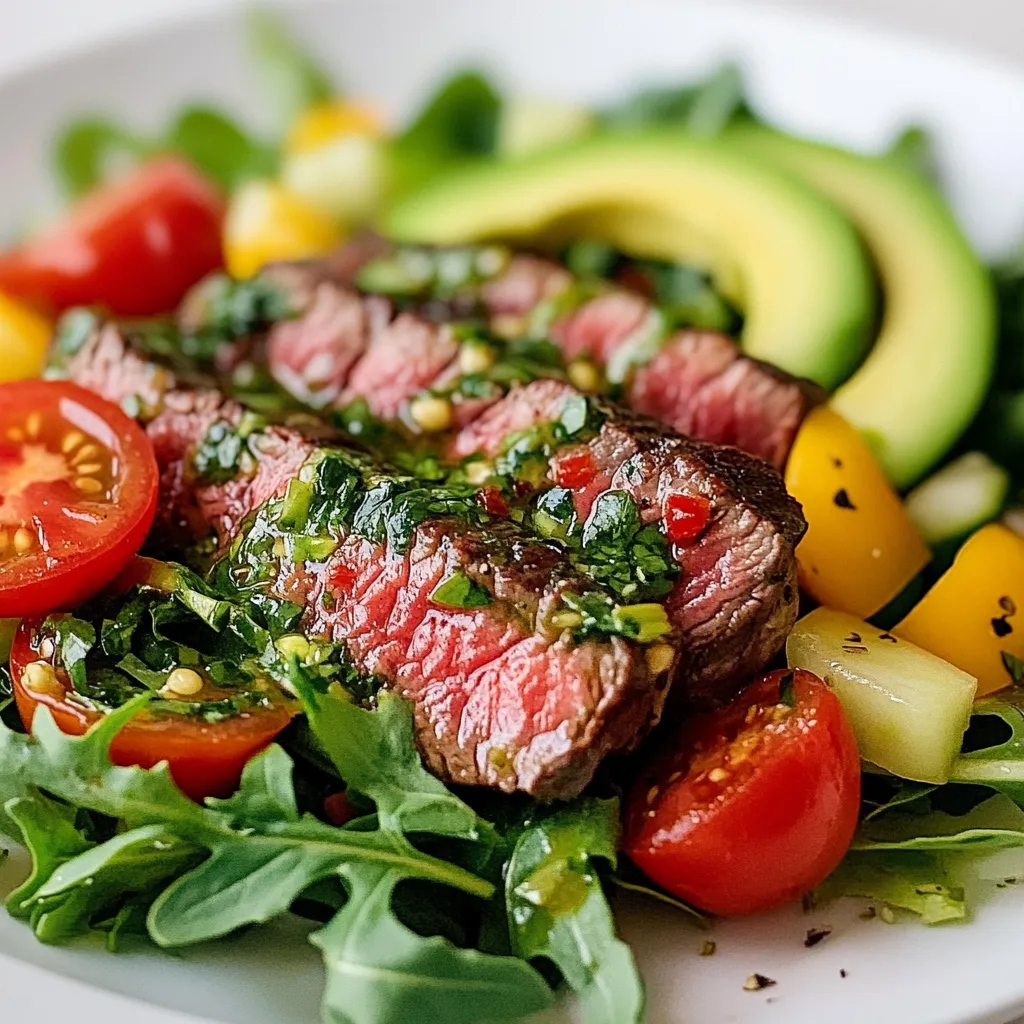
Are you ready to elevate your salad game with a burst of flavor? My Chimichurri Steak Salad will do just that! It combines juicy flank steak and fresh, vibrant veggies, all topped with zesty chimichurri sauce. This dish is perfect for lunch or dinner, satisfying your cravings with every bite. Let’s dive into the fresh and flavorful delight that will impress your taste buds and your guests!
Why I Love This Recipe
- Fresh Flavors: The combination of herbs in the chimichurri sauce brings a vibrant and zesty flavor that perfectly complements the steak.
- Nutritious Ingredients: This salad is packed with fresh vegetables and healthy fats from the avocado, making it a nutritious choice.
- Easy to Prepare: With simple ingredients and straightforward steps, this recipe is perfect for a quick weeknight dinner or a weekend gathering.
- Customizable: You can easily swap out vegetables or adjust the chimichurri ingredients to suit your taste preferences.
Ingredients
Main Ingredients for Chimichurri Steak Salad
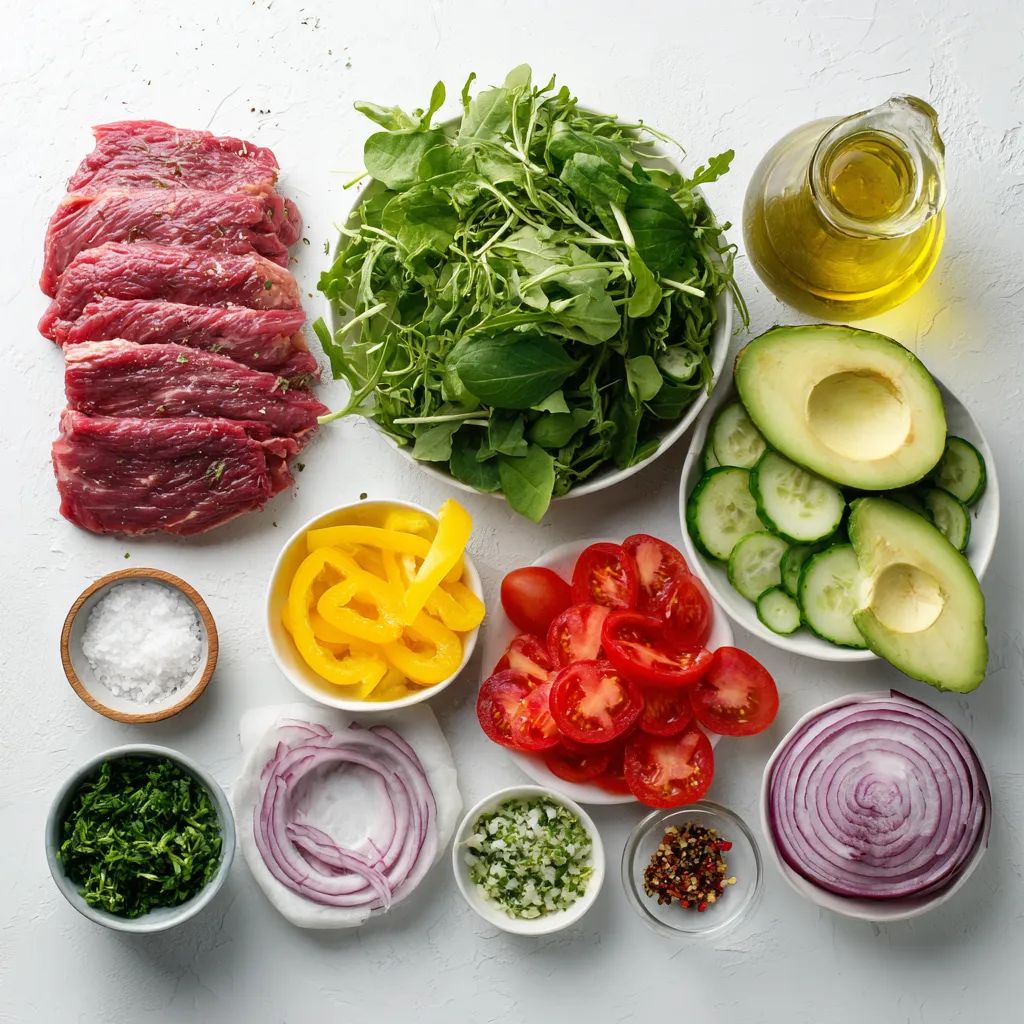
- 1 pound flank steak
- 1 tablespoon olive oil
- Salt and pepper to taste
- 4 cups mixed salad greens (arugula, spinach, and romaine)
- 1 avocado, sliced
- 1 cup cherry tomatoes, halved
- ½ cucumber, thinly sliced
- ¼ red onion, thinly sliced
- 1 bell pepper, sliced (any color)
For this salad, flank steak is the star. It is juicy and full of flavor. The olive oil helps keep the steak moist. Mixed salad greens add crunch and color. Avocado brings creaminess, while cherry tomatoes add a sweet bite. Cucumbers, red onion, and bell pepper give the dish even more texture and flavor.
Ingredients for Chimichurri Sauce
- 1 cup fresh parsley, finely chopped
- ¼ cup fresh cilantro, finely chopped
- 3 cloves garlic, minced
- 1 teaspoon red pepper flakes
- ½ teaspoon dried oregano
- ½ cup olive oil
- 3 tablespoons red wine vinegar (substitute with apple cider vinegar for a non-alcoholic option)
- Salt and pepper to taste
Chimichurri sauce is a fresh herb mix. It uses parsley and cilantro for a bright taste. Garlic adds depth, while red pepper flakes give it a kick. Dried oregano rounds out the flavors. Olive oil and red wine vinegar tie everything together. This sauce can make any dish pop with flavor.
Optional Ingredients and Substitutions
You can mix things up with different oils. Avocado oil or sesame oil can add a unique twist. If you want to change the vinegar, try balsamic or lemon juice for a different taste. You can also add other veggies like radishes or carrots for extra crunch and color. This salad is flexible, so feel free to get creative!

Step-by-Step Instructions
Preparing the Chimichurri Sauce
To make the chimichurri sauce, start with a medium bowl. Chop the parsley and cilantro finely. Add the chopped herbs to the bowl. Next, mince the garlic and add that too. Sprinkle in the red pepper flakes and dried oregano. Now, slowly pour in the olive oil and red wine vinegar. Stir everything together until it blends well. Taste it and add salt and pepper as needed. Let the sauce sit so the flavors come together. This step is key for a tasty sauce.
Cooking the Flank Steak
Get your grill or skillet ready by preheating it to medium-high heat. While it warms up, rub the flank steak with olive oil. Sprinkle a good amount of salt and pepper on both sides. Place the steak on the grill or in the skillet. Cook for about 5 to 7 minutes on each side for medium-rare. If you want it more done, cook longer. Use a meat thermometer to check the internal temperature. For medium-rare, it should hit 130°F.
Assembling the Salad
Once the steak is cooked, let it rest for 5 to 10 minutes. This helps keep it juicy. After resting, slice the steak thinly against the grain. Now, grab a large bowl. Add your mixed salad greens first. Then, layer in the sliced avocado, halved cherry tomatoes, cucumber, red onion, and bell pepper. Finally, top the salad with the steak strips. Drizzle the chimichurri sauce over everything. This adds color and flavor. You can toss it gently or keep it layered for a nice look. Enjoy your fresh and flavorful chimichurri steak salad!
Tips & Tricks
Achieving the Perfect Steak
To get the best steak, you need to focus on two things: temperature and resting. First, always use a meat thermometer. For medium-rare, aim for 130°F. You can cook the steak for about 5-7 minutes on each side, but remember, cooking time may vary based on thickness. After cooking, let the steak rest for 5-10 minutes. This step helps keep the juices in the meat. If you skip this, your steak can taste dry.
Making the Best Chimichurri Sauce
Chimichurri sauce is all about fresh flavors. To make it even better, adjust your ingredients. If you want a spicier kick, add more red pepper flakes. For a bright taste, try using more vinegar. Fresh herbs are key, so make sure your parsley and cilantro are fresh. You can also mix in some fresh mint for a unique twist. Always taste your sauce before serving to see if it needs more salt or pepper.
Serving Suggestions
When serving this salad, presentation matters. Layer your salad ingredients in a large bowl for a colorful look. You can also serve the steak on top of the salad or on the side. For a fun touch, add some crumbled feta cheese or nuts for crunch. Pair the salad with a light white wine or sparkling water for a refreshing meal. This salad is perfect for picnics or dinner parties.
Pro Tips
- Rest the Steak: Allowing the steak to rest after cooking helps to retain its juices, resulting in a more flavorful and tender final dish.
- Slice Against the Grain: Always slice the steak against the grain for maximum tenderness. This technique shortens the muscle fibers, making each bite easier to chew.
- Customize the Chimichurri: Feel free to adjust the herbs and spices in the chimichurri sauce to suit your taste. Adding oregano or basil can give it a unique twist.
- Use Fresh Ingredients: For the best flavor, use fresh herbs and quality vegetables in your salad. Fresh ingredients make a significant difference in taste and presentation.

Variations
Protein Alternatives
You can switch up the protein in your Chimichurri Steak Salad easily. If you want chicken, use grilled chicken breast instead of flank steak. Just season and cook it the same way. Shrimp is another great option. Simply grill or sauté shrimp for a quick cook time. For a vegetarian choice, try grilled tofu or chickpeas. Both add protein and texture to your salad.
Salad Variations
You can customize your salad with seasonal ingredients. In summer, add fresh corn or zucchini. In fall, roasted sweet potatoes make a tasty addition. You can also swap the greens. Try kale or mixed baby greens for different flavors and textures. This makes each meal special and fresh.
Dressing Alternatives
Chimichurri sauce is delicious, but there are other options. You can try a lemon vinaigrette for a bright twist. A balsamic dressing pairs well with mixed greens, too. For a creamy texture, consider a yogurt-based dressing. Each dressing brings its own flavor and complements the salad in a new way.
Storage Info
Refrigeration Best Practices
To store leftovers, place the salad in an airtight container. Keep the chimichurri sauce separate. This helps the greens stay crisp. Use the salad within two days for the best taste. The steak can last up to three days in the fridge. Always make sure to cover it well to avoid drying out.
Freezing Recommendations
You can freeze chimichurri sauce for up to three months. Pour it into an ice cube tray for easy portions. Once frozen, transfer the cubes to a freezer bag. For the steak, wrap it tightly in plastic wrap and then foil. This prevents freezer burn and keeps it juicy. When ready to eat, thaw in the fridge overnight before reheating.
Shelf Life
The salad ingredients last about three days in the fridge. Cooked steak can stay fresh for three to four days. For the best flavor, eat it sooner rather than later. Always check for any signs of spoilage before consuming.
FAQs
What is Chimichurri Sauce?
Chimichurri sauce is a fresh, tangy sauce from Argentina. It is made with parsley, garlic, and olive oil. You can use it on grilled meats, veggies, or even as a dressing. Its bright flavor really brings dishes to life. I love adding chimichurri to my steak salad. It enhances the taste and adds a nice color.
Can I make this salad ahead of time?
Yes, you can make this salad ahead of time! Prepare the chimichurri sauce and store it in the fridge for up to a week. Cook the flank steak and slice it, then keep it in an airtight container. For the salad, wash and chop the greens and veggies. Store them in separate containers to keep them fresh. Just mix everything together right before serving.
What can I substitute if I don’t have flank steak?
If you don’t have flank steak, you can use other cuts of meat. Sirloin or skirt steak works well too. You can also use chicken breast or shrimp for a different twist. If you want a vegetarian option, try grilled portobello mushrooms or chickpeas. Just adjust the cooking time based on your choice.
In this blog post, we covered how to make a delicious Chimichurri steak salad. We reviewed the main ingredients like flank steak, fresh greens, and avocado. I shared how to whip up the chimichurri sauce and tips for cooking the steak just right. You learned various ways to customize your salad and how to store leftovers. The options are endless, from different proteins to dressing choices. Enjoy this vibrant dish that brings flavor and freshness to your table. With simple steps, you can impress anyone with your cooking skill

Chimichurri Steak Salad
Ingredients
- 1 pound flank steak
- 1 tablespoon olive oil
- to taste salt and pepper
- 4 cups mixed salad greens (arugula, spinach, and romaine)
- 1 avocado, sliced
- 1 cup cherry tomatoes, halved
- 0.5 cucumber, thinly sliced
- 0.25 red onion, thinly sliced
- 1 bell pepper, sliced (any color)
- 1 cup fresh parsley, finely chopped
- 0.25 cup fresh cilantro, finely chopped
- 3 cloves garlic, minced
- 1 teaspoon red pepper flakes
- 0.5 teaspoon dried oregano
- 0.5 cup olive oil
- 3 tablespoons red wine vinegar (or apple cider vinegar for non-alcoholic option)
- to taste salt and pepper
Instructions
- Prepare the Chimichurri Sauce: In a medium bowl, combine finely chopped parsley, cilantro, minced garlic, red pepper flakes, and dried oregano. Slowly add the olive oil and red wine vinegar (or apple cider vinegar), stirring until well mixed. Season with salt and pepper to taste. Set aside to let the flavors meld.
- Cook the Flank Steak: Preheat a grill or skillet over medium-high heat. Rub the flank steak with olive oil, and season generously with salt and pepper. Grill or cook for approximately 5-7 minutes on each side for medium-rare, or longer for your desired doneness. Use a meat thermometer to ensure it reaches an internal temperature of 130°F for medium-rare.
- Rest the Steak: Once cooked, remove the steak from heat and let it rest for about 5-10 minutes. This helps to keep the meat juicy.
- Slice the Steak: After resting, slice the flank steak against the grain into thin strips.
- Assemble the Salad: In a large bowl, add the mixed salad greens, sliced avocado, cherry tomatoes, cucumber, red onion, and bell pepper.
- Top with Steak and Chimichurri: Arrange the steak strips on top of the salad, and generously drizzle chimichurri sauce over the entire salad.
- Serve: Toss gently to combine or keep the ingredients separate for a more visually appealing presentation.


![- 1 can (15 oz) chickpeas, drained and rinsed - 2 tablespoons olive oil - 1 teaspoon smoked paprika - 1 teaspoon garlic powder - 1 teaspoon cumin - Salt and pepper to taste - 1 cup quinoa, rinsed - 2 cups vegetable broth - 1 medium avocado, sliced - 1 cup cherry tomatoes, halved - 1 small cucumber, diced - 1 cup spinach or mixed greens - 2 tablespoons tahini - 1 tablespoon lemon juice - Fresh herbs (parsley or cilantro) for garnish Chickpeas are the star of this dish. They add protein and fiber. They also take on flavors well. Roasting them makes them crispy and delicious. Olive oil helps the chickpeas brown nicely. It also adds a rich taste. Use high-quality olive oil for the best flavor. Smoked paprika gives a lovely, smoky flavor. It pairs well with the spices. Garlic powder adds a savory depth. Cumin brings warmth and earthiness. Quinoa serves as a great base. It is gluten-free and full of nutrients. It has a slight nutty taste that complements the other ingredients. Avocado adds creaminess. It also provides healthy fats. Cherry tomatoes bring sweetness and freshness. They add a nice pop of color. Cucumber adds crunch and mild flavor. Spinach or mixed greens provide vitamins and minerals. They also add a nice green touch. Tahini and lemon juice create a tangy dressing. It ties all the flavors together beautifully. When choosing chickpeas, look for those without dents or bulges. Canned chickpeas should be firm, not mushy. For olive oil, choose extra virgin for the best taste. It should have a rich, fruity aroma. Pick ripe avocados that yield slightly when pressed. They should not be hard or overly soft. For tomatoes, choose firm, shiny ones without blemishes. Select cucumbers that are dark green and firm. For greens, look for vibrant, crisp leaves. Avoid any with browning or wilting. When choosing tahini, look for a smooth texture. It should have a nutty aroma. Always check the expiration date. First, preheat your oven to 400°F (200°C). While it heats, drain and rinse the chickpeas. Pat them dry with a paper towel. This helps them crisp up nicely. In a bowl, mix the chickpeas with olive oil, smoked paprika, garlic powder, cumin, salt, and pepper. Toss until all the chickpeas are well coated. Spread them in a single layer on a baking sheet lined with parchment paper. Bake for 25-30 minutes, shaking the pan halfway through. Look for a golden brown color and a crispy texture. While the chickpeas bake, it’s time to cook the quinoa. Rinse 1 cup of quinoa under cold water. In a saucepan, combine the rinsed quinoa and 2 cups of vegetable broth. Bring it to a boil over medium heat. Then, reduce the heat to low. Cover the pot and let it simmer for about 15 minutes. Once done, fluff the quinoa with a fork. Make sure all the broth has absorbed. Now comes the fun part—assembling your Buddha bowl! Start with a base of fluffy quinoa. Next, layer in a handful of spinach or mixed greens. Add the halved cherry tomatoes and diced cucumber on top. Don’t forget the star of the dish: your crispy chickpeas! Place them generously over the greens. Finally, slice your avocado and arrange it on top. Drizzle with tahini dressing made from mixing tahini and lemon juice. Add a splash of water if needed. Garnish with fresh herbs like parsley or cilantro for a burst of flavor. Enjoy this vibrant and healthy meal! For the complete recipe, refer to the [Full Recipe]. To make your chickpeas crispy, start by draining and rinsing them well. Pat them dry with a towel. If they are wet, they won’t crisp up. Toss them in olive oil and your favorite spices. I like smoked paprika and garlic powder. Spread them in a single layer on a baking sheet. Bake them at 400°F for about 25 to 30 minutes. Shake the pan halfway for even cooking. The result? Crunchy, golden chickpeas that add great texture to your bowl. Cooking quinoa is simple if you follow a few tips. First, rinse the quinoa under cold water. This removes any bitterness. Use a ratio of 1 cup quinoa to 2 cups vegetable broth. Bring it to a boil, then reduce the heat. Cover the pan and let it simmer for about 15 minutes. Check for fluffiness and make sure all the broth is absorbed. Fluff with a fork before serving. This will give you light and fluffy quinoa, perfect for your Buddha bowl. When making tahini sauce, mix tahini and lemon juice in a bowl. If it seems too thick, add a little water to thin it out. Stir until you reach a smooth and creamy texture. The sauce should be easy to drizzle over your bowl. This adds a rich, nutty flavor that complements the other ingredients. Adjust the water based on your preference. A good tahini sauce makes your Crispy Chickpea Buddha Bowl even more enjoyable. {{image_2}} You can swap some ingredients to make this bowl even healthier. Use brown rice instead of quinoa for extra fiber. If you want fewer carbs, try cauliflower rice. Add more veggies like bell peppers or carrots for color and crunch. Instead of olive oil, try avocado oil. It has a high smoke point and adds a nice flavor. You can boost protein by adding chicken, tofu, or tempeh to your bowl. If you like chicken, grill or roast it with some spices. For a vegetarian option, marinate tofu or tempeh in soy sauce and bake until golden. This makes your bowl more filling and adds layers of taste. Enhance flavors by using different spices and seasonings. Try adding curry powder for a warm taste. A pinch of chili powder adds a nice kick. Fresh herbs like basil or mint can brighten the dish. You can even mix in a splash of soy sauce or hot sauce for an extra punch. For the full recipe, check out the instructions above! To keep your Crispy Chickpea Buddha Bowl fresh, first cool the leftovers. Place them in a container with a tight lid. Store in the fridge for up to three days. Keep the tahini sauce separate until you are ready to eat. This helps maintain the crunchiness of the chickpeas. You can freeze the chickpeas and quinoa. First, let them cool completely. Then, place them in freezer bags. Remove as much air as you can before sealing. This prevents freezer burn. They can last up to three months. When you are ready to eat, thaw them in the fridge overnight. For best results, use glass containers. They do not retain odors and are safe for the microwave. Choose containers that fit your portion size. If you plan to freeze, select freezer-safe containers. This way, you can enjoy your Buddha bowl whenever you like. A Buddha bowl is a colorful dish. It has a mix of grains, veggies, and protein. You can find these bowls in many restaurants. They are great for a healthy meal. The idea is to fill a bowl with healthy food. Each bowl is unique and can change daily. Yes, you can make this recipe vegan. The main ingredients are already plant-based. Use chickpeas, quinoa, and veggies. The tahini sauce is also vegan. Just skip any animal products like cheese. This makes it a perfect dish for everyone. You can store the Crispy Chickpea Buddha Bowl for up to four days. Keep it in an airtight container. Place it in the fridge to keep it fresh. The chickpeas will stay crispy for a short time. They are best eaten right after baking. You can add many toppings to your bowl. Here are some ideas: - Roasted sweet potatoes - Grated carrots - Sliced radishes - Hummus - Seeds like pumpkin or sunflower These add flavor and nutrients to your meal. Yes, this recipe is gluten-free. The main ingredients, chickpeas and quinoa, do not have gluten. Always check labels on packaged items. Some sauces or dressings might contain gluten. This bowl is a great choice for those who avoid gluten. For the detailed cooking process, check the Full Recipe. This blog post covered how to make a Crispy Chickpea Buddha Bowl. We looked at key ingredients, step-by-step instructions, and tips for perfect results. You learned about variations and how to store your bowl for later. I hope this inspire you to create your own Buddha Bowl at home. With fresh ingredients and some tasty swaps, you can make it just right. Enjoy experimenting with flavors and textures, and remember to share your delicious creations!](https://dailydishlab.com/wp-content/uploads/2025/06/f4e12441-0b70-45ef-b3b3-f6f2a153c11f-768x768.webp)
![- 1 pound gnocchi (store-bought or homemade) - 1 cup cherry tomatoes, halved - 1 zucchini, sliced into half-moons - 1 bell pepper (red or yellow), chopped - 1 cup broccoli florets - 2 tablespoons olive oil - 2 cloves garlic, minced - 1 teaspoon Italian seasoning - Salt and pepper to taste - 1/4 cup grated Parmesan cheese (optional) - Fresh basil leaves for garnish To make Easy Sheet Pan Gnocchi Primavera, gather these simple ingredients. Start with gnocchi, which you can find at any store. The cherry tomatoes add sweetness. Zucchini and bell pepper give texture and color. Broccoli adds a crunch, balancing the dish. For seasoning, olive oil helps cook the veggies and gnocchi. Garlic brings a bold flavor. Italian seasoning adds a classic taste. Salt and pepper enhance all the flavors. Don’t forget the Parmesan cheese for creaminess! Fresh basil leaves make a lovely garnish. Once you have all your ingredients, you’re ready to create a delicious meal! For the complete recipe, check out the [Full Recipe]. - Step 1: Preheat your oven to 425°F (220°C). This helps cook the gnocchi right. - Step 2: Combine gnocchi, cherry tomatoes, zucchini, bell pepper, and broccoli on a baking sheet. Make sure they mix well for even cooking. - Step 3: Drizzle olive oil and add minced garlic, Italian seasoning, salt, and pepper. This adds great flavor to the dish. - Step 4: Toss and spread everything evenly on the baking sheet. This helps all the ingredients cook at the same time. - Step 5: Roast for 20-25 minutes, stirring halfway through. This step ensures a nice golden color. - Step 6: Sprinkle with Parmesan cheese and garnish with basil before serving. This makes your dish look and taste amazing. Follow these steps closely for a delicious Easy Sheet Pan Gnocchi Primavera. For the full recipe, check out the section above. - Cook gnocchi until golden brown and vegetables are tender. This adds great flavor. - Use parchment paper for easier cleanup. It saves time and keeps your pan clean. - Add red pepper flakes for heat. It gives a nice kick to the dish. - Try different herbs like thyme or rosemary for varied flavor. Fresh herbs can brighten your meal. - Serve directly from the sheet pan for a casual meal. This makes for easy serving and a fun vibe. - Pair with a side salad for a balanced dinner. A light salad complements the warm gnocchi well. For the complete details, check out the Full Recipe. {{image_2}} You can change up the veggies based on your taste. Try replacing the broccoli with asparagus or green beans. These veggies add crunch and flavor. For more greens, toss in baby spinach or kale. They cook down nicely and boost nutrition. Want more protein? You can add cooked chicken, shrimp, or tofu. These ingredients make the dish heartier. If you prefer a vegetarian option, mix in cannellini beans. They are creamy and fill you up. If you want a healthier twist, consider using cauliflower gnocchi. Whole wheat gnocchi is another great option. If gnocchi is not available, try other types of dumplings. They can add a fun new taste to your meal. For the full recipe, check out the Easy Sheet Pan Gnocchi Primavera. To store leftovers, place them in an airtight container. This keeps them fresh. You can keep them in the fridge for up to three days. If you want to save them longer, freeze portions. Use freezer-safe bags or containers. Label them with the date. They can last up to three months in the freezer. To reheat gnocchi, use the oven for best texture. Preheat the oven to 350°F (175°C). Place the gnocchi on a baking sheet. Heat for about 10-15 minutes. Stir halfway through to warm evenly. If you use a microwave, put the gnocchi in a bowl. Heat for 1-2 minutes, stirring once. Be careful not to overheat, as it can change the texture. For easy weeknight meals, prepare ingredients in advance. Chop vegetables and store them in the fridge. You can also cook the gnocchi ahead of time. Keep sauces and garnishes separate to keep them fresh. This way, you can mix and match ingredients as needed. Use these tips to enjoy quick meals all week. If you want to see the full recipe, check the link. Can I use frozen gnocchi for this recipe? Yes, you can use frozen gnocchi. Just toss them straight on the sheet pan. They will cook well and taste great. No need to thaw them first. How can I make this vegan-friendly? To make this dish vegan, skip the Parmesan cheese. You can use nutritional yeast for a cheesy flavor. Also, check that your gnocchi is egg-free. What’s the best way to tell when the vegetables are done? The best way is to check their color and texture. They should be bright and tender, but not mushy. You can poke them with a fork to test. Can I add more vegetables or change the quantities? Absolutely! Feel free to add more veggies like carrots or mushrooms. Just remember to keep the total amount similar so everything cooks evenly. What can I serve with Easy Sheet Pan Gnocchi Primavera? This dish goes well with a fresh salad. You can also serve garlic bread or a light soup. They add flavors and make the meal more filling. How do I store leftovers for the next day? To store leftovers, place them in an airtight container. Keep them in the fridge for up to three days. Reheat in the oven or microwave before serving. This recipe shows how to make a simple sheet pan gnocchi dish. We covered all the main ingredients, seasonings, and step-by-step cooking directions to ensure success. Remember to customize your meal with different veggies, proteins, or gnocchi types. After a quick roast, you can have a delicious dinner ready. Keep it fresh with storage tips for leftovers. Enjoy your cooking and make this dish your own. Each bite is packed with flavor and fun. Happy cooking!](https://dailydishlab.com/wp-content/uploads/2025/07/51139aef-520e-4271-91ea-5c6754dfc759-768x768.webp)


![- Sweet Potatoes and Chickpeas - 2 medium sweet potatoes, diced - 1 can (15 oz) chickpeas, drained and rinsed - Aromatics and Spices - 1 onion, finely chopped - 3 cloves garlic, minced - 1 inch ginger, grated - 2 tablespoons curry powder - 1 teaspoon turmeric powder - 1 teaspoon cumin - 1 teaspoon red chili flakes (adjust for spice level) - Liquid Ingredients - 1 can (14 oz) coconut milk - 2 cups vegetable broth - 2 tablespoons olive oil - Salt and pepper to taste - Fresh cilantro, for garnish This mix of ingredients gives the dish its bold and flavorful taste. Sweet potatoes bring a natural sweetness and creaminess. Chickpeas add protein and texture. The onion, garlic, and ginger create a strong base. Spices like curry powder and turmeric give warmth and depth. Coconut milk adds richness, while vegetable broth brings it all together. Don't forget to adjust the red chili flakes to suit your taste. For the full recipe, check out the Sweet Potato & Chickpea Delight 🥔. Sautéing the Aromatics First, grab a large pot and heat olive oil on medium heat. Add finely chopped onion. Sauté for about five minutes. You want the onion to turn translucent. Next, stir in minced garlic and grated ginger. Cook this for two minutes. The aroma will fill your kitchen. Toasting the Spices Now, add curry powder, turmeric, cumin, and red chili flakes. Stir the mix for about one minute. This toasting brings out the spices' flavors. You will notice a warm, fragrant scent. Cooking the Sweet Potatoes Next, incorporate diced sweet potatoes into the pot. Mix them well with the spices. Ensure they are fully coated. This step adds depth to the curry's taste. Adding Coconut Milk and Vegetable Broth Pour in the coconut milk and vegetable broth. Stir the mixture gently. Bring it to a gentle simmer. The sweet potatoes will soften as it cooks. Incorporating Chickpeas and Seasoning Now, add drained and rinsed chickpeas. Stir everything to combine. Season with salt and pepper to your liking. This is where the dish gets its hearty texture. Simmering the Curry Cover the pot and let it simmer for about 20 to 25 minutes. This allows the sweet potatoes to become tender. You want them to be easy to pierce with a fork. Adjusting Seasoning and Serving Once cooked, taste the curry. Adjust the seasoning if needed. You can add more chili for heat or cumin for depth. Serve the curry hot. Garnish with fresh cilantro for a pop of color. For the complete recipe, check the [Full Recipe]. - Perfecting the Texture of Sweet Potatoes To get the best texture, cut sweet potatoes into even pieces. This helps them cook uniformly. If you want them soft and creamy, cook them until tender. You can check by piercing them with a fork. If they break apart easily, they are done. - Balancing Flavor with Seasoning Start with the spices. Toast them to release their oils and enhance their taste. Taste the curry as it cooks. You can always add more salt or spices. If you want more heat, add red chili flakes. For a deeper flavor, add extra cumin. - Ideas for Accompaniments Serve the curry with rice or quinoa. They soak up the sauce well. You can also pair it with naan or pita bread for a fun twist. Add a side salad for some crunch and freshness. - Garnishing Tips Fresh cilantro adds a nice touch. Chop it finely and sprinkle on top just before serving. You can also drizzle a little coconut milk for creaminess and visual flair. For a pop of color, add lime wedges on the side. These tips will help you make the Sweet Potato Chickpea Curry truly special. Be sure to check the Full Recipe for all the details! {{image_2}} You can change up the protein in this dish. Tofu or tempeh works well. Both add great texture and soak up the flavors. For a heartier option, consider lentils. They cook quickly and mix nicely with the sweet potatoes. You can also swap in different veggies. Spinach adds color and nutrition. Kale offers a chewy texture that holds up well in the curry. Carrots or green beans bring crunch. Feel free to get creative with what you have on hand! If you like it hot, increase the red chili flakes. Start with a pinch, then taste as you go. You can also add fresh chili peppers for more heat. Just slice them and toss them in during cooking. For unique flavors, add a dash of cinnamon or nutmeg. These spices add warmth without overpowering the dish. You could also try curry pastes or blends. They can add a different twist to the classic taste. For the full recipe of this tasty dish, check the [Full Recipe]. To keep your sweet potato chickpea curry fresh, follow these tips: - Refrigerating Leftovers: Place leftover curry in an airtight container. It lasts about 3 to 5 days in the fridge. Make sure it cools down before sealing. This helps lock in flavor and freshness. - Freezing for Long-Term Storage: If you want to save some for later, freezing is a great option. Use a freezer-safe container or a heavy-duty freezer bag. Your curry can stay good for up to 3 months. Just remember to leave some space for expansion as it freezes. For the best taste when reheating, consider these methods: - Best Methods for Reheating: The stove is ideal for reheating. Pour the curry into a pot and warm it over low heat. Stir it often to heat evenly. You can also use the microwave. Place it in a microwave-safe bowl and cover it. Heat in short bursts, stirring in between, until hot. These simple storage and reheating tips ensure that your sweet potato chickpea curry remains delicious and satisfying every time you enjoy it. How long does the curry last in the fridge? Sweet Potato Chickpea Curry stays fresh for about 4 to 5 days in the fridge. Store it in an airtight container. The flavors deepen as it sits. Can I make Sweet Potato Chickpea Curry ahead of time? Yes, you can make this curry a day early. This dish tastes even better after resting. Just reheat it gently on the stove or in the microwave. Is this recipe gluten-free or vegan? Absolutely! This recipe is both gluten-free and vegan. It uses wholesome ingredients like sweet potatoes and chickpeas. You can enjoy it without worry. Health Benefits of Sweet Potatoes and Chickpeas Sweet potatoes are rich in vitamins and fiber. They support your immune system and digestion. Chickpeas provide protein and keep you full. They also have good fats and help with heart health. Nutritional Information for the Recipe Each serving of Sweet Potato Chickpea Curry offers: - Calories: 320 - Protein: 10g - Carbohydrates: 50g - Fiber: 12g - Fat: 10g This dish is a great choice for a healthy meal. You get nourishment and flavor in every bite. For the complete recipe, check the [Full Recipe]. This blog post covered the key steps to make a delicious sweet potato chickpea curry. We explored the ingredients, from sweet potatoes to spices. I shared tips on perfecting texture and flavor. You learned how to store and reheat leftovers effectively. In the end, this curry is simple, tasty, and full of nutrition. Feel free to modify it as you like. Enjoy making it your own!](https://dailydishlab.com/wp-content/uploads/2025/06/3a6395ce-0a8b-49f3-888b-6de387966cb9-768x768.webp)
