
Are you ready to enjoy a sweet, creamy, and crunchy treat? Chocolate Covered Banana Pops are a delightful snack that kids and adults both love. They are simple to make and perfect for hot days. In this post, I will share the best ingredients, fun variations, and clever tips to create this frozen delight. Let’s dive into the tasty world of chocolate-covered joy!
Why I Love This Recipe
- Quick and Easy: This recipe is simple to make and takes just a few minutes to prepare, making it perfect for a last-minute treat.
- Healthy Indulgence: Using bananas and dark chocolate provides a healthier alternative to traditional desserts while satisfying your sweet tooth.
- Customizable Toppings: Feel free to mix and match toppings like nuts and shredded coconut, allowing everyone to personalize their pops.
- Fun for All Ages: These banana pops are a hit with both kids and adults, making them a great choice for parties or family gatherings.
Ingredients
Essential Ingredients for Chocolate Covered Banana Pops
To make these tasty treats, you need a few key items:
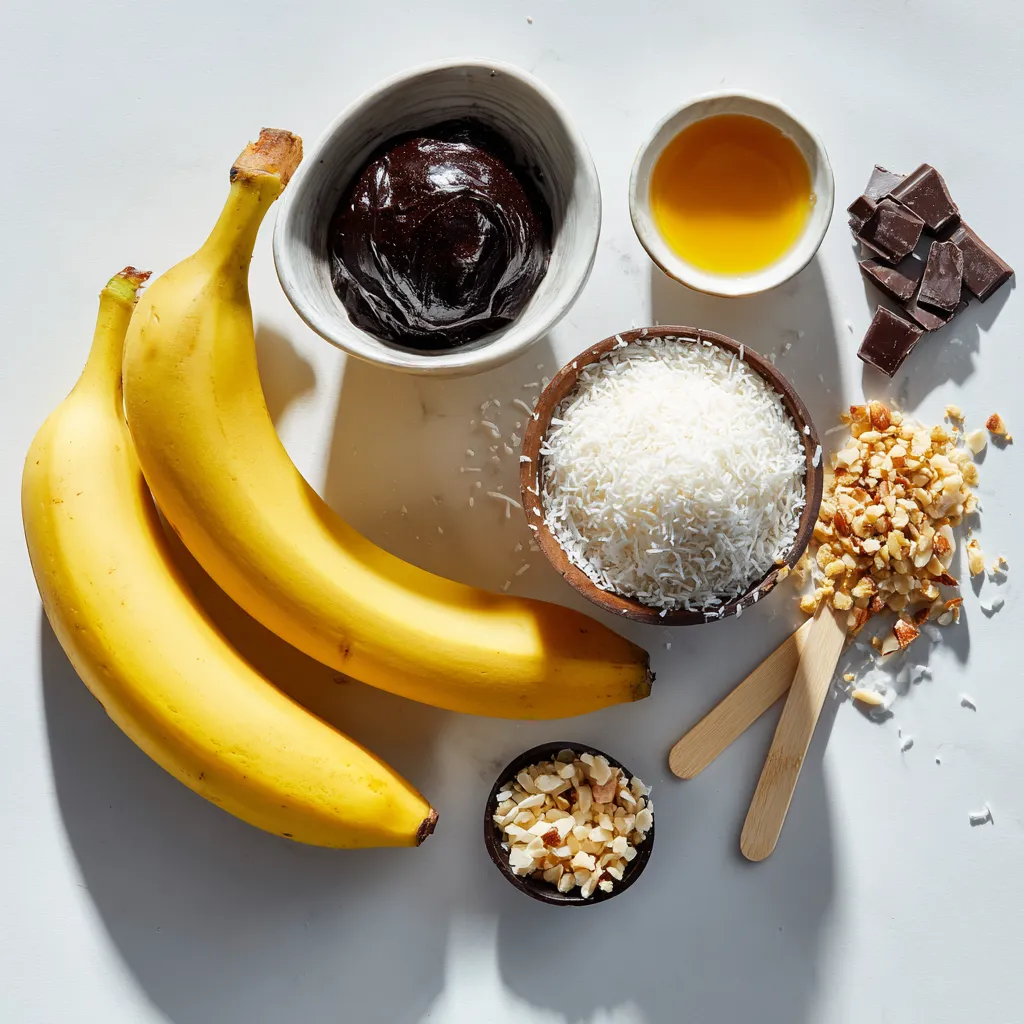
– 2 ripe bananas
– 1 cup dark chocolate chips
– 1 tablespoon coconut oil
– 1/4 cup crushed nuts (almonds, walnuts, or peanuts)
– 1/4 cup shredded coconut
– Wooden popsicle sticks
These ingredients come together to create a delightful snack. The ripe bananas are sweet, and the dark chocolate adds a rich flavor. Coconut oil helps the chocolate melt smoothly, while the nuts and coconut add crunch.
Alternative Ingredient Options
If you want to switch things up, consider these options:
– Use milk chocolate chips instead of dark chocolate for a sweeter taste.
– Try using white chocolate for a creamy twist.
– Substitute any nut for your favorite or use seeds if there are allergy concerns.
These alternatives keep the spirit of the recipe while catering to your taste or needs.
Suggested Toppings and Coatings
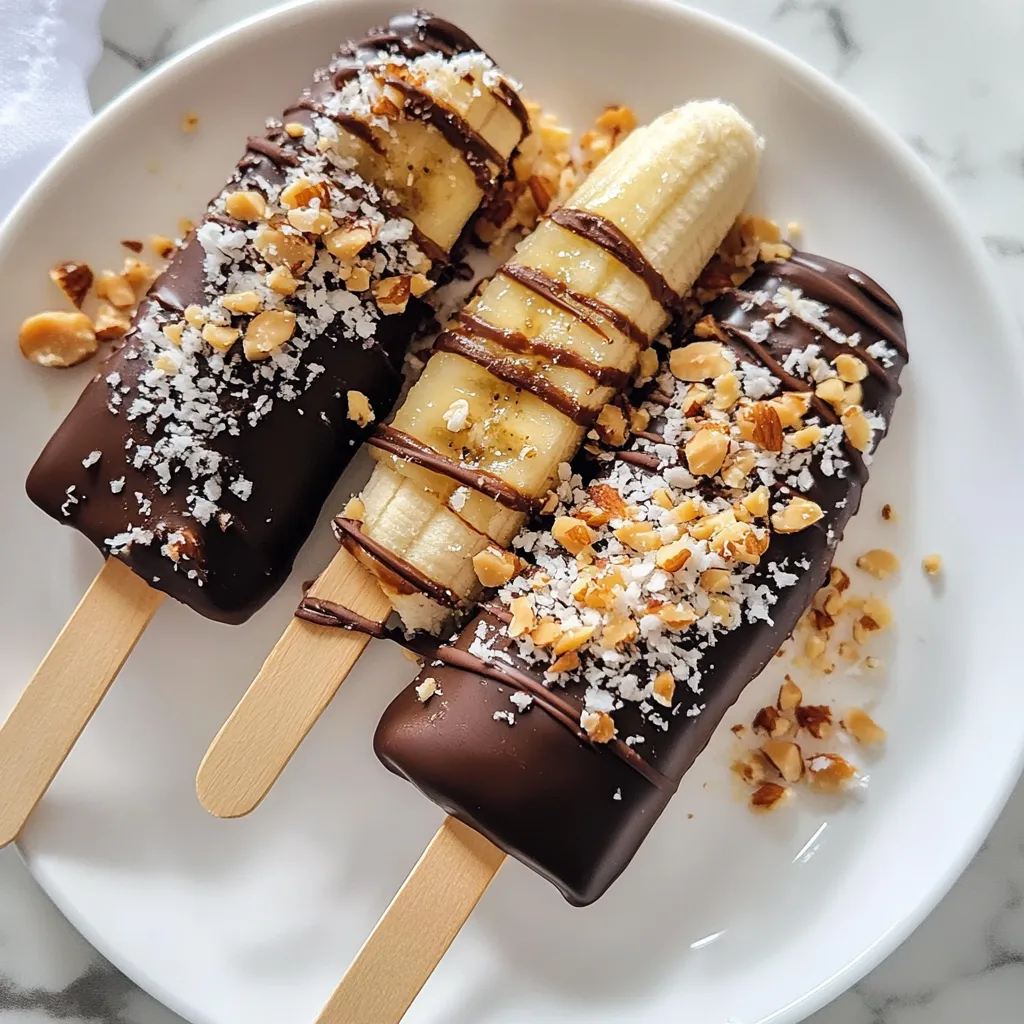
To make your banana pops even more fun, you can add various toppings:
– Crushed nuts for texture and flavor.
– Shredded coconut for a tropical vibe.
– Colorful sprinkles for a festive look.
– Drizzle with caramel or peanut butter for an extra treat.
Feel free to mix and match these toppings. This lets you create a banana pop that suits your mood or occasion!
Step-by-Step Instructions
Preparing the Bananas
Start by peeling the bananas. Cut each banana in half. This gives you four pieces. Next, take a wooden popsicle stick. Insert one stick into the end of each banana half. This stick will act as a handle. Once you finish this step, place the banana pops on a baking sheet. Make sure to use parchment paper to avoid sticking. Then, put the baking sheet in the freezer. Let the bananas freeze for about one hour. This step makes them firm and easy to coat.
Melting the Chocolate
While the bananas are freezing, it’s time to melt the chocolate. Take one cup of dark chocolate chips and put them in a microwave-safe bowl. Add one tablespoon of coconut oil to the bowl. The coconut oil helps the chocolate melt smoothly. Heat the bowl in the microwave. Set it for 30 seconds. After 30 seconds, take it out and stir. Repeat this process until the chocolate is smooth and melted. Be careful not to overheat it. You want it just melted.
Assembling and Coating
Now, take the banana pops out of the freezer. Dip each banana pop into the melted chocolate. Make sure to cover the banana completely. This gives you a nice, thick coat of chocolate. After dipping, quickly roll or sprinkle your choice of toppings. You can use crushed nuts or shredded coconut. This adds flavor and crunch. Once coated, place the banana pops back on the parchment-lined baking sheet. Finally, return them to the freezer. Let them set for at least 30 minutes. This helps the chocolate become firm and ready to eat.
Tips & Tricks
How to Achieve the Perfect Chocolate Coating
To get the best chocolate coating, melt the chocolate chips with coconut oil. The oil helps the chocolate glide smoothly. Heat in 30-second bursts. Stir well after each burst. This method keeps the chocolate from burning. Make sure to cover the banana pops fully. You want a thick, shiny layer of chocolate.
Avoiding Common Mistakes
A few mistakes can ruin your banana pops. First, don’t use cold chocolate. If it’s too cold, it won’t stick well. Next, dip the banana pops quickly. If they sit too long, the coating can drip. Also, make sure your bananas are ripe. Overripe bananas can be mushy and hard to coat.
Best Practices for Freezing
Freezing is key for great banana pops. Freeze the bananas for at least one hour. This makes them firm. When you dip them in chocolate, they don’t fall apart. After coating, freeze them again for 30 minutes. This helps the chocolate harden. Store them in a single layer to avoid sticking.
Pro Tips
- Choose the Right Bananas: Make sure your bananas are perfectly ripe for the best flavor and texture. Overripe bananas can become mushy when frozen.
- Experiment with Chocolate: You can use milk chocolate or white chocolate if dark chocolate isn’t your preference. Just be mindful of melting times as they may vary.
- Get Creative with Toppings: Try different toppings like sprinkles, mini chocolate chips, or dried fruits to add variety and flair to your banana pops.
- Storage Tips: Store leftover banana pops in an airtight container in the freezer for up to a month for a quick and healthy snack!
Variations
Different Chocolate Types (Milk, White, Dark)
You can use different types of chocolate for your banana pops. Dark chocolate gives a rich taste. Milk chocolate is sweet and creamy, perfect for kids. White chocolate adds a fun twist with its sweet flavor. Each type changes the treat’s taste, so try them all!
Alternative Toppings (Sprinkles, Dried Fruit)
Toppings can make your banana pops even better. You can add colorful sprinkles for a fun look. Dried fruit like raisins or cranberries adds a chewy, sweet bite. Crushed cookies or pretzels offer a salty crunch. Mix and match to find your favorite combo!
Flavoring Options (Peanut Butter Drizzle, Mint)
Flavoring your chocolate can take your pops to the next level. A peanut butter drizzle adds a nutty taste that pairs well with banana. For a refreshing twist, try adding mint extract to the chocolate. Just a little goes a long way!
Storage Info
Best Storage Practices for Banana Pops
To keep your chocolate covered banana pops fresh, store them in a freezer-safe container. Use layers of parchment paper to separate each pop. This way, they won’t stick together. Make sure the container is airtight. This keeps out moisture and prevents freezer burn.
How to Store Leftovers
If you have any leftover banana pops, wrap each one in plastic wrap. Then, place them in a container. This ensures they stay fresh. Store them in the freezer for up to two weeks. If you want to enjoy them longer, consider vacuum sealing.
Reheating Tips for Perfect Pops
You don’t need to reheat banana pops. They taste best when cold and frozen. Just take them out of the freezer and let them sit for a minute. This makes them easier to eat. Enjoy your treat straight from the freezer for the best flavor!
FAQs
Can I use frozen bananas for this recipe?
No, I don’t recommend using frozen bananas. They can be mushy. Fresh bananas hold their shape well. They also have a better taste and texture when frozen after coating.
How long will chocolate-covered banana pops last in the freezer?
Chocolate-covered banana pops can last up to two months in the freezer. Make sure to wrap them well. This keeps them from getting freezer burn. Use a sealed container or plastic wrap for best results.
What can I substitute for chocolate chips?
You can use white chocolate chips or milk chocolate chips. If you want a healthier option, try dark chocolate or cacao nibs. Nut butters also work well for a creamy texture.
You can easily make tasty chocolate-covered banana pops at home. We covered key ingredients, from essential items to fun toppings. I shared step-by-step instructions for making, coating, and freezing these treats. Tips help you avoid mistakes and achieve a smooth chocolate layer. You can also explore different chocolate types and toppings for variety. Store them well, and you’ll enjoy these pops longer. Remember, simple swaps can make a big difference. Enjoy creating these delicious treat


