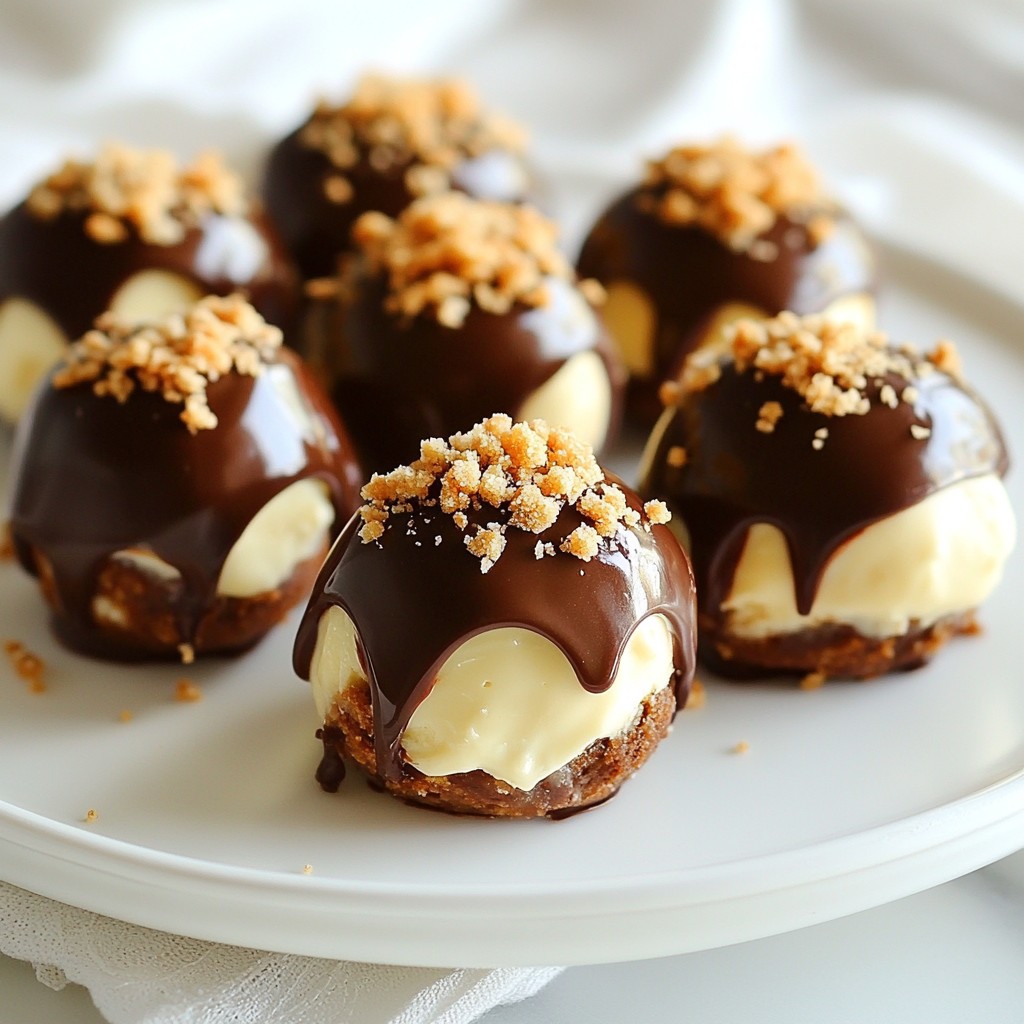
Love sweet treats? You’re in for a treat with these Chocolate Covered Cheesecake Bites! Imagine rich, creamy cheesecake coated in luscious chocolate. They make a perfect snack or dessert. In this post, I'll share my easy recipe and tips to get the best results. Whether you want to impress guests or enjoy a tasty bite yourself, these cheesecake bites will delight everyone. Let’s dive into the joy of making this savory delight!
Why I Love This Recipe
- Indulgent Flavor: The combination of rich chocolate and creamy cheesecake creates an irresistible treat that satisfies any sweet tooth.
- Easy to Make: With simple ingredients and straightforward steps, this recipe is perfect for both beginners and experienced bakers.
- Perfect for Sharing: These bite-sized delights are ideal for parties or gatherings, making them easy to share and enjoy with friends.
- Customizable: Feel free to experiment with different toppings or flavors, such as adding nuts or using white chocolate for a twist!
Ingredients
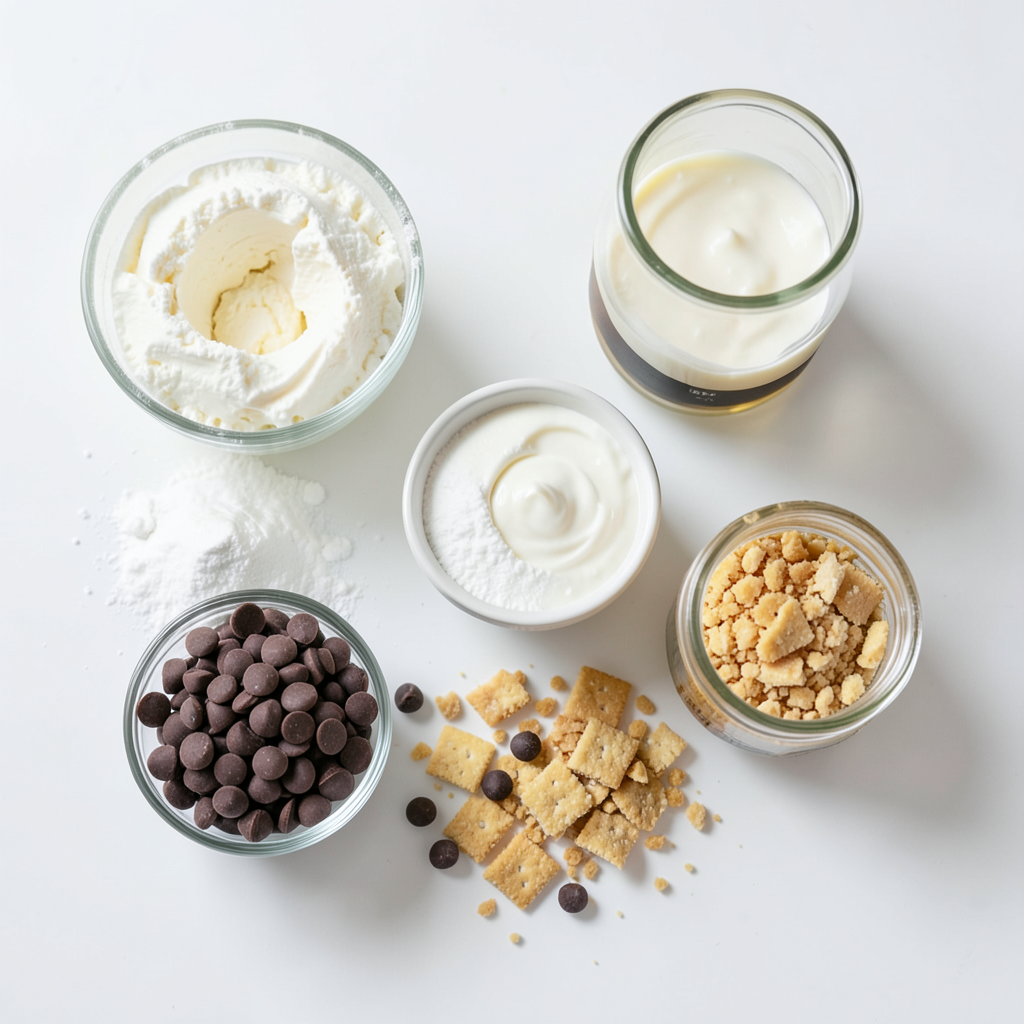
Required ingredients for Chocolate Covered Cheesecake Bites
To make these tasty cheesecake bites, gather the following:
- 8 oz cream cheese, softened
- 1/2 cup powdered sugar
- 1 teaspoon vanilla extract
- 1/2 cup heavy cream
- 1 cup semi-sweet chocolate chips
- 2 tablespoons coconut oil (or vegetable oil)
- 1/4 cup crushed graham crackers (for coating)
These ingredients create a rich and creamy filling, balanced by a sweet chocolate coating.
Optional add-ins or toppings
You can enhance your cheesecake bites with these fun extras:
- Mini chocolate chips
- Chopped nuts like almonds or pecans
- A drizzle of caramel or white chocolate
- Fresh fruit pieces, such as raspberries or strawberries
These options add unique flavors and textures to your bites.
Ingredient substitutions
If you need to swap out any ingredients, here are some ideas:
- Use ricotta cheese instead of cream cheese for a lighter texture.
- Swap powdered sugar for maple syrup to reduce refined sugar.
- Use dark chocolate chips for a richer taste.
- Replace heavy cream with coconut cream for a dairy-free option.
These substitutions can help you tailor the recipe to your taste or dietary needs.
Step-by-Step Instructions
Detailed instructions for preparing cheesecake mixture
To start, gather your ingredients. You will need cream cheese, powdered sugar, and vanilla extract. In a bowl, mix the softened cream cheese, powdered sugar, and vanilla. Use a hand mixer to beat these until smooth and creamy. Next, take another bowl and whip the heavy cream until you see stiff peaks. This means it holds its shape well. Now, gently fold the whipped cream into the cream cheese mixture. Make sure everything blends together nicely.
Steps for freezing and coating the bites
Prepare a baking sheet by lining it with parchment paper. Now, scoop out small portions of the cheesecake mixture. Aim for about one inch in diameter. You can use a cookie scoop or your hands. Place these balls on the sheet. Once you finish, put the baking sheet in the freezer for at least 30 minutes. This helps the bites firm up.
How to properly melt and dip in chocolate
While the cheesecake bites freeze, it’s time to melt your chocolate. In a microwave-safe bowl, combine the semi-sweet chocolate chips and coconut oil. Microwave this in 30-second intervals. Stir between each interval until the mixture is smooth. Once the bites are firm, dip each one into the melted chocolate. Use a fork to lift them out. Allow any extra chocolate to drip back into the bowl. If you like, you can sprinkle crushed graham crackers on top before the chocolate sets. Finally, place the bites back on the parchment paper and return them to the freezer for about 15 minutes.
Tips & Tricks
Tips for achieving a smooth cheesecake mixture
To get a smooth cheesecake mixture, start with softened cream cheese. This helps blend it well. Beat the cream cheese with powdered sugar and vanilla until creamy. I suggest using a hand mixer for the best results. When you add the whipped cream, fold it in gently. This keeps the mixture light and fluffy.
Best practices for chocolate coating
When coating your cheesecake bites, use high-quality chocolate chips. Melt them slowly in a microwave. Stir after every 30 seconds until it is smooth. Add coconut oil to the chocolate. This makes it easier to dip and gives a nice shine. Dip each cheesecake bite fully. Use a fork to lift them out and let excess chocolate drip off.
Common mistakes to avoid
One common mistake is not freezing the cheesecake bites enough. They should be firm before dipping. Another mistake is overheating the chocolate. This can cause it to seize. Be patient and melt in small intervals. Finally, don’t skip the crushed graham cracker topping. It adds great texture and flavor!
Pro Tips
- Chill the Mixture: For easier handling, chill the cheesecake mixture for about 15 minutes before forming the balls. This will make it less sticky and easier to shape.
- Use Quality Chocolate: Opt for high-quality chocolate chips for melting. The better the chocolate, the richer and more delicious your cheesecake bites will be.
- Experiment with Toppings: While graham crackers are classic, feel free to experiment with other toppings like crushed nuts, sprinkles, or even a drizzle of caramel sauce for added flavor.
- Storage Tips: Keep any leftover cheesecake bites in an airtight container in the freezer. They can last for up to a month, making them a perfect make-ahead dessert!
Variations
Different chocolate types to use
You can switch up the chocolate for fun. Try dark chocolate for a richer taste. Milk chocolate is great if you prefer sweetness. White chocolate offers a creamy twist. You can even mix chocolates for a unique flavor. Just remember, each type will change the taste.
Flavor variations
Add a fruity twist to your bites. You can mix in pureed strawberries or raspberries into the cheesecake. This gives a pop of color and flavor. Try adding lemon zest for a fresh zing. You can also fold in crushed pineapple for a tropical vibe. The key is to balance the fruit with the cream cheese.
Alternative coatings and toppings
Get creative with your coatings! Instead of just graham crackers, try crushed nuts for crunch. Chopped pistachios or almonds add a nice touch. You can also use shredded coconut for a tropical flair. For a fun look, drizzle extra melted chocolate on top. It makes them look fancy and tastes great!
Storage Info
How to store cheesecake bites
To keep your chocolate covered cheesecake bites fresh, place them in an airtight container. Layer the bites with parchment paper to avoid sticking. Store them in the fridge if you plan to eat them within a week. They taste best when cold.
Freezing tips for longer shelf life
If you want to keep your cheesecake bites for longer, freezing is the way to go. Freeze them on a baking sheet first. This prevents them from sticking together. Once frozen, transfer the bites to a freezer-safe bag or container. They can last up to three months in the freezer. Just thaw them in the fridge before serving.
Recommended storage containers
For short-term storage, use a glass or plastic container with a tight lid. For long-term storage, vacuum-sealed bags work great. They keep air out and preserve the flavor. Make sure to label your containers with the date, so you know when you made them.
FAQs
How do I know when the cheesecake bites are ready?
You can tell when the cheesecake bites are ready by checking their firmness. After freezing them for at least 30 minutes, they should feel solid to the touch. If they still feel soft, give them more time in the freezer. When you dip them in chocolate, they should hold their shape well.
Can I make these cheesecake bites ahead of time?
Yes, you can make these cheesecake bites ahead of time. They store well in the freezer. Just freeze them after dipping in chocolate. You can keep them for up to three months. When you're ready to enjoy them, let them sit at room temperature for a few minutes before serving.
Where can I buy Chocolate Covered Cheesecake Bites?
You can find Chocolate Covered Cheesecake Bites at some specialty dessert shops or bakeries. Many grocery stores also carry them in the frozen dessert aisle. If you want a fresh batch, I recommend making them at home. You can control the taste and quality, plus they are fun to make!
In this post, we explored making Chocolate Covered Cheesecake Bites. We covered all the ingredients you need, plus optional toppings and substitutes. I shared step-by-step instructions for the cheesecake mixture and chocolate coating. You learned useful tips to ensure success and different variations to try. Lastly, we discussed how to store these treats for later enjoyment.
Make these bites your own and enjoy every creamy, chocolatey bite!