Chocolate Espresso Crinkle Cookies Delightfully Rich Treat

Are you ready to indulge in a treat that’s rich, chocolatey, and full of espresso flavor? Chocolate Espresso Crinkle Cookies are a delightful blend of two beloved ingredients that create a cookie experience you’ll crave again and again. In this post, I’ll walk you through the easy steps to make these cookies, share helpful tips, and offer delicious variations. Let’s dive in and bake something special today!
Why I Love This Recipe
- Decadent Flavor: The rich combination of chocolate and espresso creates an indulgent treat that satisfies any sweet tooth.
- Beautiful Presentation: The crinkle effect gives these cookies a stunning appearance, making them perfect for sharing or gifting.
- Easy to Make: With simple ingredients and straightforward steps, this recipe is accessible for bakers of all skill levels.
- Perfect Pairing: These cookies are delightful with a cup of coffee or tea, making them a great accompaniment for any afternoon break.
Ingredients
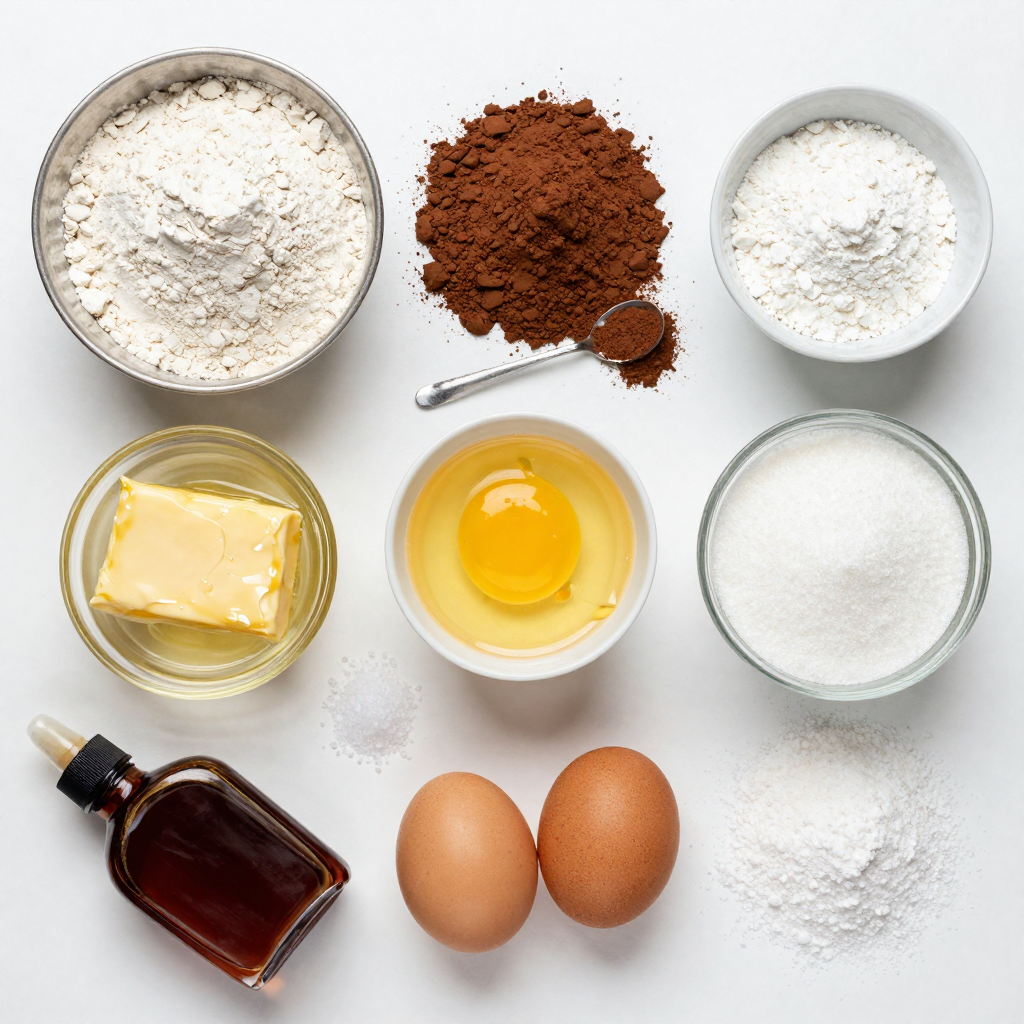
Baking the perfect Chocolate Espresso Crinkle Cookies starts with gathering your ingredients. Each item plays a key role in creating that rich, chocolatey flavor with a hint of espresso. Here is what you need:
- 1 cup all-purpose flour
- 1/2 cup unsweetened cocoa powder
- 2 teaspoons instant espresso powder
- 1/2 teaspoon baking powder
- 1/4 teaspoon salt
- 1/2 cup unsalted butter, melted
- 1 cup granulated sugar
- 2 large eggs
- 1 teaspoon vanilla extract
- Powdered sugar for dusting
These ingredients come together to create a dough that is thick and sticky. The espresso powder adds depth to the chocolate. The melted butter helps bind everything, while the eggs provide moisture. The baking powder ensures a slight rise, creating that delightful crinkle on top. Remember, using fresh ingredients will yield the best results in texture and taste.
This recipe gives you a chance to make cookies that impress your friends and family.

Step-by-Step Instructions
Preparation Steps
- Preheat your oven to 350°F (175°C) and line two baking sheets with parchment paper.
- In a medium bowl, whisk together:
- 1 cup all-purpose flour
- 1/2 cup unsweetened cocoa powder
- 2 teaspoons instant espresso powder
- 1/2 teaspoon baking powder
- 1/4 teaspoon salt
- In another large bowl, combine:
- 1/2 cup melted unsalted butter
- 1 cup granulated sugar
Whisk until smooth and creamy.
Mixing the Dough
- Gradually add the dry mixture to the wet ingredients. Stir with a spatula until no flour streaks remain. The dough will feel thick and sticky.
- Chill the dough in the fridge for 30 minutes. This helps the cookies keep their shape while baking.
Baking Process
- After chilling, scoop the dough with a tablespoon and roll it into balls.
- Roll each ball in powdered sugar until fully coated. Space them on the baking sheets about 2 inches apart.
- Bake for 10-12 minutes. The edges should set, but the centers will be soft. Look for cracks on top for that classic crinkle.
- Let the cookies cool on the sheets for about 5 minutes. Then transfer them to wire racks to cool completely.
Pro Tips
- Chill the Dough: Allowing the cookie dough to chill for at least 30 minutes helps firm it up, making it easier to handle and ensuring the cookies maintain their shape while baking.
- Quality Cocoa: Use high-quality unsweetened cocoa powder for a richer chocolate flavor. The better the cocoa, the more intense the taste of your cookies.
- Don’t Overbake: To achieve that perfect soft center, be careful not to overbake the cookies. They should be set at the edges but still soft in the center when you remove them from the oven.
- Experiment with Add-ins: Feel free to mix in chocolate chips, nuts, or dried fruit for added texture and flavor. Just be mindful of the overall balance of ingredients.
Tips & Tricks
Baking Tips
To get the perfect crinkle effect, follow these steps:
- Chill the dough for at least 30 minutes. This keeps the shape.
- Roll the dough balls in powdered sugar. It creates the crinkle look as they bake.
- Bake at 350°F (175°C) for 10-12 minutes. Check for soft centers and set edges.
Adjusting baking times can help. If you live at a high altitude, reduce the time by 1-2 minutes. For a chewier cookie, bake a bit less.
Ingredient Substitutions
You can swap ingredients to fit your needs:
- For butter: Try coconut oil or a vegan butter alternative.
- For eggs: Use flax eggs or applesauce.
Adjust sweetness by adding less sugar. You can also increase cocoa powder for a richer taste. Just remember, cocoa can make the dough thicker.
Serving Suggestions
Make your Chocolate Espresso Crinkle Cookies shine:
- Serve them on a fun plate with extra powdered sugar on top.
- Pair with a hot cup of coffee or milk. The flavors mix well together.
For a twist, add vanilla ice cream on the side. It makes a delightful dessert.Enjoy your baking!

Variations
Flavor Enhancements
To make your cookies even richer, try adding chocolate chips or nuts. Chocolate chips add extra gooeyness and sweetness. Nuts, like walnuts or pecans, give a nice crunch and depth. You can also enhance flavor by mixing in spices. A dash of cinnamon or nutmeg brings warmth to the cookies. This twist makes them unique and exciting.
Dietary Adjustments
If you need gluten-free options, use a gluten-free flour blend. It works well in this recipe and keeps the cookies chewy. For vegan alternatives, swap butter with coconut oil. Use flax eggs instead of regular eggs. Just mix one tablespoon of ground flaxseed with three tablespoons of water for each egg. These changes allow everyone to enjoy these treats.
Seasonal Variants
You can easily make holiday-themed variations of these cookies. For fall, add pumpkin spice for a cozy flavor. During Christmas, consider adding peppermint extract. Experimenting with different flavors keeps your baking fresh. Remember, the key is to balance flavors with the rich chocolate base to maintain that delightful taste.
Storage Info
Proper Storage Techniques
To keep your Chocolate Espresso Crinkle Cookies fresh, store them in an airtight container. This helps prevent them from drying out. You can use a glass jar or a plastic container. If you have a lot, layer them with parchment paper to avoid sticking. Make sure to place the lid on tight.
Freezing Instructions
You can freeze both the dough and the baked cookies. For uncooked dough, scoop and roll it into balls, then freeze on a baking sheet. Once frozen, move them to a bag. This way, you can bake fresh cookies anytime. For baked cookies, let them cool completely first. Then, store them in an airtight bag. To thaw, just leave them at room temperature for a few hours.
Shelf Life
At room temperature, these cookies last about a week. Keep an eye out for signs of spoilage. If they smell off or look hard, it’s best to toss them. Always trust your senses when deciding if food is safe to eat.
FAQs
Common Questions
What can I use if I don’t have instant espresso powder?
You can use strong brewed coffee instead. Use 1 tablespoon of coffee for every 2 teaspoons of espresso powder. The flavor will be different but still tasty.
Can I make the dough ahead of time?
Yes! You can make the dough and chill it in the fridge. Make sure to cover it tightly. You can also freeze the dough for up to three months. Just thaw it in the fridge before use.
Troubleshooting Baking Issues
Why did my cookies spread too much?
Cookies may spread too much if the dough is too warm. Make sure to chill the dough for at least 30 minutes. If they still spread, try adding a bit more flour next time.
How can I fix dry or crumbly dough?
If your dough is dry, add a bit of melted butter or water. Start with one teaspoon at a time. Mix well and check the dough’s texture.
Additional Information
Are Chocolate Espresso Crinkle Cookies safe for kids?
Yes, these cookies are safe for kids. The espresso powder gives a nice flavor but has less caffeine than coffee. They are a fun treat for everyone!
Can I use other types of flour for this recipe?
You can use gluten-free flour blends as a substitute. Make sure to use a blend that works well for baking. The texture may change, but the cookies will still taste great.
This post covered how to make Chocolate Espresso Crinkle Cookies from start to finish. You learned about the ingredients, step-by-step instructions, and tips for success. I shared variations and storage methods to keep your cookies fresh. Remember, baking is fun! Don’t hesitate to experiment with flavors or substitute ingredients. Enjoy making these cookies for yourself or to share with friends. Happy baking!

Chocolate Espresso Crinkle Cookies
Ingredients
1 cup all-purpose flour
1/2 cup unsweetened cocoa powder
2 teaspoons instant espresso powder
1/2 teaspoon baking powder
1/4 teaspoon salt
1/2 cup unsalted butter, melted
1 cup granulated sugar
2 large eggs
1 teaspoon vanilla extract
Powdered sugar for dusting
Instructions
Preheat your oven to 350°F (175°C) and line two baking sheets with parchment paper.
In a medium bowl, whisk together the flour, cocoa powder, espresso powder, baking powder, and salt until well combined.
In a large mixing bowl, combine the melted butter and granulated sugar, whisking until smooth and creamy.
Add the eggs one at a time, mixing well after each addition, followed by the vanilla extract. Ensure everything is well incorporated.
Gradually add the dry mixture to the wet ingredients, stirring with a spatula or wooden spoon until there are no flour streaks. The dough will be thick and sticky.
Chill the cookie dough in the refrigerator for about 30 minutes. This helps the cookies maintain their shape while baking.
Once chilled, use a tablespoon to scoop the dough and roll it into balls.
Roll each dough ball in powdered sugar until thoroughly coated. Place them on the prepared baking sheets, spacing them about 2 inches apart.
Bake the cookies in the preheated oven for 10-12 minutes, or until the edges are set but the centers are still soft. The cookies will crack on top, creating a beautiful crinkle effect.
Remove from the oven and let the cookies cool on the baking sheets for about 5 minutes before transferring them to wire racks to cool completely.
Prep Time: 30 minutes | Total Time: 1 hour | Servings: 20 cookies
– Presentation Tips: Serve the cookies on a decorative plate dusted with extra powdered sugar, and consider pairing them with a cup of fresh brewed coffee for a delightful afternoon treat!

Chocolate Espresso Crinkle Cookies
Ingredients
- 1 cup all-purpose flour
- 0.5 cup unsweetened cocoa powder
- 2 teaspoons instant espresso powder
- 0.5 teaspoon baking powder
- 0.25 teaspoon salt
- 0.5 cup unsalted butter, melted
- 1 cup granulated sugar
- 2 large eggs
- 1 teaspoon vanilla extract
- to taste powdered sugar for dusting
Instructions
- Preheat your oven to 350°F (175°C) and line two baking sheets with parchment paper.
- In a medium bowl, whisk together the flour, cocoa powder, espresso powder, baking powder, and salt until well combined.
- In a large mixing bowl, combine the melted butter and granulated sugar, whisking until smooth and creamy.
- Add the eggs one at a time, mixing well after each addition, followed by the vanilla extract. Ensure everything is well incorporated.
- Gradually add the dry mixture to the wet ingredients, stirring with a spatula or wooden spoon until there are no flour streaks. The dough will be thick and sticky.
- Chill the cookie dough in the refrigerator for about 30 minutes. This helps the cookies maintain their shape while baking.
- Once chilled, use a tablespoon to scoop the dough and roll it into balls.
- Roll each dough ball in powdered sugar until thoroughly coated. Place them on the prepared baking sheets, spacing them about 2 inches apart.
- Bake the cookies in the preheated oven for 10-12 minutes, or until the edges are set but the centers are still soft. The cookies will crack on top, creating a beautiful crinkle effect.
- Remove from the oven and let the cookies cool on the baking sheets for about 5 minutes before transferring them to wire racks to cool completely.


![- Fresh strawberries - Semi-sweet chocolate chips - Coconut oil for smooth melting - Crushed nuts (almonds or hazelnuts) - Colorful sprinkles - Lollipop sticks - Microwave-safe bowl - Parchment paper To make delicious chocolate-covered strawberry pops, you need a few key items. Start with fresh strawberries. Choose ripe, firm ones for the best taste. Next, grab semi-sweet chocolate chips. They melt well and add a rich flavor. Also, use coconut oil. This helps the chocolate melt smoothly and stick to the strawberries. You can add fun toppings to make your pops even better. Try crushed nuts, like almonds or hazelnuts, for a crunchy bite. Colorful sprinkles also add a nice touch. They make the pops look festive and fun. For the tools, have lollipop sticks ready. They help you hold the strawberries while dipping. Use a microwave-safe bowl for melting the chocolate. Finally, get parchment paper. It keeps your pops from sticking as they cool. With these ingredients and tools, you're all set to create a tasty delight. For the full recipe, check the details above. First, wash the strawberries gently. Make sure they are dry. Any water will stop the chocolate from sticking. You can use a paper towel to help. Next, take the lollipop sticks. Push one stick into the stem end of each strawberry. Aim to push it about halfway in. This gives you a nice handle for dipping. Now, let’s melt the chocolate. In a microwave-safe bowl, mix the chocolate chips with coconut oil. The coconut oil helps the chocolate melt smoothly. Microwave this mix in 30-second bursts. Stir after each burst until it is fully melted. Be careful not to overheat it, or the chocolate can burn. Hold the strawberry by the stick. Dip it into the melted chocolate. Make sure to cover it fully. Let any extra chocolate drip off. After dipping, it’s time to add toppings. While the chocolate is still wet, sprinkle on crushed nuts or colorful sprinkles. This helps them stick well. Finally, place the dipped strawberries upright in a container or on parchment paper. Let them sit until the chocolate hardens. This usually takes about 15-20 minutes at room temperature. If you’re in a hurry, the fridge works too; just chill them for 10 minutes. To get a smooth coat on your pops, always add coconut oil. Coconut oil helps the chocolate melt evenly. This helps create a shiny finish that looks great. If you don't have coconut oil, you can use vegetable oil. Just keep in mind that it may not shine as much. When you melt the chocolate, do it slowly. Use short bursts in the microwave. Stir well after each burst to keep the texture just right. Making your chocolate-covered strawberry pops look fun is easy. Use colorful lollipop holders to make them pop at parties. Consider sticking them in a piece of foam or a pretty container. You can also arrange them in a fun shape, like a heart. Another idea is to drizzle white chocolate on top for a more stylish look. These small touches make your dessert stand out. Watch out for moisture! If your strawberries are wet, the chocolate will not stick. Always dry them well before dipping. Another mistake is overheating the chocolate. If it gets too hot, it can clump. This ruins the smooth finish you want. Always use a low heat and stir often to prevent this. {{image_2}} You can switch up the chocolate for your pops. Dark chocolate gives a rich taste. Milk chocolate is sweet and creamy. White chocolate adds a fun twist with its sweet flavor. You can also add flavor. Try a drop of peppermint extract for a cool touch. Vanilla extract brings a warm, sweet note to the mix. Get creative with toppings! Coconut flakes add a tropical flair. Mini chocolate chips bring extra sweetness and crunch. You can also use crushed nuts for a nutty bite. Rainbow sprinkles make the pops fun and colorful. Just make sure to add them right after dipping the strawberry. Make your pops party-ready! For holidays, decorate with colors that match the theme. Use red and green for Christmas or pastel colors for Easter. You can even customize them for birthdays. Just add sprinkles or edible glitter to match the party theme. These small touches make your pops stand out! For the complete recipe, check out the [Full Recipe]. Store chocolate-covered strawberry pops in a cool, dry place. The ideal temperature is between 60°F and 70°F. Keep them away from direct sunlight. This helps keep the chocolate smooth and shiny. To stack the pops, use a container with dividers. Place parchment paper between layers. This prevents them from sticking to each other. If you don't have dividers, lay them flat on a tray lined with parchment paper. For the best taste, eat the pops within two days. After that, the strawberries may lose their freshness. You can freeze chocolate-covered strawberry pops. Wrap them well in plastic wrap, then place them in a freezer bag. They can last up to a month in the freezer. To enjoy, thaw them in the fridge. Avoid thawing at room temperature. This keeps the chocolate from getting too soft. If you have leftover chocolate, pour it into molds. You can make chocolate bites or bars. This is a fun way to enjoy extra chocolate. For leftover strawberries, try making a smoothie. Blend them with yogurt or milk. You can also slice them for topping on pancakes or oatmeal. This way, nothing goes to waste, and you enjoy more treats. You can use frozen strawberries, but they change the texture. They may become mushy when thawed. This can affect how well the chocolate sticks to them. Fresh strawberries hold up better, ensuring a firm bite. If you choose frozen, let them thaw completely and dry them well before dipping. To make the chocolate smoother, you can add coconut oil during melting. This helps create a nice, glossy finish. Melt the chocolate in short bursts in the microwave, stirring well in between. Avoid overheating, as this can make the chocolate clumpy. Stirring helps keep the heat even, giving you a smooth result. Yes, there are vegan options! You can use dairy-free chocolate chips for a vegan treat. Look for brands that use plant-based ingredients. For toppings, consider nuts, seeds, or dairy-free sprinkles. This way, you can enjoy chocolate-covered strawberry pops while sticking to a vegan diet. We explored how to create delicious chocolate-covered strawberry pops, from essential ingredients to creative variations. Remember, fresh strawberries, coconut oil, and careful melting are key. Avoid common mistakes like moisture and overheating for the best results. With these tips, you can impress at any event. Enjoy experimenting with toppings and flavors, and get creative in your presentations. These treats are not just tasty; they can also be fun to make and share. Happy dipping!](https://dailydishlab.com/wp-content/uploads/2025/07/28782691-e2ef-4ba1-b328-d9019563a0b5-768x768.webp)


