Chocolate Espresso Truffles Rich and Simple Delight

If you love chocolate and coffee, you’re in for a treat! My Chocolate Espresso Truffles are rich, simple, and full of flavor. Perfect for any occasion, these delights will impress your friends and family. In this post, I’ll share everything you need, from ingredients to tips and tricks. Get ready to create your own batch of these mouth-watering treats that combine the best of both worlds!
Why I Love This Recipe
- Decadent Flavor: The combination of rich dark chocolate and bold espresso creates a luxurious treat that is hard to resist.
- Simple Ingredients: With just a few pantry staples, you can whip up these indulgent truffles in no time.
- Customizable Coating: Whether you prefer cocoa powder or chopped nuts, the coating options allow for personalized touches.
- Perfect for Gifting: These truffles make a thoughtful and elegant gift for friends and family, especially when beautifully presented.
Ingredients
Complete List of Ingredients
To make chocolate espresso truffles, you need the following ingredients:
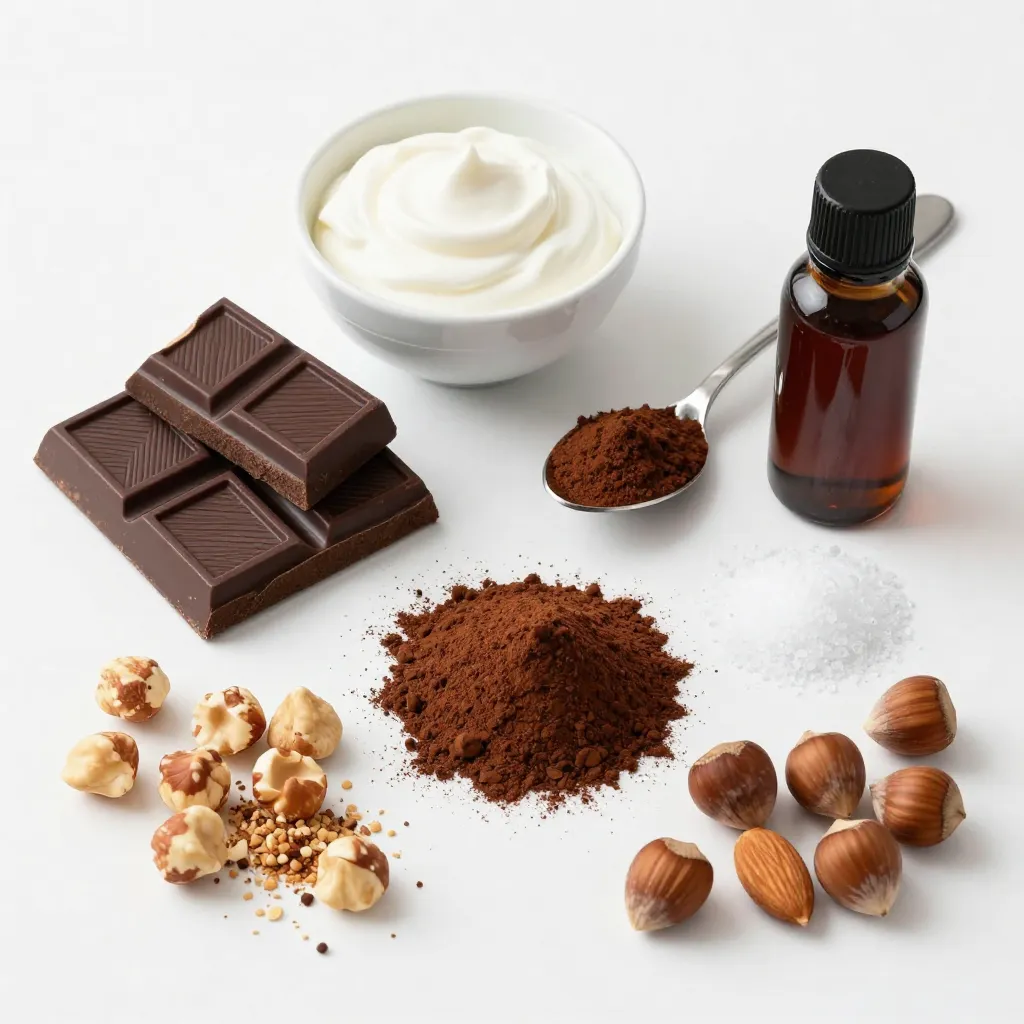
- 8 oz dark chocolate (70% cacao or higher), chopped
- 1/2 cup heavy cream
- 1 tablespoon instant espresso powder
- 1 teaspoon vanilla extract
- 1/4 teaspoon sea salt
- Cocoa powder, for dusting
- Finely chopped nuts (such as hazelnuts or almonds), for coating (optional)
Quality of Ingredients
Using high-quality dark chocolate makes a big difference. Choose chocolate with at least 70% cacao. This gives your truffles a rich flavor. The heavy cream should be fresh and full-fat. It helps create a smooth texture. Instant espresso powder adds a deep coffee flavor. Look for brands that use pure coffee beans for the best taste.
Substitutions for Dietary Needs
If you need a dairy-free option, use coconut cream instead of heavy cream. Make sure to use dairy-free chocolate too. For a nut-free version, skip the chopped nuts for coating. You can also roll the truffles in shredded coconut or crushed cookies instead. These swaps allow everyone to enjoy the truffles, no matter their dietary needs.


Step-by-Step Instructions
Detailed Preparation Steps
1. Start by heating the heavy cream. Use a small saucepan over medium heat. Heat until just simmering. This step is key for blooming flavors.
2. Once the cream simmers, remove it from the heat. Stir in the instant espresso powder, vanilla extract, and sea salt. Make sure they dissolve fully.
3. Next, place the chopped dark chocolate in a mixing bowl. Pour your hot cream mixture over it. Let it sit for one minute. This helps the chocolate melt evenly.
4. After a minute, stir the mixture gently with a spatula. Keep stirring until it becomes smooth and glossy. If you see unmelted chocolate, return it to low heat. Stir until melted.
5. Cover the bowl with plastic wrap. Refrigerate for about 1-2 hours. You want the mixture to firm up enough to handle.
6. Once set, use a melon baller or teaspoon. Scoop small portions of the mixture. Quickly roll them into balls using your palms.
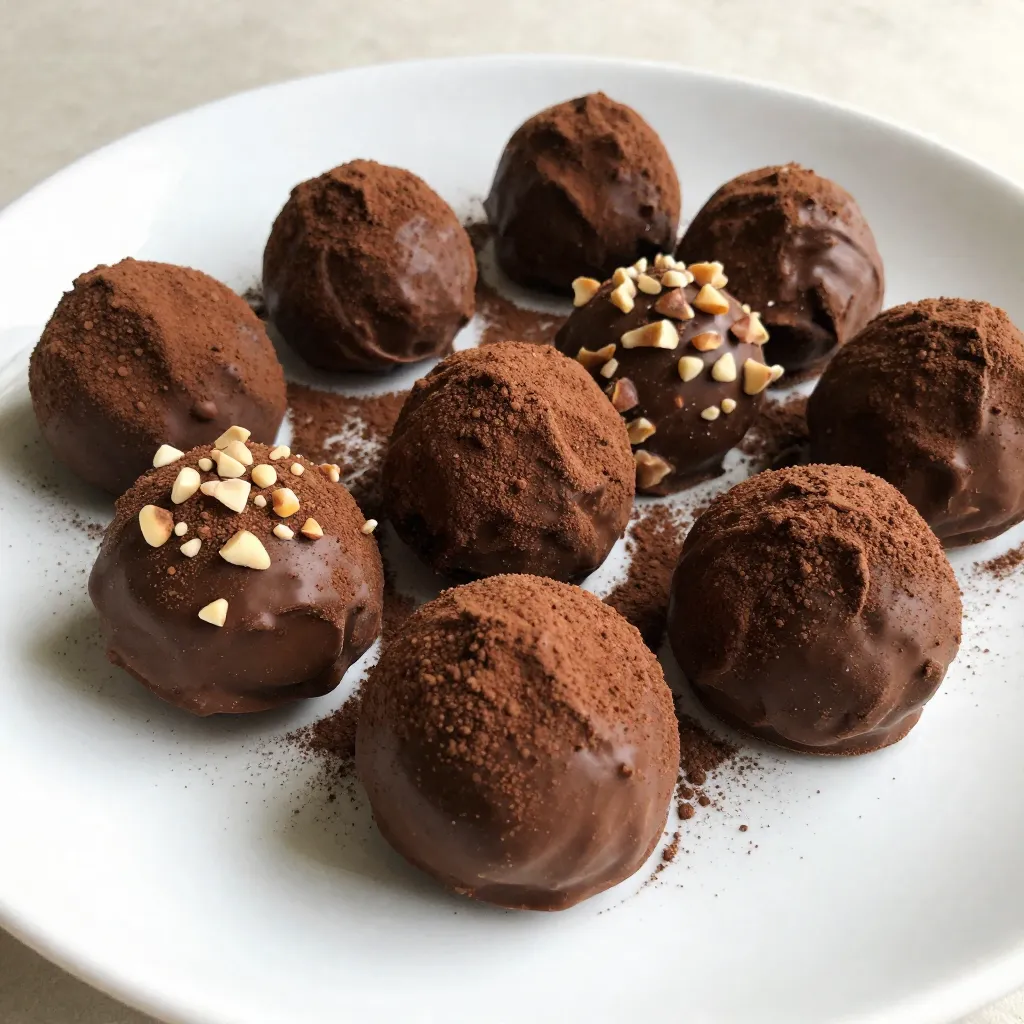
7. Roll the truffles in cocoa powder or finely chopped nuts. Make sure they are evenly coated.
8. Finally, place the truffles on a baking sheet lined with parchment paper. Refrigerate for another 30 minutes to set.
Tips for Melting Chocolate Safely
- Always use low heat when melting chocolate. High heat can burn it.
- Stir often to help it melt evenly.
- If you use a microwave, heat in short bursts. Stir in between.
- A double boiler is a great tool. It helps control the heat well.
- Ensure no water gets into the chocolate. Water can cause it to seize up.
Rolling Techniques for Perfect Truffles
- When rolling, keep your hands dry. Wet hands can make the mixture sticky.
- Use a light touch to shape the truffles. Don’t press too hard.
- To add flair, roll some in cocoa powder and others in nuts. This makes them look pretty and taste great.
- For a smooth finish, roll them quickly. This helps heat from your hands to soften the truffle slightly.
- After rolling, chill them again. This helps maintain their shape and texture.
Tips & Tricks
Common Mistakes to Avoid
One common mistake is overheating the cream. It should just simmer, not boil. Boiling can cause the cream to separate. Another mistake is not letting the chocolate melt fully. If some pieces stay hard, your truffles will not be smooth. Also, avoid rolling the truffles too soon. They need to chill enough to hold their shape.
How to Achieve the Ideal Texture
To get the perfect texture, use high-quality chocolate. I recommend dark chocolate with at least 70% cacao. The heavy cream must be hot enough to melt the chocolate. Stir gently until the mix is smooth. If your mixture feels too soft, chill it longer. When rolling, your hands should be warm but not hot. This helps form perfect balls without melting them.
Best Practices for Storing Truffles
Store your chocolate espresso truffles in an airtight container. Place parchment paper between layers to prevent sticking. Keep them in the fridge for up to two weeks. If you want to save them longer, you can freeze them. Just make sure they are in a sealed bag. Thaw them in the fridge for best results. Enjoy the rich taste whenever you like!
Pro Tips
- Quality Chocolate Matters: Use high-quality dark chocolate with at least 70% cacao for the best flavor and texture in your truffles.
- Chill for Easy Rolling: If the chocolate mixture is too soft to handle, chill it for an additional 30 minutes in the refrigerator before rolling into balls.
- Experiment with Coatings: Try rolling the truffles in different coatings such as shredded coconut, matcha powder, or crushed freeze-dried fruit for unique flavors and textures.
- Presentation is Key: For an elegant presentation, arrange the truffles in a decorative box or on a cake stand, and dust with cocoa powder just before serving.
Variations
Flavor Infusion Ideas
You can add fun flavors to your chocolate espresso truffles. Try mixing in a bit of orange zest for a bright twist. The citrus pairs well with the rich chocolate. You can also use peppermint extract for a minty kick. Just a drop will do! If you like nuts, add a pinch of finely chopped almonds or hazelnuts. These will give a nice crunch and flavor.
Different Coating Options
The outside of your truffles can be just as fun as the inside. Cocoa powder is a classic choice. It gives a rich taste and looks great. But you can also roll them in shredded coconut for a tropical vibe. Colored sprinkles can make them festive. If you want a crunchy texture, use finely chopped nuts. The options are endless, so get creative!
Alternative Chocolate Types
While dark chocolate is rich and bold, you can use other types too. Milk chocolate offers a creamier taste. If you love white chocolate, it can also work! Just remember, white chocolate is sweeter, so adjust the sugar in your truffles. You can mix different chocolates for a layered flavor. Each type brings something unique to your truffles.
Storage Info
How to Store Chocolate Espresso Truffles
To keep your chocolate espresso truffles fresh, store them in an airtight container. Place a layer of parchment paper between the truffles to avoid sticking. Keep the container in the fridge. This will help maintain their rich taste and creamy texture.
Shelf Life of Homemade Truffles
Homemade chocolate espresso truffles last about one week in the fridge. If you follow proper storage methods, they can stay fresh. Check for any signs of spoilage before eating. If they look or smell off, it’s best to toss them out.
Freezing Truffles for Long-Term Storage
For longer storage, you can freeze the truffles. Place them in a single layer on a baking sheet and freeze for about an hour. After that, transfer them to a freezer-safe bag or container. They can last up to three months in the freezer. When ready to eat, thaw them in the fridge for a few hours. Enjoy your sweet treat whenever you want!
FAQs
What is the best chocolate to use for truffles?
For truffles, I recommend using dark chocolate with at least 70% cacao. This gives rich flavor and a smooth texture. High-quality chocolate melts better and tastes great. You can use brands like Valrhona or Ghirardelli, which are known for their quality. Avoid chocolate chips, as they often contain stabilizers that affect melting.
Can I make these truffles dairy-free?
Yes, you can easily make these truffles dairy-free. Just swap the heavy cream for a dairy-free alternative, like coconut cream or almond milk. Both options work well and add a unique flavor. Make sure to check that your chocolate is dairy-free too. Look for brands that specify they are vegan.
How can I make my truffles more indulgent?
To add more richness, try using a flavored liqueur, like coffee or hazelnut. Mix a tablespoon into your cream before blending it with chocolate. You can also add a touch of sea salt on top after rolling them. For an extra layer of flavor, roll the truffles in crushed espresso beans or flavored cocoa powder.
We covered everything you need for making amazing chocolate truffles. You learned about the key ingredients, how to prepare your truffles step-by-step, and tips to avoid common mistakes. You also discovered flavor ideas and the best ways to store and freeze your truffles for later.
Remember, making truffles is fun and flexible. Enjoy experimenting with different flavors and techniques. Your homemade truffles will surely impress friends and famil

Chocolate Espresso Truffles
Ingredients
- 8 oz dark chocolate (70% cacao or higher), chopped
- 0.5 cup heavy cream
- 1 tablespoon instant espresso powder
- 1 teaspoon vanilla extract
- 0.25 teaspoon sea salt
- None for dusting Cocoa powder
- None for coating Finely chopped nuts (such as hazelnuts or almonds), optional
Instructions
- In a small saucepan, heat the heavy cream over medium heat until just simmering. Remove from heat.
- Stir in the instant espresso powder, vanilla extract, and sea salt until fully dissolved.
- Place the chopped dark chocolate in a mixing bowl. Pour the hot cream mixture over the chocolate and let it sit for a minute to melt the chocolate.
- After a minute, gently stir the mixture with a spatula until smooth and glossy. If some chocolate remains unmelted, place it back over low heat while stirring until completely melted.
- Cover the bowl with plastic wrap and refrigerate for about 1-2 hours, or until the mixture is firm enough to handle.
- Once set, use a melon baller or a teaspoon to scoop out small portions of the chocolate mixture and quickly roll them into balls between your palms.
- Roll the truffles in cocoa powder or finely chopped nuts until evenly coated.
- Place the finished truffles on a baking sheet lined with parchment paper and refrigerate for another 30 minutes to set.
Notes

Chocolate Espresso Truffles
Ingredients
- 8 ounces bittersweet chocolate, chopped
- 1 cup heavy cream
- 2 tablespoons espresso or strong coffee
- 1 teaspoon vanilla extract
- 1 cup cocoa powder, for dusting
Instructions
- In a saucepan, heat the heavy cream until it just begins to simmer.
- Remove from heat and add the chopped chocolate, stirring until smooth.
- Stir in the espresso and vanilla extract until well combined.
- Refrigerate the mixture for about 2 hours or until firm.
- Once firm, use a melon baller or spoon to scoop out small portions and roll them into balls.
- Roll the truffles in cocoa powder to coat.
- Store in the refrigerator until ready to serve.


![To make these delicious scones, gather the following ingredients: - 2 cups all-purpose flour - 1/3 cup granulated sugar - 1 tablespoon baking powder - 1/4 teaspoon salt - 1/2 cup unsalted butter, chilled and cubed - 1/2 cup heavy cream - 1 large egg - 1 teaspoon vanilla extract - 1 cup fresh raspberries - 1/2 cup white chocolate chips You can customize your scones with some fun add-ins. Here are a few ideas: - 1/2 cup chopped nuts, like pecans or walnuts - 1/2 teaspoon cinnamon for a warm spice note - Zest from 1 lemon or orange for a citrus twist - A handful of dark chocolate chips for a richer flavor Using fresh, high-quality ingredients makes a big difference. For the best results, choose: - Flour: Go for a good brand of all-purpose flour. This helps with texture. - Butter: Use unsalted butter. It gives you control over the salt in your recipe. - Raspberries: Fresh raspberries are key. Look for plump, firm berries. - Chocolate: Choose high-quality white chocolate chips. They melt well and taste great. These choices enhance the flavor and texture of your scones. For an easy guide, check out the Full Recipe for more details. 1. Preheat your oven to 400°F (200°C). Line a baking sheet with parchment paper. 2. In a large bowl, whisk together the flour, sugar, baking powder, and salt. 3. Add the chilled butter to the dry mix. Use your fingers or a pastry cutter to blend until the mix looks like coarse crumbs. 4. In another bowl, whisk the cream, egg, and vanilla together. 5. Pour the cream mix into the flour mix. Stir gently until just combined. Do not overmix! 6. Fold in the fresh raspberries and white chocolate chips. Make sure they are evenly spread. 7. Turn the dough onto a floured surface. Knead gently a few times until it comes together. 8. Pat the dough into a circle about 1 inch thick. Cut it into 8 wedges with a sharp knife or pizza cutter. 9. Place the wedges on the baking sheet, leaving space between each. 10. Bake for 15-20 minutes until golden brown on top. 11. Remove from the oven. Let them cool slightly on a wire rack before serving. - Step 1: Make sure your oven is fully preheated. This helps the scones rise well. - Step 3: Keep the butter cold. This gives the scones a nice flaky texture. - Step 5: Mixing too much makes the scones tough. Mix until you see no dry flour. - Step 6: Gently fold, so you keep the raspberries whole. This adds a juicy burst of flavor. - Overmixing the dough: This results in tough scones. Mix just until combined. - Skipping the chilling: Cold ingredients help create a better texture. Don’t skip the cold butter! - Not measuring ingredients: Use exact measurements for the best results. Baking is a science. - Ignoring baking time: Check your scones at 15 minutes. They should be golden, not burnt. For the complete recipe, check out the Full Recipe section above. To make the best raspberry white chocolate scones, follow a few simple steps. First, keep your butter very cold. This helps create a fluffy texture. I suggest cubing the butter and chilling it before use. Second, mix the dry and wet ingredients gently. Overmixing makes scones tough, and we want them light and airy. Lastly, shape your dough carefully. Pat it down without pressing too hard to keep air pockets inside. Serve these scones warm for the best taste. You can dust them with powdered sugar for a sweet touch. Pair them with clotted cream for richness. If you like, add fresh raspberries on the side for extra flavor. These scones also shine at brunch or tea time, making them perfect for any gathering. Raspberry white chocolate scones go well with many drinks. A nice cup of Earl Grey tea complements their sweetness. You can also enjoy them with a light lemonade or even coffee. For spreads, try a tart raspberry jam to balance the sweetness. Each pairing enhances the flavors of the scones, making each bite delightful. For the full recipe, visit the [Full Recipe]. {{image_2}} You can play with the flavors of your scones. Instead of raspberries, try blueberries or strawberries for a fresh twist. You may also swap white chocolate for dark chocolate or milk chocolate. Each option gives a new taste. If you like nuts, add chopped almonds or pecans to the mix. These small changes can make a big difference. If you need gluten-free scones, use a gluten-free flour blend. Many blends work well in baking. Look for one that has xanthan gum. This will help the scones hold their shape. You can also use almond flour or coconut flour, but adjust the liquid in the recipe. These flours add a different flavor and texture. You can change the flavors with the seasons. In fall, add chopped apples and cinnamon for a warm taste. Winter calls for cranberry and orange zest. In spring, use lemon zest and poppy seeds for a bright, fresh flavor. Summer is perfect for peaches or cherries. Each season brings new fruits to enjoy in your scones. For the complete recipe, check the Full Recipe section. To keep your Raspberry White Chocolate Scones fresh, store them in an airtight container. This helps maintain their soft texture and delightful flavor. Place a piece of parchment paper between layers to prevent sticking. You can keep them at room temperature for up to two days. If you want to store them longer, the fridge is a good option, but it may dry them out a bit. When you're ready to enjoy your scones again, reheating is easy. Preheat your oven to 350°F (175°C). Place the scones on a baking sheet. Warm them for about 5-7 minutes. This will bring back their fresh-baked taste. You can also microwave them for about 10-15 seconds, but this might make them a bit soft. Freezing is a great way to save scones for later. Allow the scones to cool completely. Then, wrap each scone in plastic wrap. Place them in a freezer bag or container. They will stay fresh for up to three months. When you want to eat them, thaw overnight in the fridge. Then, reheat as mentioned above. This way, you can enjoy these tasty treats anytime! For the complete recipe, check out the Full Recipe. You can tell scones are done when they turn golden brown. The tops should feel firm to the touch. A toothpick inserted into the center should come out clean. If it has dough on it, bake them a bit longer. These signs help ensure your Raspberry White Chocolate Scones are baked just right! Yes, you can make the dough ahead of time! Chill the dough for up to 24 hours in the fridge. Wrap it tightly in plastic wrap. When you’re ready to bake, simply cut the dough into wedges and bake as directed. This saves time and lets you enjoy fresh scones at your convenience. If you need a substitute for white chocolate, try using dark chocolate chips or milk chocolate chips. You can also use dried fruit like cherries or apricots for a different flavor. Each option adds a unique twist to the scone. Experiment and find what you like best! For the complete recipe and specific steps, check the Full Recipe. We explored how to make perfect scones from scratch. We covered key ingredients, detailed instructions, and helpful tips. I shared common mistakes to avoid and fun variations to try. Storing and reheating tips ensure you enjoy fresh scones longer. Baking scones is easy and rewarding. With practice, your scones will impress everyone. Get creative and enjoy this tasty treat!](https://dailydishlab.com/wp-content/uploads/2025/07/7e56670c-1729-4c97-bf35-067a569313c1-768x768.webp)


