
Looking for a fun and easy treat? Chocolate Mint Oreo Truffles are your answer! With just a few simple ingredients, these no-bake delights melt in your mouth. In this post, I'll guide you step-by-step to make these tasty bites, from mixing the Oreo crunch to coating them in rich chocolate. Perfect for parties or a sweet bite at home, you'll love making and sharing these treats. Let's get started!
Why I Love This Recipe
- Decadent Flavor: The combination of rich chocolate and refreshing mint creates a perfect balance that satisfies any sweet tooth.
- Easy to Make: With just a few simple steps, these truffles come together quickly, making them a great treat for any occasion.
- Customizable: You can easily adapt the toppings or the type of chocolate used to suit your personal taste or dietary preferences.
- Perfect for Gifting: These truffles look impressive and can be beautifully packaged, making them an ideal homemade gift.
Ingredients
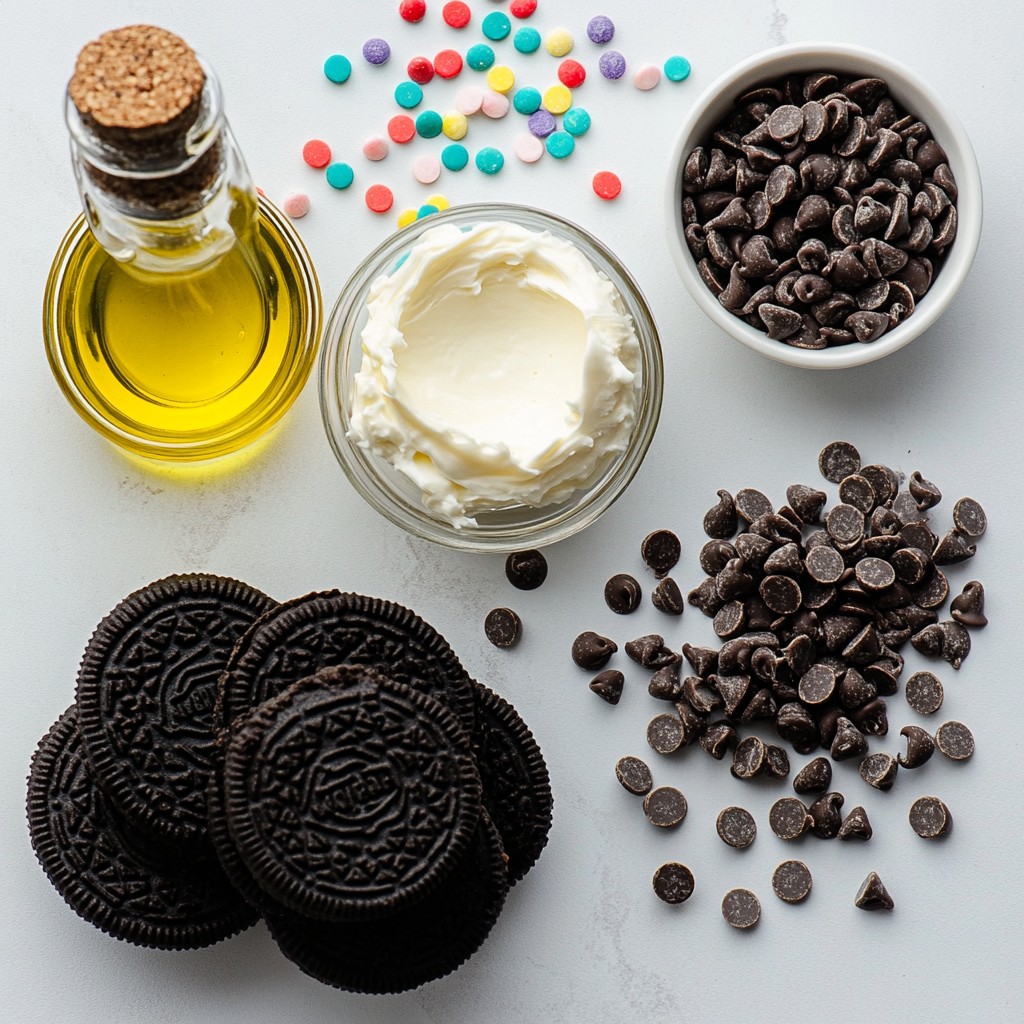
List of Ingredients
- 1 package (15.25 oz) Oreo cookies
- 8 oz cream cheese, softened
- 1 cup mint chocolate chips
- 1 cup semi-sweet chocolate chips
- 1 tablespoon vegetable oil
- ¼ teaspoon peppermint extract
- Optional toppings (crushed Oreos, chocolate sprinkles)
To make Chocolate Mint Oreo Truffles, you'll need simple but tasty ingredients. The star ingredient is Oreo cookies. These cookies add a sweet, crunchy base. Next, you will use cream cheese. This gives the truffles a rich and creamy texture. Mint chocolate chips bring a refreshing flavor. They add a nice twist to the truffles.
Semi-sweet chocolate chips are essential for coating. This chocolate adds depth to each bite. The vegetable oil helps the chocolate melt smoothly. A little peppermint extract enhances the minty taste.
Lastly, you can use optional toppings. Crushed Oreos or chocolate sprinkles make the truffles look fun and fancy. Whether you use them or not, the main truffle flavor shines through. You can find all these ingredients at any grocery store. Enjoy making this simple treat!
Step-by-Step Instructions
Preparing the Oreo Mixture
First, you need to crush the Oreo cookies. Place them in a food processor. Pulse until they turn into fine crumbs. This gives a smooth base for your truffles. Next, add the softened cream cheese and peppermint extract. Pulse the mixture again until it combines well. You want it smooth and creamy, with no lumps.
Shaping the Truffles
Now, it’s time to shape the truffles. Take about one tablespoon of the Oreo mixture in your hands. Roll it into a ball. Place the ball on a lined baking sheet. Repeat this for the rest of the mixture. Once you finish rolling, refrigerate the truffles for about 30 minutes. This helps them firm up for coating.
Melting and Coating
Next, you’ll melt the chocolate. In a microwave-safe bowl, combine the semi-sweet chocolate chips with vegetable oil. Microwave this mixture in 30-second intervals. Stir in between until the chocolate is melted and smooth. After melting, it’s time to coat the truffles. Remove the chilled truffles from the fridge. Use a fork to dip each truffle into the melted chocolate. Make sure it gets fully coated. Let the excess chocolate drip off before placing it back on the baking sheet.
Adding Finishing Touches
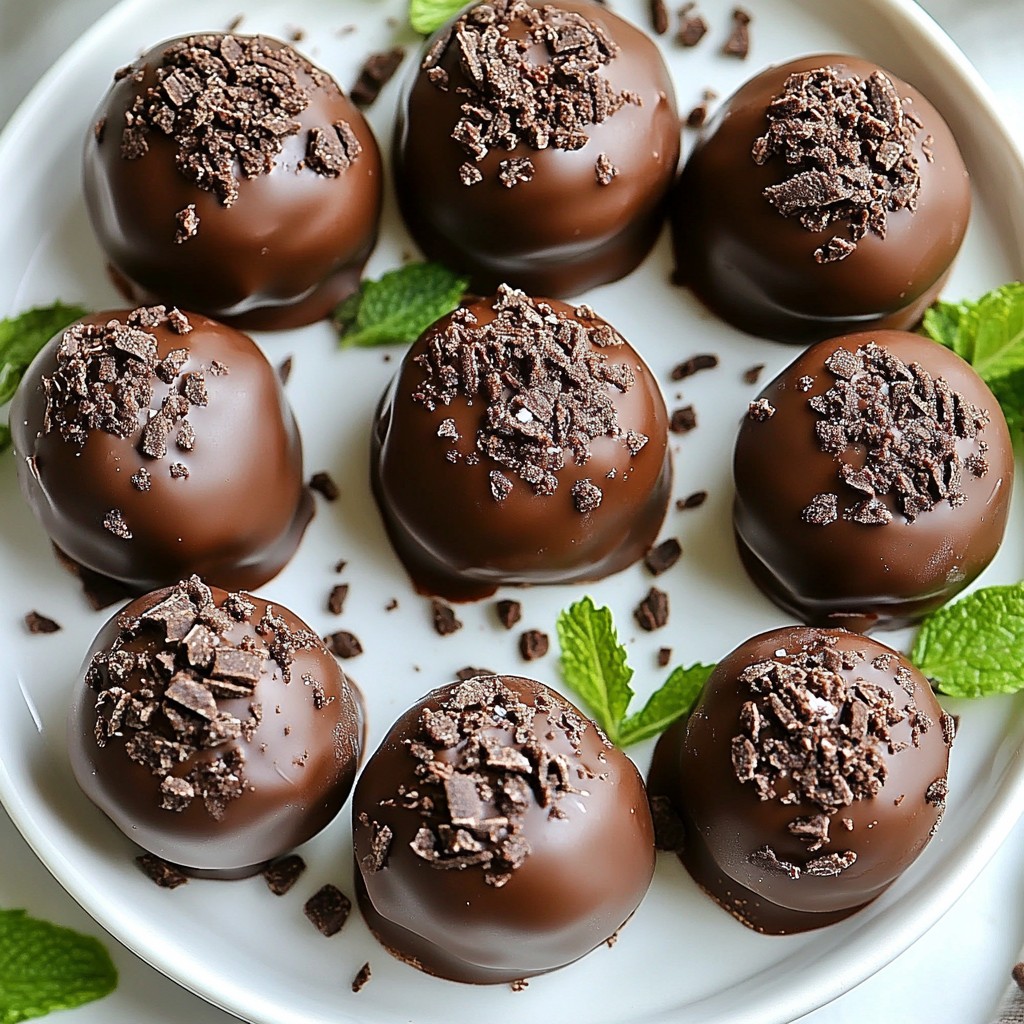
Now, for the fun part! While the chocolate is still wet, sprinkle crushed Oreos or chocolate sprinkles on top. This adds a nice look and extra flavor. You can get creative here, too!
Final Chilling
Finally, let’s set the chocolate coating. Place the truffles back in the refrigerator for another 30 minutes. This helps the chocolate harden completely. Once set, your Minty Chocolate Oreo Truffles are ready to enjoy!
Tips & Tricks
How to Perfect the Truffle Texture
To get the best truffle texture, start by crushing the Oreos well. Use a food processor for fine crumbs. This ensures a smooth mixture. If you don’t have a processor, place them in a bag and crush with a rolling pin.
Next, mix in the cream cheese. Make sure it is softened. This helps it blend better. The mixture should be smooth and easy to shape. If it is too thick, let the cream cheese soften a bit more.
Melting Chocolate Safely
Melting chocolate can be tricky. To melt chocolate chips, use a microwave-safe bowl. Start by adding the chocolate and the vegetable oil. Heat in 30-second bursts. After each burst, stir well. This helps prevent clumps and burning.
If you notice any lumps, keep stirring until it’s smooth. Avoid using high heat, as this can scorch the chocolate. Be patient for the best results.
Presentation Ideas
For a stunning presentation, arrange truffles on a nice platter. You can also use a decorative box. Add fresh mint leaves for a pop of color.
Garnishing options are key to impressing guests. Use crushed Oreos or colorful sprinkles on top. This adds texture and flair. You want your truffles to look as good as they taste!
Pro Tips
- Chill the Mixture: Make sure to refrigerate the Oreo mixture for a while before shaping the truffles. This will make it easier to roll them into smooth balls.
- Use High-Quality Chocolate: Opt for high-quality chocolate chips for the coating to enhance the flavor of your truffles. This will make a noticeable difference in the final taste.
- Experiment with Flavors: Feel free to customize your truffles by adding different extracts or flavorings, such as vanilla or almond, for a unique twist.
- Store Properly: Keep the truffles in an airtight container in the refrigerator to maintain their freshness and prevent them from drying out.
Variations
Flavor Variations
You can change the flavor of your truffles by using different Oreos. Try peanut butter or strawberry Oreos for a fun twist. Each flavor adds a unique taste. You can also switch to white chocolate for the coating. White chocolate gives a sweet contrast to the mint flavor.
Dietary Substitutions
If you want vegan truffles, use vegan cream cheese and dark chocolate. Many brands offer these options. You can find gluten-free Oreos for those avoiding gluten. This way, everyone can enjoy these treats.
Adding Fillings or Mix-ins
Want to make your truffles extra special? Add nuts or dried fruit to the mix. Chopped walnuts or cranberries work well. You can also layer in different extracts. Try almond or orange extract for new flavors. Each change makes these truffles unique and fun!
Storage Info
Best Practices for Storing Truffles
Store your Chocolate Mint Oreo Truffles in the fridge. This keeps them cool and fresh. Wrap them in plastic wrap or place them in an airtight container. This way, they won't dry out. If you leave them at room temperature, they may get too soft. For best taste, eat them within a week.
Freezing Truffles
To freeze your truffles, start by placing them on a baking sheet. Make sure they don’t touch each other. Freeze them for about two hours. Once they are firm, transfer them to a freezer bag. Remove as much air as possible. They can stay fresh for up to three months.
To thaw, simply take them out and let them sit at room temperature for about 30 minutes. They will taste just as good as fresh!
FAQs
Can you use other cookie types for truffles?
Yes, you can use other cookies! Chocolate cookies work well, like chocolate wafers. Vanilla Oreos give a different taste but still taste great. Try peanut butter cookies for a fun twist. Just ensure the cookies are crunchy for the right texture.
How long do Chocolate Mint Oreo Truffles last?
Chocolate Mint Oreo Truffles last about one week in the fridge. Keep them in an airtight container. If you freeze them, they can last up to three months. Just thaw them in the fridge before serving.
What if I don’t have mint chocolate chips?
You can use regular chocolate chips instead. Mix in a bit of peppermint extract for that minty flavor. Dark chocolate or white chocolate chips are also good options. Adjust the amount of peppermint extract to your taste.
You now have all the steps to make delicious Mint Oreo Truffles. Start by gathering your tasty ingredients, crush the Oreos, and mix them with cream cheese. Shape, chill, and coat your truffles for that perfect bite. Remember, there are endless ways to customize these treats to fit your taste. Whether you are using different cookies or various toppings, the possibilities are fun! Enjoy sharing these flavorful goodies with friends and family, or keep them all for yourself. Happy truffle-making!


