
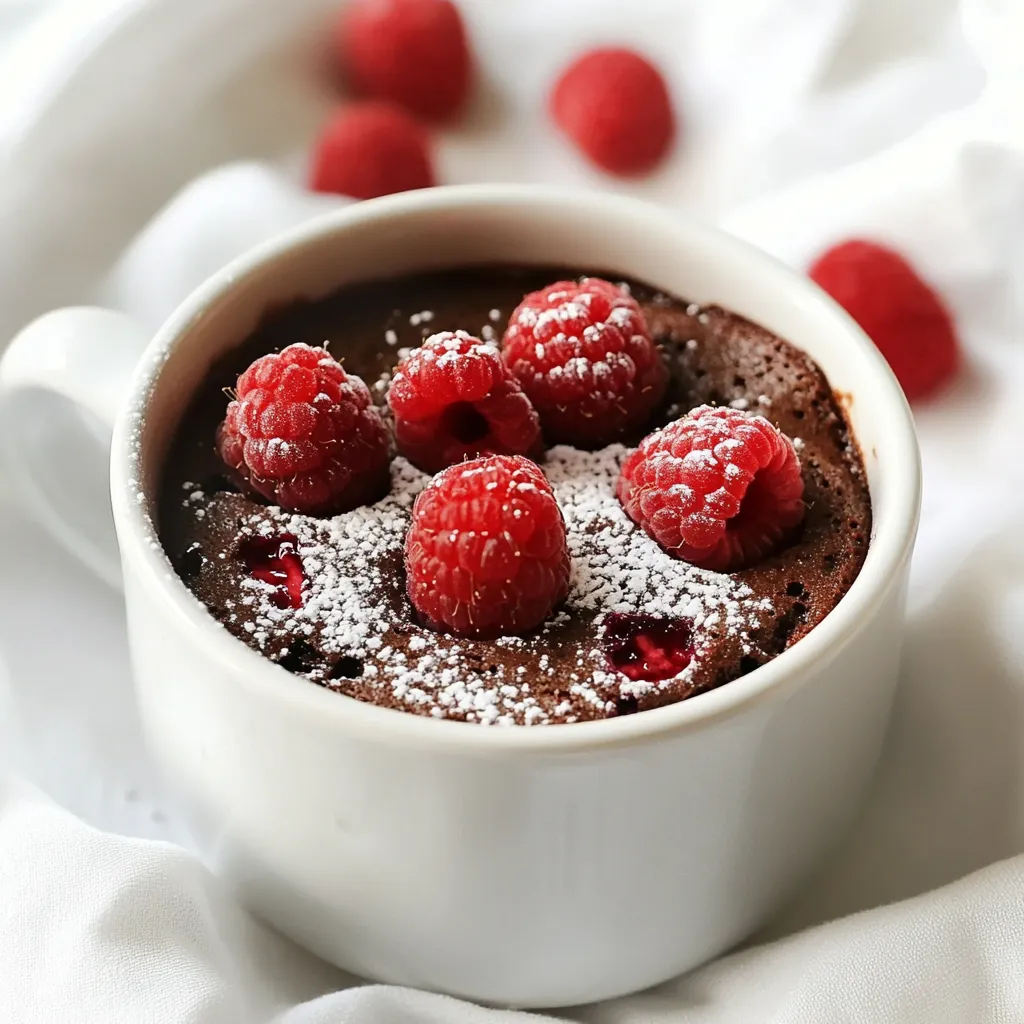
Craving a sweet treat that’s quick and easy? You’re in the right place! My Chocolate Raspberry Mug Cake is a delightful dessert that’s made in minutes. With rich chocolate and tangy raspberries, this mug cake satisfies your sweet tooth without complicated steps. I’ll guide you through simple ingredients and easy instructions, so you can enjoy this tasty treat anytime. Let’s dive in and whip up this delicious dessert together!
Why I Love This Recipe
- Quick and Easy: This mug cake takes just 5 minutes to prepare and cook, making it a perfect last-minute dessert.
- Gooey Goodness: The combination of rich chocolate and fresh raspberries creates a decadent treat that melts in your mouth.
- Single Serving: Designed for one, this recipe is perfect for satisfying a sweet craving without making a whole cake.
- Customizable: You can easily swap out the raspberries for other fruits or add chocolate chips for an extra indulgence!
Ingredients
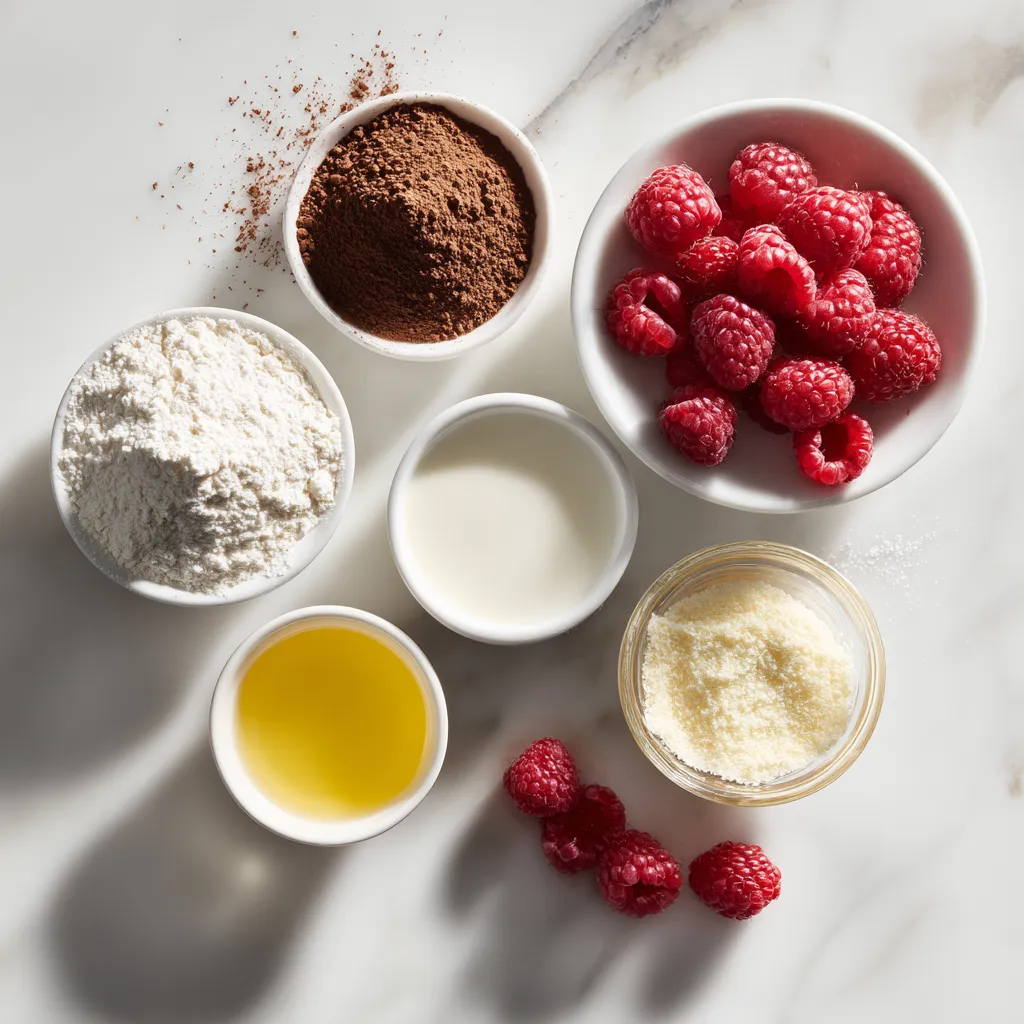
List of Ingredients for Chocolate Raspberry Mug Cake
– 4 tablespoons all-purpose flour
– 4 tablespoons granulated sugar
– 2 tablespoons unsweetened cocoa powder
– 1/8 teaspoon baking powder
– 1/8 teaspoon salt
– 3 tablespoons milk (or any plant-based alternative)
– 2 tablespoons vegetable oil
– 1/4 teaspoon vanilla extract
– 2 tablespoons fresh raspberries (plus extra for garnish)
Measurements for Each Ingredient
Each ingredient plays a key role in the flavor and texture of your mug cake. Here’s a simple breakdown:
– Flour: 4 tablespoons give the cake structure.
– Sugar: 4 tablespoons add sweetness and moisture.
– Cocoa powder: 2 tablespoons bring rich chocolate flavor.
– Baking powder: A pinch helps the cake rise.
– Salt: 1/8 teaspoon enhances all the flavors.
– Milk: 3 tablespoons keep the batter smooth.
– Vegetable oil: 2 tablespoons add moisture and richness.
– Vanilla extract: 1/4 teaspoon adds warmth and depth.
– Raspberries: 2 tablespoons give a fresh, fruity burst.
Options for Ingredient Substitutions
You can swap some ingredients based on your taste or needs:
– Flour: Use whole wheat or gluten-free flour.
– Sugar: Substitute with honey or maple syrup for a different sweetness.
– Cocoa powder: Carob powder can work for a unique twist.
– Milk: Almond, soy, or oat milk are great plant-based options.
– Vegetable oil: Melted coconut oil brings a nice flavor.
– Vanilla extract: Almond extract can give a fun change.
– Raspberries: Try blueberries or strawberries if you prefer.
Feel free to mix and match these options! With these ingredients and substitutions, you can create a delightful Chocolate Raspberry Mug Cake that suits your taste.
Step-by-Step Instructions
Preparation of the Mug Cake
Start by gathering your ingredients. You need flour, sugar, cocoa powder, baking powder, salt, milk, vegetable oil, vanilla, and raspberries.
1. Mix the Dry Ingredients: In a microwave-safe mug, add 4 tablespoons of all-purpose flour, 4 tablespoons of granulated sugar, 2 tablespoons of unsweetened cocoa powder, 1/8 teaspoon of baking powder, and 1/8 teaspoon of salt. Use a whisk to mix them well.
2. Add Wet Ingredients: Pour in 3 tablespoons of milk, 2 tablespoons of vegetable oil, and 1/4 teaspoon of vanilla extract. Stir until the mix is smooth. Make sure there are no dry spots left.
3. Fold in the Raspberries: Take 2 tablespoons of fresh raspberries and gently fold them into the batter. Be careful not to crush them too much.
Microwave Cooking Instructions
Now it’s time to cook your mug cake.
1. Microwave the Mug: Place the mug in the microwave. Cook on high for 1 minute and 30 seconds. Each microwave is different, so watch it closely.
2. Check for Doneness: After 1 minute, check the cake. It should look slightly moist on top but not wet. If it needs more time, microwave in 10-second bursts until done.
Tips for Checking Doneness
Checking doneness is key to a great mug cake.
– Visual Check: The top should look set but not too dry. It can have a bit of shine.
– Toothpick Test: If you want, you can use a toothpick. Insert it into the center. It should come out clean or with a few moist crumbs.
– Cooling Time: Let the mug cake cool for a couple of minutes before enjoying. This helps the flavors settle and makes it easier to eat.
Enjoy your simple yet delicious Chocolate Raspberry Mug Cake!
Tips & Tricks
Best Practices for Mug Cake Success
To make a perfect Chocolate Raspberry Mug Cake, follow these tips:
– Use a large mug. A 12 oz mug works best.
– Whisk dry ingredients well. This ensures even mixing.
– Stir in wet ingredients slowly. This helps avoid lumps.
– Gently fold in raspberries. You want them whole for texture.
Avoiding Common Mistakes
Here are some common mistakes and how to avoid them:
– Overmixing the batter can make the cake tough. Mix just until blended.
– Cooking too long can dry out the cake. Start checking at 1 minute.
– Not using a microwave-safe mug can be dangerous. Always check the label.
Enhancing Flavor and Texture
Want to make your mug cake even better? Here are some ideas:
– Add a pinch of cinnamon for warmth.
– Try using dark chocolate cocoa powder for a richer taste.
– Top with whipped cream or ice cream for a treat.
– Include nuts or chocolate chips for extra crunch or sweetness.
These tips will help you create a delightful mug cake experience!
Pro Tips
- Use a Larger Mug: To prevent overflow while microwaving, choose a mug that holds at least 12 oz.
- Don’t Overmix: Stir the batter just until combined; overmixing can make the cake dense.
- Customize Your Flavor: Experiment with different extracts like almond or orange to add a unique twist.
- Check for Doneness: Microwaves vary in power, so start checking at 1 minute and adjust time as needed.
Variations
Different Flavor Combinations
You can have fun with flavors in your mug cake. Try adding peanut butter for a nutty taste. Swapping the raspberries for strawberries gives a fresh twist. You can even use mint extract instead of vanilla for a cool flavor. How about adding a sprinkle of cinnamon for warmth? Each twist brings a new cake to life.
Healthier Alternatives and Modifications
Want a lighter version? Use whole wheat flour instead of all-purpose flour. You can replace sugar with honey or maple syrup. This change makes the cake less sweet but still tasty. For a vegan option, swap milk with almond or oat milk. This keeps it dairy-free and just as delicious.
Toppings and Garnishing Ideas
Toppings can make your mug cake even better. A scoop of ice cream on top adds creaminess. Whipped cream is another fun option. You might sprinkle chocolate chips for extra sweetness. Fresh mint leaves can add a pop of color. Don’t forget to add more fresh raspberries for that burst of flavor!
Storage Info
How to Store Leftover Mug Cake
To store leftover mug cake, let it cool completely. Place it in a clean, airtight container. This keeps the cake fresh and moist. You can store it in the fridge for up to three days. If you want to keep it longer, freeze it. Wrap it tightly in plastic wrap before putting it in a freezer-safe bag.
Reheating Instructions
When you want to enjoy your mug cake again, use the microwave. Take the cake out of the container and place it in a microwave-safe dish. Heat it for about 15-30 seconds. Check to see if it’s warm but not too hot. You want it soft, not dry.
Recommended Storage Containers
Use glass or plastic containers with tight lids for storage. These keep moisture in and air out. For freezing, use freezer-safe bags or containers. Make sure to label them with the date. This way, you will know how fresh they are when you want a sweet treat.
FAQs
Can I make this mug cake without eggs?
Yes, you can easily make this mug cake without eggs. You can use 1/4 cup of unsweetened applesauce or 1 tablespoon of ground flaxseed mixed with 2.5 tablespoons of water. Both options work well and keep the cake moist.
How can I make this recipe dairy-free?
To make this mug cake dairy-free, simply swap the milk for a plant-based milk. Almond milk, oat milk, or soy milk are great options. They all add flavor without dairy.
What is the best microwave time for different wattages?
Microwave times can change based on the wattage of your microwave. For a 700-watt microwave, cook for 1 minute and 30 seconds. For a 1000-watt microwave, check at 1 minute. If it needs more time, add 10 seconds at a time until done. The cake should look moist on top but not wet.
This blog post covered how to make a tasty chocolate raspberry mug cake. We explored the key ingredients and their measurements, plus smart substitutions. I shared easy step-by-step instructions for quick prep and cooking. You learned tips to avoid common mistakes and enhance the cake’s taste. We also discussed fun variations, storage tips, and frequently asked questions to guide you.
Now, go ahead and enjoy your delicious mug cake. With these tips, you’ll impress everyone with your baking skills. Happy cookin


