Cinnamon Snickerdoodle Blondies Scrumptious Easy Treat

If you crave a sweet treat that’s easy to make and delicious, you’re in the right place! Cinnamon Snickerdoodle Blondies combine warm cinnamon and soft, chewy texture for a delightful dessert that everyone will love. I’ll guide you through simple steps and helpful tips to create these yummy blondies in no time. Get ready to impress your friends and family with a dessert they’ll keep asking for!
Why I Love This Recipe
- Easy to Make: These blondies come together quickly with simple ingredients, perfect for a last-minute treat.
- Delicious Flavor: The combination of cinnamon and brown sugar creates a warm, comforting flavor that everyone loves.
- Perfect Texture: These blondies are soft and chewy, with a slightly crispy topping that adds the perfect contrast.
- Great for Sharing: With 24 servings, they are ideal for parties, gatherings, or just sharing with family and friends!
Ingredients
To make these delicious cinnamon snickerdoodle blondies, gather these key ingredients. Each one plays an important role in creating the perfect treat.
- 1 cup unsalted butter, melted
- 1 ½ cups brown sugar, packed
- 2 large eggs
- 1 teaspoon vanilla extract
- 2 cups all-purpose flour
- 1 teaspoon baking powder
- 1 teaspoon ground cinnamon
- ½ teaspoon salt
- ¼ teaspoon baking soda
For the cinnamon sugar topping, you will need:
- 2 tablespoons granulated sugar
- 1 teaspoon ground cinnamon
These ingredients come together to create a rich, sweet, and cinnamon-spiced blondie. The melted butter adds a nice richness, while the brown sugar gives moisture and a hint of caramel flavor. Using eggs helps bind everything, making the blondies chewy.
The flour and baking powder lift the blondies, keeping them light. Ground cinnamon is essential for that warm, cozy taste we love in snickerdoodles. Salt and baking soda balance the sweetness, making every bite delightful.
Don’t forget the cinnamon sugar topping! It adds a sweet crunch that elevates the overall flavor. With these ingredients, you are on your way to creating a treat that everyone will enjoy!

Step-by-Step Instructions
Preparation Steps
1. Preheating the oven: Start by preheating your oven to 350°F (175°C). This step helps the blondies bake evenly.
2. Mixing wet ingredients: In a large bowl, mix 1 cup of melted unsalted butter and 1 ½ cups of packed brown sugar. Whisk until it is smooth and creamy. Then, add 2 large eggs one at a time. Stir in 1 teaspoon of vanilla extract for extra flavor.
3. Combining dry ingredients: In another bowl, whisk together 2 cups of all-purpose flour, 1 teaspoon of baking powder, 1 teaspoon of ground cinnamon, ½ teaspoon of salt, and ¼ teaspoon of baking soda. This mix gives your blondies structure and taste.
4. Pouring and spreading the batter: Gradually add the dry mix to the wet mix. Stir until just combined. Pour the batter into a greased 9×13 inch baking dish and spread it evenly.
Baking Process
1. Adding the cinnamon sugar topping: In a small bowl, mix 2 tablespoons of granulated sugar with 1 teaspoon of ground cinnamon. Sprinkle this mixture evenly over the blondie batter for a sweet, spiced crust.
2. Baking time and temperature: Place the baking dish in your preheated oven. Bake for 20-25 minutes. The edges should turn golden brown.
3. Checking for doneness: Use a toothpick to check if the blondies are done. Insert it in the center. If it comes out clean or with a few moist crumbs, they are ready.
Cooling and Serving
1. Cooling instructions: Once baked, take the blondies out of the oven. Let them cool in the pan for about 10 minutes. This helps them set up nicely.
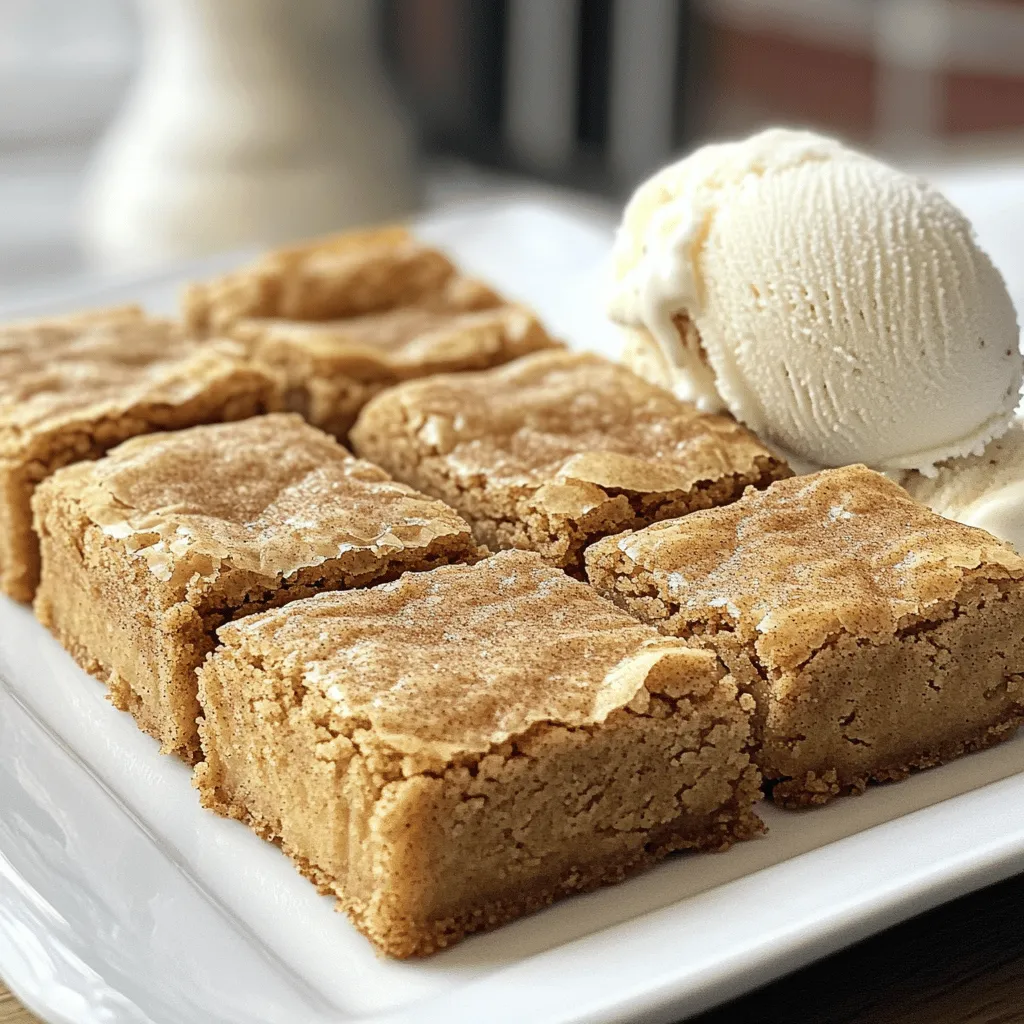
2. Cutting and presenting the blondies: Transfer the blondies to a wire rack to cool completely. Once cooled, cut them into squares. Serve them on a stylish platter, and you can add a light sprinkle of cinnamon sugar on top for an extra touch. Pair them with vanilla ice cream for a special treat.
Pro Tips
- Use Room Temperature Ingredients: Ensure your eggs are at room temperature for better incorporation into the batter, which leads to a more uniform texture.
- Don’t Overmix the Batter: Mix until just combined to keep the blondies chewy and prevent them from becoming tough.
- Check for Doneness: Start checking the blondies at the 20-minute mark to prevent overbaking; they should be golden around the edges but still soft in the center.
- Storage Tips: Store the blondies in an airtight container at room temperature for up to a week, or freeze them for longer storage.
Tips & Tricks
Baking Tips
- Ensuring even baking: To bake evenly, always preheat your oven to 350°F (175°C). Use the center rack for the best heat flow. Make sure the batter is spread evenly in the pan.
- How to test for doneness: To check if your blondies are done, insert a toothpick in the center. If it comes out clean or with a few moist crumbs, they are ready. If it’s wet with batter, bake a few more minutes.
- Troubleshooting common issues: If your blondies are too dry, next time try not to overmix the batter. Overmixing can make them tough. If they spread too much, ensure your butter is not too hot when mixing in the sugar.
Presentation Tips
- Creative serving ideas: For a fun touch, cut the blondies into fun shapes. Dust them lightly with cinnamon sugar before serving. Arrange them on a colorful platter for a festive look.
- Pairing suggestions: These blondies are tasty with a scoop of vanilla ice cream. The cold ice cream pairs well with the warm, soft texture of the blondies. You can also serve them with whipped cream for extra joy.

Variations
Flavor Variations
You can easily change the flavor of your Cinnamon Snickerdoodle Blondies. One great option is to add nuts or chocolate chips. Walnuts or pecans add a nice crunch. You can also try dark chocolate or white chocolate chips for a sweet twist. These add fun textures and flavors.
You can also explore different spices. Try nutmeg or cardamom for a unique touch. A little ginger can add warmth too. Just remember to keep the cinnamon as the star of the show.
Dietary Substitutions
If you need gluten-free options, replace the all-purpose flour with a gluten-free blend. Look for one that has xanthan gum for the best results. This way, you can still enjoy these blondies without the gluten.
For vegan modifications, swap the eggs with flaxseed meal or applesauce. Use plant-based butter instead of regular butter. Also, choose a vegan vanilla extract. These swaps keep the blondies tasty and friendly for a vegan diet.
Storage Info
Storing Blondies
To keep your cinnamon snickerdoodle blondies fresh, store them in an airtight container. This will help prevent them from drying out. You can keep them at room temperature for up to four days. If you want to keep them longer, the fridge is a good option. Just make sure to wrap them well to avoid any moisture loss.
For the best storage, use a container that fits the size of your blondies. A glass or plastic container works well. If you stack them, separate layers with parchment paper. This keeps them from sticking together.
Freezing Guidelines
If you want your blondies to last even longer, freezing is a great choice. To freeze, cut them into squares and place them in a single layer on a baking sheet. Freeze for about an hour. After that, transfer them to a freezer-safe bag or container. This helps keep them fresh and easy to grab later.
When you want to enjoy them, take out the desired amount. Let them thaw in the fridge overnight or at room temperature for a couple of hours. You can also warm them in the microwave for a few seconds for a fresh-out-of-the-oven taste.
FAQs
Common Questions
How can I make my blondies chewier?
To make your blondies chewier, use more brown sugar and less white sugar. Brown sugar adds moisture and a soft texture. You can also bake them for a shorter time. This keeps the center soft and chewy.
Can I double the recipe?
Yes, you can double the recipe! Just use a larger baking dish. A 12×18 inch pan works well. Keep an eye on the baking time, as it may change when you double the batch.
What’s the difference between brownies and blondies?
Brownies are chocolate-based, while blondies are vanilla-based. Blondies have a rich, buttery flavor. They often include brown sugar, which gives them a unique taste.
Troubleshooting FAQs
Why did my blondies turn out dry?
Dry blondies often come from overbaking. Make sure to check them a few minutes early. Another reason could be using too much flour. Make sure to measure accurately.
How can I enhance the cinnamon flavor?
To enhance the cinnamon flavor, add more ground cinnamon to the batter. You can also use cinnamon sticks in your sugar topping. This boosts the flavor and aroma.
Can I add mix-ins to the batter?
Yes, mix-ins are great! You can add chocolate chips, nuts, or even dried fruit. Just fold them in gently after mixing the batter. Be sure not to add too many, or it may affect the texture.
In this article, we explored key ingredients for blondies, step-by-step instructions, and helpful tips. You learned how to bake, cool, and serve these treats. Variations can suit your taste, while storage tips ensure they stay fresh.
Remember, baking is an art, and practice makes perfect. Feel free to experiment with flavors and textures. Enjoy your baking journey, and delight your friends and family with your delicious blondies!

Cinnamon Snickerdoodle Blondies
Ingredients
1 cup unsalted butter, melted
1 ½ cups brown sugar, packed
2 large eggs
1 teaspoon vanilla extract
2 cups all-purpose flour
1 teaspoon baking powder
1 teaspoon ground cinnamon
½ teaspoon salt
¼ teaspoon baking soda
For the Cinnamon Sugar Topping:
2 tablespoons granulated sugar
1 teaspoon ground cinnamon
Instructions
Preheat your oven to 350°F (175°C). Grease a 9×13 inch baking dish or line it with parchment paper for easy removal.
In a large mixing bowl, combine the melted butter and brown sugar, whisking until smooth and creamy.
Add the eggs, one at a time, whisking well after each addition. Stir in the vanilla extract.
In another bowl, whisk together the flour, baking powder, ground cinnamon, salt, and baking soda. Gradually add the dry ingredients to the wet mixture, stirring until just combined.
Pour the batter into the prepared baking dish and spread it evenly with a spatula.
In a small bowl, mix the granulated sugar and ground cinnamon for the topping. Sprinkle the cinnamon sugar evenly over the blondie batter.
Bake in the preheated oven for 20-25 minutes, or until the edges are golden brown and a toothpick inserted into the center comes out clean or with a few moist crumbs.
Once baked, remove from the oven and allow to cool in the pan for about 10 minutes before transferring to a wire rack to cool completely.
Once cooled, cut into squares and serve.
Prep Time: 10 minutes | Total Time: 35 minutes | Servings: 24
– Presentation Tips: Serve the blondies on a stylish platter, dusted with a light sprinkle of cinnamon sugar for an extra touch. Pair with a scoop of vanilla ice cream for a delightful dessert experience!

Cinnamon Snickerdoodle Blondies
Ingredients
- 1 cup unsalted butter, melted
- 1.5 cups brown sugar, packed
- 2 large eggs
- 1 teaspoon vanilla extract
- 2 cups all-purpose flour
- 1 teaspoon baking powder
- 1 teaspoon ground cinnamon
- 0.5 teaspoon salt
- 0.25 teaspoon baking soda
- 2 tablespoons granulated sugar
- 1 teaspoon ground cinnamon
Instructions
- Preheat your oven to 350°F (175°C). Grease a 9x13 inch baking dish or line it with parchment paper for easy removal.
- In a large mixing bowl, combine the melted butter and brown sugar, whisking until smooth and creamy.
- Add the eggs, one at a time, whisking well after each addition. Stir in the vanilla extract.
- In another bowl, whisk together the flour, baking powder, ground cinnamon, salt, and baking soda. Gradually add the dry ingredients to the wet mixture, stirring until just combined.
- Pour the batter into the prepared baking dish and spread it evenly with a spatula.
- In a small bowl, mix the granulated sugar and ground cinnamon for the topping. Sprinkle the cinnamon sugar evenly over the blondie batter.
- Bake in the preheated oven for 20-25 minutes, or until the edges are golden brown and a toothpick inserted into the center comes out clean or with a few moist crumbs.
- Once baked, remove from the oven and allow to cool in the pan for about 10 minutes before transferring to a wire rack to cool completely.
- Once cooled, cut into squares and serve.


![To make these delightful cinnamon apple muffins, you need the following ingredients: - 2 cups all-purpose flour - 1 teaspoon baking soda - 1 teaspoon baking powder - 1 teaspoon ground cinnamon - 1/2 teaspoon salt - 1/2 cup unsalted butter, softened - 1 cup packed brown sugar - 2 large eggs - 1 teaspoon vanilla extract - 1 cup buttermilk - 2 apples, peeled, cored, and diced (preferably Granny Smith for tartness) - 1/2 cup chopped walnuts (optional) - Extra cinnamon sugar for topping (1 tablespoon sugar mixed with 1/2 teaspoon cinnamon) The right mix of these ingredients creates a warm, inviting flavor. I love how the sweet apples and warm cinnamon blend. The buttermilk adds moisture, making the muffins soft and fluffy. You can also add walnuts for a nice crunch, but they are optional. This simple list allows you to bake a batch that brings joy to any kitchen. Follow the [Full Recipe] for step-by-step instructions. - Preheat your oven to 350°F (175°C). - Line a muffin tin with paper liners or grease it well. - In a medium bowl, whisk together the flour, baking soda, baking powder, ground cinnamon, and salt. - In a large mixing bowl, cream softened butter and brown sugar until light and fluffy. - Add eggs one at a time, mixing well after each. Stir in the vanilla extract. - Gradually mix in the dry ingredients and buttermilk. Alternate adding each, starting and ending with dry ingredients. - Fold diced apples and walnuts into the batter. - Spoon the batter into the muffin tin, filling each cup about three-quarters full. - Sprinkle the tops with cinnamon sugar for added crunch and sweetness. - Bake for 18-22 minutes, or until a toothpick comes out clean. This simple method leads to tasty cinnamon apple muffins. For the full recipe, refer to the section above. Enjoy the warm, fluffy bites of joy! - Make sure all your ingredients are at room temperature. This helps them mix better. - Use a toothpick to check for doneness. Insert it in the center; it should come out clean. - Serve your muffins warm with a pat of butter. This adds richness and flavor. - You can also dust them with powdered sugar for a sweet touch. - For a cozy display, place them on a rustic wooden board. It looks inviting! - To achieve a moist muffin, do not overmix the batter. Mix just until combined. - Avoid dense muffins by measuring flour correctly. Too much flour can weigh them down. - Use a light hand when folding in the apples. This keeps the air in the batter. These tips will help you bake delicious cinnamon apple muffins every time! For a full recipe, check the earlier section. {{image_2}} You can switch things up by using different fruits. Instead of apples, try pears or berries. Both options bring a fresh taste to your muffins. If you love dried fruits, add cranberries to the mix. They add a nice chew and burst of flavor. If you want gluten-free muffins, use almond or oat flour instead of regular flour. Both options work well and keep the muffins soft. For those who prefer vegan options, replace eggs with flax eggs and use plant-based milk. These changes make the recipe accessible for everyone. To add more depth, mix in spices like nutmeg or ginger. They pair well with cinnamon and give your muffins a warm flavor. You can also swirl in caramel or chocolate chips for a sweet surprise. These little changes can take your muffins to a whole new level. Check out the Full Recipe for all the details on making these delightful treats! To keep your muffins fresh, store them at room temperature. Place them in an airtight container. This helps retain moisture. If you don't have a container, wrap them tightly in plastic wrap. They will stay soft for about three days. Be sure to keep them away from direct sunlight and heat. For longer storage, freeze your muffins. Allow them to cool completely first. Place them in a freezer-safe bag or container. Remove as much air as possible to prevent freezer burn. They can last up to three months in the freezer. When you want to enjoy one, reheat it for the best texture. You can microwave it for about 20-30 seconds. If you prefer the oven, bake at 350°F (175°C) for about 10 minutes. This keeps the muffins soft and fluffy. For the full recipe, check out the previous section. To make your muffins rise higher, focus on the batter's consistency. Use the right amount of flour. If your batter is too thick, add a touch more liquid. Air pockets help muffins rise, so mix gently but well. Also, make sure your oven is preheated to 350°F (175°C). An oven that is too cool can lead to flat muffins. Yes, you can use different apples. Granny Smith apples are tart and work well. Honeycrisp apples add a nice sweetness and crunch. Fuji apples are also great for a sweeter taste. Try to pick apples that are firm and fresh for the best results. Muffins usually last about 2-3 days at room temperature. Store them in an airtight container. If you want them to last longer, freeze them. In the freezer, they can last up to three months. Just make sure to wrap them well to prevent freezer burn. You can replace buttermilk with milk and vinegar. Just mix 1 cup of milk with 1 tablespoon of vinegar. Let it sit for a few minutes to thicken. Another option is to use yogurt or sour cream. These will also give your muffins a nice texture. For the full recipe, check out the [Full Recipe]. In this blog post, we covered how to make delicious apple muffins step by step, from gathering ingredients to baking tips. We also explored fun variations and smart storage methods. Remember, the right techniques make all the difference in your baking. Whether you stick to the classic recipe or try new flavors, these muffins will delight everyone. Enjoy the process, share them with friends, and savor each bite. Happy baking!](https://dailydishlab.com/wp-content/uploads/2025/06/22877687-0dd6-40e4-bb31-9a2a429db395-768x768.webp)

![To make No Bake Pumpkin Spice Cookie Dough Bites, gather the following ingredients. Each one plays a key role in flavor and texture. - 1 cup almond flour - 1/2 cup rolled oats - 1/2 cup pumpkin puree - 1/4 cup maple syrup - 1/4 cup almond butter - 1 tsp vanilla extract - 1 tsp pumpkin spice - 1/2 tsp cinnamon - A pinch of salt - 1/4 cup dark chocolate chips 1. Almond flour: This nut-based flour adds a rich taste and soft texture. 2. Rolled oats: They give the bites a nice chew and help bind the mixture. 3. Pumpkin puree: This provides moisture and a warm, cozy flavor. 4. Maple syrup: It acts as a natural sweetener and adds depth to the taste. 5. Almond butter: This creamy ingredient helps hold everything together. 6. Vanilla extract: A splash of this brightens the flavors in the bites. 7. Pumpkin spice: This blend of spices brings fall warmth to each bite. 8. Cinnamon: It adds a sweet aroma and enhances the pumpkin flavor. 9. Salt: Just a pinch balances the sweetness and lifts the flavors. 10. Dark chocolate chips: These bits of chocolate create delightful bursts of sweetness. These ingredients work together to create a tasty treat. If you want the full experience, check out the Full Recipe for more details. First, gather your ingredients. You will need almond flour, rolled oats, pumpkin puree, maple syrup, almond butter, vanilla extract, pumpkin spice, cinnamon, salt, and dark chocolate chips. 1. In a large mixing bowl, mix the almond flour, rolled oats, pumpkin spice, cinnamon, and salt. Stir well until all the dry ingredients blend together nicely. 2. In another bowl, whisk together the pumpkin puree, maple syrup, almond butter, and vanilla extract. Keep whisking until the mixture is smooth and blended. 3. Pour the wet mixture into the bowl with the dry ingredients. Mix thoroughly. You want to form a dough that holds together well. Now it's time to shape the dough. Use your hands to roll the mixture into small balls. Each ball should be about 1 inch in diameter. Place them on a baking sheet lined with parchment paper. This step makes it easy to chill the bites later. To set the bites, refrigerate them for at least 30 minutes. This chilling time helps them firm up nicely. When you’re ready to serve, enjoy them cold. If you prefer, let them sit out for a few minutes. This makes them easier to eat. You can also serve them as a fun snack or dessert for friends and family. For the full recipe, check out the details above! To get the right texture in your No Bake Pumpkin Spice Cookie Dough Bites, I suggest adjusting the ingredient ratios. For a softer bite, add more pumpkin puree. If you prefer a firmer texture, increase the almond flour. You can also try different sweeteners. Maple syrup adds a nice taste, but agave or honey works too. Just keep the ratios similar for the best results. Want to change it up? You can easily customize the flavor. Try adding nuts or dried fruits. Chopped walnuts or pecans add crunch. Dried cranberries or raisins bring a sweet twist. Just mix them in when you combine the wet and dry ingredients. Prepping ingredients in advance saves time. Measure out the almond flour and oats the night before. You can even mix the dry ingredients early. This way, when you're ready to make the bites, everything is ready to go. It makes the process fast and easy! For the full recipe, check out the details and enjoy making these tasty treats. {{image_2}} You can easily make No Bake Pumpkin Spice Cookie Dough Bites vegan and dairy-free. Use almond butter and maple syrup, just like in the original recipe. Almond flour and rolled oats are already plant-based. You can also swap dark chocolate chips for dairy-free ones. This way, everyone can enjoy them! Want to mix things up? Try adding different spices. Nutmeg is a great choice. It pairs well with pumpkin and gives a warm flavor. You can also add a dash of ginger for some extra warmth. These small changes can make a big difference! How you serve these bites can be fun! You can roll them in crushed nuts or coconut for a crunchy coat. Drizzle some melted dark chocolate on top for a fancy touch. You could also sprinkle a bit of cinnamon for extra flair. These ideas make your bites look as good as they taste. For the complete recipe, check the [Full Recipe]. To keep No Bake Pumpkin Spice Cookie Dough Bites fresh, store them in the fridge. Use an airtight container to prevent them from drying out. Make sure to separate layers with parchment paper. This keeps them from sticking together. They will stay fresh for a longer time when stored properly. If you want to keep these bites longer, freezing is a great option. To freeze, place the cookie dough bites on a baking sheet. Make sure they are not touching each other. Freeze them for about an hour until firm. Then, transfer them to a freezer-safe bag or container. Label the container with the date and flavor. They can last up to three months in the freezer. When stored in the fridge, these bites last about a week. If you freeze them, they can last up to three months. You can enjoy these treats whenever you crave a sweet snack! Just let them thaw in the fridge or at room temperature before eating. For the full recipe, check out the previous sections. Store your cookie dough bites in an airtight container. Keep them in the fridge for up to one week. If you want them to last longer, you can freeze them. Just make sure to separate them with parchment paper. This will help prevent sticking. Yes, you can use other flours. Oat flour or coconut flour are great options. Just know that they may change the texture a bit. If you use coconut flour, reduce the amount to about 1/3 cup. It absorbs more moisture than almond flour. To make sugar-free bites, swap maple syrup for a sugar-free sweetener. Options like stevia or erythritol can work well. Adjust the amount based on your taste. You might need to add a little more pumpkin puree for moisture. For extra flavor, consider adding a dash of vanilla extract. For the full recipe, check out the No Bake Pumpkin Spice Cookie Dough Bites section. These no-bake pumpkin spice cookie dough bites are fun to make and tasty. You learned about the key ingredients, step-by-step instructions, and how to tailor the flavors. We also covered tips for perfect texture and storage. Feel free to mix in your favorite nuts or fruits for a personal touch. Remember, these bites are great for sharing or enjoying on your own. Experiment, have fun, and enjoy every bite of your creation!](https://dailydishlab.com/wp-content/uploads/2025/07/e6c47970-ab6c-4140-bac8-89f339878891-768x768.webp)
