Classic Chicken Caesar Wraps Simple and Tasty Meal

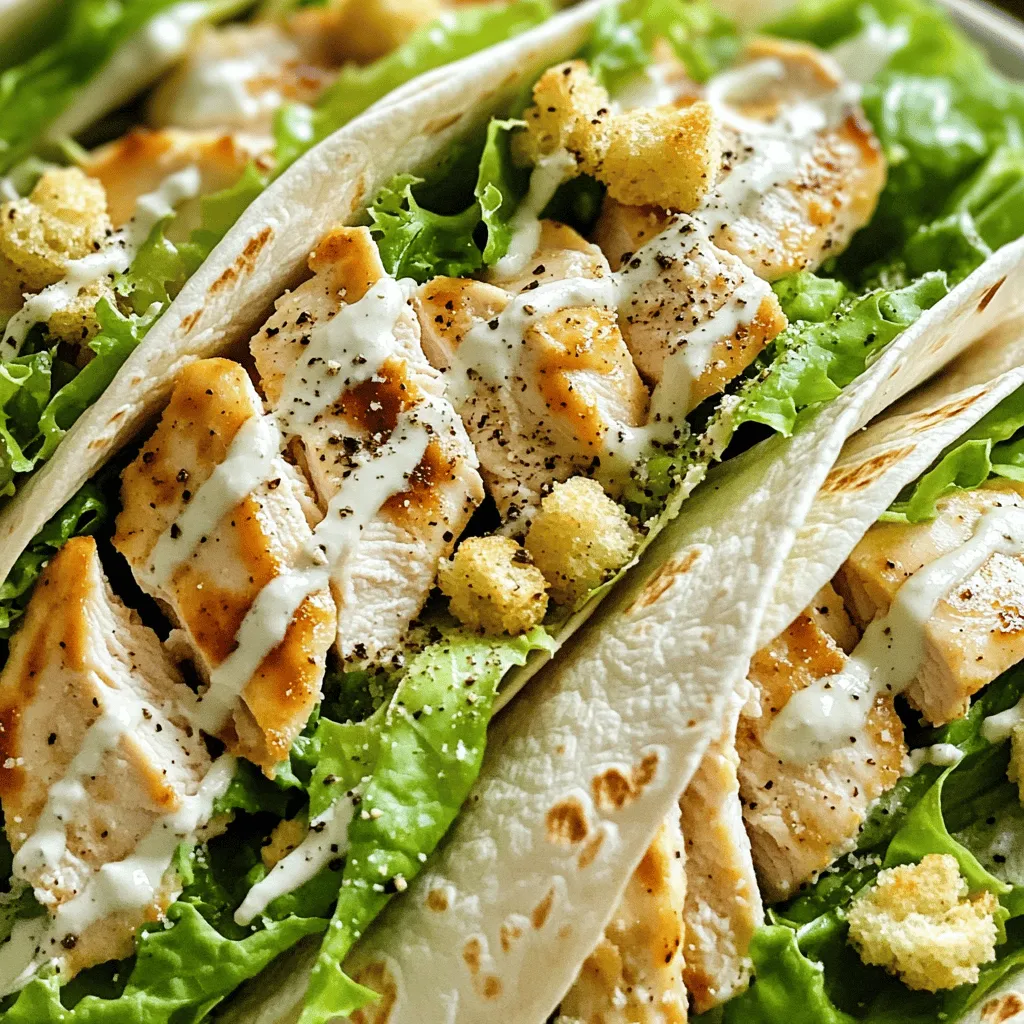
Craving a quick meal that’s both tasty and simple? Look no further than Classic Chicken Caesar Wraps! These wraps blend juicy chicken, fresh greens, and creamy dressing, all wrapped in a toasted tortilla. Perfect for lunch or dinner, they pack flavor and nutrition into a handheld delight. In this guide, I’ll show you how to make these wraps step-by-step. Let’s dive into this delicious, easy recipe!
Why I Love This Recipe
- Quick and Easy: This recipe takes only 30 minutes, making it perfect for busy weeknights or a quick lunch.
- Flavorful Combination: The mix of tender chicken, crunchy romaine, and creamy Caesar dressing creates a deliciously satisfying meal.
- Customizable: You can easily add other ingredients like avocado, tomatoes, or even swap the dressing to suit your taste.
- Great for Meal Prep: These wraps can be made ahead of time, making them a convenient option for lunches or picnics.
Ingredients
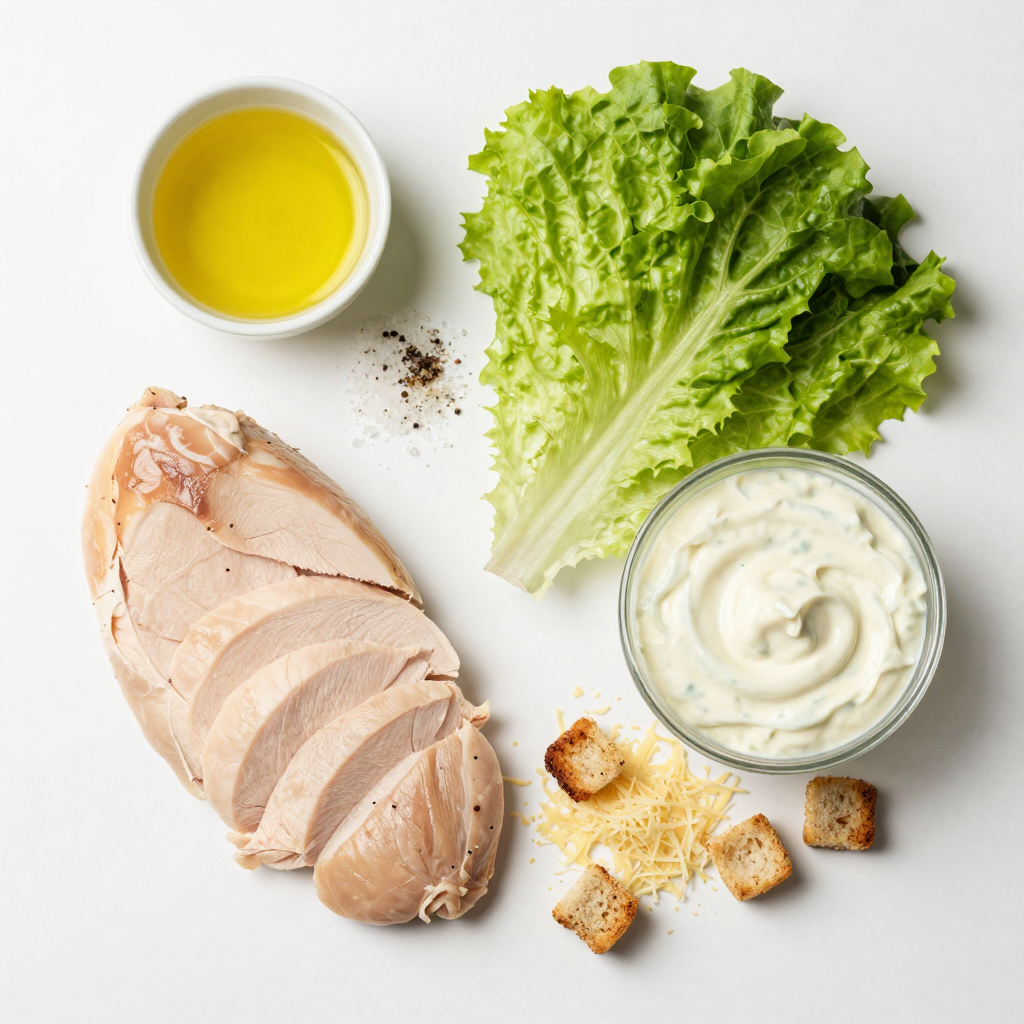
Main Ingredients for Classic Chicken Caesar Wraps
Chicken Preparation
For your Classic Chicken Caesar Wraps, you need two boneless, skinless chicken breasts. Start by heating a skillet over medium heat. Add one tablespoon of olive oil to the pan. Season the chicken with salt, pepper, and one teaspoon of garlic powder. Cook the chicken for about six to seven minutes per side until it’s no longer pink. Let it cool, then slice it into thin strips.
Tortilla and Dressing Choices
You will need four large tortillas or wraps to make this dish. Choose your favorite type, whether it’s whole wheat, spinach, or classic flour. For the dressing, half a cup of Caesar dressing adds flavor and creaminess to the wrap. You can buy this pre-made or make your own for extra freshness.
Optional Add-ins for Extra Crunch
For a fun crunch, consider adding crushed croutons. About one-third of a cup will do the trick. They add texture and flavor. Feel free to mix in some chopped veggies, too, for added nutrition and color.

Step-by-Step Instructions
Cooking the Chicken
1. Preheating the Skillet: Start by heating a skillet over medium heat. Add a tablespoon of olive oil to the pan. This helps the chicken cook evenly and adds flavor.
2. Seasoning Tips: Take the chicken breasts and sprinkle them with salt, pepper, and garlic powder. This simple mix boosts the taste of the chicken. Make sure to coat both sides well.
3. Cooking Duration and Technique: Place the chicken in the hot skillet. Cook it for 6 to 7 minutes on each side. The chicken is done when it is no longer pink inside. Remove it from the heat and let it cool slightly before slicing.
Preparing the Wrap Filling
1. Mixing the Ingredients: In a large bowl, combine chopped romaine lettuce, Caesar dressing, and grated Parmesan cheese. Toss these ingredients together until the lettuce is fully coated. This creates a creamy base for your wrap.
2. Dressing Variations: If you want to mix it up, try different dressings. You can use ranch or a yogurt-based dressing for a lighter touch. These options can change the flavor of your wrap.
Assembling the Wraps
1. Layering the Ingredients: Lay a tortilla flat on a clean surface. Add a handful of the lettuce mixture in the center. Place sliced chicken on top and sprinkle with crushed croutons if you like extra crunch.
2. Folding Techniques: To wrap it up, fold in the sides of the tortilla first. Then roll it tightly from the bottom up. This technique keeps all the tasty filling inside. Repeat this for each tortilla until all wraps are ready to serve.
Pro Tips
- Rest the Chicken: Allow the cooked chicken to rest for a few minutes before slicing. This helps retain its juices and keeps the meat tender.
- Choose the Right Lettuce: Opt for fresh, crisp romaine lettuce for the best flavor and texture. Avoid wilted leaves for a more appealing wrap.
- Customize Your Wrap: Feel free to add other ingredients like cherry tomatoes, avocado, or bacon for more flavor and variety in your wraps.
- Use Fresh Ingredients: Using freshly grated Parmesan cheese and homemade croutons can elevate the taste of your wraps significantly.
Tips & Tricks
Perfecting Chicken Cooking
To avoid dry chicken, start with good quality chicken breasts. Use a meat thermometer to check the internal temperature. Cook until it reaches 165°F. This ensures your chicken stays juicy and tender.
Serving Suggestions
Pair your wraps with easy side dishes. Think about crispy veggie sticks or fresh fruit. A light soup can also work well. For presentation, slice your wraps in half and arrange them on a nice plate. Add a sprinkle of extra Parmesan on top for a lovely touch.
Common Mistakes to Avoid
Avoid overloading your wrap. Too much filling can make it hard to eat. Stick to a handful of filling for the best result. Also, let your chicken cool before you slice it. Not chilling it can make the wrap soggy. This ensures a great texture in every bite.

Variations
Protein Alternatives
You can switch up the protein in your Classic Chicken Caesar Wraps. Using turkey is a great option. Turkey has a mild flavor and is leaner than chicken. It keeps the wraps light and healthy. If you prefer plant-based options, try tofu. Firm tofu absorbs flavors well. Just marinate it in your favorite sauces before cooking. This gives it a tasty kick.
Other meat options include grilled shrimp or steak. Both bring a unique taste. Shrimp cooks quickly and adds a seafood twist. Steak gives a hearty flavor, perfect for meat lovers.
Different Dressing Choices
While Caesar dressing is classic, you can explore other flavors. Making your own Caesar dressing is simple. Just combine garlic, lemon juice, anchovies, and Parmesan. Blend these for a fresh taste.
If you’re looking for lighter options, try yogurt-based dressings. They offer creaminess without the heaviness. Ranch or Greek dressing can also work well. These choices provide a different flavor profile, keeping your wraps exciting.
Adding Flavor with Toppings
Toppings can transform your wraps. Consider adding unique veggies like bell peppers or cucumbers. These add crunch and freshness. You can also include shredded carrots for a nice pop of color.
Cheese alternatives can change the game too. Instead of Parmesan, try feta or goat cheese. They bring tanginess that pairs perfectly. Just sprinkle some on top before wrapping for extra flavor.
With these variations, you can make your wraps new each time. Enjoy experimenting!
Storage Info
Storing Leftovers
After enjoying your Classic Chicken Caesar Wraps, you might have some leftovers. To keep them fresh, store them in the fridge. Place the wraps in an airtight container. They stay good for about three days. If you want to keep them longer, freeze them.
- Best Practices for Refrigeration:
- Wrap each wrap in plastic wrap or foil.
- Place them in a sealable bag to avoid air exposure.
- Freezing Tips:
- Make sure to remove as much air as possible from the bag.
- Label the bag with the date you made them.
- Use within two months for best taste.
Reheating Suggestions
When you’re ready to enjoy your wraps again, reheating is key. You have two main options: microwave and oven. Each method offers a different result.
- Microwave vs. Oven:
- Microwave: Heat your wrap on a plate for about 30 to 60 seconds. This option is quick but may make the wrap a bit soggy.
- Oven: Preheat your oven to 350°F (175°C). Place the wrap on a baking sheet. Heat for about 10 minutes. This keeps the wrap crispy and tasty.
- Maintaining Texture and Flavor:
- If microwaving, cover the wrap with a damp paper towel. This helps keep it moist.
- For oven reheating, you can wrap the wrap in foil. This keeps it from drying out while it heats.
Enjoy your Classic Chicken Caesar Wraps again, just like they were fresh!
FAQs
What can I substitute for Caesar dressing?
You can swap Caesar dressing for many options. Here are some ideas:
- Healthier Alternatives: Use Greek yogurt mixed with lemon juice and herbs. This makes a creamy dressing with less fat. You can also try a light vinaigrette for tang.
- Vegan Options: For a vegan choice, use tahini mixed with lemon and garlic. Another great option is avocado blended with lime juice. Both give a rich taste without dairy.
Can I make Classic Chicken Caesar Wraps ahead of time?
Yes, you can prepare these wraps in advance. Here are some meal prep tips:
- Wrap Assembly: Assemble the wraps but do not cut or add dressing yet. This helps keep them fresh.
- Storage: Wrap each one in foil or plastic wrap. Store them in the fridge. They stay good for about 2 days.
How do I make a gluten-free version?
Making a gluten-free version is easy! Here’s how:
- Ingredient Swaps: Use gluten-free tortillas instead of regular ones. They taste great and hold the filling well. Check labels to avoid hidden gluten.
- Wrap Choices: You can also use lettuce leaves instead of tortillas. This gives a fresh crunch and is low-carb. Enjoy your wraps in a new way!
In this blog post, we explored how to make Classic Chicken Caesar Wraps. We covered the main ingredients, step-by-step cooking instructions, and tips for perfect wraps. You learned how to avoid common mistakes and discovered tasty variations. Keeping leftovers fresh is crucial, and I shared ideas for reheating. Remember, simple adjustments can turn this dish into a new favorite. Enjoy experimenting with different flavors and ingredients to make it your own. Happy cooking!

Classic Chicken Caesar Wraps
Ingredients
2 boneless, skinless chicken breasts
1 tablespoon olive oil
Salt and pepper to taste
1 teaspoon garlic powder
4 large tortillas or wraps
2 cups romaine lettuce, chopped
1/2 cup Caesar dressing
1/2 cup grated Parmesan cheese
1/3 cup croutons, crushed (optional for crunch)
Freshly cracked black pepper for garnish
Instructions
Cook the Chicken: Preheat a skillet over medium heat and drizzle with olive oil. Season the chicken breasts with salt, pepper, and garlic powder. Add them to the skillet and cook for 6-7 minutes on each side or until fully cooked and no longer pink in the center. Remove from heat and let cool slightly.
Slice the Chicken: Once the chicken is cool enough to handle, slice it into thin strips.
Prepare the Wrap Filling: In a large bowl, combine the chopped romaine lettuce, Caesar dressing, and grated Parmesan cheese. Toss until the lettuce is well coated.
Assemble the Wraps: Lay a tortilla flat on a clean surface. Place a generous handful of the lettuce mixture in the center, add a portion of the sliced chicken on top, and sprinkle with crushed croutons for added texture (if using).
Wrap It Up: Fold in the sides of the tortilla, then roll it tightly from the bottom up to create a secure wrap. Repeat for the remaining tortillas.
Serve: Slice each wrap in half diagonally and secure with toothpicks if desired. Sprinkle freshly cracked black pepper on top for added flavor.
Prep Time: 15 minutes | Total Time: 30 minutes | Servings: 4

Classic Chicken Caesar Wraps
Ingredients
- 2 pieces boneless, skinless chicken breasts
- 1 tablespoon olive oil
- to taste Salt and pepper
- 1 teaspoon garlic powder
- 4 large tortillas or wraps
- 2 cups romaine lettuce, chopped
- 0.5 cup Caesar dressing
- 0.5 cup grated Parmesan cheese
- 0.33 cup croutons, crushed (optional for crunch)
- to taste Freshly cracked black pepper for garnish
Instructions
- Cook the Chicken: Preheat a skillet over medium heat and drizzle with olive oil. Season the chicken breasts with salt, pepper, and garlic powder. Add them to the skillet and cook for 6-7 minutes on each side or until fully cooked and no longer pink in the center. Remove from heat and let cool slightly.
- Slice the Chicken: Once the chicken is cool enough to handle, slice it into thin strips.
- Prepare the Wrap Filling: In a large bowl, combine the chopped romaine lettuce, Caesar dressing, and grated Parmesan cheese. Toss until the lettuce is well coated.
- Assemble the Wraps: Lay a tortilla flat on a clean surface. Place a generous handful of the lettuce mixture in the center, add a portion of the sliced chicken on top, and sprinkle with crushed croutons for added texture (if using).
- Wrap It Up: Fold in the sides of the tortilla, then roll it tightly from the bottom up to create a secure wrap. Repeat for the remaining tortillas.
- Serve: Slice each wrap in half diagonally and secure with toothpicks if desired. Sprinkle freshly cracked black pepper on top for added flavor.


![For a great Italian wedding soup, you need a few key items: - 1 cup acini di pepe pasta (or any small pasta) - 1 tablespoon olive oil - 1 medium onion, diced - 2 cloves garlic, minced - 2 medium carrots, diced - 2 celery stalks, diced - 6 cups chicken broth (low sodium) - 1 teaspoon dried oregano - 1 teaspoon dried thyme - Salt and pepper to taste - 1 cup fresh spinach or Swiss chard, chopped - ½ cup grated Parmesan cheese - 1 pound ground turkey (or chicken) - 1 teaspoon Italian seasoning - ¼ cup fresh parsley, chopped (for garnish) These ingredients work together to create a warm, comforting soup. The acini di pepe pasta adds a fun texture. The fresh veggies provide crunch and flavor. The meatballs bring hearty satisfaction. You can switch up some ingredients for your taste. Here are a few ideas: - Use spinach or Swiss chard for greens. Both add color and nutrients. - Add extra spices like red pepper flakes or fresh herbs to boost flavor. These optional ingredients let you personalize your soup. Don’t be afraid to experiment and make it your own. When it’s time to serve, pair your soup with some tasty options: - Serve with a slice of crusty bread for dipping. - A light salad on the side adds freshness to the meal. For garnishing, top your soup with fresh parsley and a sprinkle of Parmesan cheese. This makes the soup look extra special and inviting. For the complete cooking directions, check the Full Recipe. Enjoy crafting this delicious dish! To start, heat olive oil in a large pot over medium heat. Add the diced onion and sauté it until it turns soft and clear, about 3-4 minutes. Then, toss in the minced garlic, diced carrots, and celery. Cook these veggies for another 5 minutes. This step builds a great flavor base for the soup. Next, pour in 6 cups of chicken broth and bring it to a boil. The broth adds depth and richness to the soup. In a bowl, mix ground turkey with Italian seasoning, salt, and pepper. This simple mix creates tasty meatballs. Form the meat into small balls, about 1 inch wide. Once the broth is boiling, carefully add the meatballs. Reduce the heat to a gentle simmer. Let them cook for about 10 minutes. This allows the meatballs to cook fully while adding flavor to the broth. Next, stir in the acini di pepe pasta. Cook it according to the package instructions, usually about 7-9 minutes. The pasta adds heartiness to the soup. When the pasta is almost done, add chopped spinach or Swiss chard. Stir it in and let it wilt into the soup. This adds a fresh taste and bright color. Finally, mix in the grated Parmesan cheese. This adds creaminess and a savory finish. Taste and adjust salt and pepper if needed. Let the soup rest for a few minutes before serving. Enjoy this Italian wedding soup with a crusty bread slice for a complete meal. For the full recipe, check [Full Recipe]. Seasoning is key. I always add salt and pepper at each step. This builds deep flavor. Use homemade broth when you can. It gives a rich taste that store-bought broth lacks. If you use store-bought, choose low-sodium to control salt levels. Add herbs like oregano and thyme to boost the flavor. Fresh herbs work even better than dried. To save time, prep ingredients ahead. Chop veggies and form meatballs the night before. Store them in the fridge until you are ready. Cook pasta separately to keep it firm. This stops the pasta from becoming mushy in the soup. You can also cook it in a large pot of salted water while making the soup. For great meatballs, mix ground turkey with breadcrumbs and egg. This keeps them moist and tender. Aim for a consistency that holds shape but is not too dense. Choose acini di pepe pasta for the best texture. It adds a nice bite and fits perfectly in the soup. You can use small shells or ditalini if needed, but nothing beats the classic choice. {{image_2}} You can change the soup to fit your needs. If you have dietary restrictions, try these swaps: - Ground meat: Use ground beef or pork instead of turkey. - Pasta: If you don't have acini di pepe, use small shells or ditalini. - Broth: Use vegetable broth for a vegetarian version. - Greens: If you can't find spinach, try kale or arugula. These substitutions keep the soup tasty while meeting your needs. Italian wedding soup has many faces. Each region adds its own twist: - Southern Italy: You might find a spicier version with hot sausage. - Northern Italy: Some recipes use beef broth instead of chicken broth. - Local ingredients: Different herbs and vegetables may appear based on what's fresh. These regional touches highlight the rich culture behind this dish. Make the soup your own by adding fun ingredients: - Extra veggies: Try adding peas, green beans, or zucchini for more texture. - Legumes: Toss in some cannellini beans for added protein and fiber. - Spices: A dash of red pepper flakes or smoked paprika can change the flavor. These creative twists keep your Italian wedding soup exciting and flavorful. For the full recipe, check out Italian Love Soup . To store leftover Italian wedding soup, let it cool first. Pour it into an airtight container. This keeps the soup fresh and tasty. Store it in the fridge for up to three days. If you want to keep it longer, freezing is great too. Pour the soup into freezer-safe containers. Leave some space at the top for expansion. This helps prevent spills. To reheat the soup, you can use the stove or microwave. If using the stove, heat it over medium heat until it's hot. Stir it often to avoid sticking. For the microwave, place it in a microwave-safe bowl. Heat in one-minute intervals, stirring in between, until hot. In the fridge, this soup lasts about three days. After that, it may spoil. Signs of spoilage include an off smell or changes in color. If you see mold, throw it away. Always check your leftovers before eating. Making a large batch of Italian wedding soup is smart. You can enjoy it for several meals. Just double or triple the recipe. Store it in portions for easy meals later. On busy days, you can reheat the soup quickly. Use the microwave or stove as mentioned. This way, you have a warm meal ready in no time. With the soup on hand, you can enjoy a hearty dish without much fuss. For the full recipe, check out the Italian Love Soup. Italian wedding soup is a tasty dish from Italy. The name comes from "matrimonio," meaning marriage. It reflects the blend of flavors from meat and greens. This soup combines meatballs, small pasta, and fresh greens. It offers a hearty and warm meal, perfect for family gatherings. The dish showcases Italian cooking's charm, bringing people together at the table. Yes, you can make Italian wedding soup ahead of time. To do this, prepare the soup base without the pasta. Store it in an airtight container in the fridge for up to three days. When ready to serve, reheat the soup and add the pasta. This keeps the pasta from getting mushy. You can also freeze the soup base. Just remember to add the pasta when you reheat it. There are many fun ways to change up Italian wedding soup. You can swap out ground turkey for ground beef or pork. Try adding different greens, like kale or escarole, for variety. Using different types of pasta can also change the texture. For a unique twist, add beans for extra protein. Feel free to get creative and make it your own! To boost flavor, use fresh herbs like basil or dill. Adding a squeeze of lemon juice brightens the soup. You can also mix in red pepper flakes for a bit of heat. Consider using homemade broth for richer taste. Don't forget to taste and adjust salt and pepper. These simple tweaks can make your soup even more delicious. For the full recipe, please check the Italian Love Soup section. Italian Wedding Soup blends rich flavors with fresh ingredients. We covered key ingredients like pasta, meat, and vegetables. You learned how to make this dish step-by-step, from cooking the base to preparing meatballs. Tips and tricks help enhance flavors and save time. Variations allow for personal twists, accommodating dietary needs. Lastly, we discussed how to store your soup safely. With these insights, you can create a tasty and satisfying Italian Wedding Soup. Enjoy your cooking experience!](https://dailydishlab.com/wp-content/uploads/2025/07/6044dbfa-4b21-481c-9945-f2312ef87f99-768x768.webp)

. To start, you need to preheat your oven. Set it to 400°F (200°C). This step is key for even cooking. Let the oven warm up while you prepare the glaze. Next, you’ll make the honey lemon garlic mixture. Take a small bowl and add: - 1/4 cup honey - 2 tablespoons fresh lemon juice - 3 cloves garlic, minced - 2 tablespoons olive oil - Salt and pepper to taste - 1 teaspoon paprika Whisk these ingredients together until they blend well. This glaze gives the salmon its sweet and tangy flavor. Now, grab your salmon fillets. Place them skin-side down on a parchment-lined baking sheet. This helps with easy cleanup and prevents sticking. Then, brush that tasty honey lemon garlic mixture generously over each fillet. Make sure to coat them well. This step adds flavor and keeps the salmon moist. Bake your salmon in the preheated oven for about 12 to 15 minutes. The ideal temperature is 400°F. To check for doneness, look for the salmon to flake easily with a fork. If it does, it’s ready! If not, give it a few more minutes. To get the perfect texture for salmon, follow these steps: - Choose the right salmon: Fresh, wild-caught salmon has better flavor and texture. - Avoid overcooking: Bake the salmon for 12-15 minutes. It should flake easily. - Rest the salmon: Let it sit for a few minutes after baking. This keeps it juicy. For the best honey and garlic combination, try these tips: - Use fresh garlic: Freshly minced garlic gives the best flavor. Avoid powdered garlic. - Balance sweetness and acidity: Adjust the honey and lemon juice to your taste. This balance makes the dish shine. Creative plating ideas can enhance your meal: - Use a decorative platter: Place the salmon fillets on a colorful plate. Drizzle extra glaze over the top. - Garnish thoughtfully: Add lemon slices and fresh parsley around the salmon. This adds color and freshness. Pairing suggestions can make your meal even better: - Choose sides wisely: Serve with steamed veggies or rice. These sides complement the salmon well. - Wine pairing: Light white wine, like Sauvignon Blanc, works great. It enhances the flavors of the dish. For the full recipe, including steps and tips, check out the Honey Lemon Garlic Salmon section. {{image_2}} You can change how you cook honey lemon garlic salmon to suit your taste. Here are two methods: - Grilling honey lemon garlic salmon: Grilling gives the salmon a nice smoky flavor. Preheat your grill to medium-high. Place the salmon on the grill and cook for about 6-8 minutes per side. Brush it with the honey lemon garlic mix while it cooks. This method adds a crispy char and enhances the dish's flavor. - Pan-searing for a crispy finish: This method can create a great crust. Heat a skillet over medium heat with olive oil. Place the salmon skin-side down. Cook for 4-5 minutes, then flip and cook for another 3-4 minutes. Use the honey lemon garlic mix to glaze the salmon during the last minute of cooking. This method gives a beautiful golden-brown color. You can swap out ingredients to fit your needs: - Replacing salmon with other fish: If you can’t find salmon, try trout or tilapia. Both fish work well with the honey lemon garlic mix. They cook in similar times and will soak up the flavors nicely. - Vegan alternatives for a similar recipe: For a plant-based option, use tofu or tempeh. Marinate them in the same honey lemon garlic mix. Bake or grill them just like you would the salmon. This will give you a similar sweet and tangy taste while keeping it vegan. For the full recipe, check out the guidelines I provided earlier. Enjoy experimenting with these variations! To keep your honey lemon garlic salmon fresh, store it in the fridge. Place leftovers in an airtight container. This helps keep the salmon moist and flavorful. Ideally, eat it within three days for the best taste. If you want to save it for longer, consider freezing it. For freezing salmon, make sure it's completely cool. Wrap each piece in plastic wrap, then place it in a freezer bag. Remove as much air as possible to prevent freezer burn. You can freeze it for up to two months. When you’re ready to eat, thaw it in the fridge overnight. Reheating salmon can be tricky. You don't want to dry it out. The best method is to use the oven. Preheat it to 300°F (150°C). Place the salmon on a baking sheet and cover it with foil. Heat for about 10-15 minutes. This keeps it moist and tasty. You can also use the microwave, but be careful. Set it at a low power level. Heat in short bursts, checking often. Serve it right after reheating for the best taste. Enjoy your meal! What is the best type of salmon to use? I recommend using wild-caught salmon. It has richer flavor and better texture. Sockeye and king salmon are both great choices. They are firm and hold up well during cooking. Farmed salmon is also fine but may be fattier. Can I prepare the glaze in advance? Yes, you can make the glaze ahead of time. Just mix honey, lemon juice, and garlic. Store it in the fridge for up to two days. When you're ready to cook, simply take it out and use it. How do I know when the salmon is fully cooked? Look for a few signs. The salmon should be opaque and flake easily with a fork. An internal temperature of 145°F (63°C) means it's done. If you’re unsure, use a food thermometer for accuracy. Can I use bottled lemon juice instead of fresh? You can use bottled lemon juice, but fresh is best. Fresh lemon juice has a brighter taste. Bottled juice can be more tart or less flavorful. If you must use bottled, choose a high-quality brand for the best effect. Nutritional benefits of salmon and the ingredients used Salmon is packed with omega-3 fatty acids, which are good for your heart. It also has high protein and vitamins like B12. Honey adds natural sweetness and antioxidants. Garlic offers health benefits like boosting the immune system. Is honey lemon garlic salmon suitable for special diets? Yes, this dish fits many diets. It is gluten-free and low-carb. If you are vegan, you can substitute salmon with tofu or chickpeas. Just adjust the cooking time to fit the new ingredients. For those watching sugar, you can reduce the honey amount. For the full recipe, check out the Honey Lemon Garlic Salmon section! This blog post explored how to make a delicious honey lemon garlic salmon. We covered required ingredients, preparation, and cooking steps to get it just right. I shared some tips for perfect texture and presentation. You also learned variations and storage methods for leftovers. Enjoy trying this recipe in your kitchen! With practice, you'll impress your family with a tasty, healthy meal.](https://dailydishlab.com/wp-content/uploads/2025/07/2945a810-a7cd-4e48-9023-917694da23c6-768x768.webp)
