
Looking for a quick, tasty snack? Coconut Chocolate Energy Balls are your answer! These bite-sized treats pack a punch of flavor and energy, making them perfect for busy days or post-workout boosts. Made with simple ingredients like oats, almond butter, and dark chocolate, they are healthy and satisfying. Join me as I guide you through easy steps to make these delicious energy balls. Let’s get started on your new favorite snack!
Why I Love This Recipe
- Nutritious Boost: These energy balls are packed with wholesome ingredients, providing a great source of energy and nutrients for a quick snack.
- Easy to Make: With just a few simple steps, you can whip up a batch of these delicious bites in no time, making them perfect for busy days.
- Customizable: Feel free to swap out ingredients like nut butter or sweeteners for your personal preferences, allowing for endless variations.
- Kid-Friendly: These treats are not only healthy but also tasty, making them a hit with kids and adults alike!
Ingredients
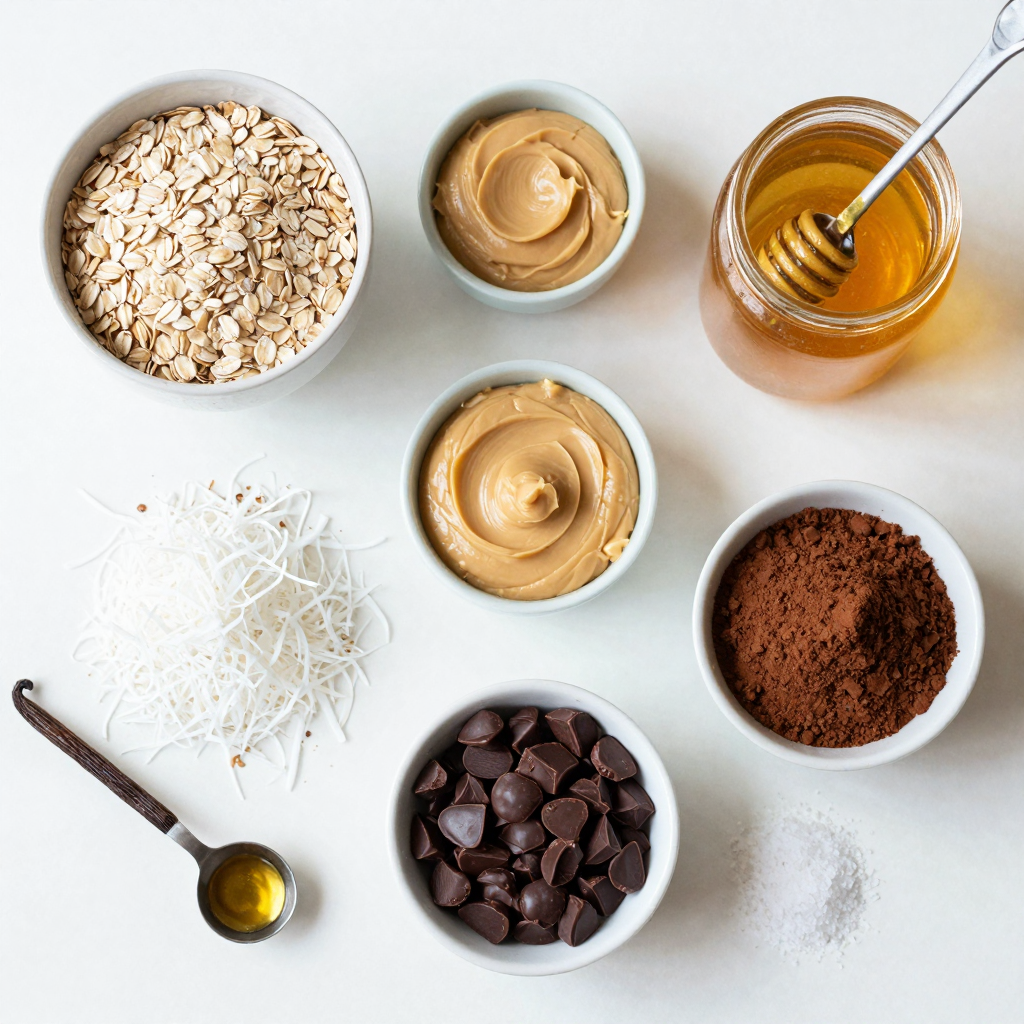
Main Ingredients List
– 1 cup rolled oats
– 1/2 cup almond butter
– 1/3 cup honey or maple syrup
– 1/2 cup unsweetened shredded coconut
– 1/4 cup cocoa powder
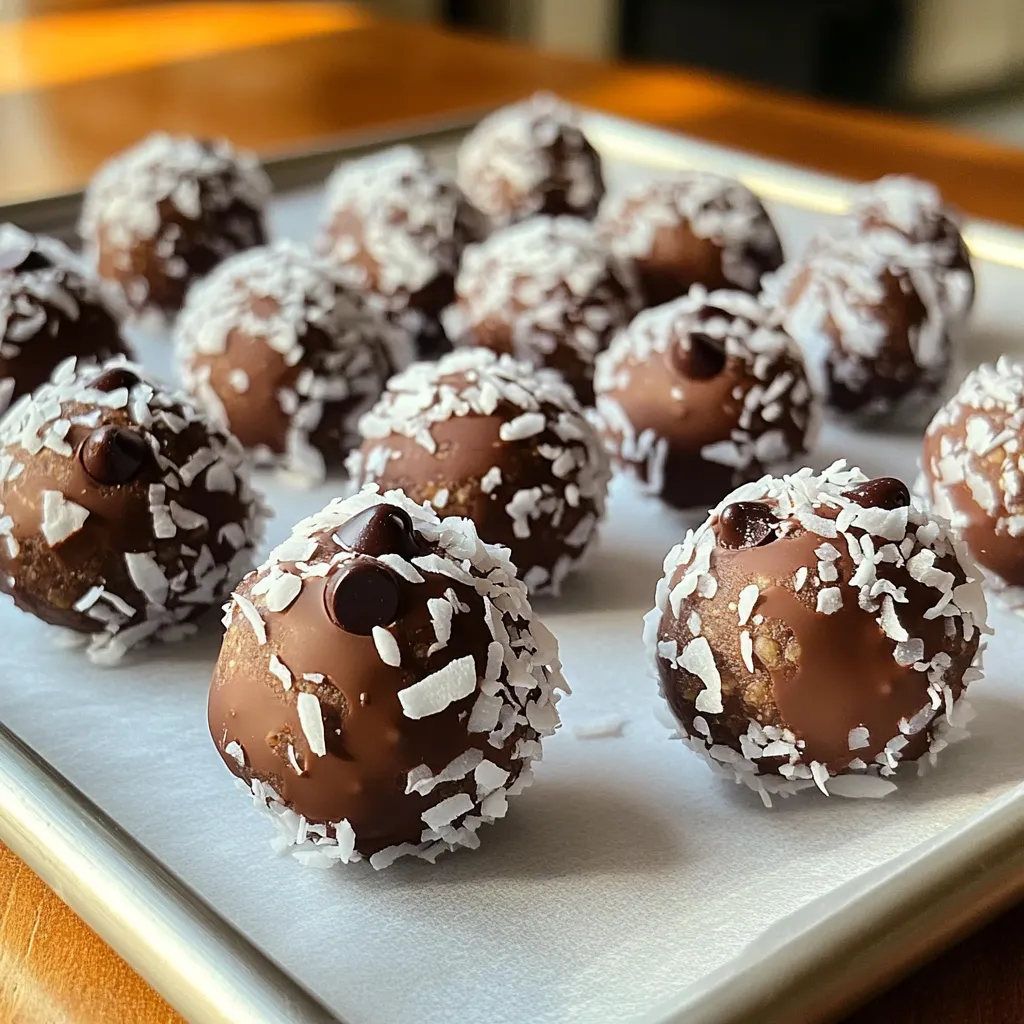
– 1/4 cup dark chocolate chips
– 1 teaspoon vanilla extract
– Pinch of salt
These main ingredients combine to create a flavorful and satisfying snack. Rolled oats provide a good base. They add fiber and help hold everything together. Almond butter gives the energy balls a rich, nutty taste. Honey or maple syrup sweetens the mix naturally.
Unsweetened shredded coconut adds texture and a tropical twist. Cocoa powder brings a deep chocolate flavor. Dark chocolate chips add little bursts of sweetness. A pinch of salt balances the flavors perfectly.
Optional Add-Ins
– Chopped nuts
– Protein powder
– Dried fruits
Feel free to personalize your energy balls with optional add-ins. Chopped nuts add crunch and extra protein. Protein powder can boost the nutritional value. Dried fruits like raisins or cranberries give a chewy texture. These options make each batch unique and tasty.
Step-by-Step Instructions
Preparation Steps
1. Mixing dry ingredients
Start with a large bowl. Add 1 cup of rolled oats. Then, mix in 1/4 cup of cocoa powder and a pinch of salt. This adds flavor and helps the balls stick together.
2. Combining wet ingredients
In the same bowl, add 1/2 cup of almond butter and 1/3 cup of honey or maple syrup. Stir well until it all blends smoothly. This mix gives the balls their sweetness and moisture.
3. Forming the energy balls
Next, add in 1/2 cup of unsweetened shredded coconut. Then, fold in 1/4 cup of dark chocolate chips. Use your hands to scoop small portions of the mixture. Roll them into balls, about 1 inch in diameter. Place the balls on a tray lined with parchment paper.
Chilling and Serving
1. Cooling the energy balls
Once you form all the balls, put the tray in the fridge. Chill them for at least 30 minutes. This helps them firm up and makes them easier to eat.
2. Tips for storage
If you have any leftovers, keep them in an airtight container. Store them in the fridge for up to a week. This way, you can enjoy these tasty snacks anytime!
Pro Tips
- Chill for Better Texture: Chilling the energy balls not only helps them firm up but also enhances the flavors. Make sure to refrigerate them for at least 30 minutes.
- Customize Your Sweetness: Adjust the amount of honey or maple syrup based on your sweetness preference or dietary needs. You can even use a sugar substitute if you prefer.
- Experiment with Add-ins: Feel free to mix in your favorite nuts, seeds, or dried fruits for added texture and flavor. Chia seeds or flaxseeds are great options!
- Store Properly: Keep the energy balls in an airtight container in the refrigerator to maintain freshness. They can last up to a week, but they may not last that long!
Tips & Tricks
Perfecting Texture and Flavor
To get the right sweetness, taste your mix. If you want it sweeter, add more honey or maple syrup. You can also use dark chocolate chips to boost the flavor. They add a nice sweetness too.
For the right consistency, you need a good balance. The mix should stick together but not be too wet. If it’s too dry, add a bit more almond butter or honey. If it’s too wet, add more oats or cocoa powder. This keeps the energy balls from falling apart.
Making it Kid-Friendly
Involve your kids in making these energy balls. They can help measure the ingredients and stir the mix. Kids love to help in the kitchen. It’s a fun way to bond and teach them about healthy snacks.
Try fun variations to keep things exciting. Swap in peanut butter for almond butter. You can also add in dried fruits like raisins or cranberries. Let your kids pick their favorite mix-ins. This makes snack time fun and tasty.
Variations
Flavor Variations
You can change the flavor of your energy balls to keep things exciting. Here are a few fun ideas:
– Coconut almond energy balls: Swap almond butter for cashew or add chopped almonds. The nutty taste pairs well with coconut.
– Peanut butter chocolate energy balls: Use peanut butter instead of almond butter. This change brings a rich, creamy flavor that many love.
– Matcha coconut energy balls: Add one tablespoon of matcha powder. This gives a unique flavor and a lovely green color.
Dietary Adjustments
If you have different dietary needs, you can still enjoy these energy balls.
– Vegan options: Use maple syrup instead of honey to keep it vegan. Make sure your chocolate chips are dairy-free as well.
– Gluten-free substitutions: Rolled oats are often gluten-free, but check the label. You can also use gluten-free flour if you want a different texture.
These variations help you create energy balls that fit your tastes and needs. Enjoy making them your own!
Storage Info
Best Storage Practices
To keep your Coconut Chocolate Energy Balls fresh, use an airtight container. Glass or plastic containers work well. Make sure to seal them tightly to keep out air and moisture. If you want to save some for later, freezing is a great option.
To freeze, place the energy balls in a single layer on a tray. Once they freeze solid, transfer them to a freezer bag. This way, they won’t stick together. They last longer this way and stay tasty.
Shelf Life
Coconut Chocolate Energy Balls last about one week in the fridge. After a week, they may lose their flavor and texture. To check for spoilage, look for signs like an off smell or changes in color. If they seem dry or crumbly, it’s time to toss them. Enjoy these treats while they’re fresh!
FAQs
How long do Coconut Chocolate Energy Balls take to make?
These energy balls take about 20 minutes to prepare. After mixing, they need 30 minutes to chill. So, the total time is around 50 minutes.
Can I use other nut butters?
Yes, you can use other nut butters. Peanut butter or cashew butter work well too. Each nut butter will add its own flavor.
Are these energy balls suitable for meal prep?
Absolutely! These energy balls are great for meal prep. You can make a batch ahead and store them. They stay fresh in the fridge for up to a week.
What can I substitute for honey or maple syrup?
If you want a substitute for honey or maple syrup, try agave nectar or brown rice syrup. You can also use stevia for a lower-calorie option.
How do I boost the protein content in these energy balls?
To boost protein, add protein powder to the mix. You can also include chopped nuts or seeds. This will make your snack even more filling and nutritious.
This blog post covered how to make delicious Coconut Chocolate Energy Balls. We talked about key ingredients like rolled oats and almond butter, plus optional add-ins. You learned the steps for mixing, chilling, and serving. I shared tips to perfect flavor and texture, along with kid-friendly ideas.
Energy balls are versatile and easy to store. They last a while and can fit many diets. Now you’re ready to enjoy a tasty treat that fuels your day!


