

Coconut Curry Chickpea Soup is not just a meal; it’s a warm hug in a bowl. This flavorful and hearty dish combines creamy coconut milk, protein-packed chickpeas, and aromatic spices to create a delightful experience. Whether you’re a seasoned cook or a beginner, you’ll find our step-by-step guide easy to follow. Get ready to spice up your dinner plans with this comforting soup that’s sure to please everyone at your table!
Why I Love This Recipe
- Deliciously Creamy: The combination of coconut milk and spices creates a rich and comforting soup that warms you from the inside out.
- Quick and Easy: This recipe comes together in just 30 minutes, making it perfect for busy weeknight dinners.
- Nutritious Ingredients: Packed with chickpeas, spinach, and tomatoes, this soup is loaded with vitamins, minerals, and plant-based protein.
- Customizable: Easily adjust the spice level or add your favorite vegetables to make it your own!
Ingredients
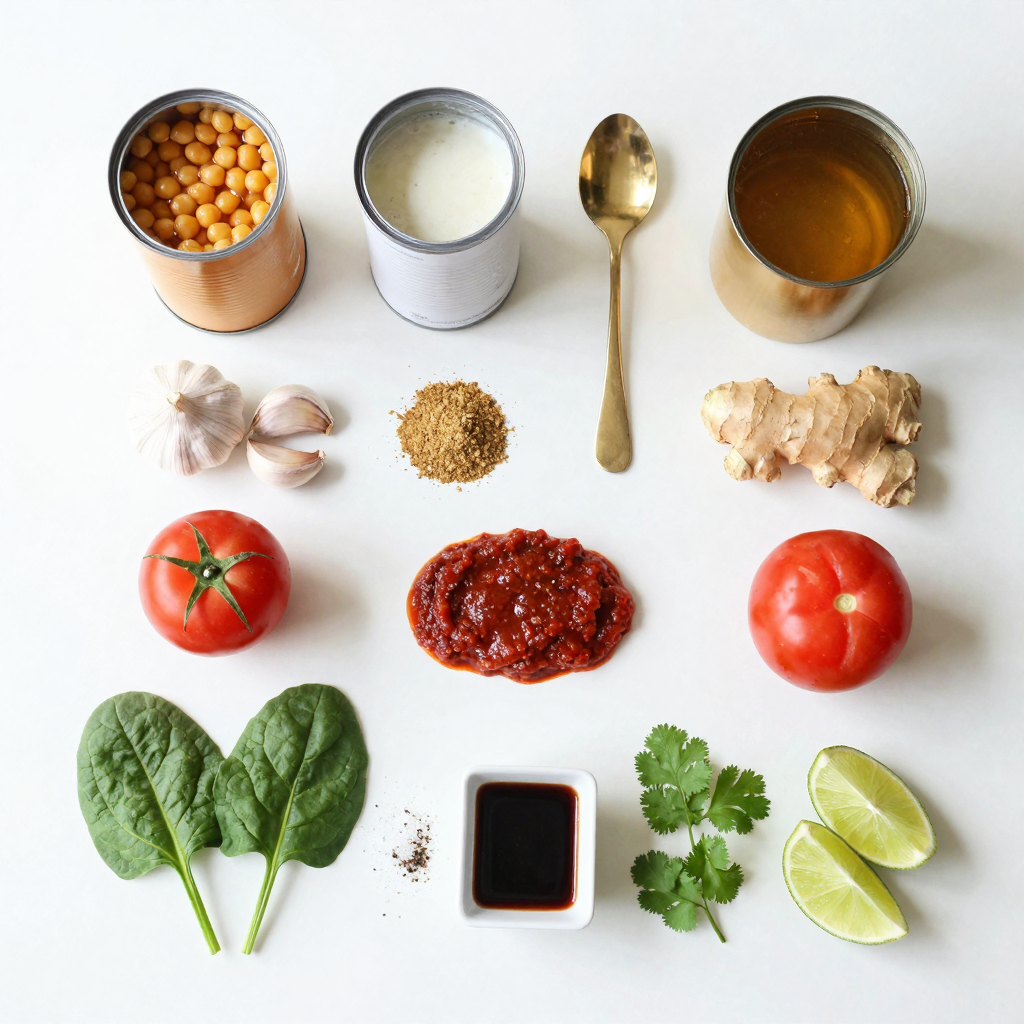
Main Ingredients
– 1 can chickpeas
– 1 can coconut milk
– 1 cup vegetable broth
– 1 tablespoon coconut oil
Vegetables and Aromatics
– 1 medium onion, diced
– 3 cloves garlic, minced
– 1-inch piece fresh ginger, grated
– 1 cup diced tomatoes
Spices and Seasoning
– 1 tablespoon red curry paste
– 1 teaspoon ground cumin
– 1 teaspoon ground coriander
– 1 tablespoon soy sauce
Fresh Additions and Garnishes
– 2 cups fresh spinach
– Salt and pepper to taste
– Fresh cilantro and lime wedges for serving
In this soup, the main ingredients are the stars of the show. The chickpeas provide protein and texture. Coconut milk adds creaminess and a hint of sweetness. Vegetable broth gives the soup a rich base. Coconut oil adds a touch of flavor to start.
Next, the vegetables and aromatics bring depth. Diced onions create a sweet base when sautéed. Garlic adds warmth, while ginger contributes a spicy kick. Diced tomatoes enhance the soup’s color and freshness.
Spices and seasonings elevate the dish. Red curry paste adds heat and flavor. Ground cumin and coriander deepen the taste, creating a warm, earthy profile. Soy sauce adds umami and saltiness.
Fresh additions like spinach brighten the soup. They add color and nutrients too. Finally, a sprinkle of fresh cilantro and a squeeze of lime juice before serving give it a refreshing finish. Enjoy crafting this delicious meal!
Step-by-Step Instructions
Preparing the Base
First, heat the coconut oil in a large pot over medium heat. Once the oil is hot, add the diced onion. Sauté the onion until it softens and turns lightly golden, which takes about 5 minutes. Next, add the minced garlic and grated ginger. Cook for an additional 1 to 2 minutes until you smell their wonderful aroma.
Introducing Flavors
Now it’s time to mix in the red curry paste, ground cumin, and ground coriander. Stir these spices well and let them cook for 1 minute. This step helps the spices bloom and release their flavors. After that, pour in the diced tomatoes, coconut milk, and vegetable broth. Stir everything together and bring the mixture to a gentle simmer.
Simmering the Soup
Once simmering, add the rinsed and drained chickpeas along with the soy sauce. Allow the soup to simmer for about 15 to 20 minutes. This helps all the flavors meld together, creating a rich and delicious taste.
Final Touches
Just before you serve the soup, stir in the fresh spinach. Cook it for about 2 to 3 minutes until it wilts. Season the soup with salt and pepper to taste. When you are ready to serve, garnish with fresh cilantro and a squeeze of lime juice for a bright finish. Enjoy your hearty coconut curry chickpea soup!
Pro Tips
- Use Fresh Spices: Fresh spices can significantly enhance the flavor of your soup. Consider using freshly ground cumin and coriander for a more vibrant taste.
- Adjust the Heat: If you prefer a spicier soup, add more red curry paste or a pinch of cayenne pepper. Start with a small amount and adjust to your taste.
- Chickpea Variations: For added texture, try using roasted chickpeas instead of canned. Simply roast them in the oven with some spices before adding to the soup.
- Garnish for Freshness: Don’t skip the fresh cilantro and lime juice! They add a burst of freshness that complements the rich coconut curry beautifully.
Tips & Tricks
Cooking Tips
To sauté your onion perfectly, use medium heat. This helps the onion soften without burning. Sauté for about five minutes until it turns golden. Next, when you add garlic and ginger, keep the heat at medium too. This will keep the flavors fresh and bright.
Blooming spices is key. After you add red curry paste, ground cumin, and ground coriander, let them cook for one minute. This lets the spices release their full flavor. Stir well to mix them into the onion, garlic, and ginger.
Flavor Enhancements
Want more flavor? Add a pinch of cayenne pepper for heat. You can also try adding turmeric for an earthy twist. If you like a sweeter taste, consider a splash of maple syrup.
To adjust spice levels, simply add more coconut milk. This will cool down the heat if it feels too spicy. You can also reduce the amount of red curry paste for a milder soup.
Presentation Tips
Garnishing can make your soup look stunning. Sprinkle fresh cilantro on top right before serving. It adds color and a burst of flavor. You can also add thinly sliced green onions for crunch.
For serving, pair the soup with warm naan or rice. These sides soak up the delicious flavors and make your meal heartier. A lime wedge on the side adds a fresh kick when squeezed over the soup.
Variations
Plant-Based Alternatives
You can switch chickpeas for lentils. Lentils cook faster and add a nice texture. Red or green lentils work well in this soup. They soak up flavors well. You can also add different vegetables. Try carrots, bell peppers, or sweet potatoes. These veggies add color and nutrition.
Different Protein Options
If you want more protein, add tofu or tempeh. Both options soak up the soup’s flavor. Just cube them and add them when you simmer the soup. You can also use chicken or shrimp. Cook these proteins separately first. Then add them to the soup at the end. This way, they stay juicy and tender.
Dietary Modifications
For gluten-free soup, use tamari instead of soy sauce. This keeps it safe for those with gluten issues. You can also make it nut-free. Simply leave out the coconut milk. Use vegetable broth instead. This change still keeps the soup flavorful and hearty.
Storage Info
How to Store Leftovers
To keep your Coconut Curry Chickpea Soup fresh, follow these steps:
– Allow the soup to cool to room temperature.
– Transfer it to an airtight container.
– Store it in the fridge for up to 4 days.
Using glass containers helps prevent spills and keeps the soup tasting great. Avoid using plastic wrap, as it can trap moisture.
Reheating Tips
When you’re ready to enjoy your leftovers, here’s how to reheat the soup:
– Use a pot on the stove over medium heat.
– Stir often to keep it from sticking.
– Heat for about 5-10 minutes until warm.
You can also microwave it in a microwave-safe bowl. Heat in 1-minute intervals, stirring each time, until hot.
Freezing Guidelines
If you want to save your soup for later, freezing is a great option. Here’s how:
– Let the soup cool completely.
– Pour it into freezer-safe bags or containers, leaving space for expansion.
– Label the bags with the date and freeze for up to 3 months.
To thaw, move the soup to the fridge overnight. Reheat as mentioned above. Avoid refreezing thawed soup to keep the flavors fresh.
FAQs
How long does Coconut Curry Chickpea Soup last in the fridge?
Coconut Curry Chickpea Soup can last about 3 to 5 days in the fridge. Store it in a sealed container. Make sure it cools down before putting it away. This keeps it fresh and safe to eat.
Can I make this soup ahead of time?
Yes, you can make this soup ahead of time! In fact, it tastes even better the next day. Just let it cool before storing. Reheat it gently on the stove or in the microwave when you’re ready to enjoy.
Is this soup suitable for freezing?
Yes, this soup is great for freezing. To freeze it, let it cool completely. Then, pour it into freezer-safe bags or containers. Remove as much air as you can to prevent freezer burn. When you want to eat it, thaw it in the fridge overnight.
What can I serve with Coconut Curry Chickpea Soup?
You can serve this soup with rice or quinoa for a complete meal. Crusty bread also pairs well. For a fresh touch, add a side salad. You can even top the soup with extra cilantro or lime wedges for added flavor.
This blog post covered a tasty Coconut Curry Chickpea Soup recipe. We explored main ingredients, from chickpeas to coconut milk. I shared step-by-step instructions for a perfect cook. We also discussed tips for flavor and storage, plus fun variations.
In closing, this dish is not just simple; it’s also adaptable. You can change the ingredients based on what you have. Enjoy making it your own!


