
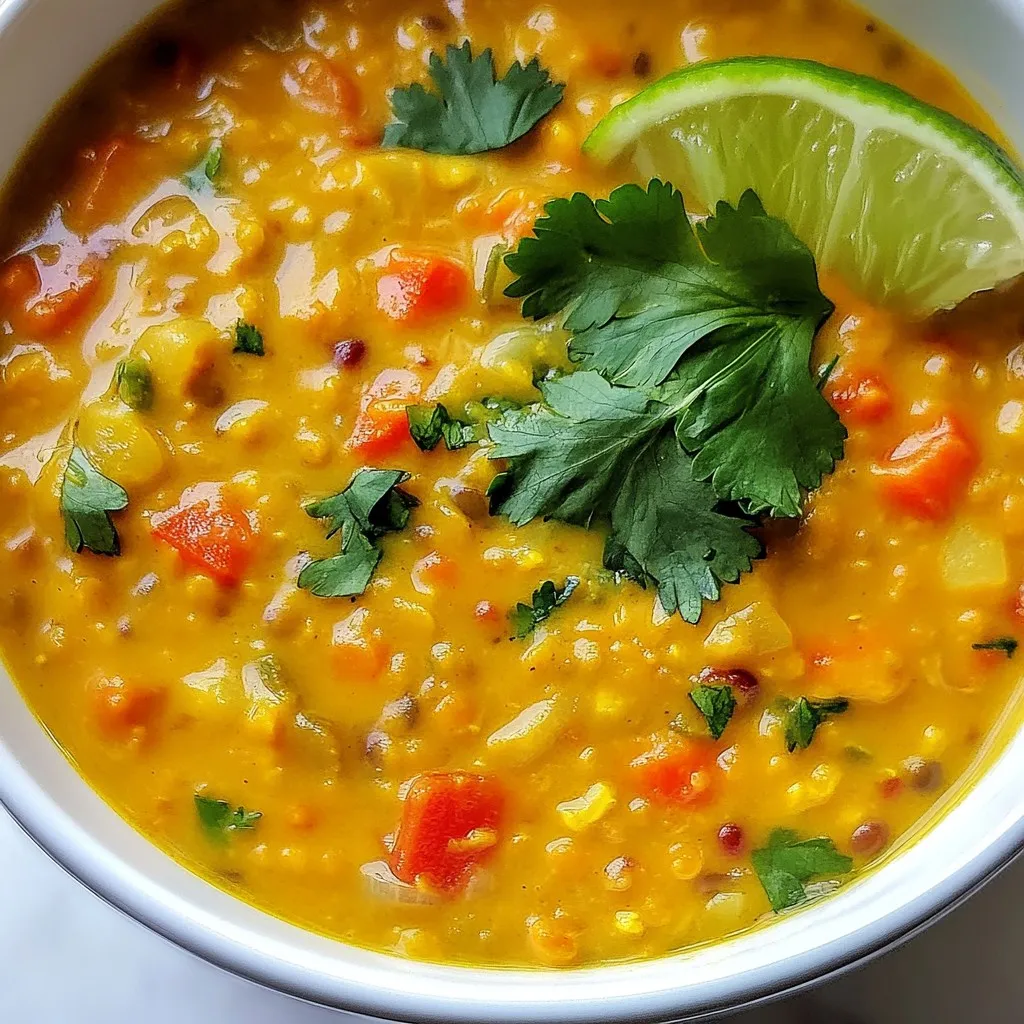
Are you looking for a warm and tasty dish that’s easy to make? This Coconut Curry Lentil Soup hits the spot! Packed with red lentils, rich coconut milk, and vibrant veggies, it’s a flavorful treat for any meal. Plus, I’ll share simple tips to customize it to your taste. Dive in to learn how to whip up this delicious soup that’ll impress your family and friends!
Why I Love This Recipe
- Deliciously Creamy: The addition of coconut milk gives this soup a rich and creamy texture that is both comforting and satisfying.
- Nutritious and Filling: Packed with protein and fiber from lentils, this soup is a healthy meal option that keeps you full for hours.
- Easy to Make: With simple ingredients and straightforward instructions, this recipe is perfect for busy weeknights or meal prep.
- Customizable: Feel free to add your favorite vegetables or adjust the spices to suit your taste, making it a versatile dish!
Ingredients
Main Ingredients for Coconut Curry Lentil Soup
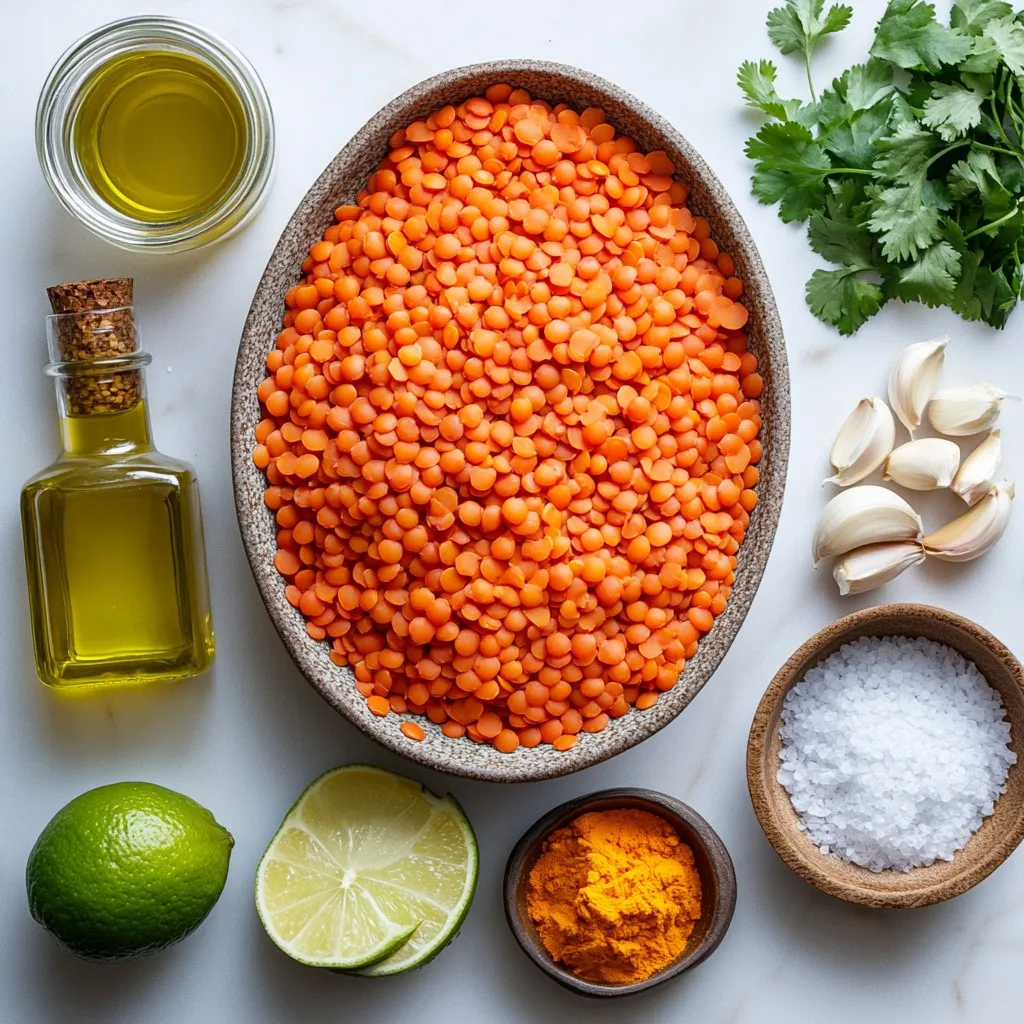
– 1 cup red lentils, rinsed
– 1 can (14 oz) coconut milk
– 1 medium onion, diced
– 2 cloves garlic, minced
– 1 tablespoon fresh ginger, grated
– 1 medium carrot, diced
– 1 bell pepper (any color), diced
– 1 tablespoon curry powder
– 1 teaspoon turmeric
– 1 teaspoon cumin
– 4 cups vegetable broth
– 2 tablespoons olive oil
– Salt and pepper to taste
In my Coconut Curry Lentil Soup, red lentils are the star. They cook quickly and add protein. Coconut milk makes it creamy and rich. It gives the soup a nice, sweet flavor. I love to use fresh vegetables, too. The diced onion, garlic, and ginger create a strong base. Carrots and bell peppers add color and crunch.
Curry powder, turmeric, and cumin bring warmth to the soup. These spices meld together, creating a vibrant flavor. I often use vegetable broth for a hearty taste. It keeps the dish plant-based and light. Olive oil helps to sauté the veggies, making them soft and tasty. Finally, salt and pepper balance the flavors just right.
Optional Garnishes and Seasonings
– Fresh cilantro
– Lime juice
– Salt and pepper
To finish, I like to add fresh cilantro. It brightens the soup and adds a fresh taste. A squeeze of lime juice brings a zesty kick. This touch really uplifts the dish. You can always adjust the salt and pepper to suit your taste. These simple garnishes can take your soup to the next level!
Step-by-Step Instructions
Preparing the Base
– Heat 2 tablespoons of olive oil in a large pot over medium heat.
– Add 1 diced onion and sauté for about 5 minutes until it turns soft.
– Stir in 2 minced garlic cloves and 1 tablespoon of grated ginger. Cook for 2 more minutes.
Adding Vegetables and Spices
– Toss in 1 diced carrot and 1 diced bell pepper. Cook for an additional 5 minutes until they soften.
– Sprinkle in 1 tablespoon of curry powder, 1 teaspoon of turmeric, and 1 teaspoon of cumin. Mix well to coat the vegetables.
– Pour in 1 cup of rinsed red lentils and 4 cups of vegetable broth. Bring the mixture to a boil.
Final Cooking Steps
– Lower the heat and let the soup simmer for about 20 minutes or until the lentils are soft.
– Stir in 1 can of coconut milk, adding salt and pepper to taste. Let it warm for another 5 minutes.
– Remove from heat and add the juice of 1 lime for extra flavor. Serve hot, garnished with fresh cilantro.
Tips & Tricks
Perfecting the Flavor
To make your coconut curry lentil soup just right, you can adjust the seasonings to fit your taste. Start with the basic amounts, then try adding a pinch of salt or a dash of pepper. This simple step makes a big difference. You can also switch between fresh and dried spices. Fresh spices often give a brighter, more vibrant taste. Dried spices work well too, but they may need a bit more time to bloom in the soup.
Achieving the Right Consistency
Getting the soup’s texture right is key. If your soup is too thick, thin it out with some extra vegetable broth. Just add a little at a time until you reach the desired consistency. If the soup turns out too watery, don’t worry. You can thicken it by cooking it a bit longer or adding a small amount of lentils. They will break down and help create a creamier texture.
Quick Preparation Tips
To save time, prep your ingredients ahead. Dice the onion, garlic, and veggies, and store them in the fridge. This way, when you’re ready to cook, everything is at hand. If you want even faster results, consider using a pressure cooker. It reduces cooking time significantly and keeps the flavors locked in. You’ll enjoy a delicious meal in no time!
Pro Tips
- Use Fresh Spices: Fresh spices provide a more vibrant flavor than older, stale ones. Consider purchasing whole spices and grinding them just before use for maximum potency.
- Adjust Consistency: If you prefer a thicker soup, reduce the amount of vegetable broth or let it simmer longer. For a thinner soup, simply add more broth or coconut milk.
- Top with Crunch: Add a crunchy element such as toasted coconut flakes or roasted chickpeas on top of the soup for a delightful texture contrast.
- Make it Ahead: This soup tastes even better the next day! Prepare it in advance and store it in the refrigerator to allow the flavors to meld beautifully.
Variations
Ingredient Substitutions
You can easily switch out some ingredients in this soup. For vegetarian or vegan options, simply use vegetable broth instead of chicken broth. This soup is already vegan because it uses coconut milk. You can add more veggies like spinach, zucchini, or sweet potatoes. These will add flavor and color. Each choice will change the taste a bit, which makes it fun to experiment.
Spice Level Adjustments
Want more heat? You can add chili peppers or red pepper flakes to the soup. Start with a small amount and taste as you go. If you prefer less spice, reduce the amount of curry powder. This keeps the dish flavorful but mild. You can also use a milder curry powder for a gentler taste.
Alternative Serving Suggestions
This soup is great on its own, but pairing it with rice or crusty bread makes it even better. The rice soaks up the soup’s flavors. If you want, serve it as a main dish or as a side. It works well with grilled chicken or fish too. Enjoying this soup in different ways keeps meals fun and exciting!
Storage Info
Refrigerating Leftovers
To store coconut curry lentil soup, follow these simple steps:
– Let the soup cool down to room temperature.
– Transfer it to an airtight container.
– Store it in the fridge.
This soup lasts for about 3 to 4 days in the fridge. If you want to enjoy it later, make sure to label your container with the date. This way, you will know when to eat it.
Freezing Guidelines
If you want to keep the soup for longer, freezing is a great option. Here’s how:
– Pour the cooled soup into freezer-safe bags or containers.
– Leave some space at the top for expansion.
– Seal tightly and label with the date.
Coconut curry lentil soup can last up to 3 months in the freezer. When you want to eat it, thaw it in the fridge overnight. To reheat, warm it in a pot on the stove or use the microwave. Add a splash of broth if it seems too thick. Enjoy your warm, comforting soup!
FAQs
What can I serve with Coconut Curry Lentil Soup?
You can serve Coconut Curry Lentil Soup with several tasty sides. Here are some ideas:
– Warm naan or pita bread
– Steamed rice or quinoa
– A fresh salad with greens and lemon dressing
– Roasted or grilled veggies
– Crispy plantain chips
These sides balance the soup’s richness and add texture to your meal.
Can I make this soup in advance?
Yes! You can make this soup ahead of time. Here are some tips:
– Cook the soup and let it cool.
– Store it in an airtight container in the fridge for up to three days.
– You can also freeze it for long-term storage; it lasts for about three months.
– To reheat, warm it on the stove over low heat. Add a splash of broth if it seems thick.
Is this soup gluten-free?
Yes, Coconut Curry Lentil Soup is gluten-free. The main ingredients, like lentils and vegetables, do not contain gluten. If you use vegetable broth, check the label to ensure it’s gluten-free. This soup is a great option for those with gluten sensitivities.
This blog post covered how to make a delicious Coconut Curry Lentil Soup. We discussed key ingredients like red lentils, coconut milk, and spices. You learned step-by-step instructions on preparing, cooking, and serving the soup. I also shared tips for perfecting flavor and variations to keep it interesting. Remember, you can adjust spices to suit your taste. Store leftovers properly to enjoy later. This soup is not just tasty; it’s simple to make and can be a delightful addition to your meals. Enjoy cooking and happy eatin


