Cranberry Orange Energy Bites Healthy Snack Boost

Looking for a quick snack that boosts your energy without the guilt? Cranberry Orange Energy Bites are your answer! Packed with healthy ingredients like oats, almond butter, and dried cranberries, these bites are vibrant and tasty. In this post, I’ll guide you through making these delicious treats that offer flavor and nutrition. Trust me; your snack game is about to level up!
Ingredients
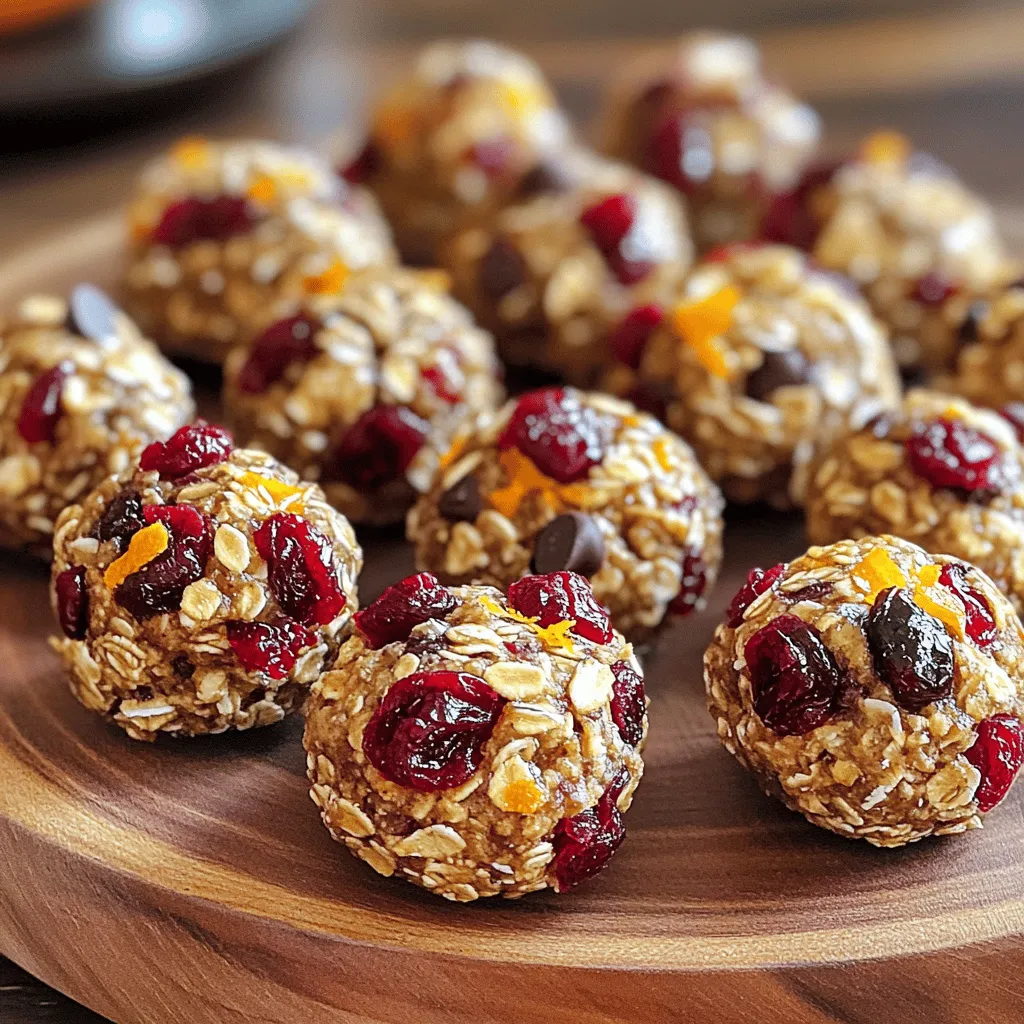
List of Required Ingredients
- 1 cup rolled oats
- ½ cup almond butter (or any nut butter of choice)
- ½ cup honey or maple syrup
- 1 cup dried cranberries, chopped
- Zest of 1 large orange
- ¼ cup fresh orange juice
- ½ cup ground flaxseed
- ¼ cup mini dark chocolate chips (optional)
- Pinch of salt
For these tasty Cranberry Orange Energy Bites, you will need simple ingredients. Rolled oats give a great base. Almond butter adds creaminess and protein. Honey or maple syrup gives sweetness. Chopped dried cranberries add chewiness and tartness. The zest and juice from the orange brighten the flavors. Ground flaxseed adds fiber and healthy fats. Dark chocolate chips are optional, but they bring a fun twist.
Using these key ingredients, you create a healthy snack. Each bite is packed with energy. They are perfect for busy days or after workouts. Plus, you can make them in just 15 minutes. Eating these bites can help you feel full and satisfied.
Nutritional Information
- Calories per serving: About 100 calories
- Macronutrient breakdown:
- Protein: 3g
- Fats: 4g
- Carbs: 14g
These energy bites are not just tasty; they are good for you too. Each serving has about 100 calories. You get a balance of protein, fats, and carbs. Almond butter and flaxseed give healthy fats. Dried cranberries add vitamins and antioxidants.
Eating these bites can support your health. They provide energy for your day. The oats help keep you full, while the orange gives a boost of vitamin C. With these bites, you enjoy a snack that tastes great and fuels your body.
Step-by-Step Instructions
Preparation Steps
Combining the base ingredients
Start by taking a large bowl. Add 1 cup of rolled oats, ½ cup of almond butter, and ½ cup of honey or maple syrup. Mix these until they blend smoothly. This forms the base of your energy bites.
Incorporating cranberries and orange flavors
Next, add 1 cup of chopped dried cranberries, the zest of 1 large orange, and ¼ cup of fresh orange juice. Then, include ½ cup of ground flaxseed and a pinch of salt. Stir well until all flavors mix evenly.
Chilling the mixture for better texture
Once mixed, place the bowl in the refrigerator. Let it chill for about 30 minutes. This helps the mixture firm up, making it easier to roll into bites.
Rolling and Storing
Forming the energy bites
After chilling, take the mixture out. Scoop about a tablespoon of the mixture. Roll it into small balls, roughly 1 inch in size. Place each ball on a parchment-lined sheet or plate.
Recommendations for airtight storage
Once you roll all the bites, store them in an airtight container. You can keep them in the fridge for up to one week. This keeps them fresh and tasty.
Tips for freezing energy bites
If you want to store them longer, freeze the energy bites. Place them in a freezer-safe container. When you’re ready to eat, thaw them in the fridge overnight for the best taste.
Tips & Tricks
Textural Adjustments
To change the texture of your energy bites, you can adjust the oats. For chewier bites, use less ground flaxseed. If you want them firmer, add a bit more. You might also try adding a bit of coconut flour for extra firmness.
When it comes to sweeteners, honey and maple syrup both work well. Honey gives a rich flavor, while maple syrup adds a light touch. If you use agave syrup, it will be sweeter and thinner. Adjust the amount accordingly for your taste.
Flavor Enhancements
Adding spices can elevate the taste of your energy bites. Cinnamon or ginger adds warmth. A pinch of nutmeg can bring a nice twist. You can also explore adding vanilla extract for a sweet aroma.
If you want to skip dark chocolate chips, try using chopped nuts or seeds. Dried fruits like apricots or figs can also work well. They can add a pop of flavor while keeping the bites healthy.

Variations
Different Base Ingredients
You can easily switch almond butter for other nut butters. Peanut butter works well if you enjoy its rich taste. Cashew butter gives a creamy texture that many love. Just remember, each nut butter brings its own flavor.
You can also try using agave syrup instead of honey. Agave syrup is a great option for vegans. It has a mild flavor that blends well with the other ingredients. This swap may change the texture slightly, but you’ll still enjoy a delicious snack.
Flavor Combinations
Adding nuts or seeds to your energy bites enhances the crunch. Chopped walnuts or almonds add a lovely texture. Sunflower seeds or pumpkin seeds also boost nutrition and flavor.
Trying different dried fruits can add a unique twist. Dried apricots or figs pair nicely with cranberries. You can also mix in raisins for extra sweetness. Each fruit brings its own taste and health benefits, making your bites even more exciting.
Storage Info
Short-term Storage
To keep your Cranberry Orange Energy Bites fresh, store them in the fridge. Use an airtight container. This will help prevent them from drying out. They stay good for about one week. Make sure to label the container with the date. This way, you know when to eat them.
Long-term Storage
For longer storage, freezing is the best option. Simply place the energy bites in a freezer-safe bag. Remove as much air as possible before sealing. This helps prevent freezer burn. You can freeze them for up to three months.
When you’re ready to eat, take out the bites and thaw them in the fridge. Give them a few hours to soften. For a quick option, you can leave them at room temperature for about 30 minutes. This keeps their taste fresh and enjoyable.
FAQs
Can I use fresh cranberries instead of dried?
Yes, you can use fresh cranberries. However, fresh ones are tart and have more water. This may change the texture of your energy bites. Dried cranberries are sweeter and help bind the mixture better. If you want to use fresh cranberries, chop them small and add a bit more nut butter or oats to balance the moisture.
How long can I store these energy bites?
You can store these energy bites in an airtight container in the fridge for up to one week. They stay fresh and tasty during this time. If you want them to last longer, freeze them. They keep well in the freezer for about three months. Just thaw them in the fridge before eating.
Are there any allergy-friendly substitutions available?
Yes, there are many options! Use sunbutter or soy nut butter if you have nut allergies. For a vegan option, swap honey for maple syrup. You can also use gluten-free oats if you need a gluten-free snack. Always check labels to ensure all ingredients fit your dietary needs.
Can I double the recipe? If so, how?
Absolutely! Doubling the recipe is easy. Just use two cups of oats, one cup of nut butter, and so on.It’s a great way to have snacks ready for the week!
These energy bites are easy to make and packed with flavor. We covered simple steps from mixing ingredients to shaping the bites. You learned how to tweak texture and flavor to suit your taste. Storing options help you keep these treats fresh.
Experiment with different ingredients and flavors to find your favorite mix. Enjoy these bites as a healthy snack anytime. They offer great nutrition and convenience. Make them today and see how they boost your energy!


, just follow the steps as usual. This blog post shared a simple and tasty creamy roasted red pepper pasta recipe. You learned about key ingredients, cooking steps, and storage tips. I also covered different variations, like adding proteins or making it vegan. Embrace your creativity in the kitchen! Experiment with flavors and ingredients you love. A delicious dish is just a recipe away. Enjoy your cooking adventure!](https://dailydishlab.com/wp-content/uploads/2025/06/2529ec18-61a8-42ae-8447-1e8f4d1f05d6-768x768.webp)
![To make Lemon Dill Grilled Salmon, you need a few simple yet fresh ingredients. Here’s the list: - Fresh Salmon Fillets - Fresh Dill - Lemon - Garlic - Olive Oil - Honey - Seasoning: Salt and Pepper - Lemon Slices for Garnish Each ingredient plays a key role in creating the bright and delicious taste of this dish. Fresh salmon fillets give you a rich flavor and perfect texture. The fresh dill adds a fragrant herb note that pairs well with the fish. Lemon provides the zesty brightness that cuts through the richness of the salmon. Garlic gives depth, while olive oil adds a smooth finish. Honey balances the flavors with just a hint of sweetness. Finally, salt and pepper enhance everything, and lemon slices make for a lovely garnish. You can find the full recipe with detailed steps to prepare this dish easily. Enjoy the process of cooking and savor the delightful taste! - In a mixing bowl, combine the chopped dill, lemon zest, lemon juice, minced garlic, olive oil, honey, salt, and pepper. - Whisk the ingredients together until well blended to create a marinade. This step is key. The mix of flavors will soak into the salmon. - Place the salmon fillets in a resealable plastic bag or shallow dish. Pour the marinade over the top. - Seal the bag or cover the dish. This ensures the salmon gets coated well. Marinate in the refrigerator for 30 minutes to 1 hour for maximum flavor. The longer you marinate, the more taste you get. - Preheat your grill to medium-high heat. This helps cook the salmon evenly. - Remove the salmon from the marinade and let any excess drip off. Discard the marinade for safety. - Grease the grill grates with a little olive oil. This helps prevent sticking. - Place the salmon fillets skin-side down on the grill. Grill for 4-6 minutes without moving them. This allows the skin to become crispy. - Carefully flip the salmon fillets using a wide spatula. Grill for an additional 4-6 minutes. The fish should be opaque and flake easily with a fork. Adjust the time based on the thickness of your fillets. - Remove the salmon from the grill and let it rest for a couple of minutes. Resting helps keep it juicy. - Serve the grilled salmon garnished with fresh lemon slices and a sprinkle of additional dill if desired. Enjoy the fresh taste! For the complete recipe, check out the Full Recipe link. To enhance flavor with the marinade, use fresh ingredients. Fresh dill, garlic, and lemon add zest to the salmon. Combine these ingredients in a bowl and whisk until well mixed. This step makes every bite burst with flavor. Marinating is key, too. Let the salmon sit in the marinade for at least 30 minutes. This time allows the flavors to soak in deeply. For best results, aim for one hour. To prevent sticking on the grill, grease the grates with olive oil. This simple tip helps the salmon slide off easily. Place the salmon skin-side down on the grill first. Grill for 4-6 minutes without moving it. This helps the skin get crispy. To check for doneness, look for opaque flesh that flakes easily. If your salmon is thick, it may need a bit more time. Always use a wide spatula when flipping. This supports the fillet and keeps it intact. For a complete meal, pair your salmon with fresh vegetables or a light salad. Steamed asparagus or roasted broccoli complement the dish well. You can also serve it with rice or quinoa for a filling side. Don’t forget to garnish with lemon slices. They add a bright touch and extra flavor. Enjoy your delicious meal! For the full recipe, check out the detailed steps above. {{image_2}} Alternative Herbs and Spices You can switch up the herbs in this dish. Try fresh parsley or basil instead of dill. These herbs add unique tastes and aromas. Adding a pinch of red pepper flakes gives a bit of heat. This twist can make your salmon extra special. Different Citrus Options Lemon is great, but don’t stop there. Use lime or orange juice for a different kick. Each citrus option brings its own flavor. You can mix citrus juices for a fun blend. This variation makes the dish exciting and fresh. Oven-Baked Lemon Dill Salmon Baking salmon is simple and tasty. Preheat your oven to 375°F. Place the marinated salmon on a baking sheet. Bake for 15 to 20 minutes. Check for flakiness to know when it's done. This method keeps the salmon moist and flavorful. Pan-Seared Lemon Dill Salmon Pan-searing gives a crispy outer layer. Heat oil in a pan over medium heat. Add the salmon skin-side down and cook for 4-5 minutes. Flip and cook for another 4-5 minutes. This method enhances the flavor and adds a nice texture. Low-Carb and Keto Options This recipe is already low in carbs. You can keep it keto-friendly by using healthy fats. Olive oil works great here. You can also serve it with low-carb veggies like zucchini or asparagus. Gluten-Free Modifications This dish is naturally gluten-free. Just make sure all your ingredients are gluten-free. Check the labels on the olive oil and honey. This way, you can enjoy this dish without any worries. For the full recipe, check the earlier section and get started on this delicious meal! After grilling your lemon dill salmon, you may have some leftovers. To keep your salmon fresh, follow these best practices for refrigeration: - Cool it down first. Let the salmon reach room temperature before storing. - Use an airtight container. This helps prevent odors and keeps the salmon moist. - Refrigerate within two hours. This keeps bacteria from growing. If you want to enjoy your salmon later, freezing is a great option. Here's how to freeze salmon safely: - Wrap each fillet tightly. Use plastic wrap or aluminum foil to prevent freezer burn. - Place in a freezer bag. Squeeze out as much air as possible before sealing. - Label and date it. This helps you keep track of how long it’s been in the freezer. When it's time to enjoy your leftover salmon, reheating correctly is key to keeping the flavor and texture. Here are some recommended methods: - Oven method: Preheat your oven to 275°F (135°C). Place the salmon on a baking sheet and cover it with foil. Heat for about 15 minutes. - Stovetop method: Heat a non-stick skillet over medium-low heat. Add a splash of water or broth. Place the salmon in the skillet, cover, and heat for 5-7 minutes. To maintain the flavor and texture, avoid using a microwave. Microwaving can dry out the salmon and make it tough. Enjoy your delicious lemon dill grilled salmon again with these easy tips. And don't forget to check out the Full Recipe for more details! Marinating salmon for 30 minutes to 1 hour works best. This time allows the flavors to soak in without overpowering the fish. If you marinate for too long, the texture may change. Always keep it in the fridge while marinating to keep it fresh. Yes, you can use dried dill instead of fresh. Use about one-third of the amount since dried herbs are stronger. Fresh dill gives a brighter flavor, but dried dill still works well in a pinch. Grill your salmon at medium-high heat, around 375°F to 400°F. This heat helps create a nice sear while keeping the inside tender. If your grill runs hotter, reduce the heat slightly. - What if my salmon fillets are thick or thin? For thick fillets, increase the grilling time by a few minutes. For thin fillets, decrease the time. Always check for doneness by seeing if the fish flakes easily with a fork. Salmon is rich in omega-3 fatty acids, which are good for your heart. It also has high-quality protein that helps build muscle. Salmon is packed with vitamins like B12, D, and selenium. Eating salmon can boost brain health and improve mood. For the full recipe, please refer to [Full Recipe]. This blog post gives you the keys to grill perfect salmon. We covered essential ingredients, marinating tips, and grilling techniques. With the right marinade and careful cooking, you'll impress at every meal. Plus, explore tasty variations to keep it fresh and exciting. Store leftovers smartly and reheat without losing flavor. By following these steps, you can enjoy delicious salmon that is healthy and easy to make. Embrace these tips to make every salmon dish a hit!](https://dailydishlab.com/wp-content/uploads/2025/06/c925202d-eb72-4cda-aa67-938206b6f665-768x768.webp)
. First, preheat your oven to 350°F (175°C). This makes sure your casserole cooks evenly. Next, grab a large baking dish. Spread a thin layer of alfredo sauce on the bottom. This helps prevent sticking. Now, let’s sauté some garlic and onion. In a skillet, heat a tablespoon of oil over medium heat. Add the minced garlic and diced onion. Cook until the onion is clear, about 4-5 minutes. This step brings out great flavor. Next, add the shredded chicken, black beans, corn, cumin, chili powder, salt, and pepper. Mix well and cook for 3-4 minutes. This allows the flavors to blend nicely. Now, let’s dip the tortillas in alfredo sauce. Coat both sides lightly for the best flavor. Lay 6 tortillas flat in the baking dish. Overlap them slightly, if needed. Next, it's time to assemble the layers. Spread half of the chicken and bean mixture over the tortillas. Then, sprinkle half of the shredded cheese on top. Repeat this process with the remaining tortillas and chicken mixture. Finish by pouring the rest of the alfredo sauce and topping with the last of the cheese. To bake, cover the dish with aluminum foil, shiny side in. Bake for 25 minutes. This keeps moisture in. After that, remove the foil and bake for another 10-15 minutes. You want the cheese to be bubbly and golden brown. Let the casserole cool for 5 minutes before serving. Garnish with fresh cilantro for a tasty touch. For the full recipe, check out the complete details. You can make this casserole a day before. Just prepare each part and store them in the fridge. Keep the tortillas, chicken mixture, and sauce separate until you are ready to bake. This way, the flavors blend well. When ready, layer as directed in the Full Recipe. Bake it straight from the fridge for about 10 extra minutes. Taste is key. Adjust the seasoning to fit your preference. If you like it spicier, add more chili powder. For a creamier texture, stir in a bit more alfredo sauce. You can also mix in a splash of milk or cream for extra richness. This makes every bite so much better. Pair your casserole with simple side dishes like a fresh salad or rice. These balance the cheesy richness of the enchiladas. For garnish, sprinkle fresh cilantro on top. You could also add sliced green onions or diced tomatoes for color. This makes your dish look as good as it tastes! {{image_2}} You can switch up the protein in this dish. Instead of chicken, try beef or shrimp. Ground beef adds a nice flavor. Shrimp gives a light touch. Both options work well with the creamy sauce. For a vegetarian version, use black beans or lentils. They add protein and keep it satisfying. Boost the flavor by adding spices. Try a pinch of cayenne for heat. You can also mix in smoked paprika for a smoky taste. Adding vegetables makes it even better. Bell peppers, spinach, or zucchini all work great. They add color and nutrients to your meal. If you need a gluten-free meal, corn tortillas are your best choice. They hold up well and taste great. You can also find gluten-free alfredo sauce at the store. Check labels to ensure it meets your needs. This way, everyone can enjoy the casserole without worry. For the full recipe, be sure to check out the ingredients and instructions. To keep your Chicken and Cheese Enchiladas Alfredo Casserole fresh, use airtight containers. Glass or plastic containers with tight lids work best. This keeps the casserole from drying out and helps it stay tasty. In the fridge, the casserole lasts about three to four days. You can freeze the casserole before or after baking. If you freeze it before baking, wrap it tightly in plastic wrap and then again in foil. This helps prevent freezer burn. If you choose to freeze it after baking, wait for it to cool first. Then, store it in a freezer-safe container. When you are ready to eat, thaw the casserole overnight in the fridge. To reheat, place it in the oven at 350°F (175°C) until warm all the way through. You can also microwave it for a quicker option, but check often to avoid overcooking. Enjoy your delicious casserole, even days later! For the full recipe, check out the complete details. How to reheat Chicken and Cheese Enchiladas Alfredo Casserole? To reheat, preheat your oven to 350°F (175°C). Place the casserole in a baking dish and cover with foil. Bake for about 20 minutes or until hot. You can also use a microwave. Heat in short intervals, stirring in between, until warm. Can I make it ahead of time? Yes, you can prepare the casserole a day before. Assemble it and store it in the fridge. Just bake it when you’re ready to serve. This saves time and adds flavor as it sits. What can I serve with Chicken and Cheese Enchiladas Alfredo Casserole? I love serving this casserole with a fresh salad or some Mexican rice. You can also add guacamole, sour cream, or fresh salsa. These sides balance the richness and make the meal more delicious. What’s the best way to adjust the spice level? To change the spice level, you can add more or less chili powder. If you want it milder, skip the chili powder. For more heat, add diced jalapeños or a dash of hot sauce. How to tell when it's done baking? You’ll know it’s done when the cheese is bubbly and golden brown. The casserole should be hot all the way through. A knife inserted in the center should come out warm. Enjoy the full recipe to make this dish shine! This blog post covered a delicious Chicken and Cheese Enchiladas Alfredo Casserole. We discussed the key ingredients, including chicken, tortillas, and cheese. I offered tips on how to prepare, layer, and bake the dish for perfect results. Remember to try the variations to suit your taste. In summary, this dish is easy to make and full of flavor. It works well for gatherings or busy weeknights. Enjoy this tasty casserole and make it your own!](https://dailydishlab.com/wp-content/uploads/2025/06/c52f16b1-e126-40f1-801c-467dac7db649-768x768.webp)
