Creamy Avocado Lime Pasta Delicious and Easy Meal

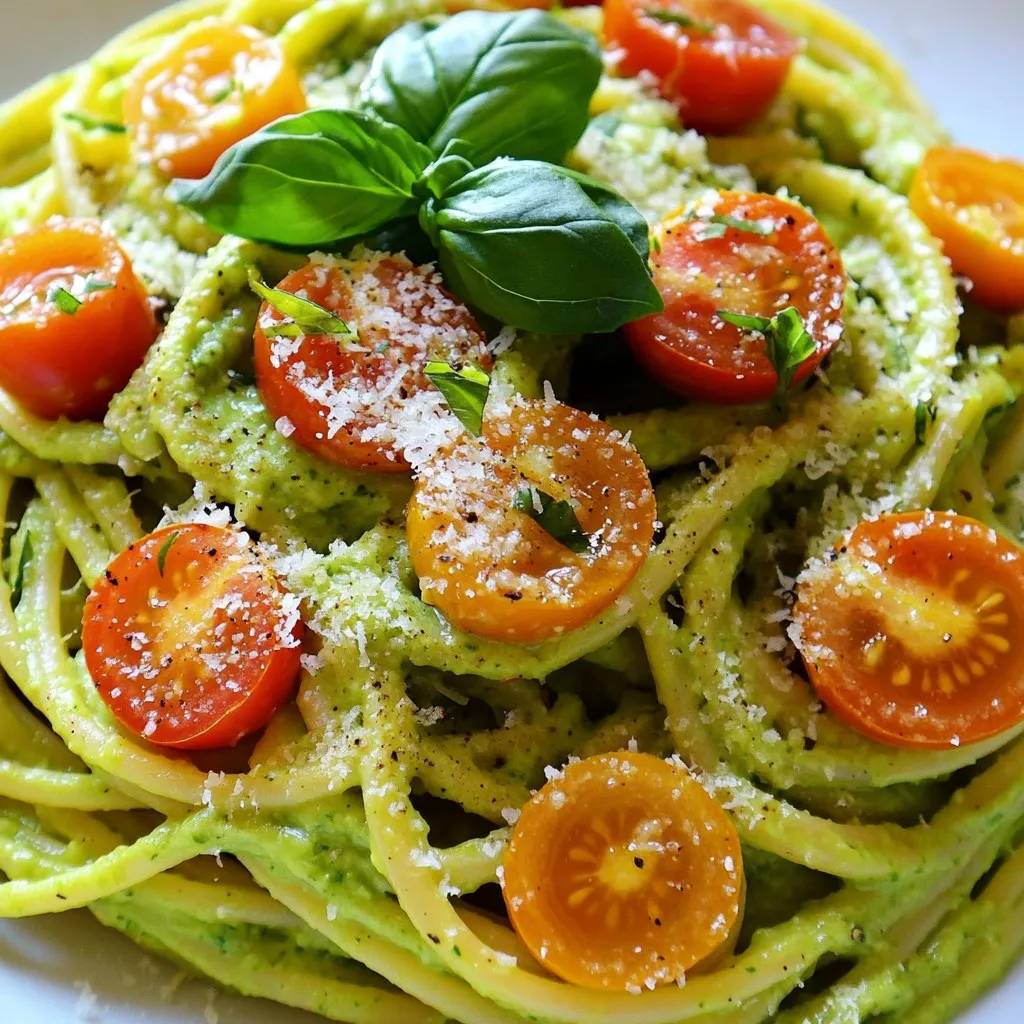
Looking for a tasty meal that’s quick to make? You’re in the right place! My Creamy Avocado Lime Pasta is a flavorful delight that mixes creamy avocado with zesty lime. It’s not just easy; it’s also packed with fresh ingredients that will leave you feeling satisfied. Whether you’re busy or just love cooking, this dish will impress your taste buds. Let’s jump into the details of this delicious meal!
Why I Love This Recipe
- Quick and Easy: This pasta dish can be made in just 20 minutes, making it perfect for a quick weeknight dinner.
- Healthy Ingredients: Packed with nutritious avocados, this recipe is a great way to incorporate healthy fats into your diet.
- Vibrant Flavor: The combination of lime and basil adds a fresh and zesty flavor that brightens up the dish.
- Customizable: You can easily modify this recipe by adding your favorite vegetables or proteins for a heartier meal.
Ingredients
List of Ingredients
To make creamy avocado lime pasta, you will need the following ingredients:
- 2 ripe avocados, pitted and peeled
- 2 tablespoons fresh lime juice
- 2 cloves garlic, minced
- 1/4 cup olive oil
- 1/4 cup fresh basil leaves
- Salt and pepper to taste
- 12 oz spaghetti or your choice of pasta
- 1/2 cup cherry tomatoes, halved
- 1/4 cup grated Parmesan cheese (optional)
Ingredient Substitutions
You can easily swap some ingredients if you don’t have them. Here are a few ideas:
- Use lemon juice instead of lime juice for a different taste.
- If you don’t have fresh basil, try parsley or cilantro.
- You can use any pasta you like, such as penne or fettuccine.
- For a vegan option, skip the Parmesan cheese or use a nut-based cheese.
Importance of Fresh Ingredients
Using fresh ingredients makes your dish taste better. Ripe avocados create a smooth and creamy sauce. Fresh lime juice adds a bright, zesty flavor. Fresh garlic gives a nice kick. Fresh basil adds a lovely aroma and taste. When you use fresh ingredients, you make your meal healthier and more enjoyable. Always choose the best you can find for the best results!

Step-by-Step Instructions
Preparing the Pasta
First, put a large pot of water on the stove. Add a good amount of salt to the water. Bring it to a boil. Once it’s boiling, add 12 ounces of spaghetti or your favorite pasta. Cook the pasta according to the package instructions until it is al dente. This usually takes about 8 to 10 minutes. Before draining, save 1 cup of the pasta water. This water helps to make the sauce creamy later. After saving the water, drain the pasta in a colander.
Making the Avocado Lime Sauce
While the pasta cooks, it’s time to make the sauce. Grab a blender or food processor. Add 2 ripe avocados that are pitted and peeled. Then, add 2 tablespoons of fresh lime juice and 2 cloves of minced garlic. Toss in 1/4 cup of fresh basil leaves and 1/4 cup of olive oil. Season with salt and pepper to taste. Blend these ingredients until the mixture is smooth and creamy. If the sauce seems too thick, add a little of that reserved pasta water until you like the consistency.
Combining and Serving the Dish
Once the pasta is done, return it to the pot. Pour the creamy avocado lime sauce over the hot pasta. Gently toss everything together until the pasta is well coated. Next, fold in 1/2 cup of halved cherry tomatoes. Mix again to make sure the tomatoes are evenly spread. Taste your dish and adjust the seasoning if needed. You may want to add more salt, pepper, or lime juice. Serve the pasta warm and sprinkle with 1/4 cup of grated Parmesan cheese if you like. Enjoy this bright and fresh meal!
Tips & Tricks
How to Achieve the Perfect Creamy Texture
To get the best creamy texture, use ripe avocados. They should feel soft but not mushy. Blend them well with lime juice and olive oil. This mix creates a smooth sauce. If it’s too thick, add some pasta water. Start with a little, then blend again until it’s just right.
Adding More Flavor
Want to jazz up the taste? Try adding more garlic or fresh herbs. You can also mix in a pinch of red pepper flakes for heat. A splash of lime zest gives a bright kick. Consider using lemon juice instead of lime for a different twist.
Serving Suggestions and Pairings
Serve your creamy avocado lime pasta with fresh greens. A light salad with lemon vinaigrette works well. You can also add grilled chicken or shrimp for protein. For a fun touch, sprinkle extra cherry tomatoes on top. Lastly, enjoy the dish with a chilled glass of white wine for a perfect meal!
Pro Tips
- Use Ripe Avocados: Ensure your avocados are perfectly ripe for the creamiest sauce. A ripe avocado should yield slightly to gentle pressure.
- Balance the Lime: Adjust the lime juice to your taste. Start with less and add more if you want a tangier flavor, keeping in mind that fresh lime juice can vary in acidity.
- Reserve Pasta Water: Always reserve some pasta water before draining. It helps to adjust the sauce consistency and helps it adhere better to the pasta.
- Customize with Vegetables: Feel free to add more veggies like spinach, arugula, or bell peppers for added nutrition and color to your dish.

Variations
Vegan-Friendly Adjustments
To make this dish vegan, skip the Parmesan cheese. The avocado already gives a creamy feel. You can also add nutritional yeast instead of cheese for a cheesy flavor. This keeps the dish tasty while sticking to vegan rules.
Gluten-Free Options
If you need a gluten-free meal, choose gluten-free pasta. Many brands offer great options. Rice or quinoa pasta works well too. They cook nicely and hold the creamy sauce just right.
Additional Ingredients for Customization
You can add more veggies to boost flavor and nutrition. Try adding spinach or zucchini. For a bit of spice, toss in some red pepper flakes. You can also mix in some cooked chicken or shrimp for extra protein. This dish is very flexible, so feel free to get creative with your favorite ingredients!
Storage Info
How to Store Leftovers
To store leftover creamy avocado lime pasta, place it in an airtight container. Make sure to cover it tightly. This way, it stays fresh longer. You can keep it in the fridge for up to three days. If you want to enjoy it later, it’s best to store the sauce and pasta separately. This keeps the texture nice.
Reheating Tips
When you’re ready to enjoy the pasta again, gently reheat it. You can use a microwave or a pan. If using a microwave, heat it in short bursts. Stir after each burst to ensure even warming. If it’s too thick, add a splash of pasta water. This will help bring back its creamy texture. If using a pan, warm it on low heat. Stir often to avoid sticking.
Freezing Options
Freezing creamy avocado lime pasta is possible, but the texture may change. If you want to freeze it, store the sauce and pasta separately. Place them in airtight containers. You can freeze the sauce for up to three months. When ready to eat, thaw it in the fridge overnight. Reheat as explained above. Remember, the fresh taste may not be the same, but it will still be tasty!
FAQs
Can I make this dish ahead of time?
Yes, you can make this dish ahead of time. Cook the pasta and prepare the sauce. Store them separately in the fridge. When you are ready to eat, combine them. This keeps the pasta fresh and tasty.
What type of pasta works best?
I love using spaghetti for this dish. It holds the creamy sauce well. You can also use fettuccine or penne if you prefer. Just ensure the pasta is cooked until al dente for the best texture.
How do I prevent the avocado from browning?
To stop avocados from browning, use fresh lime juice. Lime helps slow down oxidation. Store the sauce in an airtight container. If you have leftovers, eat them soon for the best flavor and color.
In this blog post, we explored fresh ingredients, step-by-step instructions, and handy tips for making a delicious avocado lime pasta. You learned about ingredient swaps, how to achieve creaminess, and suggested pairings. Remember, always use fresh ingredients for the best flavor. Customize your dish to suit your needs, whether vegan or gluten-free. Store leftovers properly to enjoy later. With these insights, you can create an amazing meal that delights your taste buds. Enjoy your cooking and the delicious result

Creamy Avocado Lime Pasta
Ingredients
- 2 whole ripe avocados, pitted and peeled
- 2 tablespoons fresh lime juice
- 2 cloves garlic, minced
- 1 quarter cup olive oil
- 1 quarter cup fresh basil leaves
- to taste salt
- to taste pepper
- 12 oz spaghetti or your choice of pasta
- 1 half cup cherry tomatoes, halved
- 1 quarter cup grated Parmesan cheese (optional)
Instructions
- Begin by boiling salted water in a large pot. Cook the pasta according to the package instructions until al dente. Reserve 1 cup of pasta water before draining.
- In a blender or food processor, combine the ripe avocados, lime juice, minced garlic, basil leaves, olive oil, salt, and pepper. Blend until smooth and creamy. If the sauce is too thick, add a bit of the reserved pasta water until reaching your desired consistency.
- Once the pasta is cooked and drained, return it to the pot. Pour the avocado lime sauce over the pasta and gently toss until every strand is well coated.
- Add halved cherry tomatoes and toss again until evenly distributed.
- Taste the pasta and adjust seasoning with more salt, pepper, or lime juice as preferred.
- Serve immediately, garnished with grated Parmesan cheese if desired.


![To make the perfect cheesesteak, you need a few key ingredients: - 1 lb ribeye steak, thinly sliced against the grain - 4 slices provolone cheese or Cheez Whiz - 4 fresh hoagie rolls Ribeye steak is great because it has a lot of flavor. Thin slices help it cook fast. Provolone cheese adds a nice, creamy texture. Cheez Whiz gives a fun twist. The hoagie rolls hold all the goodness together. You can make your cheesesteak even better with some optional ingredients: - Bell peppers (red or green) - Sliced jalapeños - Seasonings and spices Bell peppers add sweetness and color. Sliced jalapeños bring heat and spice. You can also add spices like garlic powder and pepper for extra flavor. Feel free to mix and match these ingredients. This way, you can create a cheesesteak that fits your taste! For the full recipe, check out the Ultimate Cheesesteak Sandwich. - Preheat the skillet: Start by heating a large skillet over medium-high heat. Add 2 tablespoons of olive oil. Let it heat until it shimmers. - Season the ribeye steak: Take 1 pound of ribeye steak and slice it thinly against the grain. In a bowl, mix salt, freshly ground pepper, and 1 teaspoon of garlic powder. Coat the beef evenly with this mixture. - Sauté onions and bell peppers: Add 1 large thinly sliced onion and 1 bell pepper to the hot skillet. Cook for 3-4 minutes. Stir until they soften and smell great. - Combine steak with vegetables: Push the veggies to one side of the skillet. Add the seasoned ribeye to the other side. Cook for 5-7 minutes. Stir it now and then until the beef is browned to your liking. - Melt the provolone cheese: Once the steak is cooked, mix it with the veggies. Place 4 slices of provolone cheese on top. Cover the skillet with a lid for 2 minutes to melt the cheese nicely. - Toasting the hoagie rolls: While the cheese melts, toast 4 fresh hoagie rolls in another skillet or toaster. Aim for a golden and crisp finish for added texture. Now you are ready to build your ultimate cheesesteak sandwich! Follow the [Full Recipe] for complete details. To make a great cheesesteak, start with ribeye steak. - How to slice ribeye against the grain: Look at the meat. The grain shows the direction of the fibers. Slice against the grain. This method makes the meat tender and easy to chew. - Choose the right thickness: Aim for slices about 1/8 inch thick. Thinner slices cook fast and soak up flavors. Getting the right flavor makes your cheesesteak special. - Importance of skillet temperature: Preheat your skillet over medium-high heat. A hot skillet sears the steak. This gives a nice crust and locks in juices. - Tips for achieving desired steak doneness: Cook steak for 5-7 minutes. Stir occasionally to avoid burning. Use a meat thermometer if you want to be precise. Aim for 130°F for medium-rare. Pair your cheesesteak with great sides to enhance the meal. - Best side dishes to pair: Crispy fries are classic. A fresh salad adds crunch and brightness. You can also try onion rings for a fun twist. - Quick condiment ideas: Serve with ketchup or hot sauce for extra flavor. Pickles add a nice crunch, too. Sliced jalapeños give a spicy kick. Follow these tips to elevate your ultimate cheesesteak. For detailed steps, check the Full Recipe. {{image_4}} For a classic cheesesteak, use provolone cheese or Cheez Whiz. Both melt well and add rich flavor. However, if you want to elevate your sandwich, try gourmet cheeses like sharp cheddar or creamy gouda. These options give you a unique twist. You can also add truffle oil or sautéed mushrooms for deeper taste. You can enjoy a cheesesteak without meat. Use portobello mushrooms or seitan as a meat substitute. Both add great texture and flavor. For cheese, try plant-based options like cashew cheese or vegan mozzarella. These substitutes melt nicely and taste amazing. The most famous cheesesteaks come from Philadelphia. They focus on thinly sliced ribeye with cheese on a soft roll. However, other regions have their spins. In Chicago, you might see giardiniera added for a spicy kick. In Texas, barbecue sauces give a sweet and smoky flavor. Each style brings its own unique toppings and spices, showcasing local tastes. For more about making your own cheesesteak, check out the Full Recipe. To keep your cheesesteak fresh, follow these steps: - Store leftovers in the fridge. Let them cool first. - Use airtight containers. Glass or plastic containers work well. - Separate layers with parchment paper. This prevents sogginess. Place your leftover cheesesteak in the fridge. It will stay good for 3 to 4 days. If you have extra filling, store it separately from the rolls. This keeps the bread fresh. Reheat your cheesesteak to bring back its flavor. Here’s how: - Use a skillet. Heat it over medium heat. Add a bit of oil. - Place the sandwich in the skillet. Cover it with a lid. This helps the cheese melt. - Heat for 5-7 minutes. Flip halfway to warm both sides. You can also use the microwave, but be careful. It can make the bread chewy. To keep the taste and texture, the skillet is best. Enjoy your delicious ultimate cheesesteak! For the full recipe, check out the complete instructions. The best cut for a cheesesteak is ribeye. Its marbling gives great flavor and tenderness. You can also use sirloin or flank steak, but ribeye is my top choice. Always slice against the grain for the best bite. This makes it easier to chew and helps keep the flavors locked in. You can skip the cheese and still have a tasty sandwich. Try adding toppings like sautéed mushrooms, avocado, or spicy mustard. Use roasted red peppers for a sweet flavor boost. You can also add fresh herbs, like basil or cilantro, for extra freshness. These alternatives keep your sandwich tasty and fun. To find great cheesesteaks, ask locals for their favorites. Check out food blogs or review sites for tips. Look for places that use fresh ingredients and have a good reputation. You can also explore food festivals or markets. These spots often showcase local chefs who make amazing cheesesteaks. Yes, you can freeze cheesesteak sandwiches! Wrap them tightly in plastic wrap or foil. Place them in an airtight container or freezer bag to prevent freezer burn. They can last up to three months in the freezer. When you're ready to eat, thaw in the fridge and reheat in the oven for the best taste. This guide has covered all you need to make the ultimate cheesesteak sandwich. From selecting the right ribeye steak and cheese to perfecting your cooking technique, you’re now equipped to create a tasty meal. Remember to customize your sandwich with your favorite ingredients and remember storage tips for leftovers. Enjoy exploring different styles and variations. Making a great cheesesteak can be fun and rewarding. Now, you can impress friends and family with your delicious creations. Happy cooking!](https://dailydishlab.com/wp-content/uploads/2025/06/698132e8-5117-44f3-910b-a554f39a5b8a-768x768.webp)
. {{image_2}} You can make this dish fit your needs. For those who need gluten-free options, use gluten-free tortillas. Many brands offer tasty choices that work well. Check your local store for these. If you prefer a vegetarian or plant-based meal, swap the chicken for tofu or tempeh. Cut them into strips like the chicken. Use the same spices to keep the flavor. Add extra veggies like zucchini or mushrooms for more texture. Want to spice things up? Try adding Southwestern style enhancements. You could mix in some jalapeños for heat or use chipotle powder for a smoky touch. These small changes can really boost the taste. Another fun option is to add fruits like pineapple or mango. These fruits add sweetness and balance the spices. Just chop them into small pieces and toss them with the chicken and veggies before baking. For the full recipe, check out the details above! How to make Easy Sheet Pan Chicken Fajitas spicier? You can add more chili powder to the mix. Try using diced jalapeños or cayenne pepper for more heat. You could also serve with a spicy salsa or hot sauce. Adjust the spice level to what your family enjoys. Can the recipe be doubled for larger gatherings? Yes, you can double the recipe. Just make sure your sheet pan is large enough. You may need to use two sheet pans to keep everything spread out. Watch the cooking time, as it might take a bit longer. What is the best way to slice chicken for fajitas? Slice the chicken against the grain. This will make the chicken tender. Aim for strips about 1 inch wide. This size cooks evenly and makes for easy eating. Can I use frozen chicken instead of fresh? You can use frozen chicken, but it needs to thaw first. Thaw it overnight in the fridge for best results. Cooking from frozen will not give you the best texture. What can I use instead of chicken? You can substitute chicken with firm tofu or shrimp. For a vegetarian option, try black beans or lentils. These alternatives will still soak up the spices well. Any alternatives for tortillas? If you want a low-carb option, you can use lettuce leaves. Corn tortillas are great too for a gluten-free choice. Feel free to get creative with what you have at home! In this article, I covered how to make Easy Sheet Pan Chicken Fajitas. We looked at key ingredients, step-by-step instructions, and essential tips to perfect the dish. I also shared variations for different diets and storage info for leftovers. Fajitas bring flavor and fun to any meal. You now have everything you need to make them at home. Enjoy experimenting with seasonings and serving styles. You’ll impress friends and family with your tasty creation!](https://dailydishlab.com/wp-content/uploads/2025/07/7054fb9d-0114-4a32-a9b5-20573e789247-768x768.webp)
. 1. First, preheat your oven to 400°F (200°C). This helps the meatballs cook evenly. 2. Next, line a baking sheet with parchment paper. This makes for easy cleanup later. 3. In a large bowl, combine the ground turkey, breadcrumbs, grated Parmesan, minced garlic, grated ginger, egg, black pepper, and salt. Mix gently until everything is just combined. 4. Using your hands, form the mixture into meatballs. Aim for about 1 to 1.5 inches in diameter. Place them on the prepared baking sheet. 1. In a small bowl, whisk together the honey, soy sauce, and sesame oil. This will be your tasty honey garlic sauce. 2. Brush or drizzle half of the honey garlic sauce over the meatballs. Ensure each meatball gets a good coat. 1. Now, bake the meatballs in the oven for 15 minutes. This helps them cook through. 2. After 15 minutes, take the meatballs out. Drizzle the remaining honey garlic sauce over them. 3. Return the meatballs to the oven for another 10 minutes. They should be golden brown and fully cooked. 4. Once done, remove the meatballs from the oven. Let them rest for a few minutes. 5. Before serving, garnish with chopped cilantro and sprinkle sesame seeds on top for a nice touch. For the full experience of these flavors, check out the Full Recipe. Enjoy your cooking! Choosing the right ground turkey is key. Use lean ground turkey for juicy meatballs. Look for a blend that is 93% lean or higher. This gives a nice balance of flavor and moisture. Mixing techniques matter too. Use your hands, but don’t overmix. Overmixing can make the meatballs tough. Just mix until all the ingredients hold together. This keeps them light and tender. Ensure even cooking by placing meatballs apart on the baking sheet. This allows heat to flow around each one. You can also turn them halfway through baking for a nice brown color all over. Adjusting sweetness and saltiness can enhance your dish. If you like it sweeter, add more honey. For more salt, increase the soy sauce. Taste as you go to get it just right. Try alternative sauces for a twist. You can use teriyaki sauce for a richer taste. Or mix in some sriracha for a spicy kick. These changes can make the meatballs feel new and exciting. Using gluten-free substitutes is easy. Swap regular soy sauce with tamari. This keeps all the great flavor while making it gluten-free. Plus, you can use gluten-free breadcrumbs for the same tasty meatballs. For the full recipe, check the earlier section of this article. {{image_2}} You can easily swap turkey for other meats. Chicken and beef work well in this recipe. They both give great flavor. Just keep the cooking times in mind. If you want a vegetarian option, try plant-based meatballs. They are tasty and healthy. Use lentils or chickpeas as the base. You can also find many brands ready to cook. Experiment with herbs for different flavors. Add basil, parsley, or oregano to mix it up. Each herb brings a new taste to the dish. The air fryer is a quick way to cook these meatballs. Set it to 375°F (190°C). Cook for about 12 minutes, turning halfway. This gives them a nice crispy outside. You can also use a slow cooker. Place the meatballs in the cooker and pour the honey garlic sauce over them. Cook on low for 4 hours. The meatballs will be juicy and full of flavor. Grilling adds a smoky taste. Preheat your grill and cook for about 10 minutes. Turn them often to avoid burning. This method gives a nice char and enhances the flavor even more. For the full recipe, check out the complete guide above. Store your leftover honey garlic turkey meatballs in the fridge. Use an airtight container to keep them fresh. They can last for about 3 to 4 days in the refrigerator. When you want to eat them, simply reheat in the microwave or warm them on the stove. You can freeze these meatballs for later use. Let them cool completely after cooking. Place them in a single layer on a baking sheet. Freeze for about an hour until firm. Then, transfer the meatballs to a freezer-safe bag or container. Label the bag with the date. They should stay good for about 3 months. When you want to enjoy them, take out the meatballs and let them thaw in the fridge overnight. For reheating, you can bake them in the oven at 350°F (175°C) for about 15 minutes. This will help them stay juicy and flavorful. For more details and the full recipe, check out the entire guide! How do I know when turkey meatballs are cooked? Turkey meatballs are done when they reach an internal temperature of 165°F (74°C). Use a meat thermometer to check. The outside should also be golden brown for best taste. Can I make honey garlic turkey meatballs ahead of time? Yes, you can prepare the meatballs ahead of time. Shape them and store them in the fridge for up to 24 hours. This saves time on busy days. What can I serve with honey garlic turkey meatballs? These meatballs pair well with jasmine rice, steamed veggies, or a fresh salad. You can also serve them as appetizers with toothpicks. Is this recipe suitable for meal prep? Absolutely! The meatballs store well in airtight containers. They can last in the fridge for 3 to 4 days, making them perfect for meal prep. Can I substitute honey for another sweetener? Yes, you can use maple syrup or agave nectar. They will give a similar sweetness without the honey flavor. How can I make these meatballs spicier? Add red pepper flakes or sriracha to the meatball mix. You can also drizzle hot sauce over the meatballs before serving for an extra kick. In this post, I shared a simple recipe for honey garlic turkey meatballs. We covered the key ingredients, from ground turkey to delicious sauce options. You learned how to prepare, bake, and store your meatballs. With tips on perfecting texture and flavor, plus variations for all diets, you can make this dish your own. Enjoy making these meatballs and impress your family with your cooking skills!](https://dailydishlab.com/wp-content/uploads/2025/07/69b29533-6935-43ed-a652-e91bcda4bd1d-768x768.webp)