

Are you ready to impress with a dish that’s both simple and full of flavor? In this article, I’ll guide you through making Creamy Garlic Spinach Chicken, a recipe that’s perfect for busy weeknights or cozy dinners. With just a few ingredients like juicy chicken breasts, fresh spinach, and rich cream, you’ll create a dish that’s not only tasty but also quick to whip up. Let’s dive in and transform your meal into something special!
Why I Love This Recipe
- Delicious Flavor: The combination of creamy sauce, garlic, and spinach elevates the chicken to a whole new level of deliciousness.
- Quick and Easy: This recipe comes together in just 30 minutes, making it perfect for a weeknight dinner.
- Healthy Ingredients: Fresh spinach and lean chicken breasts provide a nutritious meal that doesn’t compromise on taste.
- Versatile Dish: This creamy garlic spinach chicken pairs well with a variety of sides, from rice to pasta or even a fresh salad.
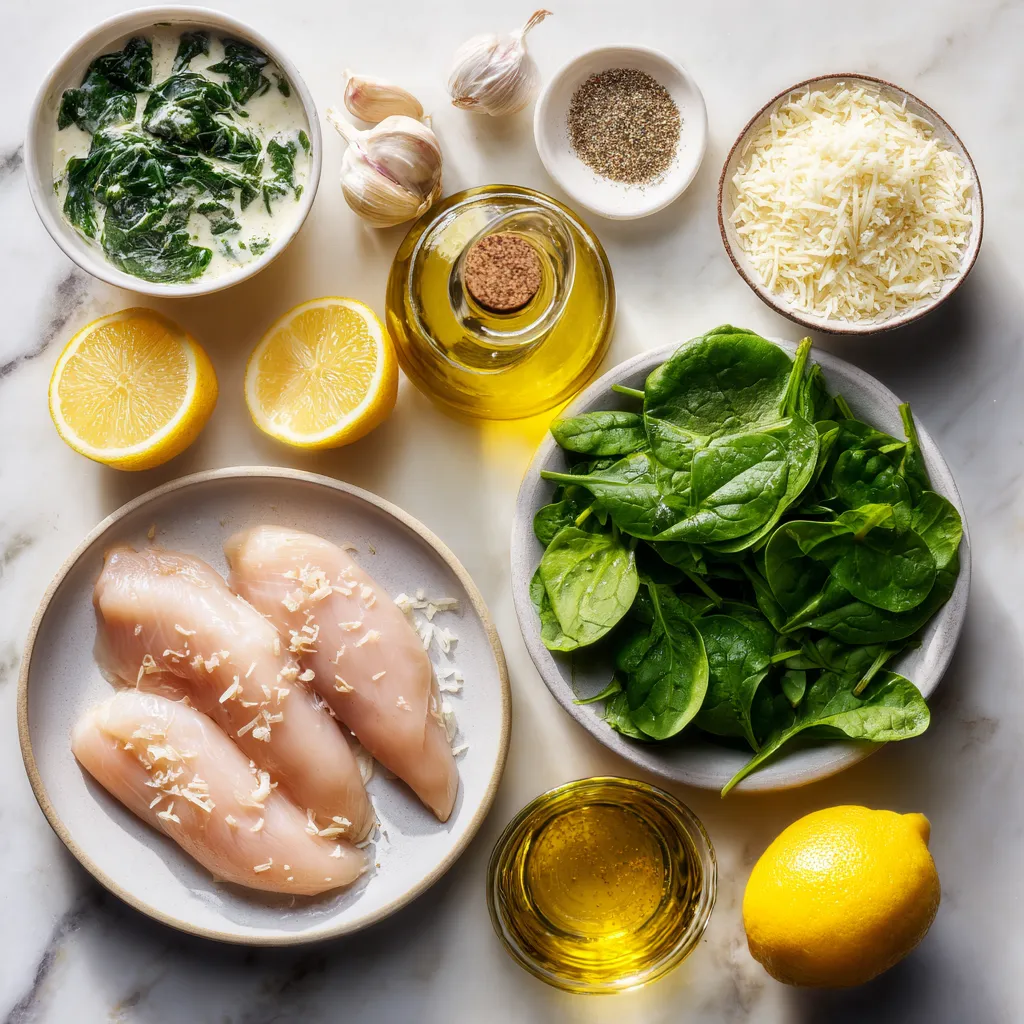
Ingredients
List of Main Ingredients
– 4 boneless, skinless chicken breasts
– 2 tablespoons olive oil
– 4 cloves garlic, minced
– 1 cup heavy cream
– 1 cup fresh spinach, chopped
– 1/2 cup grated Parmesan cheese
– 1 teaspoon Italian seasoning
– Salt and pepper to taste
– Lemon wedges for serving
When I make Creamy Garlic Spinach Chicken, I always start with the best ingredients. Fresh chicken breasts are key since they keep the dish moist. I prefer boneless and skinless because they cook evenly.
Next, I use olive oil. It adds a nice flavor and helps the chicken brown well. Garlic is a must. I use four cloves of minced garlic to give a strong taste.
For creaminess, I choose heavy cream. It makes the sauce rich and smooth. Fresh spinach is essential too. I chop it up and add it to the sauce. It wilts quickly and adds a pop of color.
Grated Parmesan cheese gives the dish a lovely salty bite. I sprinkle in Italian seasoning for a hint of herbs. Lastly, I always have salt and pepper on hand to adjust the flavor.
Don’t forget the lemon wedges! They add a bright touch when you squeeze them over the dish before eating. This combo makes a simple yet tasty meal that shines on any table.
Step-by-Step Instructions
Cooking the Chicken
1. Heat 2 tablespoons of olive oil in a large skillet over medium heat.
2. Season 4 boneless, skinless chicken breasts with salt and pepper on both sides.
3. Add the chicken to the skillet and cook for about 6-7 minutes on each side.
4. Look for a golden brown color. Once cooked through, remove the chicken and set it aside.
Making the Creamy Sauce
1. In the same skillet, lower the heat and add 4 minced garlic cloves.
2. Sauté the garlic for about 1 minute until it smells great. Watch closely; you don’t want it to burn.
3. Pour in 1 cup of heavy cream and stir to mix with the garlic. Bring it to a gentle simmer.
4. Add 1 cup of chopped fresh spinach and 1/2 cup of grated Parmesan cheese to the skillet. Stir until the spinach wilts and the cheese melts.
Combining Everything
1. Return the cooked chicken to the skillet with the sauce.
2. Spoon the creamy sauce over the chicken pieces.
3. Let it simmer for 2-3 minutes. This helps the flavors blend together beautifully.
Tips & Tricks
Cooking Tips for Perfect Chicken
To prevent overcooking, always check the chicken’s internal temperature. Use a meat thermometer and aim for 165°F. This gives you juicy chicken every time. Avoid cooking on high heat. Medium heat lets the chicken brown well without drying it out.
For seasoning, start simple. Salt and pepper bring out the chicken’s natural flavor. You can add garlic powder or paprika for extra taste. Season both sides evenly to enhance the flavor.
Enhancing the Creamy Sauce
To add more flavor to the creamy sauce, think about fresh herbs. Basil or thyme can brighten the dish. You can also mix in lemon juice for a zesty kick. If you want a spicy twist, add red pepper flakes.
Adjust the creaminess by adding more heavy cream or broth. If you like it thick, let it simmer longer. For a lighter version, use half-and-half instead of heavy cream.
Serving Suggestions
Best side dishes to pair with this dish include rice, pasta, or mashed potatoes. These options soak up the creamy sauce well. Roasted vegetables like broccoli or green beans also add color and texture.
For garnishing, sprinkle fresh parsley or additional Parmesan cheese on top. Lemon wedges not only look nice but add a fresh taste when squeezed over the chicken. Enjoy your meal!
Pro Tips
- Use Fresh Ingredients: Always opt for fresh spinach and high-quality chicken for the best flavor and texture in your dish.
- Mind the Garlic: Sauté garlic on low heat to prevent burning, which can make it bitter; it’s best when it’s just fragrant.
- Adjust Creaminess: For a lighter sauce, use half-and-half instead of heavy cream or add more spinach for extra volume.
- Lemon Zest Boost: Adding a bit of lemon zest along with the juice can enhance the dish’s brightness and depth of flavor.
Variations
Ingredient Substitutions
You can switch up the cheese. Use mozzarella or feta instead of Parmesan. Each cheese gives a unique taste to the dish.
If you don’t have heavy cream, try using half-and-half or coconut milk. These options keep the sauce rich and creamy.
Flavor Additions
Want to add more flavor? Toss in sun-dried tomatoes or mushrooms. These ingredients bring a burst of taste to the creamy sauce.
You can also play with spices. Add a pinch of red pepper flakes for heat or fresh herbs like basil for freshness.
Dietary Adjustments
To make this dish gluten-free, ensure your seasonings are gluten-free. Most herbs and spices fit this need easily.
For a dairy-free version, swap heavy cream with a plant-based cream. Nutritional yeast can give a cheesy flavor without dairy.
Storage Info
Storing Leftovers
To keep your creamy garlic spinach chicken fresh, store it right. Place the chicken in an airtight container. This helps keep moisture in and prevents odors. Let the chicken cool to room temperature before sealing it. You can store it in the fridge for up to three days.
For best results, use glass or BPA-free plastic containers. They are easy to clean and stack well. Make sure the lid fits tightly to keep flavors intact.
Reheating Instructions
When it’s time to enjoy leftovers, reheating needs care. The safest way is to use the microwave. Place the chicken on a microwave-safe plate. Cover it with a damp paper towel to keep it moist. Heat it in short bursts, about 30 seconds at a time. Check often to avoid overcooking.
To maintain that creamy texture, you can add a splash of heavy cream or broth before reheating. This helps keep the sauce smooth and rich.
Freezer-Friendly Options
If you want to save some for later, freezing is a great choice. First, let the chicken cool completely. Then, wrap it tightly in plastic wrap. Place it in a freezer-safe bag or container. This keeps it safe from freezer burn. You can store it for up to three months.
When you’re ready to eat, thaw the chicken in the fridge overnight. After it’s thawed, reheat it using the microwave or stovetop. Remember to add a bit of liquid to keep the creaminess. Enjoy your meal just like the first time!
FAQs
How long does it take to cook Creamy Garlic Spinach Chicken?
This dish takes about 30 minutes from start to finish. You’ll spend around 10 minutes prepping the ingredients. Cooking the chicken will take about 12 to 14 minutes. After that, you’ll need about 5 to 7 minutes to make the creamy sauce and finish everything up. It’s a quick and tasty meal that fits into a busy schedule.
Can I use frozen chicken breasts?
Yes, you can use frozen chicken breasts. Just make sure to thaw them first. Thawing is best done in the fridge overnight. If you’re short on time, you can use the microwave. Once thawed, follow the same cooking steps. Cook them on medium heat until the chicken is no longer pink inside.
Is this recipe suitable for meal prep?
Absolutely! Creamy Garlic Spinach Chicken is great for meal prep. You can make a batch and store it in the fridge for up to four days. Just divide it into meal containers. When you’re ready to eat, simply reheat it in the microwave. Pair it with your favorite sides for a complete meal.
What can I serve with Creamy Garlic Spinach Chicken?
You can pair this dish with many sides. Here are a few great options:
– Rice or quinoa for a filling base
– Steamed broccoli for a healthy crunch
– Mashed potatoes for a creamy contrast
– A fresh garden salad to lighten the meal
These sides will complement the rich flavors of the creamy chicken nicely. Enjoy your meal!
This blog post covered how to make a delicious Creamy Garlic Spinach Chicken. We explored key ingredients like chicken, garlic, and spinach. I shared step-by-step cooking instructions to ensure perfect results. You learned tips to enhance flavor and serve it well. We also discussed variations and storage options for leftovers.
In conclusion, this dish is not just tasty; it’s also flexible. You can make it your own while enjoying every bite. Happy cookin


