

Looking for a quick and delicious meal? Let me introduce you to Creamy Lemon Parmesan Orzo! This simple recipe is packed with bright flavors and creamy goodness. It’s perfect for busy nights or when you want something comforting. I’ll guide you through each step, from selecting ingredients to making tasty variations. Get ready to impress your family and friends with this mouthwatering dish!
Why I Love This Recipe
- Quick and Easy: This recipe comes together in just 25 minutes, making it perfect for busy weeknights.
- Creamy Texture: The combination of heavy cream and Parmesan cheese creates a rich and comforting dish.
- Fresh Flavor: The addition of lemon zest and juice brings a bright, zesty flavor that elevates the dish.
- Versatile Dish: This orzo can be served as a main course or a side, pairing wonderfully with a variety of proteins.
Ingredients
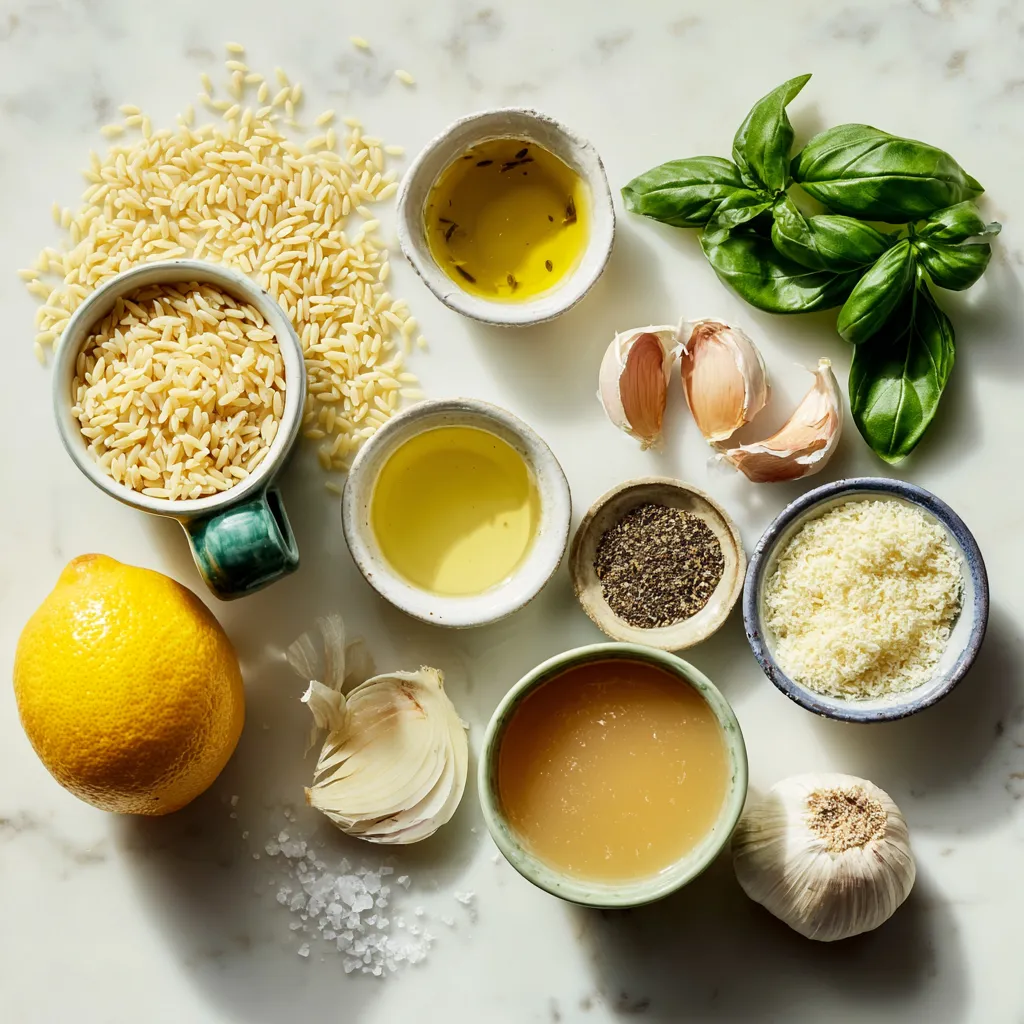
List of Ingredients
– 1 cup orzo pasta
– 2 tablespoons olive oil
– 1 small onion, finely chopped
– 2 garlic cloves, minced
– 4 cups vegetable broth
– 1 cup heavy cream
– 1 cup grated Parmesan cheese
– 1 lemon (zest and juice)
– 1 teaspoon dried parsley
– Salt and pepper to taste
– Fresh basil leaves, for garnish
Suggested Measurements
When cooking, use precise amounts for best results. For this dish, measure:
– 1 cup of orzo to keep it filling.
– 2 tablespoons of olive oil to ensure smooth cooking.
– 1 small onion adds sweetness to the flavor.
– 2 garlic cloves will give it a rich taste.
– 4 cups of vegetable broth helps cook the orzo.
– 1 cup of heavy cream creates a creamy texture.
– 1 cup of grated Parmesan adds cheesy goodness.
– 1 lemon provides bright acidity.
– 1 teaspoon of dried parsley gives an earthy note.
– Salt and pepper to taste enhances all flavors.
Substitutions and Alternatives
You can swap some ingredients based on what you have:
– Use chicken broth instead of vegetable broth for a richer taste.
– Swap heavy cream with half-and-half for a lighter option.
– If you lack Parmesan, try Pecorino Romano for a different flavor.
– Fresh parsley can replace dried parsley for a fresher taste.
– If you want to skip the lemon, consider using a splash of vinegar for acidity.
– Fresh basil can be replaced with spinach for a green touch.
These substitutions will still keep the dish flavorful and delicious.
Step-by-Step Instructions
Preparation Steps
First, gather all your ingredients. You will need:
– 1 cup orzo pasta
– 2 tablespoons olive oil
– 1 small onion, finely chopped
– 2 garlic cloves, minced
– 4 cups vegetable broth
– 1 cup heavy cream
– 1 cup grated Parmesan cheese
– 1 lemon (zest and juice)
– 1 teaspoon dried parsley
– Salt and pepper to taste
– Fresh basil leaves, for garnish
Next, chop your onion and mince the garlic. This helps the flavors blend well.
Cooking Process
1. In a large pot, heat the olive oil over medium heat.
2. Add the chopped onion. Sauté it for about 3 to 4 minutes until it turns translucent.
3. Stir in the minced garlic. Cook for another minute until you smell its great aroma.
4. Add the orzo to the pot. Stir it around for about 2 minutes. This coats the pasta in the oil.
5. Pour in the vegetable broth and bring it to a boil. Once boiling, reduce the heat.
6. Let the orzo simmer for about 10 minutes. Stir it occasionally. The pasta should be al dente when done.
7. When the orzo is cooked, add the heavy cream, Parmesan cheese, lemon zest, lemon juice, and dried parsley. Stir until creamy.
8. Season with salt and pepper to taste. Adjust flavors as needed.
Finishing Touches and Presentation
Remove the pot from the heat. Let it rest for a few minutes. If it thickens too much, add a splash of broth or water.
To serve, plate the orzo and garnish with fresh basil leaves. This adds a nice touch and fresh flavor. Enjoy your creamy lemon Parmesan orzo!
Tips & Tricks
Perfecting the Creaminess
To make your orzo extra creamy, use heavy cream. It gives a rich texture. If you want a lighter dish, swap some cream with low-fat milk. You can also add a bit more cheese when mixing it in. The more cheese, the creamier it gets! If the dish thickens too much, add a splash of broth or water. This keeps it silky.
Enhancing Flavor
Lemon zest and juice brighten the dish. Make sure to use fresh lemon for the best taste. Fresh herbs like basil add a nice touch. You can also try using a dash of garlic powder for more flavor. For a hint of heat, add some red pepper flakes. This brings a new layer of taste without overpowering the dish.
Tools to Use for Best Results
A large pot works best for cooking the orzo. A wooden spoon helps mix the pasta and prevents sticking. A fine-grater is great for zesting the lemon and grating cheese. Use a measuring cup for precise amounts of liquid. Having a good knife for chopping onion and garlic makes prep easier.
Pro Tips
- Use Fresh Ingredients: For the best flavor, opt for fresh lemons and high-quality Parmesan cheese. Fresh herbs like basil can also enhance the dish.
- Adjust Creaminess: If you prefer a lighter dish, you can reduce the amount of heavy cream or substitute it with half-and-half for a less rich flavor.
- Perfect Orzo Cooking: Keep a close eye on the orzo as it cooks; stirring frequently helps prevent sticking and ensures even cooking for that perfect al dente texture.
- Leftover Magic: This dish makes for excellent leftovers! Reheat with a splash of broth or water to loosen the sauce and enjoy it again the next day.
Variations
Adding Proteins
You can boost the nutrition of creamy lemon Parmesan orzo by adding proteins. Chicken, shrimp, or even tofu work well in this dish. If you use chicken, cook it first, then add it to the orzo at the end. For shrimp, toss them in when the orzo is almost done. They cook fast and add great flavor. Tofu is a great option too. Just cube it and sauté it before mixing it in. These additions make the meal heartier and more filling.
Vegetable Additions
Vegetables add color and health to your orzo. You can mix in spinach or peas for a pop of green. Both add nice texture and nutrients. Sauté the spinach with the onion for a soft, rich flavor. Peas can be added in the last few minutes of cooking. This keeps them bright and fresh. Roasted veggies, like zucchini or bell peppers, also work great. Just chop them up and toss them in for a tasty twist.
Flavor Swaps and Twists
You can change the flavor of your creamy lemon Parmesan orzo easily. Try adding different herbs like thyme or dill for a unique taste. Swap lemon for lime if you want a zestier dish. You can even add a pinch of red pepper flakes for some heat. If you love a stronger cheese flavor, mix in some feta or goat cheese. These swaps let you create your perfect version of this dish.
Storage Information
Refrigeration Tips
Once you finish your Creamy Lemon Parmesan Orzo, let it cool. Store it in an airtight container. It will keep well in the fridge for up to three days. Before serving, check for any signs of spoilage. Look for off smells or changes in texture.
Freezing Instructions
You can also freeze your orzo. Allow it to cool completely first. Portion it into freezer-safe bags or containers. Remove as much air as possible to prevent freezer burn. The orzo will last for about two months in the freezer. When ready to eat, thaw it overnight in the fridge.
Reheating Guidelines
To reheat, you have a few options. You can use the stove, microwave, or oven. If using the stove, add a splash of broth or water to avoid dryness. Heat over low heat, stirring gently. In the microwave, use a covered dish. Heat in short bursts, stirring in between. If using the oven, cover it with foil to keep it moist. Reheat until warmed through. Enjoy your orzo as if it was fresh!
FAQs
What can I serve with Creamy Lemon Parmesan Orzo?
You can serve Creamy Lemon Parmesan Orzo with many tasty dishes. Grilled chicken pairs well with it. You might also enjoy it alongside roasted vegetables. A simple salad with fresh greens adds a nice touch. Try serving it with some crusty bread to soak up the flavors too.
Can I make this recipe gluten-free?
Yes, you can make this recipe gluten-free. Just swap the orzo pasta for gluten-free orzo. Check the vegetable broth to ensure it is gluten-free too. Many brands offer gluten-free options that taste great. With these changes, you can still enjoy a creamy dish without gluten.
How to adjust the recipe for larger servings?
To adjust the recipe for larger servings, simply multiply the ingredients. For eight servings, use two cups of orzo. Increase the broth, cream, and cheese accordingly. Keep the cooking times similar, but check for doneness often. This way, everyone can enjoy a delicious meal without hassle.
This blog post covered all you need for Creamy Lemon Parmesan Orzo. I shared ingredients, measurements, and helpful substitutes. You learned clear steps to make the dish, from prep to plating. Tips and tricks helped you boost creaminess and flavor. Plus, I shared fun variations and storage tips.
In the end, you can enjoy this dish your way. Get creative and have fun in the kitche


