
Are you ready to indulge in a comforting bowl of creamy mushroom risotto? This savory and simple recipe is perfect for any skill level, with just the right balance of flavors. Using fresh ingredients, I’ll show you how to craft this classic dish that will impress your family and friends. Grab your apron and let’s dive into a world of rich textures and delightful tastes!
Why I Love This Recipe
- Comforting Creaminess: This risotto is the epitome of comfort food, with its rich, creamy texture that warms the soul.
- Flavorful Ingredients: The combination of mushrooms, garlic, and Parmesan creates a depth of flavor that is simply irresistible.
- Easy to Customize: Feel free to add your favorite vegetables or proteins, making it a versatile dish for any occasion.
- Quick Cook Time: With a total cook time of just 30 minutes, you can whip up this delicious dish in no time.
Ingredients
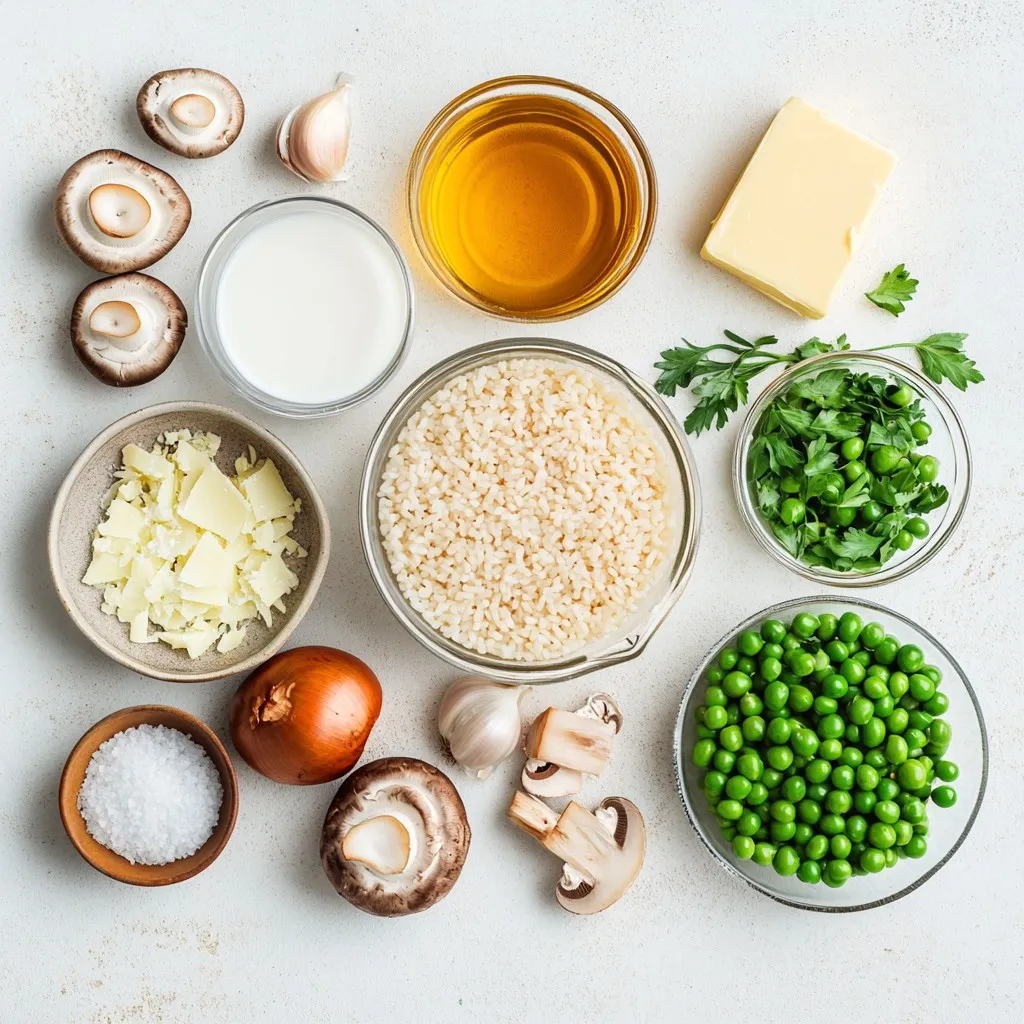
List of Ingredients
– 1 cup Arborio rice
– 4 cups vegetable broth
– 1 cup mushrooms (cremini or button), sliced
– 1 small onion, finely chopped
– 2 cloves garlic, minced
– 1 cup fresh peas (or frozen)
– 1 cup heavy cream
– ½ cup grated Parmesan cheese
– 2 tablespoons olive oil
– 2 tablespoons butter
– Salt and pepper to taste
– Fresh parsley, chopped (for garnish)
When you gather these ingredients, you set the stage for a rich and creamy dish. Arborio rice is key for that perfect texture. It absorbs broth well and gives a nice creamy feel.
Mushrooms add earthy flavors. You can use cremini or button mushrooms. Both work well. The onions and garlic give a sweet base that enhances the dish.
Heavy cream and Parmesan cheese make it rich and comforting. Fresh peas add a pop of color and sweetness. Olive oil and butter create a great cooking medium.
Optional Add-Ins
– Additional vegetables (e.g., spinach, asparagus)
– Different mushrooms (shiitake, portobello)
Feel free to get creative. Add spinach for a green boost or asparagus for a crunch. Shiitake or portobello mushrooms can give a different taste that you might enjoy.
Suggested Substitutions
– Arborio rice alternatives
– Plant-based cream and cheese options
If you can’t find Arborio rice, other short-grain rice can work. For a dairy-free version, look for plant-based cream and cheese. They can make this dish just as creamy and satisfying.
Step-by-Step Instructions
Preparation Steps
First, heat the vegetable broth in a small saucepan. Keep it on low heat. This keeps the broth warm as you cook. A warm broth helps the rice cook evenly.
Next, grab a large skillet. Add olive oil and butter and heat over medium. Once the butter melts, add the finely chopped onion. Sauté it for about 3-4 minutes. You want it soft and clear. Then, add minced garlic. Stir it in for about 30 seconds.
Cooking Steps
Now, it’s time for the mushrooms. Add the sliced mushrooms to the skillet. Cook them for 5-6 minutes. Stir often until they turn golden brown. This step helps remove their moisture, which adds great flavor.
Next, stir in the Arborio rice. Make sure each grain gets coated in the mix. Toast the rice for 1-2 minutes. You want it slightly clear at the edges.
Now, start adding the warm broth. Use a ladle and pour in one ladle at a time. Stir constantly. Wait until the rice absorbs most of the liquid before adding more. Keep it going for about 18-20 minutes. The rice should be al dente and creamy when done.
Finishing Touches
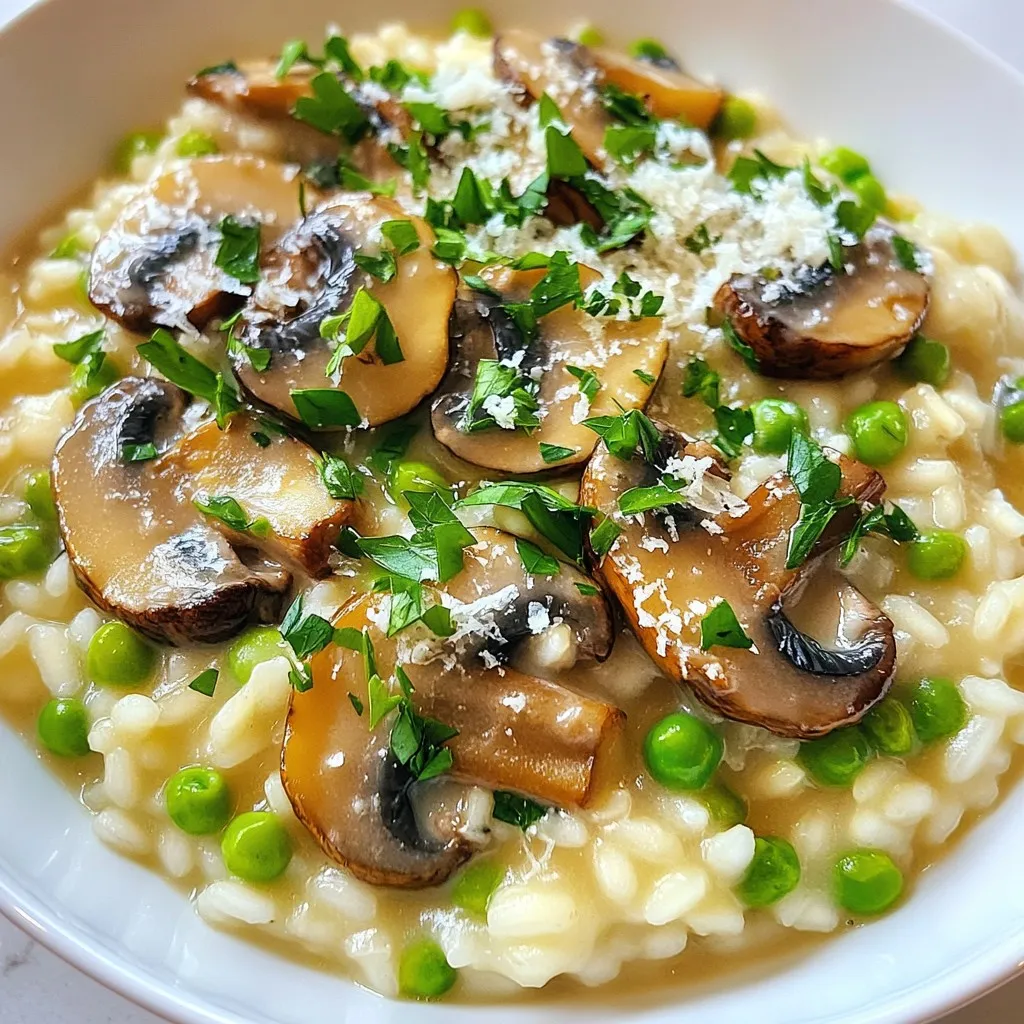
When the rice is ready, stir in the fresh peas, heavy cream, and grated Parmesan cheese. Season with salt and pepper to taste. Cook for an extra 2-3 minutes. This warms everything up and makes it creamy.
Remove the skillet from heat. Let the risotto sit for one minute. This helps it thicken before you serve it. Enjoy your creamy mushroom risotto!
Tips & Tricks
Expert Cooking Tips
– Importance of constant stirring: Always stir your risotto. This helps the rice release its starch. The starch makes the risotto creamy. It also keeps the rice from sticking to the pan. Stirring lets the rice cook evenly.
– Achieving the right consistency: You want your risotto creamy but not runny. It should hold its shape but still flow slightly when served. Add broth slowly and wait for it to absorb. This helps the rice cook properly. If it gets too thick, just add a bit more broth.
Garnishing Suggestions
– Ideal toppings for presentation: For a beautiful look, serve your risotto in shallow bowls. Top it with extra Parmesan cheese. Add a few sautéed mushroom slices for flair. This adds color and makes it appealing.
– Incorporating fresh herbs: Fresh herbs brighten up the dish. A sprinkle of chopped parsley adds flavor and color. You can also try thyme or chives for a different taste.
Serving Suggestions
– Best pairings with risotto: Risotto pairs well with simple sides. Consider a fresh salad or roasted vegetables. These add crunch and balance the creaminess.
– Recommended wine accompaniments: A light white wine works best. Try a crisp Sauvignon Blanc or a creamy Chardonnay. These wines enhance the flavors of the mushrooms and cream.
Pro Tips
- Use Fresh Ingredients: Always opt for fresh mushrooms and peas for the best flavor and texture in your risotto.
- Stir Continuously: Stirring the risotto continuously helps to release the starches from the rice, creating a creamier texture.
- Temperature Matters: Ensure the vegetable broth is warm when adding it to the rice; cold broth can interrupt the cooking process and lead to unevenly cooked rice.
- Rest Before Serving: Let the risotto rest for a minute off the heat before serving; this allows it to thicken and improves the consistency.
Variations
Seasonal Ingredient Variations
You can switch up your risotto with seasonal ingredients. For spring, use bright green veggies. Try fresh peas and asparagus for a vibrant dish. This spring vegetable risotto bursts with flavor and color.
In the fall, add mushrooms and pumpkin. The earthiness of mushrooms pairs well with sweet pumpkin. This fall-inspired risotto gives you a cozy and warm feeling, perfect for cooler days.
Dietary Variations
You can easily make a vegan creamy mushroom risotto. Replace heavy cream with coconut milk or a plant-based cream. Use nutritional yeast instead of Parmesan cheese for that cheesy flavor.
If you need a gluten-free option, use gluten-free broth and ensure your rice is certified gluten-free. This way, everyone can enjoy the creamy goodness of risotto.
Flavor Enhancements
Want to elevate your risotto? Add a splash of white wine while cooking the rice. This adds depth and richness to the dish. Just let the wine cook off before adding broth.
Another great trick is to infuse your risotto with truffle oil. A little drizzle at the end gives a luxurious touch. It adds a unique flavor that impresses anyone at your dinner table.
Storage Info
Refrigeration Guidelines
To keep your creamy mushroom risotto fresh, store it in the fridge. Use an airtight container for best results. Allow the risotto to cool completely before sealing it. This helps prevent moisture build-up. The risotto stays good for about three days in the refrigerator. Before serving, check for any off smells or changes in texture.
Freezing Instructions
You can freeze risotto to enjoy later. First, let it cool completely. Then, place it in a freezer-safe container. Make sure to leave some space for expansion. Risotto can last up to three months in the freezer. To thaw, move it to the fridge a day before you want to eat it. Reheat it slowly on the stove over low heat. Add a splash of broth or cream to restore its creamy texture.
Leftover Recommendations
Don’t let leftover risotto go to waste! You can make arancini, which are tasty risotto balls. Just form the cold risotto into balls, coat them in breadcrumbs, and fry until golden. You can also use leftover risotto in soups or casseroles. Mixing it with some veggies and cheese can create a hearty dish.
FAQs
Common Questions About Risotto
What is risotto?
Risotto is a creamy rice dish made with Arborio rice. It is cooked slowly by adding broth gradually. This technique gives risotto its rich texture. You can add various ingredients like vegetables, cheese, or meats for extra flavor.
How long does risotto take to cook?
Cooking risotto usually takes about 18 to 20 minutes. You want to stir it often to keep it creamy. The rice should be al dente, which means it is firm yet tender.
Ingredient-Specific Queries
Can I use chicken broth instead of vegetable broth?
Yes, you can use chicken broth if you prefer. It adds a different flavor to the risotto. Just make sure the broth is warm when you add it to the rice.
How do I choose the right mushrooms for risotto?
For risotto, use cremini or button mushrooms. These types add good texture and taste. Look for firm mushrooms with no dark spots. Fresh mushrooms will give you the best flavor.
Cooking Technique Questions
How do I fix overcooked risotto?
If your risotto is overcooked, try adding a splash of broth. This can help bring back some creaminess. Stir gently to combine and heat through.
What if my risotto is too thick?
If your risotto is too thick, add more warm broth. Stir it in slowly until you reach the desired creaminess. The right texture should be smooth and flowing but not runny.
Making creamy risotto is simple and rewarding. You learned about the key ingredients, like Arborio rice and fresh peas. I shared step-by-step cooking tips for the perfect texture. We explored variations to suit all diets and tastes. Remember, constant stirring is crucial. Proper storage keeps leftover risotto fresh. Now, you can impress anyone with a delicious dish. Enjoy creating your risotto mea


