Creamy Roasted Garlic Hummus Easy and Flavorful Dip

Are you ready to elevate your snack game? This Creamy Roasted Garlic Hummus is the perfect dip. With its rich flavor and easy steps, you’ll impress everyone at your next gathering. Plus, I’ll share tips on how to customize it to suit any taste! Packed with nutrients, this recipe not only satisfies your cravings but also supports your health. Let’s dive in and create this delicious, creamy delight together!
Why I Love This Recipe
- Rich Flavor: This hummus is infused with roasted garlic, giving it a deep, savory flavor that elevates it above traditional hummus.
- Easy to Make: With just a few simple ingredients and a food processor, you can whip up this creamy delight in no time.
- Versatile: Perfect as a dip, spread, or even a sandwich filler, this hummus can be enjoyed in many ways.
- Healthy Snack: Packed with protein and healthy fats, this hummus makes for a nutritious and satisfying snack option.
Ingredients
Complete Ingredient List
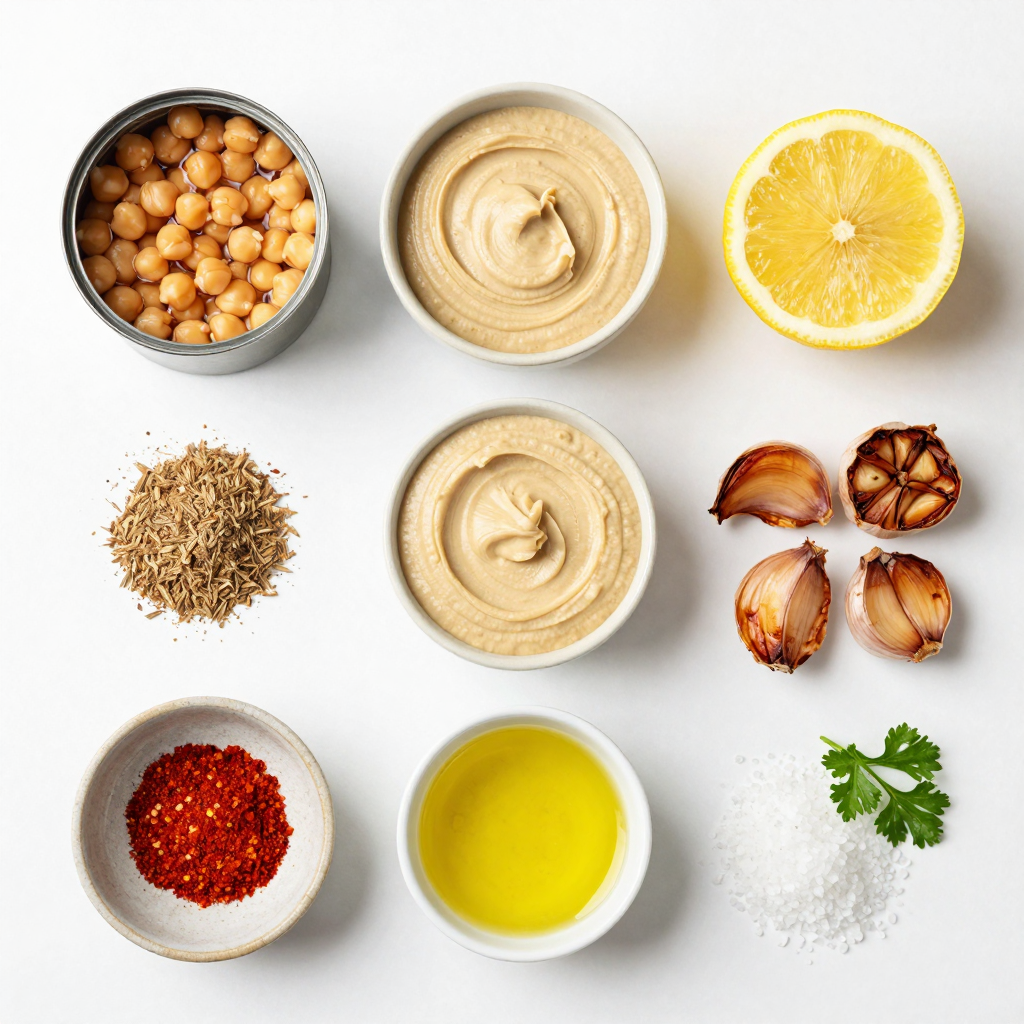
To make creamy roasted garlic hummus, gather these ingredients:
- 1 can (15 oz) chickpeas, drained and rinsed
- 1/4 cup tahini
- 1/4 cup fresh lemon juice (about 1 lemon)
- 4 cloves roasted garlic
- 3 tablespoons olive oil
- 1/2 teaspoon ground cumin
- 1/4 teaspoon smoked paprika
- Salt to taste
- Water (as needed for desired consistency)
Optional Garnishes
You can add these for extra flavor and looks:
- Fresh parsley for garnish
- Olive oil for drizzle
Nutritional Information Overview
This hummus packs a punch of nutrients. Here’s a quick overview:
- Chickpeas offer protein and fiber.
- Tahini adds healthy fats and calcium.
- Olive oil brings heart-healthy benefits.
- Lemon juice gives vitamin C and bright flavor.
One serving (about 2 tablespoons) has around 70 calories. Enjoy this tasty dip while knowing it’s good for you!

Step-by-Step Instructions
How to Roast Garlic
Roasting garlic is simple and fun. Start by preheating your oven to 400°F (200°C). Take a whole bulb of garlic and cut off the top. This helps the garlic cook well. Drizzle a bit of olive oil on the cut side. Wrap the bulb in aluminum foil. Roast it in the oven for 30-35 minutes. The garlic will feel soft and smell sweet. Let it cool a bit before handling. Squeeze the roasted garlic out of the skins, and it’s ready to use.
Blending the Hummus
Now it’s time to blend our hummus. Grab your food processor. Add the drained chickpeas, tahini, fresh lemon juice, and the roasted garlic cloves. Pour in the olive oil, ground cumin, smoked paprika, and a pinch of salt. Turn on the food processor and pulse the mixture. Keep blending until it comes together and looks creamy. You want it smooth and rich.
Tips for Adjusting Consistency
Sometimes, hummus can be too thick. To fix this, add water slowly. Pour in one tablespoon at a time while blending. Check the texture and keep adding until it’s as creamy as you like. If you need more flavor, taste it! Add more salt or lemon juice if you want. This way, your hummus will be just right.
Pro Tips
- Roasting Garlic: For an even richer flavor, roast a whole bulb of garlic at once. You can store any leftovers in the fridge for up to a week.
- Adjusting Consistency: If your hummus is too thick, add water slowly until you reach the desired creaminess. Alternatively, for a thicker texture, reduce the amount of water.
- Flavor Enhancements: Experiment with additional spices such as coriander or a dash of cayenne pepper for a kick. Fresh herbs like basil or cilantro can also enhance the flavor.
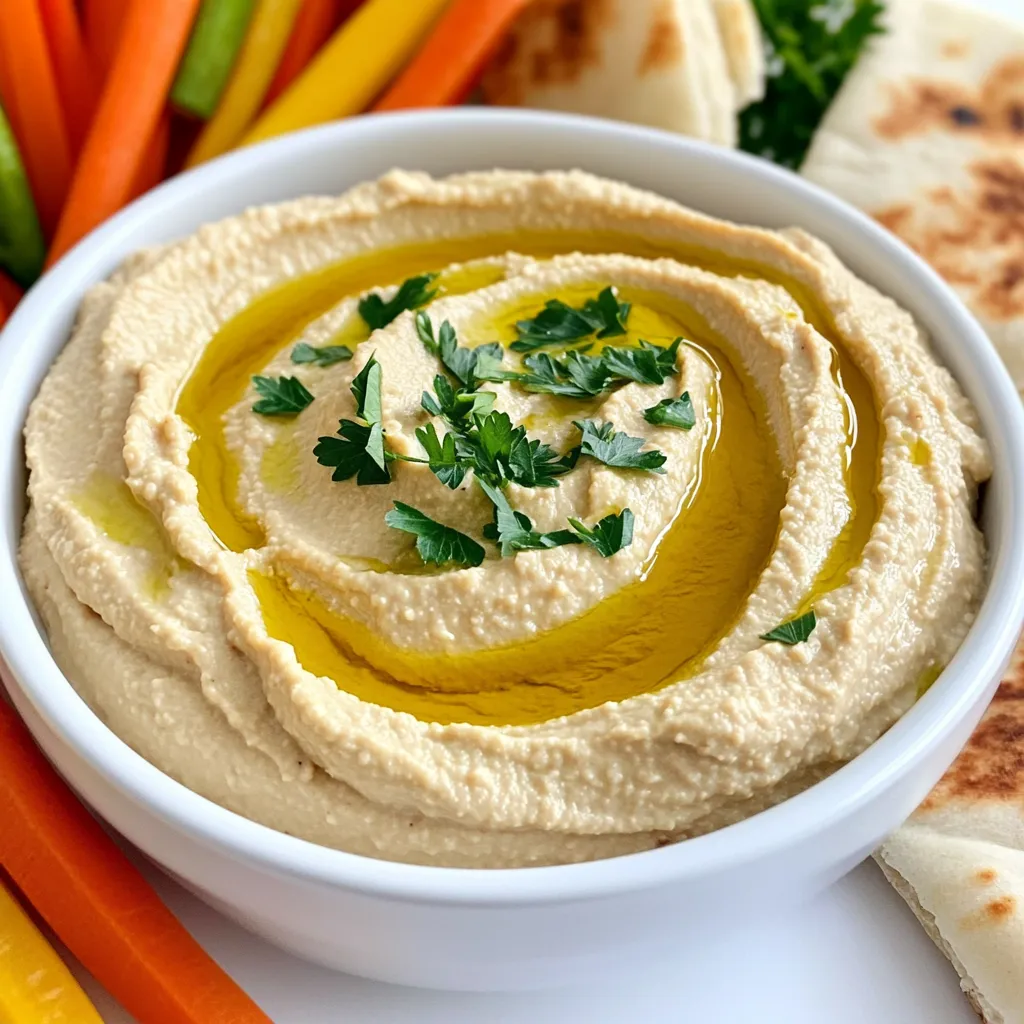
- Serving Suggestions: For a beautiful presentation, serve your hummus in a shallow bowl, create a well in the center, and drizzle with high-quality olive oil and a sprinkle of smoked paprika.
Tips & Tricks
Perfecting the Flavor
To make your creamy roasted garlic hummus shine, focus on quality. Use fresh garlic for roasting. The sweet, rich flavor of roasted garlic makes a big difference. Don’t skip the smoked paprika; it adds depth to the taste. Adjust salt and lemon juice to suit your palate. Taste as you go to get it just right.
Serving Suggestions
Serve this hummus with warm pita bread for a classic touch. Fresh veggies like carrots, cucumbers, and bell peppers add crunch. For a fun twist, pair it with olives and pickles. You can also spread it on sandwiches or wraps for added flavor. Hummus makes a great dip for parties, too!
Storing Leftover Hummus
If you have leftover hummus, store it in an airtight container. It keeps well in the fridge for about a week. To maintain freshness, drizzle a bit of olive oil on top before sealing. If it thickens, add a little water and blend again for a creamy texture.

Variations
Spicy Roasted Garlic Hummus
To make a spicy version of this hummus, add some heat. You can mix in 1-2 teaspoons of cayenne pepper or red pepper flakes. Blend this with the chickpeas, tahini, lemon juice, and roasted garlic. This adds a nice kick. Adjust the spice level based on your taste. I love how the heat blends with the creamy texture.
Herb-Infused Hummus
For a fresh twist, add herbs. Basil, cilantro, or dill work great. Just chop a handful of your chosen herb and mix it in. Blend it well to combine the flavors. This variation brings a vibrant taste and aroma to the dish. You can even use a mix of your favorite herbs for a unique flavor.
Nut-Free Alternatives
If you want to skip nuts, don’t worry. You can replace tahini with sunflower seed butter. This keeps the creaminess while being nut-free. You can also use more olive oil to help with texture. Just blend it in until you reach your desired smoothness. This option is perfect for those with nut allergies.
Health Benefits
Nutritional Value of Hummus
Hummus is a tasty dip that packs a lot of nutrients. One serving of hummus gives you protein, fiber, and healthy fats. These nutrients help keep your body strong and full of energy. The chickpeas and tahini in hummus are excellent sources of vitamins and minerals. They also add a creamy texture, making it a perfect spread or dip.
Benefits of Chickpeas
Chickpeas are the star of hummus. They are high in protein, which helps build muscles. They also contain fiber, which aids in digestion. Eating fiber-rich foods like chickpeas can help you feel full longer. This can be helpful if you want to maintain a healthy weight. Chickpeas also have vitamins like B6 and folate, which are good for your heart and brain.
Advantages of Using Olive Oil
Olive oil is a healthy fat that adds flavor to hummus. It contains antioxidants that can help protect your body from damage. Using olive oil in hummus can also improve heart health. It helps to lower bad cholesterol levels. When you drizzle olive oil on your hummus, it not only tastes great, but it also boosts the health benefits. Plus, it adds a nice shine to your dish!
FAQs
Can I use raw garlic instead of roasted garlic?
Yes, you can use raw garlic, but it changes the taste. Raw garlic is sharper and can make the hummus bitter. Roasted garlic gives a sweet, rich flavor. This makes the hummus creamy and smooth. If you prefer a stronger taste, start with one clove and taste as you go.
How long does homemade hummus last in the fridge?
Homemade hummus lasts about five to seven days in the fridge. Store it in an airtight container to keep it fresh. Always check for any change in smell or color. If it looks good, it’s likely still good to eat. For best taste, enjoy it within the first few days.
What can I use if I don’t have tahini?
If you lack tahini, you have options. You can use peanut butter, sunflower seed butter, or Greek yogurt. These substitutes add creaminess and flavor. You can also skip it altogether, but the hummus will be different. Adjust the other ingredients to maintain a balanced taste.
This blog post covered how to make hummus from scratch. We looked at key ingredients, step-by-step instructions, and tips for the best flavor. I shared variations to keep it exciting and highlighted the many health benefits of hummus.
In summary, making your own hummus is easy and rewarding. You can customize it to fit your taste and enjoy its nutrition. With the right ingredients and techniques, you’ll create a delicious dip that’s perfect for any occasion. Enjoy your hummus journey!

Creamy Roasted Garlic Hummus
Ingredients
1 can (15 oz) chickpeas, drained and rinsed
1/4 cup tahini
1/4 cup fresh lemon juice (about 1 lemon)
4 cloves roasted garlic (see instructions for roasting)
3 tablespoons olive oil
1/2 teaspoon ground cumin
1/4 teaspoon smoked paprika
Salt to taste
Water (as needed for desired consistency)
Fresh parsley for garnish (optional)
Olive oil for drizzle (optional)
Instructions
Roast the Garlic: Preheat your oven to 400°F (200°C). Cut the tops off the garlic bulb and drizzle with a little olive oil. Wrap in aluminum foil and roast for about 30-35 minutes, until soft and caramelized. Let cool slightly before handling.
Blend Ingredients: In a food processor, combine the chickpeas, tahini, lemon juice, roasted garlic cloves (squeezed out of their skins), olive oil, cumin, smoked paprika, and a pinch of salt.
Process Until Smooth: Pulse the mixture until it starts to come together.
Adjust Consistency: While blending, gradually add water, one tablespoon at a time, until you reach your desired creamy consistency. Taste and adjust seasoning with more salt or lemon juice if needed.
Serve: Transfer the hummus to a serving bowl. Smooth the top with a spatula. Drizzle with olive oil and sprinkle with fresh parsley for garnish if desired.
Prep Time: 10 minutes | Total Time: 45 minutes | Servings: 6-8
– Presentation Tips: Serve the hummus with warm pita bread, crunchy vegetable sticks (like carrots and cucumbers), or alongside a colorful array of olives and pickles for a vibrant platter.

Creamy Roasted Garlic Hummus
Ingredients
- 1 can (15 oz) chickpeas, drained and rinsed
- 1/4 cup tahini
- 1/4 cup fresh lemon juice (about 1 lemon)
- 4 cloves roasted garlic
- 3 tablespoons olive oil
- 1/2 teaspoon ground cumin
- 1/4 teaspoon smoked paprika
- to taste Salt Salt
- as needed Water Water for desired consistency
- optional Fresh parsley for garnish
- optional Olive oil for drizzle
Instructions
- Roast the Garlic: Preheat your oven to 400°F (200°C). Cut the tops off the garlic bulb and drizzle with a little olive oil. Wrap in aluminum foil and roast for about 30-35 minutes, until soft and caramelized. Let cool slightly before handling.
- Blend Ingredients: In a food processor, combine the chickpeas, tahini, lemon juice, roasted garlic cloves (squeezed out of their skins), olive oil, cumin, smoked paprika, and a pinch of salt.
- Process Until Smooth: Pulse the mixture until it starts to come together.
- Adjust Consistency: While blending, gradually add water, one tablespoon at a time, until you reach your desired creamy consistency. Taste and adjust seasoning with more salt or lemon juice if needed.
- Serve: Transfer the hummus to a serving bowl. Smooth the top with a spatula. Drizzle with olive oil and sprinkle with fresh parsley for garnish if desired.
- Presentation Tips: Serve the hummus with warm pita bread, crunchy vegetable sticks (like carrots and cucumbers), or alongside a colorful array of olives and pickles for a vibrant platter.


![To make a great Reuben Stromboli, you'll need these key items: - 1 lb pizza dough - 1 cup corned beef, thinly sliced - 1 cup sauerkraut, thoroughly drained - 1 cup Swiss cheese, finely shredded - ½ cup Russian or Thousand Island dressing - 1 tablespoon Dijon mustard - 1 egg, beaten (for egg wash) To take your Stromboli to the next level, consider adding: - 1 teaspoon caraway seeds (for added flavor) - 2 tablespoons sesame seeds (for garnish) If you don't have something on hand, here are some swaps: - Use turkey or pastrami instead of corned beef for a lighter option. - Swap sauerkraut with coleslaw for a crunchier texture. - Try provolone or mozzarella in place of Swiss cheese for a different taste. - Use a homemade dressing if you want to elevate the flavors even more. For the complete guide on how to make this dish, check the Full Recipe. To start, gather all your ingredients. You need pizza dough, corned beef, sauerkraut, Swiss cheese, and dressing. Begin by preheating your oven to 400°F (200°C). Line a baking sheet with parchment paper to make cleanup easy. On a floured surface, roll out your pizza dough into a rectangle. Aim for about 12x16 inches. This size allows enough room for filling and rolling. In a small bowl, mix the dressing with Dijon mustard. Stir until smooth. Spread this mixture evenly over the dough, leaving a one-inch border. This border keeps your filling inside. Next, layer the corned beef, sauerkraut, and Swiss cheese on top. Make sure to cover the dressing well. If you like, sprinkle caraway seeds for extra flavor. Now, roll the dough tightly from one long edge. Pinch the seams and ends to seal the Stromboli. Place it seam-side down on the baking sheet. Use a pastry brush to coat the top with beaten egg. This will give it a nice color when baked. Finally, sprinkle sesame seeds on top for a crunchy finish. Once your Stromboli is ready, it’s time to bake. Place the baking sheet in the preheated oven. Bake for 25 to 30 minutes. Look for a golden-brown crust and melted cheese. The edges should be crisp and inviting. After baking, carefully take the Stromboli out of the oven. Let it cool for about five minutes. This wait helps the filling set a bit. Now, slice it into generous portions. Each slice should show off the delicious layers inside. To get that perfect golden crust, follow these tips. First, make sure your oven is fully preheated. An oven that’s too cool will not brown the crust well. Second, use the egg wash generously. It gives the top a lovely shine and color. If you want an extra crunch, try adding more sesame seeds. They enhance both flavor and texture. Lastly, avoid opening the oven door too soon. This could cause the temperature to drop, affecting the baking process. Enjoy your Reuben Stromboli fresh out of the oven for the best taste! When making Stromboli, mistakes can happen easily. Here are some common ones to watch out for: - Overfilling the dough: Too much filling can cause leaks. Keep the filling to a moderate amount. - Not sealing the edges: If the edges are not sealed well, the filling can escape. Pinch the seams tightly to avoid this. - Rolling too loosely: A loose roll can lead to an uneven bake. Make sure to roll it tightly to keep everything intact. Sealing your Stromboli is key for a perfect bake. Here are some tips: - Pinch the seams firmly: After rolling, use your fingers to pinch the dough edges well. - Use water for sealing: A little water on your fingers can help seal the dough better. - Double-check the ends: Don’t forget to seal the ends as well. This keeps all the delicious filling inside. Serving your Reuben Stromboli right can enhance its taste. Here are my favorite ideas: - Serve warm: Warm Stromboli tastes best. It allows the cheese to melt and flavors to blend. - Pair with extra dressing: Offer more Russian or Thousand Island dressing for dipping. - Add a fresh salad: A crisp salad on the side adds freshness and balance to the meal. Try these tips for a tasty and satisfying experience. You can find the full recipe [here]. {{image_4}} You can easily make a vegetarian Reuben Stromboli. Swap corned beef with roasted vegetables. Try mushrooms, bell peppers, or zucchini. Use a plant-based cheese for a creamy touch. Sauerkraut and dressing stay the same. This way, you keep the Reuben’s tangy flavor while enjoying fresh veggies. For a fun twist, give your Reuben an international flair. Try using kimchi instead of sauerkraut for a Korean spin. You can also use spicy harissa and Moroccan spices for a North African touch. The flavors change but still give you that delicious Stromboli feel. Customization makes your Stromboli unique. Add jalapeños for heat or pickles for crunch. You can also mix in caramelized onions for sweetness. Want more cheese? Add provolone or pepper jack for extra flavor. Don’t be shy; explore and mix flavors that excite your taste buds! To keep your leftover Stromboli fresh, wrap it tightly in plastic wrap. You can also use aluminum foil for more protection. Store it in the fridge if you plan to eat it within a few days. This helps keep the flavors intact and the dough soft. When you're ready to enjoy leftovers, preheat your oven to 350°F (175°C). Place the Stromboli on a baking sheet. Heat it for about 10-15 minutes until warm. This method keeps the crust crispy while warming the filling. You can also use a microwave, but it may make the crust soft. If you prefer that method, heat it in short bursts to avoid overcooking. If you want to store Stromboli for a long time, freezing is a great option. Wrap it tightly in plastic wrap, then place it in an airtight container or freezer bag. This keeps out air and moisture. You can freeze it for up to three months. When you're ready to eat, let it thaw in the fridge overnight. Then, reheat it in the oven for the best results. Reuben Stromboli combines two popular dishes: the Reuben sandwich and Stromboli. The Reuben sandwich comes from Jewish delis in America. It has corned beef, sauerkraut, Swiss cheese, and dressing. Stromboli, on the other hand, is an Italian-American dish. It features rolled pizza dough filled with meat, cheese, and veggies. The mix of these two dishes creates a fun and tasty meal. Yes, you can make the dough from scratch. Start with flour, yeast, water, and salt. Mix them until smooth. Let it rise for about an hour. This dough can be used just like store-bought pizza dough. It will give your Reuben Stromboli a fresh taste. However, if you're short on time, store-bought dough works well too. To create a gluten-free version, use gluten-free pizza dough. Many options are available in stores. Or you can make your own using gluten-free flours. The filling can stay the same: corned beef, sauerkraut, Swiss cheese, and dressing. Just ensure all ingredients are gluten-free. This way, you can enjoy the same great taste without gluten. The Reuben Stromboli combines rich flavors with fun techniques. You learned about essential and optional ingredients, plus smart substitutes. I shared easy steps to make and bake your Stromboli perfectly. You now know tips to avoid common mistakes and how to give it a unique touch. Finally, I hope you feel inspired to try your own versions. Enjoy making this dish and share the joy with others. Your kitchen is the stage, and your Stromboli can steal the show!](https://dailydishlab.com/wp-content/uploads/2025/06/204a25e3-72de-43dd-a2c9-ed6d01f2f3a8-768x768.webp)


