Creamy Spinach Artichoke Dip Skillet Delight

Get ready to dive into my Creamy Spinach Artichoke Dip Skillet Delight! This rich and tasty dish is perfect for parties or a cozy night in. With easy steps and simple ingredients, you’ll wow your friends and family. Plus, I’ll share tips for the creamiest texture and fun variations to make it your own. Let’s get cooking and create a dip everyone will love!
Why I Love This Recipe
- Deliciously Creamy: This dip is the perfect blend of creaminess from cream cheese, sour cream, and mayonnaise, making it irresistible.
- Quick to Prepare: With just 10 minutes of prep time, you can have a warm, cheesy dip ready in no time.
- Perfect for Gatherings: Whether it’s a party or a cozy night in, this dip is a crowd-pleaser that pairs well with various dippers.
- Customizable: You can easily adjust the spice level or add other ingredients to suit your taste preferences.
Ingredients
List of Required Ingredients
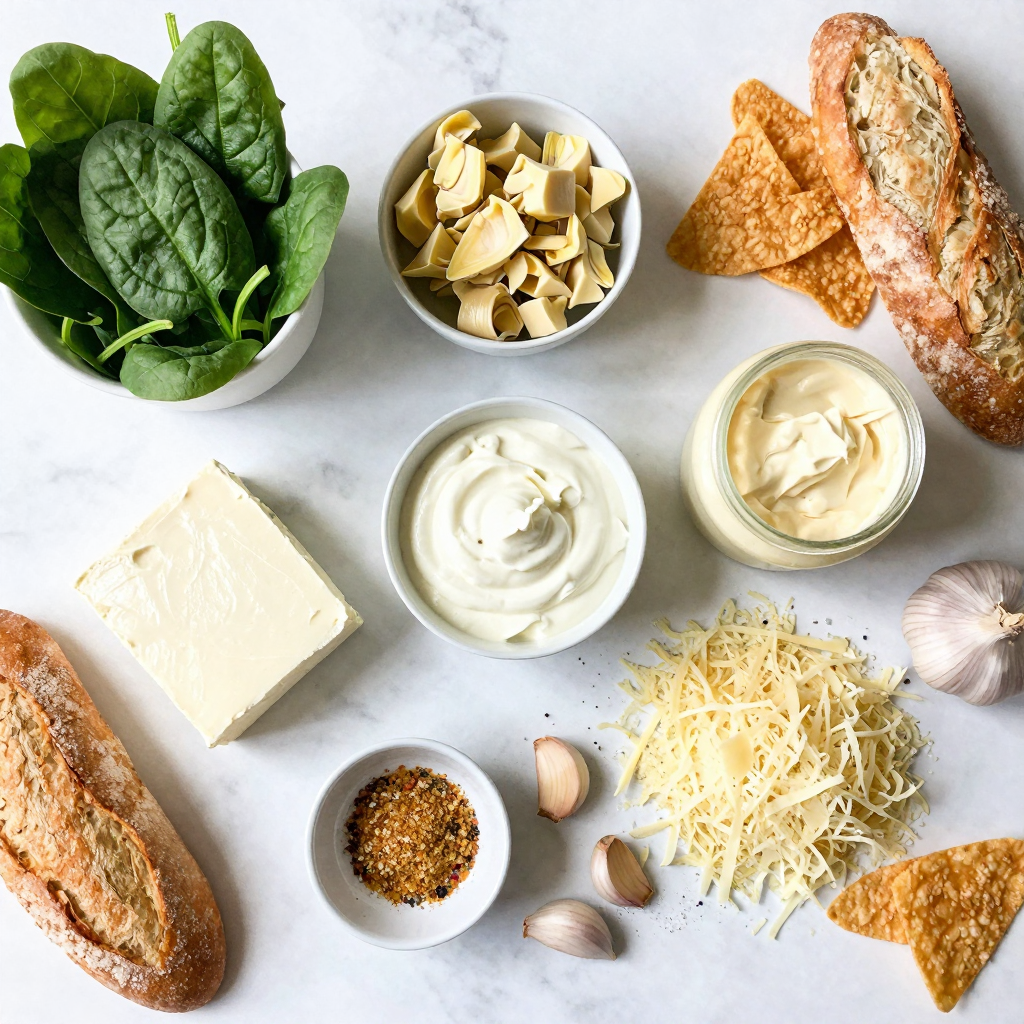
To make a tasty Creamy Spinach Artichoke Dip Skillet, gather these ingredients:
- 1 cup fresh spinach, chopped
- 1 cup canned artichoke hearts, drained and chopped
- 1 cup cream cheese, softened
- 1/2 cup sour cream
- 1/2 cup mayonnaise
- 1 cup shredded mozzarella cheese
- 1/2 cup grated Parmesan cheese
- 2 cloves garlic, minced
- 1 teaspoon onion powder
- 1/2 teaspoon red pepper flakes (optional)
- Salt and pepper to taste
- Fresh baguette or tortilla chips for serving
Measurement Details
Each ingredient plays a key role in this dip. The fresh spinach adds color and nutrition. The artichoke hearts give a nice texture. Cream cheese, sour cream, and mayo blend for a rich base. Mozzarella and Parmesan cheeses provide creaminess and flavor. Garlic adds a lovely aroma. Onion powder and red pepper flakes give depth and spice. Adjust salt and pepper based on your taste.
Suggested Alternatives for Ingredients
If you need substitutes, here are some ideas:
- Use frozen spinach instead of fresh. Just thaw and drain it well.
- Swap cream cheese for Greek yogurt for a lighter dip.
- Try a vegan mayo if you want a dairy-free option.
- You can mix different cheeses like feta or cheddar for unique flavors.
- Fresh herbs like basil or parsley can replace onion powder for freshness.
These tips help you customize your dip to suit your taste and needs. Enjoy experimenting!

Step-by-Step Instructions
Prepping the Ingredients
Gather all your ingredients first. This makes cooking smooth and easy. You will need:
- 1 cup fresh spinach, chopped
- 1 cup canned artichoke hearts, drained and chopped
- 1 cup cream cheese, softened
- 1/2 cup sour cream
- 1/2 cup mayonnaise
- 1 cup shredded mozzarella cheese
- 1/2 cup grated Parmesan cheese
- 2 cloves garlic, minced
- 1 teaspoon onion powder
- 1/2 teaspoon red pepper flakes (optional)
- Salt and pepper to taste
- Fresh baguette or tortilla chips for serving
Start by washing the spinach. Chop it finely and set it aside. Next, drain and chop the artichoke hearts.
Cooking Process in the Skillet
Heat a splash of olive oil in a medium skillet over medium heat. Add minced garlic and sauté it for about one minute. You want it fragrant but not burnt. Next, stir in the chopped spinach and artichokes. Cook until the spinach wilts, which takes about 2-3 minutes.
In a mixing bowl, combine softened cream cheese, sour cream, mayonnaise, and onion powder. Mix until smooth and creamy. Then add mozzarella and Parmesan cheeses, salt, pepper, and red pepper flakes if you like heat. Stir well until everything is mixed.
Pour this creamy cheese mixture into the skillet with the spinach and artichokes. Make sure to stir to combine everything evenly.
Baking and Finalizing the Dip
Smooth the top of the dip in the skillet. If you want a cheesier finish, sprinkle a little extra mozzarella on top. Preheat your oven to 375°F (190°C) if you haven’t already.
Transfer the skillet to the oven and bake for 20-25 minutes. Look for a bubbly and golden topping. Once done, take it out and let it cool for a few minutes. Serve it hot with fresh baguette slices or crispy tortilla chips. Enjoy this creamy spinach artichoke dip skillet delight!
Pro Tips
- Fresh Ingredients: Using fresh spinach and high-quality artichoke hearts will enhance the flavor and texture of your dip.
- Customize Your Cheese: Feel free to mix in other cheeses like Gouda or cheddar for a unique twist on the classic flavor.
- Adjust the Heat: If you prefer a spicier dip, increase the amount of red pepper flakes or add a dash of hot sauce to the cheese mixture.
- Make Ahead: Prepare the dip in advance and refrigerate it. Just bake it right before serving for a warm, gooey treat.
Tips & Tricks
How to Achieve the Creamiest Texture
To get a creamy dip, use softened cream cheese. This helps you mix it easily. Blend the cream cheese with sour cream and mayonnaise until smooth. The combination makes the dip rich. Adding mozzarella and Parmesan gives it even more creaminess. Mix all the cheeses well to avoid lumps. Bake until bubbly for that perfect texture.
Flavor Enhancements and Additions
To boost flavor, add minced garlic right at the start. This brings out a nice aroma. You can also sprinkle in onion powder for depth. If you like heat, toss in red pepper flakes. A squeeze of lemon juice can brighten the taste. Fresh herbs like parsley or basil make it fresh and lively. Feel free to experiment with different spices that you enjoy.
Serving Suggestions and Pairings
Serve this dip hot right from the skillet. It looks inviting and tastes amazing. Pair it with fresh baguette slices for dipping. Tortilla chips also work well for a crunchy bite. For a healthier option, try raw veggies like carrots or bell peppers. Always have extra cheese on top for a lovely finish. Enjoy sharing this creamy delight with friends and family!

Variations
Vegan or Dairy-Free Options
You can easily make this dip vegan. Swap the cream cheese for a plant-based version. Use dairy-free sour cream and mayonnaise too. Nutritional yeast adds a cheesy flavor. You can also try blended cashews for creaminess. This keeps the rich taste without dairy.
Different Cheese Combinations
Cheese is key in this dip. While mozzarella and Parmesan work great, you can mix it up. Try cheddar or gouda for a different flavor. For a kick, add pepper jack. Each cheese brings its own taste and creaminess. Experiment to find your favorite blend.
Flavoring with Herbs and Spices
Herbs and spices can change this dip’s taste. Add fresh basil or parsley for brightness. A pinch of thyme or dill adds depth. For a spicy twist, increase the red pepper flakes. Garlic powder or smoked paprika can also boost flavor. Personalize it to match your palate!
Storage Info
Best Practices for Storing Leftovers
After enjoying your creamy spinach artichoke dip, store any leftovers in an airtight container. This helps keep it fresh and tasty. Make sure to cool the dip to room temperature before sealing it up. It will stay good in the fridge for about 3 to 4 days. If you want to enjoy it later, freezing is a great option.
Reheating Instructions
To reheat your dip, place it in a skillet over low heat. Stir it gently until it warms up. You can also use the microwave. Heat it in short bursts of 30 seconds, stirring in between. This way, you avoid overheating and keep it creamy. If it seems too thick, add a splash of milk or cream to loosen it.
Freezing for Future Use
For freezing, transfer the dip to a freezer-safe container. Make sure to leave some space at the top for expansion. Label the container with the date. The dip can last for about 2 to 3 months in the freezer. When you’re ready to eat it, thaw it overnight in the fridge. Then, reheat following the instructions above. Enjoy your dip at any time!
FAQs
How long do I bake the dip?
Bake the dip for 20-25 minutes. You want it to be bubbly and golden. Keep an eye on it. The dip is ready when the cheese melts and the top looks nice.
Can I make it ahead of time?
Yes, you can make it ahead! Prepare the dip and store it in the fridge. Cover it tightly with plastic wrap. You can bake it later. Just remember to let it sit at room temp for a bit before baking.
What can I serve with spinach artichoke dip?
You have many tasty choices! Here are some ideas:
- Fresh baguette slices
- Crispy tortilla chips
- Veggie sticks like carrots and celery
- Pita bread or crackers
- Breadsticks
These options add fun and crunch to your meal!
We covered all the key points for making a great spinach artichoke dip. We listed the needed ingredients and how to prepare them. The cooking steps used a skillet and an oven for a tasty finish. You learned tips for a creamier texture and great flavor. I shared some fun variations, along with storage tips to keep leftovers fresh.
In closing, this dip is simple, tasty, and perfect for sharing. Enjoy experimenting with flavors and make it your own!

Creamy Spinach Artichoke Dip Skillet
Ingredients
1 cup fresh spinach, chopped
1 cup canned artichoke hearts, drained and chopped
1 cup cream cheese, softened
1/2 cup sour cream
1/2 cup mayonnaise
1 cup shredded mozzarella cheese
1/2 cup grated Parmesan cheese
2 cloves garlic, minced
1 teaspoon onion powder
1/2 teaspoon red pepper flakes (optional)
Salt and pepper to taste
Fresh baguette or tortilla chips for serving
Instructions
Preheat your oven to 375°F (190°C).
In a medium skillet (oven-safe), heat a splash of olive oil over medium heat. Add minced garlic and sauté for about 1 minute until fragrant.
Stir in the chopped spinach and artichokes, cooking until the spinach wilts (around 2-3 minutes).
In a mixing bowl, combine the softened cream cheese, sour cream, mayonnaise, and onion powder. Mix until smooth and creamy.
Add the mozzarella and Parmesan cheeses to the cream mixture, along with salt, pepper, and red pepper flakes (if using). Stir well to combine.
Pour the cheese mixture into the skillet over the sautéed spinach and artichokes. Stir to combine everything evenly.
Smooth the top of the dip and sprinkle a little extra mozzarella cheese on top if you desire a cheesier finish.
Transfer the skillet to the preheated oven and bake for 20-25 minutes, or until the dip is bubbly and golden on top.
Remove from oven and let cool slightly before serving.
Prep Time: 10 minutes | Total Time: 35 minutes | Servings: 4-6
– Presentation Tips: Serve directly from the skillet, accompanied by fresh baguette slices or crispy tortilla chips. Garnish with a sprinkle of extra Parmesan and a few fresh spinach leaves on top for color.

Creamy Spinach Artichoke Dip Skillet
Ingredients
- 1 cup fresh spinach, chopped
- 1 cup canned artichoke hearts, drained and chopped
- 1 cup cream cheese, softened
- 1 2 sour cream
- 1 2 mayonnaise
- 1 cup shredded mozzarella cheese
- 1 2 grated Parmesan cheese
- 2 cloves garlic, minced
- 1 teaspoon onion powder
- 1 2 red pepper flakes (optional)
- to taste Salt and pepper
- for serving Fresh baguette or tortilla chips
Instructions
- Preheat your oven to 375°F (190°C).
- In a medium skillet (oven-safe), heat a splash of olive oil over medium heat. Add minced garlic and sauté for about 1 minute until fragrant.
- Stir in the chopped spinach and artichokes, cooking until the spinach wilts (around 2-3 minutes).
- In a mixing bowl, combine the softened cream cheese, sour cream, mayonnaise, and onion powder. Mix until smooth and creamy.
- Add the mozzarella and Parmesan cheeses to the cream mixture, along with salt, pepper, and red pepper flakes (if using). Stir well to combine.
- Pour the cheese mixture into the skillet over the sautéed spinach and artichokes. Stir to combine everything evenly.
- Smooth the top of the dip and sprinkle a little extra mozzarella cheese on top if you desire a cheesier finish.
- Transfer the skillet to the preheated oven and bake for 20-25 minutes, or until the dip is bubbly and golden on top.
- Remove from oven and let cool slightly before serving.


![- 2 large sweet potatoes, peeled and cut into thin fries - 2 tablespoons olive oil - 1 teaspoon paprika - 1 teaspoon garlic powder - ½ teaspoon cayenne pepper (optional for heat) - Salt and pepper to taste - 1 ripe avocado - 2 tablespoons Greek yogurt - 1 tablespoon lime juice - 1 small clove garlic, minced - Fresh cilantro for garnish To make sweet potato fries, you need a few simple items. Start with large sweet potatoes. They bring a nice sweetness and vibrant color. Olive oil helps achieve a crispy texture. Spices like paprika and garlic powder add flavor. If you like heat, cayenne pepper is optional. For the avocado dip, grab a ripe avocado. It should feel soft when you press it gently. Greek yogurt makes the dip creamy and adds protein. Lime juice gives it a zesty kick. A small clove of garlic adds depth to the flavor. Finally, fresh cilantro can brighten your dish. With these ingredients, you can create a tasty snack or side dish. The flavors mix well and complement each other perfectly. If you want to see the complete recipe, check out the Full Recipe section. First, I preheat the oven to 425°F (220°C). This step is key for crispy fries. Next, I line a baking sheet with parchment paper. It helps the fries not stick. Now, I take 2 large sweet potatoes. I peel them and cut them into thin fries. Aim for about 1/4-inch thick. This size ensures even cooking. In a large bowl, I mix the fries with olive oil, paprika, garlic powder, cayenne pepper, salt, and pepper. I toss everything together until the fries are well coated. This blend adds a tasty kick. I spread the fries out in a single layer on the baking sheet. This step keeps them from steaming. I bake the fries for about 25-30 minutes. Halfway through, I flip them for even cooking. They should turn golden and crispy. To achieve optimal crispiness, I avoid overcrowding the baking sheet. If fries touch, they won’t crisp up. While the fries bake, I make the avocado dip. I grab a ripe avocado and mash it in a small bowl. I aim for a smooth texture. Next, I add Greek yogurt, lime juice, minced garlic, salt, and pepper to the mashed avocado. I stir everything until creamy. This dip adds a fresh flavor. For tips, I suggest adjusting the garlic to your liking. You want a balance of flavors that complements the fries. Once the fries are done, I serve them hot with the avocado dip. The combination is simply delightful! For the complete recipe, check out the [Full Recipe]. To get crispy sweet potato fries, you must not overcrowd the baking sheet. When fries sit on top of each other, they steam instead of bake. This makes them soggy, not crispy. Spread them out in a single layer with space in between. Cooking times can vary. Most ovens will take about 25 to 30 minutes at 425°F (220°C). Check them halfway through and flip for even cooking. If your oven runs hot or cold, adjust the time as needed. Adding spices can make your sweet potato fries pop. Try sprinkling on some cinnamon or chili powder for a tasty twist. You can also toss in some fresh herbs like rosemary or thyme. Looking for toppings? Grated parmesan cheese or crumbled feta can add great flavor. A drizzle of balsamic glaze or hot sauce can also elevate the dish. You can prep your sweet potato fries in advance. Cut and season them, then store them in the fridge for up to 24 hours. When ready, bake them straight from the fridge; just add a few extra minutes to the cooking time. For serving, consider a fun presentation. Use a large platter with the fries piled high. Place the avocado dip in a bowl in the center, garnished with fresh cilantro. It makes a great visual and invites everyone to dig in. For the full recipe, check out the link provided. {{image_2}} You can make your sweet potato fries spicy by adding heat. Use chili powder for a smoky kick. You can also try cayenne pepper for a fiery burst. If you prefer a wet heat, drizzle hot sauce on the fries before baking. This will give them a zesty flavor. Mix and match these spices to find your perfect heat level. While the avocado dip is creamy and tasty, you can explore other options. A yogurt-based dip adds a tangy twist and pairs well with fries. Try mixing Greek yogurt with herbs like dill or mint for a fresh taste. Tahini also makes a great dip. It brings a nutty flavor that complements sweet potatoes nicely. Sweet potatoes are not alone! You can mix them with other veggies for a colorful twist. Try adding carrot or zucchini fries to the mix. This not only adds flavor but also boosts nutrition. Cut them into similar sizes to ensure even cooking. This way, you get a rainbow of flavors and textures on your plate. For the full recipe, check out the details above. Enjoy your delicious and fun variations! Sweet potato fries can stay fresh in the fridge for up to three days. To store them, place the fries in an airtight container. This keeps them from getting soggy and helps maintain flavor. Always let the fries cool completely before sealing them. This prevents steam buildup, which can make them mushy. To reheat sweet potato fries and keep them crispy, use an oven or an air fryer. Preheat your oven to 400°F (200°C). Spread the fries on a baking sheet in a single layer. Bake for about 10 minutes or until heated through. If using an air fryer, set it to 350°F (175°C) and cook for about 5-7 minutes. Avoid using a microwave, as it makes fries soft and chewy. To freeze sweet potato fries, first, bake them as you would for the recipe. Allow them to cool completely. Then, spread the fries in a single layer on a baking sheet and freeze for about an hour. Once frozen, transfer the fries to a freezer bag. Seal it tightly, removing as much air as possible. When you want to enjoy them, reheat straight from the freezer. Bake at 425°F (220°C) for 25-30 minutes, flipping halfway through. This method keeps them tasty and crisp. For the full recipe, check out the link provided. Yes, you can use orange sweet potatoes. They are similar to yellow sweet potatoes but have a sweeter flavor. Orange sweet potatoes, like the Beauregard variety, are rich in beta-carotene. This gives them a vibrant color and a slightly different taste. You can use them in the same way as regular sweet potatoes. Just peel them, cut them into fries, and season as usual. To boost the flavor of your fries, try adding extra seasonings. Consider these options: - Cumin for a warm, earthy taste. - Chili powder for a spicy kick. - Dried rosemary for a savory note. - Parmesan cheese for a rich, cheesy flavor. Experiment with combinations to find your perfect mix! If you don’t have Greek yogurt, there are great substitutes for the avocado dip. You can use: - Sour cream for a tangy taste. - Plain yogurt if you want a lighter option. - Cottage cheese for added protein and creaminess. These alternatives will keep your dip creamy and delicious. For the complete recipe on how to make sweet potato fries with avocado dip, visit the [Full Recipe](#). In this post, we explored how to make crispy sweet potato fries and a tasty avocado dip. We discussed key ingredients, step-by-step instructions, helpful tips, and variations to enhance your dish. You can adapt the flavors to your taste by using different spices or dips. Making these fries at home is easy and fun. Remember, proper storage and reheating keep them crispy. Enjoy your cooking adventure with sweet potatoes and make each serving special!](https://dailydishlab.com/wp-content/uploads/2025/07/b71090ff-edcb-4680-b017-d44004cc0ae0-768x768.webp)

![- 2 medium zucchinis, cut into fries - 1 cup breadcrumbs (preferably whole wheat or panko for extra crunch) - 1/2 cup grated Parmesan cheese - 1 teaspoon garlic powder - 1 teaspoon paprika - 1/2 teaspoon salt - 1/2 teaspoon black pepper - 2 large eggs, beaten - Cooking spray or olive oil for drizzling When choosing zucchinis, look for medium-sized ones that feel firm. Avoid any that are soft or have blemishes. Fresh zucchinis taste better and give the best results. For breadcrumbs, I suggest using either whole wheat or panko. Whole wheat adds a nutty flavor, while panko gives extra crunch. Both options work well, but I lean toward panko for that delightful crisp. Using fresh ingredients is key. Fresh herbs, spices, and cheese enhance the taste of your baked zucchini fries. They make your snack not just tasty but also healthy. Always choose high-quality ingredients for the best results. For the full recipe, check the detailed instructions above. Enjoy your cooking! Start by preheating your oven to 425°F (220°C). This high heat helps achieve that crispy texture we love. While the oven heats, line a baking sheet with parchment paper. This step makes cleanup easy and prevents sticking. Make sure the parchment paper is flat against the pan. Any wrinkles can cause uneven cooking. Next, let's coat those zucchini fries. First, beat your eggs in a shallow bowl. This will help the breadcrumbs stick. Now, prepare the breadcrumb mixture. In another bowl, mix the breadcrumbs, grated Parmesan, garlic powder, paprika, salt, and pepper. The mix should be evenly combined. For coating, take each zucchini fry and dip it into the eggs. Let the extra drip off for a cleaner look. Then, roll it in the breadcrumb mix. Press gently to ensure the crumbs stick well. This step is key for a crispy bite. Now, it's time to bake. Place the coated zucchini fries on the baking sheet. Make sure they are in a single layer and not touching. This spacing helps them crisp up. Lightly spray or drizzle with olive oil for an extra crispy finish. Bake the fries for 20 to 25 minutes. Flip them halfway through to ensure even cooking. You know they are done when they turn golden brown and crisp. Let them cool for a few minutes before serving. Enjoy your crispy and flavorful baked zucchini fries! For the full recipe, check out the [Full Recipe]. To get your zucchini fries extra crispy, focus on the coating. I recommend using panko breadcrumbs. They add more crunch than regular breadcrumbs. Mix them with grated Parmesan, garlic powder, paprika, salt, and pepper for a tasty coating. Even spacing on the baking sheet is key. Place the zucchini fries in a single layer. Make sure they don’t touch each other. This allows hot air to circulate around each fry, making them crispier. You can customize the spice levels to fit your taste. If you like heat, add cayenne pepper or chili powder. For a milder flavor, stick to garlic and herbs. Fresh herbs can enhance the flavor. Try adding chopped parsley or basil to the breadcrumb mix. This adds a fresh taste that pairs well with zucchini. If you want to try air frying, it’s a great option. Air fryers cook food quickly and make it crispy. Set the temperature to 400°F (200°C) and cook for about 15 minutes, shaking the basket halfway through. Grilling zucchini fries is another fun method. Brush them with olive oil and grill them over medium heat. This gives them a smoky flavor while still keeping them crispy. For the full recipe, check out the detailed steps provided earlier. {{image_2}} You can switch up the cheese for your baked zucchini fries. For a vegan option, use nutritional yeast. It adds a cheesy flavor without dairy. You can also use vegan cheese shreds. They melt well and give a nice texture. If you prefer traditional cheese, try mozzarella or cheddar. Both add a creamy taste. Parmesan is great for a salty kick. Mixing different cheeses can create even more flavor. Want a gluten-free option? Use almond flour or crushed rice cereal instead of breadcrumbs. These options still give that crunchy texture. For more crunch, add nuts or seeds to your coating mix. Chopped almonds or sunflower seeds work well. They boost nutrition and flavor. You can even try crushed cornflakes for a unique twist. Experiment with spices to give your fries a new taste. Try adding cayenne pepper for heat or Italian herbs for a fresh flavor. You can mix garlic powder with onion powder for depth. Incorporating other vegetables can add variety, too. Try mixing in carrot or sweet potato sticks. They can add color and taste. Just keep the size similar so they cook evenly. To keep your zucchini fries fresh, use airtight containers. Glass containers work great. You can also use plastic ones that seal well. Store them in the fridge. They stay good for about 3 days. When reheating, use the oven for the best results. Preheat it to 350°F (175°C). Place the fries on a baking sheet. Heat for about 10 minutes. This keeps them crispy. The microwave works too, but it may make them soft. If you use the microwave, heat for 1-2 minutes on a plate. You can freeze your leftover fries for later. Lay them flat on a baking sheet and freeze until solid. Then, move them to a freezer bag. They stay good for about 2 months. When you're ready to eat them, thaw overnight in the fridge. Reheat in the oven for a crispy finish. Always avoid refreezing once they are thawed. To make baked zucchini fries crispy, you need to focus on a few key steps. First, choose the right breadcrumbs. Whole wheat or panko breadcrumbs add great crunch. Dip the fries in beaten eggs to help the coating stick. Make sure to press the breadcrumbs onto the zucchini well. Common mistakes include overcrowding the baking sheet. Ensure the fries are in a single layer. This allows hot air to circulate and crisp them up. Also, lightly spray the fries with cooking spray or drizzle with olive oil before baking. This step enhances the crispiness. Using frozen zucchini is not ideal for baked zucchini fries. Frozen zucchini contains more water, which affects texture. When you bake it, the fries may turn out soggy instead of crispy. Fresh zucchini gives you the best flavor and crunch. If you only have frozen zucchini, thaw it first. Pat it dry with paper towels to remove excess moisture. This may improve the final result, but fresh is always better for this recipe. Zucchini fries taste great with many dips. Here are some popular options: - Marinara sauce - Ranch dressing - Garlic aioli - Spicy ketchup - Yogurt dip You can also make your own dips to match your taste. Mixing Greek yogurt with herbs makes a refreshing dip, while a spicy aioli adds a kick. Try different combinations to find your favorite! In this post, I shared how to make delicious zucchini fries. We covered selecting the best ingredients, baking techniques, and tips for a perfect crunch. Fresh ingredients matter for great taste. Remember to space your fries evenly for crispiness. Experiment with flavors and cooking methods for variety. Finally, store your leftovers correctly to keep them tasty. Enjoy making these versatile fries, and don’t hesitate to try new combinations!](https://dailydishlab.com/wp-content/uploads/2025/06/7c2e4ba5-05a6-4328-aa36-1f6df44662bb-768x768.webp)
