Easy Baked Chicken Nuggets Crisp and Tasty Delight

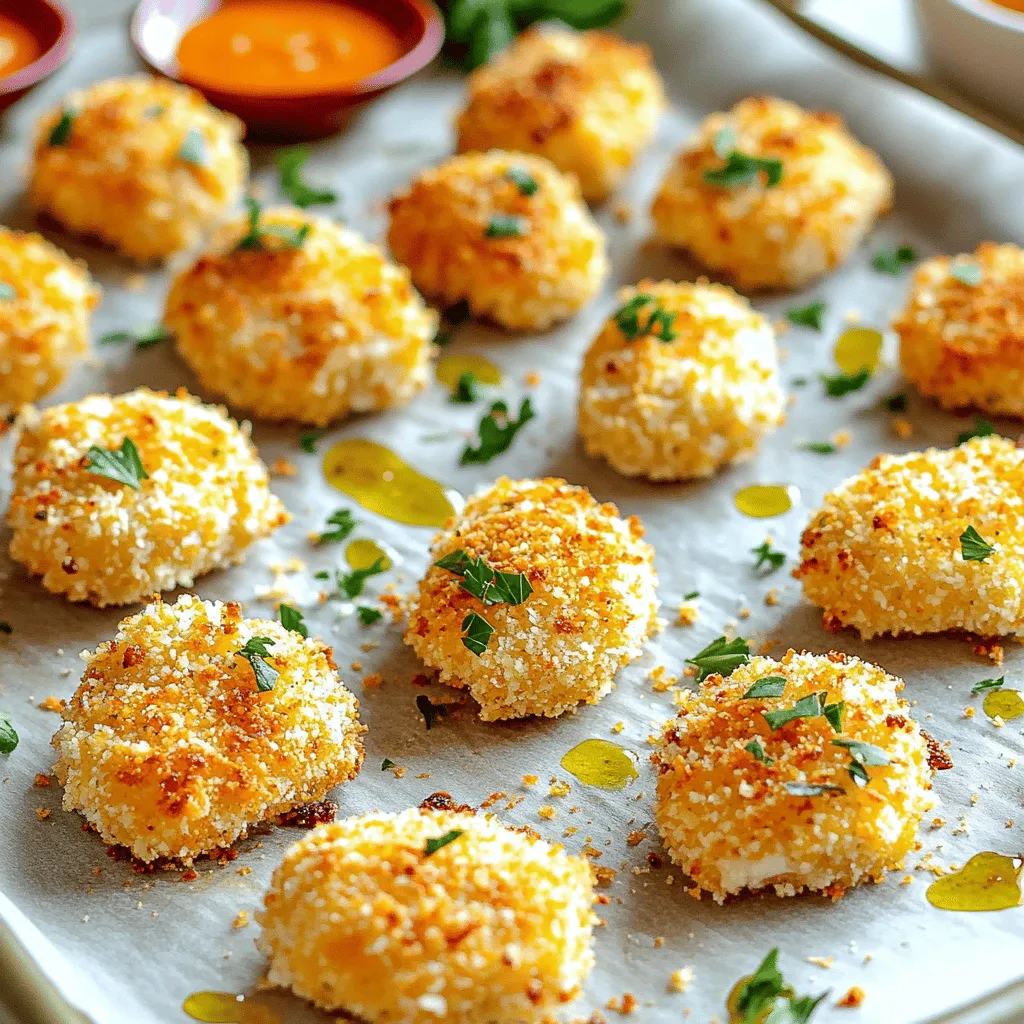
Looking for a snack that’s both crispy and healthy? You’re in the right place! These Easy Baked Chicken Nuggets are not only simple to make, but they’re also packed with flavor. With just a handful of ingredients and minimal prep, you can whip up a batch the whole family will love. Let’s dive into this tasty recipe that guarantees a crunchy delight with every bite!
Why I Love This Recipe
- Quick and Easy: This recipe takes only 15 minutes of prep time and is perfect for busy weeknights!
- Kid-Friendly: These chicken nuggets are a hit with kids, making mealtime enjoyable for the whole family.
- Customizable: You can easily swap out spices or add your favorite herbs to make these nuggets your own.
- Healthier Option: Baking instead of frying reduces the oil content, making this a healthier nugget choice!
Ingredients
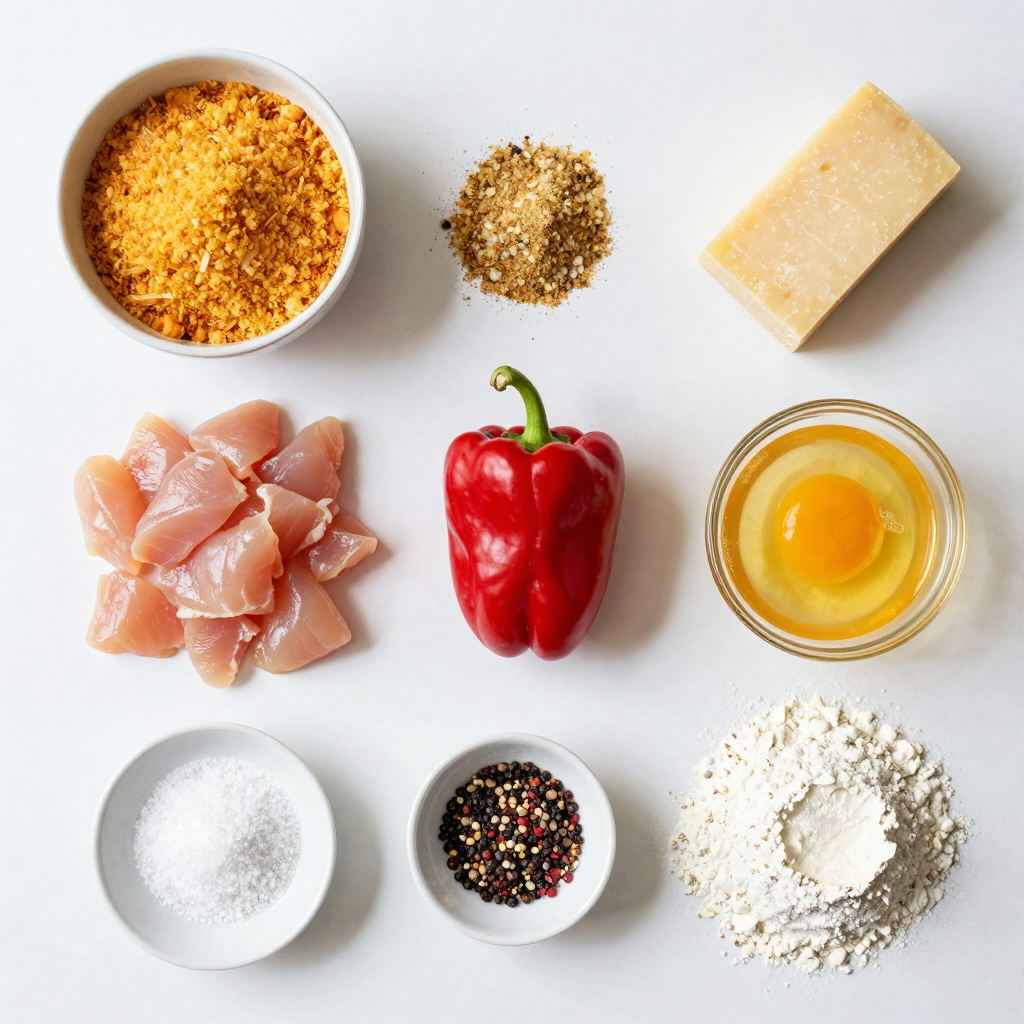
Main Ingredients List
- 1 lb chicken breast, cut into bite-sized pieces
- 1 cup breadcrumbs (preferably panko for extra crunch)
- 1/2 cup grated Parmesan cheese
- 1/2 teaspoon garlic powder
- 1/2 teaspoon onion powder
- 1 teaspoon paprika
- 1 egg, beaten
- 1/2 cup all-purpose flour
- Salt and pepper to taste
- Cooking spray or olive oil for drizzling
Optional Ingredients for Customization
- Different types of cheese (e.g., cheddar, mozzarella)
- Additional seasonings (e.g., Italian seasoning, cayenne pepper)
When I make these baked chicken nuggets, I focus on fresh ingredients. Each one plays a key role in flavor and texture. The chicken breast offers a juicy bite, while panko breadcrumbs give a satisfying crunch.
The grated Parmesan cheese adds a rich, cheesy taste. Garlic and onion powders bring depth, and paprika adds a subtle warmth.
Using an egg helps the crumbs stick well. The all-purpose flour coats the chicken, creating a barrier for moisture.
For a personal touch, feel free to switch cheeses or add spices. Cheddar gives a sharp flavor, while cayenne adds a kick.
Always remember to season with salt and pepper. This simple step makes a big difference!

Step-by-Step Instructions
Preparing Your Kitchen
- Preheat your oven to 400°F (200°C).
- Line a baking sheet with parchment paper or a silicone baking mat.
This step makes a big difference. The right temperature helps the chicken nuggets cook evenly. The parchment paper makes cleaning up much easier.
Breading the Chicken
- Set up a breading station with flour, beaten egg, and breadcrumb mixture.
- Coat chicken pieces thoroughly to ensure even coverage.
First, you take a piece of chicken, dip it in flour, and cover it well. Then, dip it in the beaten egg to make it sticky. Finally, roll it in the breadcrumb mix. This process keeps the nuggets crispy and tasty.
Baking Process
- Space nuggets on the baking sheet.
- Lightly spray with cooking oil.
- Bake for 15-20 minutes, flipping halfway.
Make sure to leave space between each nugget. This helps them crisp up nicely. After 10 minutes, flip them to get both sides golden brown. At the end of baking, they should smell amazing and look delicious.
Pro Tips
- Use Panko Breadcrumbs: For an extra crunch, opt for panko breadcrumbs instead of regular ones. They create a lighter, crispier texture that elevates your chicken nuggets.
- Season Your Flour: Add a pinch of salt and pepper to your all-purpose flour for an extra layer of flavor. This simple step ensures that every bite is delicious.
- Don’t Overcrowd the Baking Sheet: Make sure to leave space between each nugget on the baking sheet. This allows hot air to circulate and helps them crisp up evenly.
- Experiment with Dips: Besides honey mustard and ranch, try serving these nuggets with barbecue sauce, sriracha, or a homemade garlic aioli for a flavor twist.
Tips & Tricks
Achieving a Crispy Texture
To get that perfect crunch, use panko breadcrumbs. They provide a light and airy texture. You can also spray oil lightly over the nuggets before baking. This helps them brown nicely and adds to the crispiness.
Ensuring Chicken is Cooked Properly
Make sure to use a meat thermometer. The chicken should reach an internal temperature of 165°F. You can also check for visual cues; the nuggets should be golden brown. This color indicates they are cooked well.
Serving Suggestions
Serve your chicken nuggets with tasty dipping sauces. Honey mustard or ranch are great choices. For a nice touch, garnish with fresh herbs like parsley. This adds color and makes your dish look even more inviting.

Variations
Flavor Variations
You can easily change the taste of your chicken nuggets. For a spicy kick, add cayenne pepper or hot sauce to the breading. If you enjoy fresh flavors, mix in dried herbs like oregano or thyme into the breadcrumbs. These simple changes will create a new taste experience each time.
Alternative Cooking Methods
Try cooking your chicken nuggets in an air fryer for a crispy texture with less oil. Just set the air fryer to 400°F and cook for about 10-12 minutes. You can also grill the nuggets for a smoky flavor that adds depth to the dish. Grilling works well, too, and gives them a nice char.
Dietary Customization
If you need gluten-free options, use almond flour or gluten-free breadcrumbs. They work just as well and keep the nuggets tasty. For dairy-free needs, try using nutritional yeast instead of cheese. This will still give you a nice flavor without the dairy. You can enjoy different styles while keeping your diet in mind.
Storage Info
Storing Leftovers
Store your chicken nuggets in an airtight container. They will last in the fridge for up to 4 days. If you want to keep them longer, freeze them. They can stay fresh in the freezer for up to 3 months.
Reheating Techniques
To get the best texture, reheat the nuggets in the oven. Set the oven to 375°F (190°C) and bake them until warm. This keeps them crispy. If you’re in a hurry, you can use a microwave. Just know that they may lose some crispiness this way. For quick serving, the microwave is convenient but not the best for texture.
FAQs
Can I use frozen chicken for this recipe?
Yes, but thaw completely before breading and cooking. Using frozen chicken can save time, but the texture may change if not thawed. Thawing allows for even cooking and better breading adherence.
How do I make sure my chicken nuggets are cooked through?
Use a meat thermometer to check an internal temperature of 165°F. This ensures your chicken is safe to eat and juicy. If you don’t have a thermometer, look for a golden brown color and juices that run clear.
What dipping sauces pair well with baked chicken nuggets?
Honey mustard, ranch, BBQ sauce, or homemade sauces can elevate the flavor. Each sauce adds a unique twist. Feel free to mix and match to find your favorite combo!
Can I meal prep these chicken nuggets?
Yes, they can be made in advance and stored or frozen for a quick meal. When meal prepping, make sure to cool them completely before freezing. They reheat well, making them a great option for busy days.
You can make delicious baked chicken nuggets with simple steps and common ingredients. I covered main components like chicken, breading, and optional seasoning. You can get creative with flavors and dipping sauces. Remember to ensure the chicken cooks well by checking the temperature. These nuggets store well and can fit into meal prep. Try these tips to enjoy great results each time. Enjoy the process and the tasty bites you create!

Easy Baked Chicken Nuggets
Ingredients
1 lb chicken breast, cut into bite-sized pieces
1 cup breadcrumbs (preferably panko for extra crunch)
1/2 cup grated Parmesan cheese
1/2 teaspoon garlic powder
1/2 teaspoon onion powder
1 teaspoon paprika
1 egg, beaten
1/2 cup all-purpose flour
Salt and pepper to taste
Cooking spray or olive oil for drizzling
Instructions
Preheat your oven to 400°F (200°C). Line a baking sheet with parchment paper or a silicone baking mat for easy cleanup.
In a shallow bowl, combine the breadcrumbs, grated Parmesan cheese, garlic powder, onion powder, paprika, salt, and pepper. Mix well until evenly combined.
Set up a breading station: in one bowl, place the all-purpose flour; in another, add the beaten egg.
Take each piece of chicken, dip it in the flour first, coating it well, then into the egg, and finally roll it in the breadcrumb mixture until fully coated.
Place the coated chicken nuggets on the prepared baking sheet, leaving space between each nugget.
Lightly spray or drizzle the nuggets with cooking spray or olive oil to help them crisp up in the oven.
Bake in the preheated oven for 15-20 minutes or until golden brown and cooked through, flipping halfway through cooking.
Once done, let them cool for a couple of minutes before serving.
Prep Time: 15 minutes | Total Time: 35 minutes | Servings: 4
– Presentation Tips: Serve the chicken nuggets with a side of your favorite dipping sauces like honey mustard or ranch, and garnish with fresh parsley for a pop of color.

Easy Baked Chicken Nuggets
Ingredients
- 1 lb chicken breast, cut into bite-sized pieces
- 1 cup breadcrumbs (preferably panko for extra crunch)
- 0.5 cup grated Parmesan cheese
- 0.5 teaspoon garlic powder
- 0.5 teaspoon onion powder
- 1 teaspoon paprika
- 1 large egg, beaten
- 0.5 cup all-purpose flour
- to taste Salt and pepper
- as needed Cooking spray or olive oil for drizzling
Instructions
- Preheat your oven to 400°F (200°C). Line a baking sheet with parchment paper or a silicone baking mat for easy cleanup.
- In a shallow bowl, combine the breadcrumbs, grated Parmesan cheese, garlic powder, onion powder, paprika, salt, and pepper. Mix well until evenly combined.
- Set up a breading station: in one bowl, place the all-purpose flour; in another, add the beaten egg.
- Take each piece of chicken, dip it in the flour first, coating it well, then into the egg, and finally roll it in the breadcrumb mixture until fully coated.
- Place the coated chicken nuggets on the prepared baking sheet, leaving space between each nugget.
- Lightly spray or drizzle the nuggets with cooking spray or olive oil to help them crisp up in the oven.
- Bake in the preheated oven for 15-20 minutes or until golden brown and cooked through, flipping halfway through cooking.
- Once done, let them cool for a couple of minutes before serving.


![To make these tasty Brussels sprouts, you need: - 1 lb Brussels sprouts, trimmed and halved - 4 cloves garlic, minced - 1/4 cup olive oil - 1/2 teaspoon salt - 1/4 teaspoon black pepper - 1/4 teaspoon red pepper flakes (optional) - 1/2 cup grated Parmesan cheese - 2 tablespoons fresh lemon juice - Fresh parsley, chopped (for garnish) These ingredients create a delicious mix. The garlic adds a rich flavor. The Parmesan cheese brings a nice creaminess. Roasting the sprouts with these items makes them tender with a slight crunch. You can add some ingredients to boost the taste: - Balsamic vinegar for a tangy kick - Honey for a hint of sweetness - Bacon bits for a savory touch - Nuts like pecans or walnuts for crunch These ingredients can elevate your dish. Feel free to experiment with them. If you lack some items, here are some swaps: - Use canola oil instead of olive oil. - Any hard cheese can replace Parmesan. - Use shallots or leeks if you don't have garlic. - For a vegan option, skip cheese and use nutritional yeast. These swaps keep the dish tasty while making it easier to prepare. Always feel free to adjust based on what you have at home. Check the Full Recipe for more details on cooking. 1. First, preheat your oven to 400°F (200°C). This step is key for perfect roasting. 2. Take a large bowl, and add the halved Brussels sprouts. 3. Next, add the minced garlic, olive oil, salt, black pepper, and red pepper flakes if you like some heat. 4. Toss everything well. Make sure each sprout gets coated. 5. Spread the Brussels sprouts on a baking sheet lined with parchment paper. Lay them out flat for even cooking. 6. Roast in the oven for 20 minutes. This allows them to get tender. 7. After 20 minutes, take the baking sheet out. Sprinkle the grated Parmesan cheese on top of the sprouts. 8. Return the baking sheet to the oven. Roast for an additional 10 minutes. You want the cheese bubbly and golden. 9. Once done, take them out and drizzle fresh lemon juice over the sprouts for a nice zing. 10. Finally, add chopped fresh parsley on top for color and flavor before you serve. In this section, I recommend creating a visual guide. This can help you see each step clearly. For example, photos of the mixing bowl with ingredients or the roasted sprouts can enhance your cooking experience. Each image should show the sprouts' transformation, step by step. - Make sure the Brussels sprouts are cut evenly. This helps them cook at the same rate. - Avoid overcrowding the baking sheet. If they are too close, they can steam instead of roast. - Rotate the baking sheet halfway through cooking. This ensures even browning and crispiness. - For extra crunch, try using a convection oven if you have one. The fan helps circulate hot air. - Let the sprouts rest for a few minutes after roasting. This allows the flavors to settle. For the full recipe, check out the [Full Recipe]. Start with fresh Brussels sprouts. Look for tight, bright green buds. Trim off the tough ends and slice them in half. This helps them cook evenly. Rinse them under cold water. This removes dirt and makes them taste fresh. For more flavor, soak them in salted water for 5 minutes. This simple step enhances their taste. To get that perfect crisp, use high heat. Preheat your oven to 400°F (200°C). Spread the Brussels sprouts in a single layer on a baking sheet. Avoid overcrowding; this helps them roast instead of steam. Use parchment paper for easy cleanup and crispness. Toss them with olive oil and spices before roasting. This adds flavor and helps them brown nicely. One big mistake is not cutting the sprouts. If you leave them whole, they won’t cook well. Overcrowding the baking sheet is another issue. This leads to soggy sprouts instead of crispy ones. Also, don’t skip the cheese! Adding Parmesan at the right time gives a nice golden crust. Finally, remember to add lemon juice after roasting. It brightens the dish and enhances the flavors. For the full recipe, check out the main article. {{image_2}} You can change the flavor by using different cheeses. Instead of Parmesan, try Asiago or Pecorino. These cheeses add a sharp taste that pairs well with the sprouts. If you want a creamy touch, add some goat cheese. It melts nicely and gives a rich flavor. Mix different cheeses for a fun twist. Each cheese adds its own unique flair to the dish. Brussels sprouts work well with many other vegetables. You can add carrots, sweet potatoes, or bell peppers. Just chop them into similar sizes to the sprouts. This makes sure they cook at the same time. Roasting a mix of veggies adds color and flavor. Plus, it makes the dish more nutritious and fun to eat. If you like heat, add more red pepper flakes. You can also try a splash of hot sauce before serving. For a smoky flavor, sprinkle some smoked paprika on the sprouts. This adds a nice depth to the dish. You can even toss in chopped jalapeños for a fresh kick. Adjust the spice level to fit your taste. Enjoy the heat! To keep your roasted garlic Parmesan Brussels sprouts fresh, allow them to cool. Place the leftovers in an airtight container. Store them in the fridge for up to three days. This way, they stay tasty and ready to eat. When it’s time to enjoy your leftovers, the oven is best. Preheat the oven to 350°F (175°C). Spread the sprouts on a baking sheet. Heat for about 10 to 15 minutes. This method will bring back their crispiness and flavor. Freezing Brussels sprouts is simple. First, roast them as per the full recipe. Allow them to cool completely. Then, place them in a freezer-safe bag or container. Make sure to remove as much air as possible. They will stay fresh for up to three months. When you’re ready, just reheat them straight from the freezer! Roasted Brussels sprouts last about 3 to 5 days in the fridge. Store them in an airtight container. The flavors may change a bit, but they still taste great. To reheat, just warm them in the oven or a pan. This keeps them crispy. Yes, you can use frozen Brussels sprouts. They will work, but the texture may be softer. Make sure to thaw them first and pat them dry. This helps to remove extra moisture. You can then follow the same cooking steps in the [Full Recipe]. Roasted garlic Parmesan Brussels sprouts pair well with many dishes. Here are some ideas: - Grilled chicken or fish - Quinoa or rice dishes - Pasta with light sauce - A fresh salad These sides add balance to your meal. Enjoy the tasty contrast with the sprouts! Roasted garlic Parmesan Brussels sprouts are a tasty and healthy treat. We covered the key ingredients needed, along with great alternatives. You learned step-by-step cooking methods and tips for perfect roasting. I shared flavor variations and what to avoid when making them. Finally, you discovered how to store leftovers for later meals. Now, it’s your turn to try this simple recipe. Enjoy these tasty sprouts!](https://dailydishlab.com/wp-content/uploads/2025/07/0dc3de56-8693-4932-b830-16ad2f639664-768x768.webp)


