
Looking for a quick and tasty dinner? This Easy Beef Stir Fry is just what you need! In only 30 minutes, you can whip up a meal bursting with flavor. With simple ingredients, easy steps, and helpful tips, you’ll impress your family and friends. Ready to transform your weeknight routine? Let’s jump right into this delicious recipe that will make your taste buds dance!
Why I Love This Recipe
- Quick and Easy: This stir fry can be prepared in just 30 minutes, making it perfect for busy weeknights.
- Flavorful Ingredients: The combination of soy sauce, oyster sauce, and sesame oil creates a rich and savory flavor.
- Customizable: You can easily swap in your favorite vegetables or proteins to suit your tastes.
- Healthy Option: This dish is packed with fresh vegetables, making it a nutritious choice for any meal.
Ingredients
Main Ingredients for Easy Beef Stir Fry
For a tasty beef stir fry, you need some key items. They include:
– 1 lb (450g) flank steak, sliced thinly against the grain
– 2 tablespoons soy sauce
– 1 tablespoon cornstarch
– 2 tablespoons vegetable oil
These ingredients form the base of your dish. The flank steak gives a rich flavor, while the soy sauce adds a nice salty touch.
Essential Seasonings and Sauces
Seasonings turn a good dish into a great one. For this stir fry, you will use:
– 3 cloves garlic, minced
– 1 tablespoon ginger, grated
– 2 tablespoons oyster sauce
– 1 teaspoon sesame oil
– Salt and pepper to taste
Garlic and ginger bring a warm, aromatic flavor. Oyster sauce adds depth, while sesame oil gives a nutty note.
Recommended Vegetables
Fresh veggies make your stir fry colorful and healthy. I suggest:
– 1 red bell pepper, sliced
– 1 yellow bell pepper, sliced
– 1 cup broccoli florets
– 1 cup snap peas
These vegetables stay crisp and bright in the stir fry. They add texture and flavor, making your meal more fun to eat.
Step-by-Step Instructions
Preparing the Beef for Stir Fry
Start by slicing the flank steak thinly. This helps the beef cook fast and stay tender. Place the sliced beef in a bowl. Add soy sauce and cornstarch. Mix these well to coat the beef. Let it sit for about 15 minutes. This time helps the beef soak up the flavor. While it marinates, you can prepare your veggies.
Cooking the Beef to Perfection
Heat one tablespoon of vegetable oil in a large skillet or wok over high heat. Once hot, add the marinated beef. Stir-fry for about 3 to 4 minutes. You want the beef to brown and cook through. Once it’s done, remove the beef from the skillet. Set it aside while you cook the veggies. This keeps the beef juicy and tasty.
Stir-Frying the Vegetables
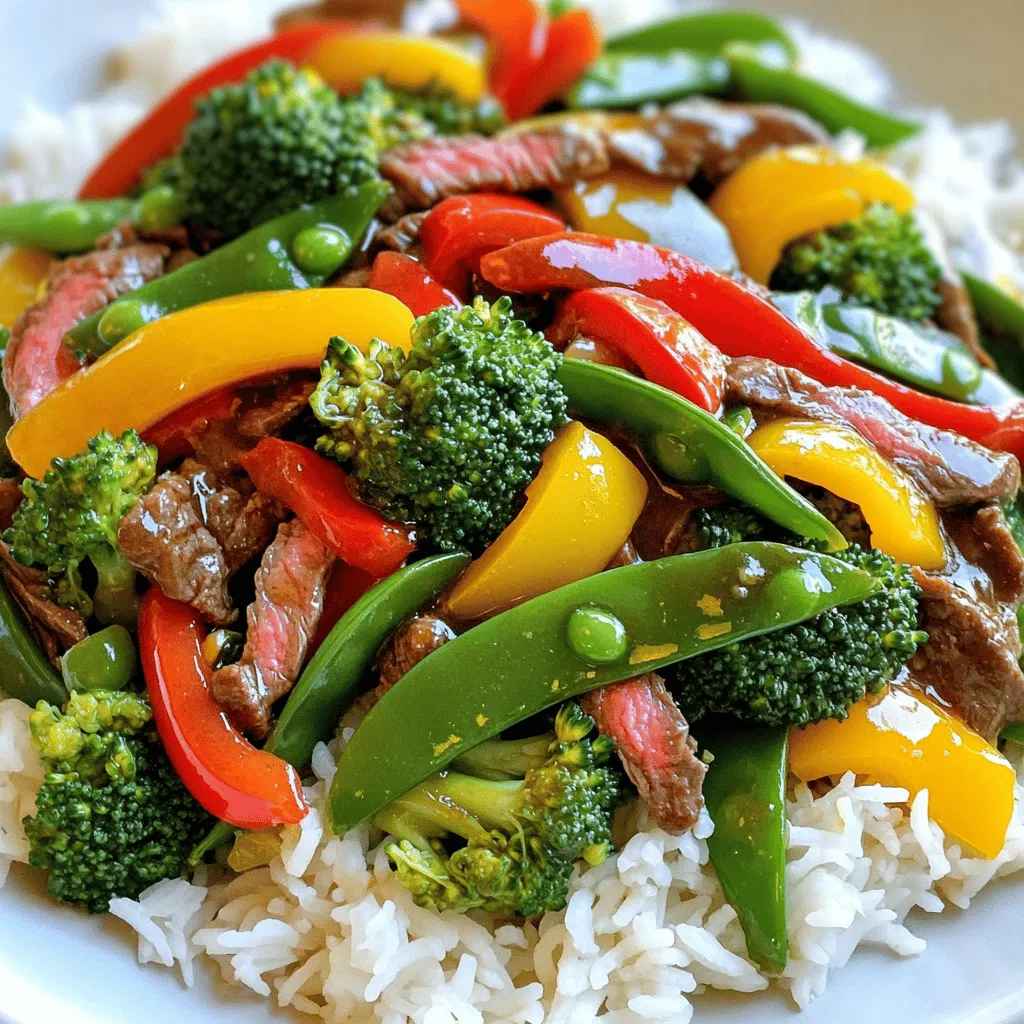
In the same skillet, add the last tablespoon of vegetable oil. Add minced garlic and grated ginger. Stir-fry these for about 30 seconds until they smell great. Next, add the sliced red and yellow bell peppers, broccoli, and snap peas. Stir-fry everything for about 5 to 7 minutes. You want the colors bright and the veggies tender-crisp. Return the cooked beef to the skillet. Pour in oyster sauce and sesame oil. Add salt and pepper to taste. Toss everything together for 1 to 2 minutes. Make sure the beef and veggies are coated in the sauce. Now, it’s ready to serve over cooked rice or noodles.
Pro Tips
- Marinate for Maximum Flavor: Allowing the flank steak to marinate for at least 15 minutes helps to tenderize the meat and infuse it with the soy sauce flavor.
- High Heat is Key: Cooking the beef and vegetables over high heat ensures they sear quickly, locking in juices and maintaining a tender texture.
- Prep Your Ingredients Ahead: To make the cooking process smooth, chop and prepare all your vegetables before you start cooking since stir-frying is a quick process.
- Use Fresh Veggies: For the best flavor and nutrition, use fresh vegetables and add them to the skillet in the order of their cooking time to ensure everything is perfectly cooked.
Tips & Tricks
Marinating for Maximum Flavor
Marinating beef adds great taste. I recommend using soy sauce and cornstarch. Mix these with the beef and let it sit for 15 minutes. This makes the beef tender and juicy. The soy sauce gives it a salty kick. Cornstarch helps create a nice sear when you cook it.
Achieving the Perfect Stir Fry Texture
To get the best texture, heat your pan well. Start with high heat before adding the beef. Cook it for just 3-4 minutes. If you overcook it, the beef becomes tough. After cooking, remove it from the pan. This keeps it tender. Then, cook your veggies. Stir-fry them until they are bright and crisp. This keeps their nutrients and crunch.
Common Mistakes to Avoid
One big mistake is overcrowding the pan. If you add too much beef or veggies at once, they steam instead of fry. Fry in batches if needed. Another mistake is not prepping all your ingredients first. Stir fry cooks fast. Have everything ready before you start. Lastly, don’t skip the sauces. They add depth and make your dish pop.
Variations
Substitutes for Beef
If you want to switch things up, try chicken or tofu. Both work well in stir fry. Chicken breast, sliced thin, cooks fast and absorbs flavors. Tofu brings a nice texture and is great for vegans. Use firm or extra-firm tofu for the best results. Just press it to remove excess water before cooking.
Alternative Vegetables
You can change the veggies based on what you have. Carrots add sweetness and color. Zucchini is tender and cooks quickly. You can also use mushrooms for a savory flavor. Snap peas and green beans are great for crunch too. Mix and match to keep it fun and fresh.
Unique Flavor Twists
Want to try something new? Add some pineapple for sweetness. A splash of lime juice gives a zesty kick. You can also sprinkle sesame seeds on top for a nutty taste. If you like heat, add chili flakes or sriracha. These little changes can make your beef stir fry exciting each time you make it.
Storage Info
Best Practices for Storing Leftovers
To keep your Easy Beef Stir Fry fresh, let it cool first. Place it in an airtight container. You can store it in the fridge for up to three days. Make sure not to leave it out at room temperature for too long. Bacteria can grow quickly in warm food.
Reheating Tips for Homemade Stir Fry
Reheating is simple. You can use the microwave or a skillet. If using a microwave, heat in short bursts. Stir the food in between to heat it evenly. If using a skillet, add a splash of water or oil. Heat over medium heat while stirring until warm.
Freezing Easy Beef Stir Fry
You can freeze Easy Beef Stir Fry for up to three months. Use a freezer-safe container or bag. Be sure to squeeze out as much air as you can. When you want to eat it, thaw it in the fridge overnight. Reheat as mentioned before for the best taste.
FAQs
How can I make Easy Beef Stir Fry spicier?
You can make Easy Beef Stir Fry spicier by adding chili sauce or fresh chilies. A dash of sriracha or crushed red pepper can boost the heat. Start with small amounts and taste as you go. This way, you can find the perfect level of spice for your dish.
Can I use a different cut of beef?
Yes, you can use other cuts of beef for this stir fry. Cuts like sirloin, ribeye, or even ground beef will work. Just remember to slice them thinly. This helps them cook quickly and stay tender. Each cut adds a unique flavor and texture to your meal.
What can I serve with Easy Beef Stir Fry?
Easy Beef Stir Fry pairs well with rice or noodles. You can use white rice, brown rice, or even cauliflower rice. Noodles like soba or rice noodles are also great options. For added crunch, serve with a side of fresh salad or crispy spring rolls.
How long does Easy Beef Stir Fry last in the fridge?
Easy Beef Stir Fry lasts about 3 to 4 days in the fridge. Store it in an airtight container to keep it fresh. When you reheat it, make sure it’s warmed through to avoid any cold spots. Enjoy it again for a quick lunch or dinner!
In this blog post, I covered the key ingredients and straightforward steps to make an easy beef stir fry. You learned about the best vegetables, seasonings, and cooking tips. Avoid common mistakes to get the right taste and texture. Explore variations for different diets and flavor twists. Remember to store leftovers properly and reheat them correctly for the best taste. Making stir fry is simple, fun, and opens up many options. Enjoy your cooking journey and savor your meals!


