Easy Chicken and Spinach Quesadillas Quick and Tasty

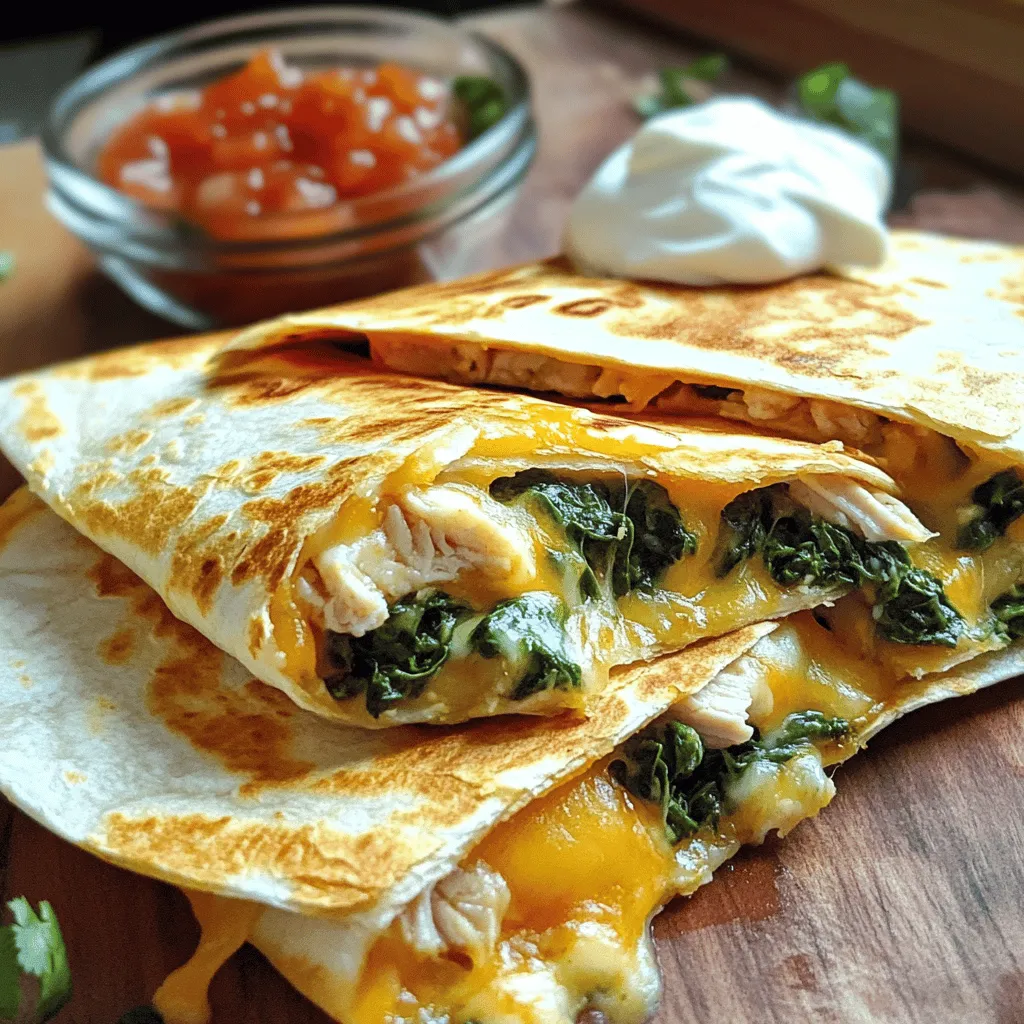
Looking for a quick and tasty meal? You’ve come to the right place! These Easy Chicken and Spinach Quesadillas are the perfect blend of flavor and nutrition. With simple ingredients like shredded chicken, fresh spinach, and melty cheese, you’ll whip this up in no time. Get ready to impress your taste buds and satisfy your hunger—it’s time to dive into this delicious recipe!
Why I Love This Recipe
- Quick and Easy: This recipe takes only 25 minutes from start to finish, making it perfect for busy weeknights.
- Healthy Ingredients: Packed with protein from chicken and vitamins from fresh spinach, these quesadillas are both nutritious and delicious.
- Customizable: You can easily swap out ingredients or add your favorite vegetables and spices to suit your taste.
- Kid-Friendly: With gooey cheese and a fun shape, kids love these quesadillas, making them a great family meal option.
Ingredients
Main Ingredients List
- 2 cups cooked chicken, shredded
- 2 cups fresh spinach, chopped
- 1 cup shredded mozzarella cheese
- 1 cup shredded cheddar cheese
- 4 large flour tortillas
Additional Flavorings
- 1 small onion, finely chopped
- 2 cloves garlic, minced
- 1 teaspoon ground cumin
- 1 teaspoon paprika
- Salt and pepper to taste
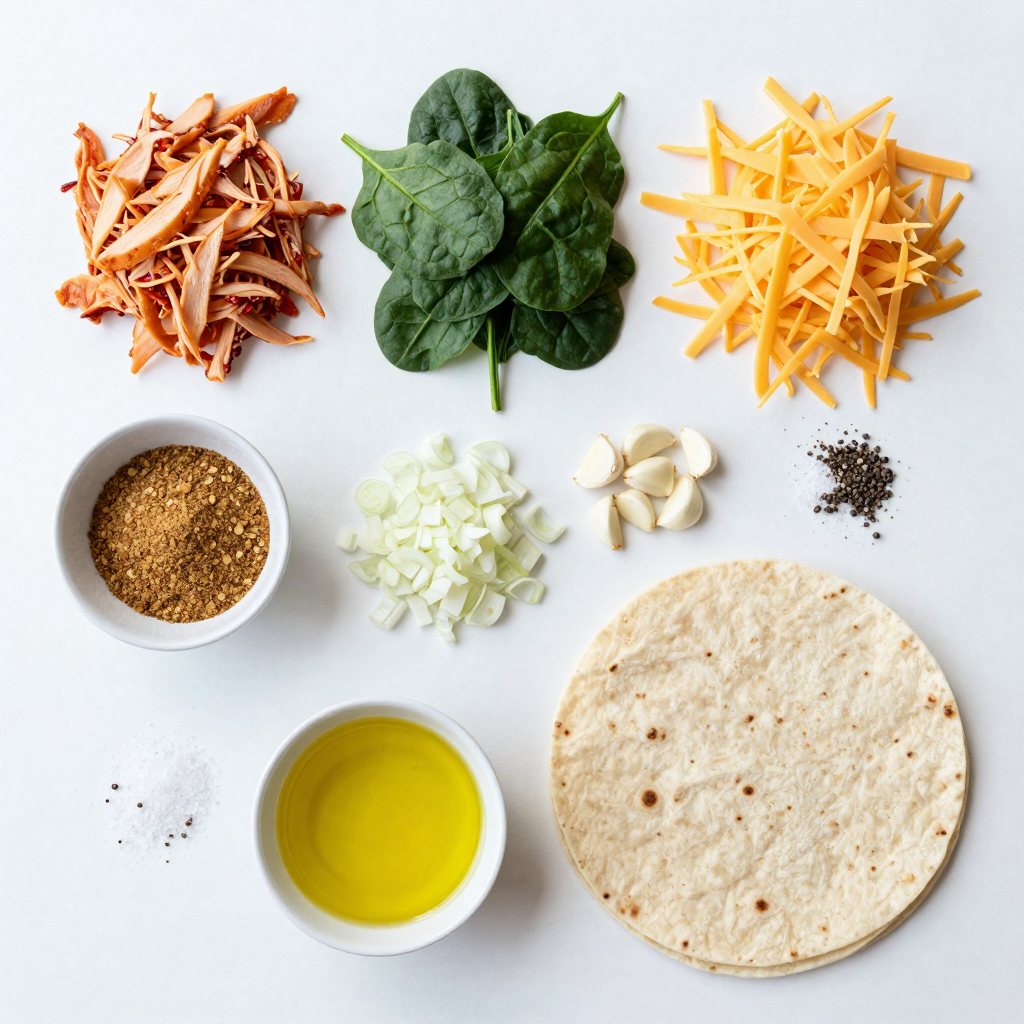
To make easy chicken and spinach quesadillas, gather these ingredients. Cooked chicken is key. You can use leftover chicken or rotisserie chicken. Fresh spinach adds color and nutrients. Mozzarella and cheddar bring gooey goodness. Tortillas hold everything together.
For added flavor, use onion and garlic. They give a nice aroma and taste. Ground cumin and paprika add warmth. Adjust salt and pepper to your liking.
Serving Suggestions
- Sour cream
- Salsa
Serve your quesadillas with sour cream and salsa. They add a nice coolness and zest. You can also try guacamole or hot sauce. Get creative with your dips!

Step-by-Step Instructions
Preparation of the Filling
1. Start by heating 1 tablespoon of olive oil in a large skillet over medium heat.
2. Add the finely chopped onion and minced garlic. Sauté them until the onion turns soft and clear, about 3-4 minutes.
3. Next, add in the shredded chicken and chopped spinach. Sprinkle in the ground cumin, paprika, salt, and pepper.
4. Cook this mixture for about 5 minutes. Stir it often until the spinach wilts and everything is warm.
5. Remove the skillet from the heat. Stir in half of the mozzarella and cheddar cheese. Mix well until the cheese begins to melt.
Cooking the Quesadillas
1. Heat the remaining tablespoon of olive oil in a clean skillet or griddle over medium heat.
2. Place one tortilla in the heated skillet. On one half of the tortilla, add a scoop of the chicken and spinach mix.
3. Top that with some of the remaining mozzarella and cheddar cheese.
4. Fold the tortilla over to cover the filling. Press it down gently.
5. Cook for about 3-4 minutes on each side. You want the tortilla to turn golden and crispy, and the cheese to melt.
6. Repeat this process for all tortillas until they are filled and cooked.
Serving Your Dish
1. Slice each quesadilla into wedges for easy serving.
2. Serve hot alongside sour cream and salsa for dipping.
3. Enjoy the mix of flavors and textures in every bite!
Pro Tips
- Use Leftover Chicken: Utilizing leftover rotisserie or grilled chicken can save time and add extra flavor to your quesadillas.
- Cheese Variations: Feel free to experiment with different cheeses like pepper jack for a spicy kick or feta for a tangy flavor.
- Cooking Method: For extra crispy quesadillas, consider using a panini press instead of a skillet.
- Serve with Fresh Sides: Enhance your meal by serving with fresh guacamole or a side salad for added nutrition.
Tips & Tricks
Ensuring Crispy Quesadillas
To get that perfect crispy quesadilla, you need to pay close attention to oil temperature. Heat your skillet over medium heat. Add oil, and let it get hot but not smoking. If it shimmers, it’s ready. This helps the tortilla crisp up nicely.
When it’s time to flip, use a spatula carefully. Slide it under the quesadilla and lift it quickly. If you hesitate, the filling can spill. You want that golden brown color on both sides.
Customizing the Flavor
You can easily change the flavors to suit your taste. Try adding bell peppers or mushrooms for more texture. They add great color and taste. If you want some heat, consider adding jalapeños or a dash of hot sauce. Adjust the spice level to your liking for a personal touch.
Time-Saving Techniques
To save time, prepare the filling in advance. You can cook the chicken and mix in the spinach and spices a day before. Store it in the fridge so it’s ready to go when you want to cook.
Using pre-cooked chicken is another great time-saver. You can shred it and mix with the other ingredients. This makes the whole process faster, giving you more time to enjoy your meal.

Variations
Vegetarian Version
You can easily make these quesadillas vegetarian. Simply swap the chicken with beans. Black beans or pinto beans work well. They add a nice texture and protein. For cheese, use a vegetarian option. Look for cheese without animal rennet. This keeps your dish meat-free but still tasty.
Different Cheese Combos
Cheese is key in quesadillas. For a spicy kick, try pepper jack cheese. It melts well and adds heat. You can also mix different cheeses for more flavor. Combine mozzarella and cheddar for a creamy, rich taste. Experiment with your favorite cheeses to find the best blend.
Flavor Themes
You can change the flavor profile of your quesadillas. For a Southwest twist, add corn and jalapeños. This brings a fun, zesty taste. Or go for an Italian theme. Use mozzarella, basil, and sun-dried tomatoes. Both options create exciting new dishes with familiar ingredients.
Storage Info
Storing Leftovers
To keep your chicken and spinach quesadillas fresh, store them in a sealed container. Place parchment paper between layers to prevent sticking. They stay best in the fridge for up to three days. For longer storage, freeze them. Wrap each quesadilla in plastic wrap and then in foil. This keeps them safe from freezer burn.
Reheating Methods
When reheating, you have two main options: the oven or the microwave. The oven keeps quesadillas crispy. Preheat it to 350°F (175°C) and bake for about 10 minutes. The microwave is faster but can make them soggy. If you use the microwave, place a paper towel under the quesadilla to absorb moisture and heat for 30-60 seconds.
Shelf Life
Refrigerated quesadillas last about three days. After that, check for signs of spoilage. Look for an off smell, discoloration, or a slimy texture. If you see any of these, toss them out. It’s better to stay safe than sorry.
FAQs
Can I make chicken and spinach quesadillas ahead of time?
Yes, you can! Prepare the filling in advance. Store it in an airtight container in the fridge. This filling will stay fresh for up to three days. When ready to eat, just fill your tortillas and cook them. You can also freeze the filling for up to a month. Just thaw it overnight in the fridge before cooking.
What can I serve with quesadillas?
Quesadillas pair well with many sides. Here are some popular options:
- Mexican rice
- Refried beans
- Guacamole
- Fresh salsa
- Corn salad
These sides add color and flavor to your meal. They also make it more filling and fun!
How do I make quesadillas gluten-free?
To make gluten-free quesadillas, use gluten-free tortillas. Many brands now offer good options. You can find them in most grocery stores.
- Look for tortillas made with corn or almond flour.
- Check the label for gluten-free status.
For a successful gluten-free version, be careful with the cooking surface. Make sure it is clean to avoid cross-contamination. Enjoy the same great taste without the gluten!
This blog post guides you through making tasty chicken and spinach quesadillas. We covered the main ingredients, easy steps, and tips for a crispy finish. Don’t forget the fun variations and storage tips for leftovers. Quesadillas are simple and quick, perfect for busy days. Try new flavors, enjoy with dips, and customize them to your taste. You’ll impress friends and family with this delicious dish. Now, grab your ingredients and start cooking!

Easy Chicken and Spinach Quesadillas
Ingredients
2 cups cooked chicken, shredded
2 cups fresh spinach, chopped
1 cup shredded mozzarella cheese
1 cup shredded cheddar cheese
1 small onion, finely chopped
2 cloves garlic, minced
1 teaspoon ground cumin
1 teaspoon paprika
Salt and pepper to taste
4 large flour tortillas
2 tablespoons olive oil
Sour cream and salsa for serving
Instructions
In a large skillet, heat 1 tablespoon of olive oil over medium heat. Add the finely chopped onion and minced garlic, sautéing until the onion becomes translucent, about 3-4 minutes.
Add in the shredded chicken, chopped spinach, ground cumin, paprika, salt, and pepper. Cook for another 5 minutes, stirring occasionally, until the spinach has wilted and the mixture is heated through.
Remove the skillet from the heat and stir in half of the mozzarella and cheddar cheese, mixing well until the cheese begins to melt.
Heat the remaining tablespoon of olive oil in a clean skillet or griddle over medium heat.
Place one tortilla in the skillet. On one half of the tortilla, add a generous scoop of the chicken and spinach mixture, then top with a sprinkle of the remaining mozzarella and cheddar cheese.
Fold the tortilla over to cover the filling and press gently. Cook for about 3-4 minutes on each side until the tortilla is golden and crispy, and the cheese is melted.
Repeat until all tortillas are filled and cooked.
Slice each quesadilla into wedges and serve hot, accompanied by sour cream and salsa.
Prep Time, Total Time, Servings: 15 minutes | 25 minutes | 4 servings

Easy Chicken and Spinach Quesadillas
Ingredients
- 2 cups cooked chicken, shredded
- 2 cups fresh spinach, chopped
- 1 cup shredded mozzarella cheese
- 1 cup shredded cheddar cheese
- 1 small onion, finely chopped
- 2 cloves garlic, minced
- 1 teaspoon ground cumin
- 1 teaspoon paprika
- to taste salt and pepper
- 4 large flour tortillas
- 2 tablespoons olive oil
- for serving sour cream and salsa
Instructions
- In a large skillet, heat 1 tablespoon of olive oil over medium heat. Add the finely chopped onion and minced garlic, sautéing until the onion becomes translucent, about 3-4 minutes.
- Add in the shredded chicken, chopped spinach, ground cumin, paprika, salt, and pepper. Cook for another 5 minutes, stirring occasionally, until the spinach has wilted and the mixture is heated through.
- Remove the skillet from the heat and stir in half of the mozzarella and cheddar cheese, mixing well until the cheese begins to melt.
- Heat the remaining tablespoon of olive oil in a clean skillet or griddle over medium heat.
- Place one tortilla in the skillet. On one half of the tortilla, add a generous scoop of the chicken and spinach mixture, then top with a sprinkle of the remaining mozzarella and cheddar cheese.
- Fold the tortilla over to cover the filling and press gently. Cook for about 3-4 minutes on each side until the tortilla is golden and crispy, and the cheese is melted.
- Repeat until all tortillas are filled and cooked.
- Slice each quesadilla into wedges and serve hot, accompanied by sour cream and salsa.


![To create a vibrant Cucumber Dill Greek Salad, you need fresh ingredients. Each element adds flavor and texture. Here’s what you will need: - Cucumber: 2 large, diced - Cherry tomatoes: 1 cup, halved - Red onion: 1 small, thinly sliced - Bell pepper: 1 (any color), diced - Kalamata olives: 1 cup, pitted and halved - Feta cheese: 1 cup, crumbled - Fresh dill: 1 tablespoon, chopped (or 1 teaspoon dried) - Olive oil: 3 tablespoons, extra-virgin - Lemon juice: 2 tablespoons - Salt and pepper: to taste These ingredients come together to form a refreshing and simple dish. The combination of cool cucumbers and tangy feta creates a delightful contrast. Adding olives brings a briny kick, while fresh dill adds a nice herbal note. Each bite is crisp, flavorful, and satisfying. Using high-quality ingredients is key. Choose firm cucumbers and ripe tomatoes. Fresh herbs make a big difference, too. For the best taste, use extra-virgin olive oil and fresh lemon juice. If you want to explore the full process, check out the Full Recipe for step-by-step guidance. Enjoy making this delicious salad! Start by peeling the cucumbers. You can skip this if you prefer the skin. Next, dice the cucumbers into small, bite-sized pieces. Then, take your cherry tomatoes and cut them in half. For the red onion, slice it thinly. Finally, dice the bell pepper into small pieces. Each vegetable adds color and crunch to our salad. In a large serving bowl, mix the diced cucumbers, halved cherry tomatoes, sliced red onion, and diced bell pepper. These fresh veggies create a nice base. Now, gently fold in the Kalamata olives and crumbled feta cheese. Be careful not to break the feta. This adds a creamy texture to the salad. In a small bowl, whisk together the extra-virgin olive oil and fresh lemon juice. This will be our dressing. Then, add the chopped dill, salt, and pepper. Whisk again until it is well mixed. The dressing brings all the flavors together. Drizzle the dressing over the salad. Use a large spoon to gently toss everything together. Make sure all ingredients are well coated. This step is key for a tasty salad. Taste the salad and adjust the seasoning. You can add more salt, pepper, or lemon juice if needed. For the best flavor, let the salad sit for about 10-15 minutes before serving. This allows the flavors to meld and enhances the taste. For the full recipe, check out the link. Fresh vegetables are key to a great salad. They add crunch and flavor. For the best taste, pick firm cucumbers, ripe tomatoes, and crisp bell peppers. Look for bright colors and smooth skins. This ensures they are fresh and packed with nutrients. Kalamata olives are a must for this dish. They bring a rich, briny taste. Seek out authentic Kalamata olives, as they offer the best flavor. Check for olives that are dark purple or black, with a smooth texture. Avoid any that look shriveled or dry. For presentation, serve this salad in a large bowl. Arrange the veggies in layers for a colorful look. You can also use small mason jars for individual servings. This fun style makes it easy to grab and enjoy. Pair this salad with grilled chicken or fish for a complete meal. You can also serve it with pita bread for a light lunch. It goes well with tzatziki sauce, which adds a nice creaminess. Marinating the salad adds depth. Let it sit for about 10-15 minutes before serving. This helps the flavors blend. If you have time, prepare it early in the day. It will taste even better after a few hours in the fridge. Serve this salad chilled for the most refreshing experience. It’s perfect for hot days or summer gatherings. Enjoy it as a side dish or a light main course. For more flavor, try adding a splash of red wine vinegar or a pinch of garlic. For the full recipe, check out the Cucumber Dill Greek Salad. {{image_2}} You can switch up the cheese in this salad. If you want a twist, try goat cheese or ricotta. Both add a creamy texture and taste. For dressings, consider balsamic vinegar or yogurt-based dressings. Each option brings its own flair to the salad. This salad shines with fresh, seasonal veggies. In summer, add ripe avocado or sweet corn. In fall, try diced apples or roasted nuts for crunch. Change the herbs too; basil or mint can give a new flavor. Adjust the dressing with spices fitting the season for a unique touch. Get creative by adding elements from other cuisines. Try diced jalapeños for a spicy kick or sprinkle with sesame seeds for an Asian vibe. You can also mix in chopped cilantro or lime juice for a Mexican twist. Explore fusion recipes, like adding quinoa for a heartier meal. To keep your Cucumber Dill Greek Salad fresh, refrigerate any leftovers right away. Use an airtight container to store the salad. This keeps flavors intact and prevents wilting. Make sure to seal the container tightly. You can enjoy the salad for about 3 to 4 days in the fridge. Check for signs of spoilage before eating. Look for wilting or a sour smell. If the salad looks off, it's best to toss it. Leftover salad can be used in many ways. Try mixing it with cooked pasta for a quick dish. You can add it to a wrap for a tasty lunch. Chopped salad makes a great topping for grilled chicken or fish. Get creative and enjoy your leftovers! For the full recipe, check the [Full Recipe]. Yes, you can make this salad ahead of time. To prepare in advance, chop the vegetables and store them separately. Keep the dressing in a jar. Just before serving, mix everything together. This keeps the veggies crisp and fresh. The salad stays good for about three days in the fridge. Use an airtight container to store it. If you notice any signs of spoilage, like a strange smell or mushy veggies, throw it away. This salad can be made vegan. Just skip the feta cheese or use a plant-based cheese. You can also replace the honey in the dressing with agave syrup for sweetness. This way, everyone can enjoy it. This salad goes well with grilled chicken or fish. You can also serve it with pita bread and hummus. For a full meal, pair it with rice or quinoa dishes. To boost the dressing's flavor, add more lemon juice or dill. You can also mix in a pinch of garlic powder or a splash of red wine vinegar. Taste as you go to find your perfect balance. For the complete recipe, check out the Full Recipe. This blog post covered everything you need for a perfect Cucumber Dill Greek Salad. You learned about key ingredients, step-by-step preparation, and expert tips for the best taste. Remember to choose fresh produce and experiment with variations to suit your taste. This salad is easy to make and can be tweaked for any season or diet. Enjoy this tasty dish at your next meal or gathering, and feel free to get creative with leftovers. A fresh salad can brighten any plate!](https://dailydishlab.com/wp-content/uploads/2025/07/5e5811ac-3a9b-4435-8173-96f3851851ae-768x768.webp)

![- 1 can (15 oz) chickpeas, drained and rinsed - 4 cloves of garlic, roasted - 1/4 cup tahini - 2 tablespoons lemon juice - 2 tablespoons olive oil (plus extra for drizzling) - 1/2 teaspoon ground cumin - Salt, to taste - Water, as needed for desired consistency These core ingredients create the base of your roasted garlic hummus. The chickpeas offer a creamy texture and protein. Roasted garlic brings a sweet, mellow flavor that warms the dish. Tahini adds a nutty element, while olive oil gives richness. Lemon juice brightens the flavor, and cumin adds depth. - Fresh parsley - Paprika - Additional olive oil drizzle Garnishes elevate your hummus. Fresh parsley adds a nice color and freshness. Paprika offers a hint of smokiness and a pop of color. A drizzle of olive oil not only makes it look great, but it enhances the flavor too. For the full recipe, visit [Full Recipe]. Roasting the garlic First, preheat your oven to 400°F (200°C). Take four cloves of garlic. Wrap them in aluminum foil. Roast the garlic for about 20-25 minutes. It should be soft and fragrant. Let it cool a bit before you touch it. Preparing chickpeas Grab one can of chickpeas. Drain the chickpeas and rinse them well under cold water. This step helps remove extra sodium and gives a better taste. Now, you’re ready to blend! Combining all ingredients in a food processor In your food processor, combine the roasted garlic, chickpeas, tahini, lemon juice, olive oil, and ground cumin. Add a pinch of salt too. This mix will create that rich, creamy texture we love. Achieving the desired consistency Blend the mixture until smooth. If it looks too thick, add water one tablespoon at a time. Keep blending until you reach that perfect hummus consistency. Taste it and adjust the seasoning if needed. Presentation tips Scoop the hummus into a serving bowl. Drizzle a bit of olive oil on top. Sprinkle paprika and some fresh parsley for color. This makes it look great! Pairing ideas Serve your hummus with warm pita bread, fresh veggies, or crunchy crackers. It also goes well with grilled meats or as a dip for a party. Enjoy your tasty creation! For the full recipe, check out the [Full Recipe]. To get the best roasted garlic flavor, I recommend roasting at 400°F (200°C) for 20-25 minutes. This time and heat bring out a sweet, mellow taste. The garlic should feel soft when you squeeze it. Using regional garlic varieties can also help. Each type has its own unique flavor. Local garlic often tastes fresher and can add a nice twist to your hummus. The thickness of your hummus can change based on your preference. If it's too thick, add water slowly, one tablespoon at a time. Blend well after each addition until you reach the right texture. If you want to avoid using water, try adding olive oil or lemon juice. These ingredients can help adjust the thickness while also enhancing the flavor. To make your hummus even better, consider adding spices like smoked paprika or cayenne pepper. These can give a nice kick to your dish. Incorporating fresh herbs can also elevate the taste. Parsley and cilantro work well, adding color and flavor. Experiment with different herbs to find your favorite mix. For the full recipe, check out the [Full Recipe]. {{image_2}} You can easily switch up the flavors in roasted garlic hummus. One popular option is spicy roasted garlic hummus. To make it, add a pinch of cayenne pepper or some chopped jalapeños. This gives your hummus a nice kick. Another great choice is herbed roasted garlic hummus. You can mix in fresh herbs like basil or cilantro. This adds a fresh taste and vibrant color to your dip. Sometimes you might want to change a few ingredients. For a lighter option, try low-fat tahini. You can find brands that reduce fat but still keep great flavor. If you need a chickpea substitute, consider using white beans or lentils. They blend well and give a similar creamy texture. When it comes to serving, think outside the box! Vegetable dippers like carrots, celery, or bell pepper strips are excellent. They add crunch and freshness to each bite. You can also serve hummus with crackers or pita bread. Both options are great for scooping. Plus, they complement the rich flavors of the hummus. For the full recipe, check out the detailed instructions above. To keep your roasted garlic hummus fresh, use airtight containers. Glass jars work well. They seal tightly and prevent air from getting in. Plastic containers are also good but make sure they are BPA-free. In the fridge, your hummus will stay fresh for about five to seven days. Always check for any off smells or changes in color before eating. If it looks or smells funny, it's best to toss it. You can freeze hummus for later use. To do this, scoop it into a freezer-safe container. Leave some space at the top. Hummus expands as it freezes. When you want to use it, move the container to the fridge. Let it thaw overnight. For quick thawing, you can also place it in warm water for about 30 minutes. After thawing, stir it well. You may need to add a bit of water to get the right consistency. Enjoy your hummus again! For more details on making this delicious dish, check the Full Recipe. Roasted garlic hummus is a smooth dip made from chickpeas and roasted garlic. It has a rich, savory flavor that is both nutty and creamy. The roasted garlic adds a sweet and mellow taste, making it a favorite among many. You can enjoy it as a snack, spread, or party appetizer. Store roasted garlic hummus in the fridge for up to five days. Look for signs of spoilage such as an off smell or mold. If you see either, it’s best to toss it. Yes, you can make roasted garlic hummus ahead of time. Prepare it two to three days before your event. Store it in an airtight container in the fridge to keep it fresh. You can find roasted garlic hummus at most grocery stores. Look in the deli section or refrigerated aisle. Brands like Sabra and Tribe often carry this flavor. For fresh options, check your local farmer's market. For a homemade option, try my Full Recipe for roasted garlic hummus. Roasted garlic hummus is simple and fun to make. You need key ingredients like chickpeas, roasted garlic, and tahini. Follow our easy steps to blend them into a creamy dip. Feel free to try different flavors or pair it with veggies or crackers. Store any leftovers properly to keep them fresh. This hummus is versatile and can spice up any meal. I hope you're excited to make your own tasty hummus at home. Enjoy experimenting with different flavors!](https://dailydishlab.com/wp-content/uploads/2025/06/d9475f29-a73b-4d87-94b9-fefa292024dd-768x768.webp)

