
Looking for a festive dessert that’s easy and delicious? Eggnog Mousse is a creamy holiday treat you can’t miss! With its light texture and rich flavor, this dessert is perfect for parties or cozy nights in. In this blog post, I’ll walk you through the ingredients, steps, and tips to create the best eggnog mousse. Let’s dive into the simple, fun, and festive world of this delightful dessert!
Why I Love This Recipe
- Rich and Creamy Texture: This eggnog mousse boasts a luxurious texture that melts in your mouth, making it a perfect holiday treat.
- Festive Flavors: The combination of nutmeg and cinnamon gives this mousse a traditional holiday flavor that evokes warm memories of Christmas.
- Easy to Prepare: With simple ingredients and straightforward steps, this recipe allows you to whip up a delightful dessert without any fuss.
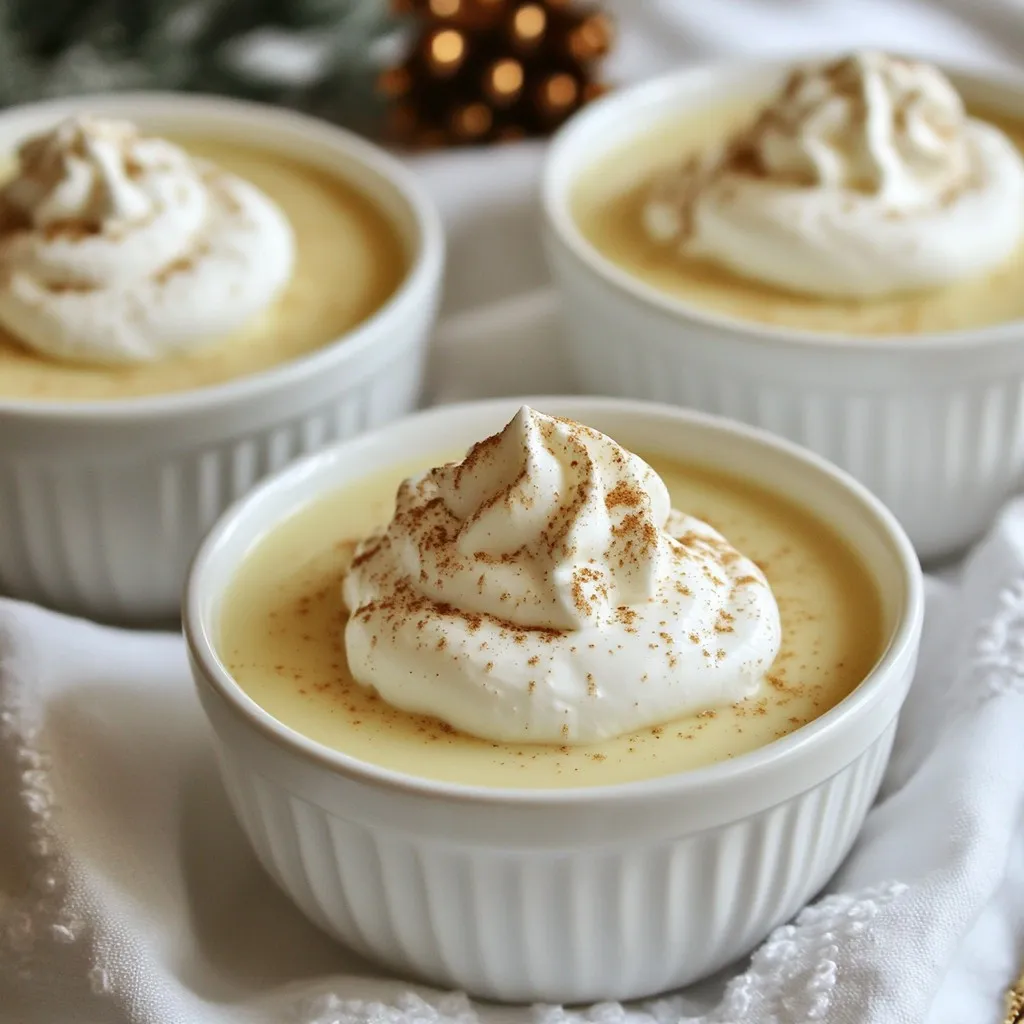
- Beautiful Presentation: Garnished with whipped cream and nutmeg, this dessert not only tastes great but looks stunning on any holiday table.
Ingredients
Complete List of Ingredients
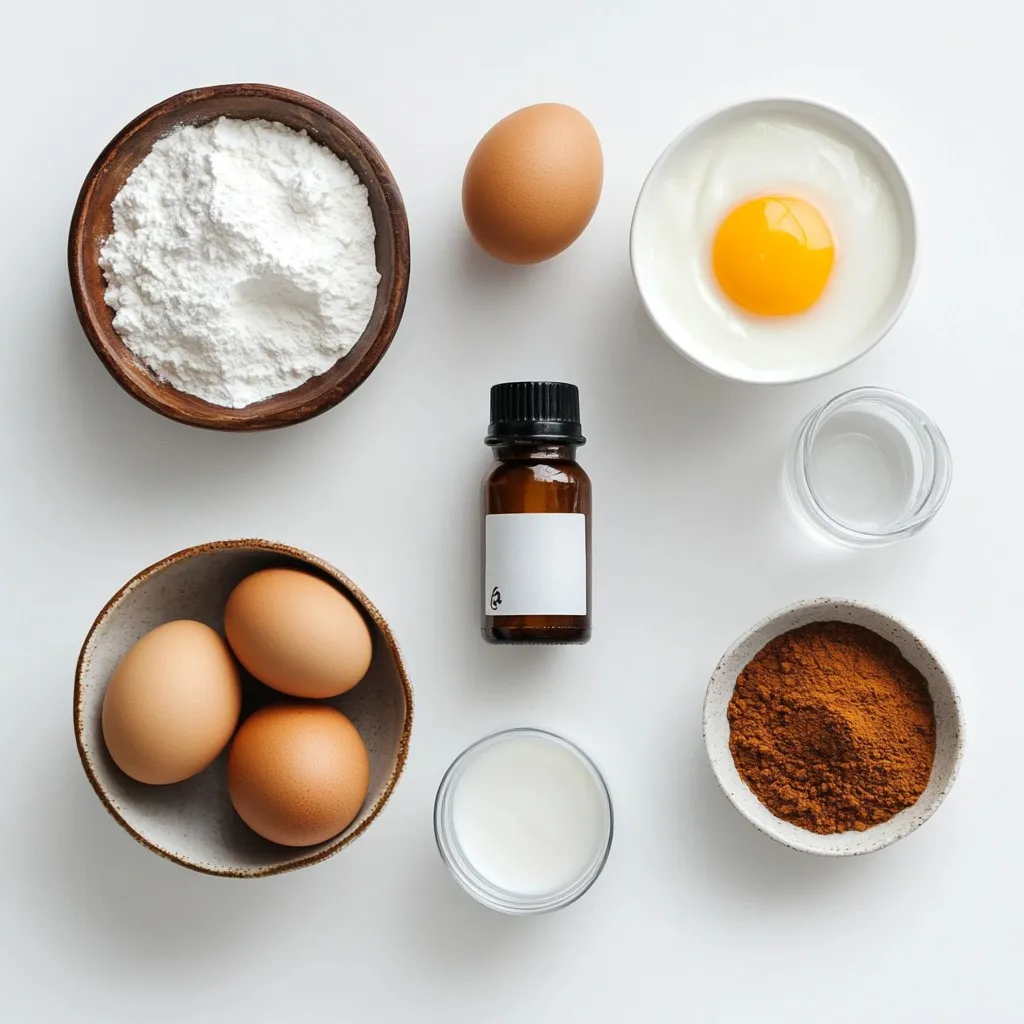
To make eggnog mousse, you will need:
– 1 cup heavy whipping cream
– 3 large egg yolks
– 1/3 cup granulated sugar
– 1/2 cup whole milk
– 1 teaspoon pure vanilla extract
– 1/2 teaspoon ground nutmeg
– 1/2 teaspoon ground cinnamon
– 1 tablespoon gelatin powder
– 3 tablespoons cold water
– Whipped cream and additional nutmeg for garnish
These ingredients come together to create a light, creamy texture that melts in your mouth.
Substitutions for Common Ingredients
You can swap some ingredients if you need. Here are some ideas:
– Heavy whipping cream: Use coconut cream for a dairy-free option.
– Granulated sugar: Try brown sugar for a deeper flavor.
– Whole milk: Almond milk works as a lighter alternative.
– Gelatin powder: Agar-agar is a good plant-based substitute.
These swaps can change the taste and texture, but they keep the spirit of the dish.
How to Choose Quality Ingredients
Choosing the best ingredients makes a big difference. Here are some tips:
– Whipping cream: Look for heavy cream with a high fat content (36% or more) for the best whip.
– Egg yolks: Choose fresh, organic eggs. They have better flavor and color.
– Milk: Full-fat whole milk provides the creaminess we want in the mousse.
– Spices: Use fresh ground nutmeg and cinnamon for a stronger taste.
Quality ingredients lead to a better eggnog mousse. Always taste your ingredients to ensure they fit your standards.
Step-by-Step Instructions
Preparation Method Overview
Making eggnog mousse is simple and fun. You will start by blooming gelatin. Then, you’ll mix eggs, sugar, and spices. Finally, you’ll fold in whipped cream for a light texture. Follow these steps for a creamy holiday treat.
Detailed Cooking Steps
1. Bloom the gelatin: In a small bowl, mix one tablespoon of gelatin powder with three tablespoons of cold water. Let it sit for five minutes. This step helps the mousse set.
2. Prepare the egg mixture: In a medium saucepan, whisk together three large egg yolks and one-third cup of granulated sugar. Whisk until creamy and well combined.
3. Add milk and spices: Pour in half a cup of whole milk, one teaspoon of pure vanilla extract, half a teaspoon of ground nutmeg, and half a teaspoon of ground cinnamon. Mix well. Heat this mixture over medium heat while stirring constantly. Cook for about five to seven minutes. Make sure it thickens but does not boil.
4. Dissolve the gelatin: Remove the saucepan from heat. Stir in the bloomed gelatin until it dissolves completely. Let the mixture cool to room temperature. Stir occasionally to prevent a skin from forming.
5. Whip the cream: In a large mixing bowl, pour in one cup of heavy whipping cream. Whip until stiff peaks form. This step adds air and lightness to your mousse.
6. Combine mixtures: Gently fold one-third of the whipped cream into the cooled eggnog mixture. This makes it lighter. Gradually fold in the rest of the whipped cream. Be gentle to keep the mixture airy.
7. Spoon into dishes: Use a spoon to fill individual serving dishes or one large bowl with the mousse.
Cooling and Setting Instructions
Refrigerate the mousse for at least two hours. This gives it time to set. If you can wait, letting it sit longer enhances the flavors. Once set, serve with a dollop of whipped cream and a sprinkle of nutmeg on top for a festive touch. Enjoy your creamy eggnog mousse!
Tips & Tricks
How to Achieve the Perfect Whipped Cream
To make great whipped cream, start with cold cream. Use heavy whipping cream for the best results. Pour the cream into a large bowl. Make sure your bowl and beaters are also cold. This helps the cream whip up faster. Beat on medium speed until you see soft peaks. Then, increase the speed to high. Stop when you see stiff peaks. If you whip too long, it turns to butter.
Common Mistakes to Avoid
One common mistake is not blooming the gelatin. Always mix gelatin with cold water first. Let it sit for five minutes to soften. This step is key to a smooth mousse. Another mistake is overcooking the egg yolk mixture. Stir it constantly and remove it from heat before it boils. If you let it boil, the texture will change. Lastly, fold the whipped cream gently. This keeps the mousse light and airy.
Enhancing Flavor Profiles
To boost the flavor, consider adding a splash of bourbon or rum. These spirits add warmth and depth to the mousse. You can also try different spices. Try adding a hint of clove or ginger for a twist. For a sweeter taste, mix in some maple syrup. This gives a nice fall flavor. Lastly, always use fresh nutmeg. It makes a big difference in taste.
Pro Tips
- Chill Your Bowl: Before whipping the cream, chill your mixing bowl and beaters in the refrigerator for 10-15 minutes. This helps the cream whip up faster and achieve better volume.
- Use Fresh Spices: For the best flavor, use freshly grated nutmeg instead of pre-ground. It adds a more vibrant and aromatic touch to your mousse.
- Don’t Rush the Cooling: Allow the eggnog mixture to cool completely before folding in the whipped cream. This ensures that the whipped cream maintains its volume and light texture.
- Garnishing Ideas: For a festive touch, consider adding a sprinkle of cinnamon or a few pomegranate seeds along with the nutmeg when garnishing each serving.
Variations
Alternate Flavor Additions
You can change up the eggnog mousse for fun. Try adding a splash of rum or brandy. This gives a nice warmth. You can also swap in peppermint extract for a fresh twist. A pinch of cocoa powder can add a rich chocolate flavor. You can mix in crushed gingerbread cookies for a spicy touch. Get creative with your flavors!
Dairy-Free Options
If you want a dairy-free treat, you can still enjoy eggnog mousse. Use coconut cream instead of heavy whipping cream. It gives a rich texture and adds a hint of coconut flavor. For the milk, choose almond milk or oat milk. Just make sure they are unsweetened for the best taste. You can still add the same warm spices for that holiday feel.
Serving Suggestions and Pairings
Eggnog mousse shines when served right. Use pretty glasses or bowls for a festive look. Top each serving with whipped cream and a sprinkle of nutmeg. You can pair it with spiced cookies or gingerbread. It also tastes great with a cup of hot cocoa. For extra fun, add a cinnamon stick for stirring. Enjoy this creamy treat at your next holiday gathering!
Storage Info
How to Store Leftover Eggnog Mousse
Store any leftover eggnog mousse in the fridge. Use an airtight container to keep it fresh. This mousse will last up to three days in the fridge. Just remember to cover it well. If you leave it uncovered, it might dry out.
Freezing Tips for Longer Storage
You can freeze eggnog mousse for longer storage. Use a freezer-safe container to avoid freezer burn. It can last up to two months in the freezer. To thaw, place it in the fridge overnight. Avoid microwaving, as it can change the texture.
Best Containers for Storage
Choose glass or plastic containers with tight-fitting lids. These containers keep air out and help maintain texture. If you want, use small jars for single servings. They make it easy to grab a treat. Always label your containers with the date to track freshness.
FAQs
What is Eggnog Mousse?
Eggnog mousse is a light and creamy dessert that captures the festive spirit of eggnog. It combines rich flavors of egg yolks, cream, and spices like nutmeg and cinnamon. This dessert is airy, smooth, and perfect for holiday gatherings. You whip heavy cream and fold it into a mixture of egg yolks and milk. The result is a delightful treat that is both festive and satisfying.
Can I make this dessert ahead of time?
Yes, you can make eggnog mousse ahead of time. In fact, it tastes better when chilled for a few hours. Prepare the mousse and refrigerate it for at least 2 hours, or until set. This makes it a great option for busy holiday schedules. You can make it a day in advance and impress your guests with minimal stress.
Is Eggnog Mousse suitable for dietary restrictions?
Eggnog mousse contains dairy and eggs, so it may not suit everyone. It is not vegan or lactose-free. However, you can adapt it for some dietary needs. Consider using dairy-free cream and egg substitutes. Just keep in mind that this may change the texture and flavor. Always check ingredient labels to ensure they meet your needs.
You learned about making eggnog mousse, from choosing the best ingredients to serving tips. Quality ingredients make a big difference in taste. Follow the steps for a creamy dessert that impresses everyone. Remember to avoid common mistakes to get the perfect whipped cream. Store leftovers properly, and feel free to explore variations. This treat is great for any occasion. Enjoy crafting this easy yet delicious dessert that everyone will love. Now it’s time to whip up your own eggnog mouss


