Flavorful Sheet Pan Chicken Fajitas Made Easy

Want a quick dinner that packs a punch? You’re in the right place! My Flavorful Sheet Pan Chicken Fajitas are simple, tasty, and perfect for busy nights. With just a few ingredients and easy steps, you can serve a colorful feast that will impress everyone. Get ready to spice things up and enjoy a meal that’s as fun to make as it is to eat! Let’s dive into this exciting recipe!
Why I Love This Recipe
- Quick and Easy: This recipe comes together in just 35 minutes, making it perfect for busy weeknights.
- Flavor-Packed: The combination of spices like chili powder, cumin, and paprika creates a deliciously rich flavor profile.
- One-Pan Wonder: Cooking everything on a sheet pan means minimal cleanup while still achieving tender chicken and perfectly roasted veggies.
- Customizable: You can easily adjust the vegetables or toppings to suit your family’s preferences, making it a versatile dish.
Ingredients
Main Ingredients for Sheet Pan Chicken Fajitas
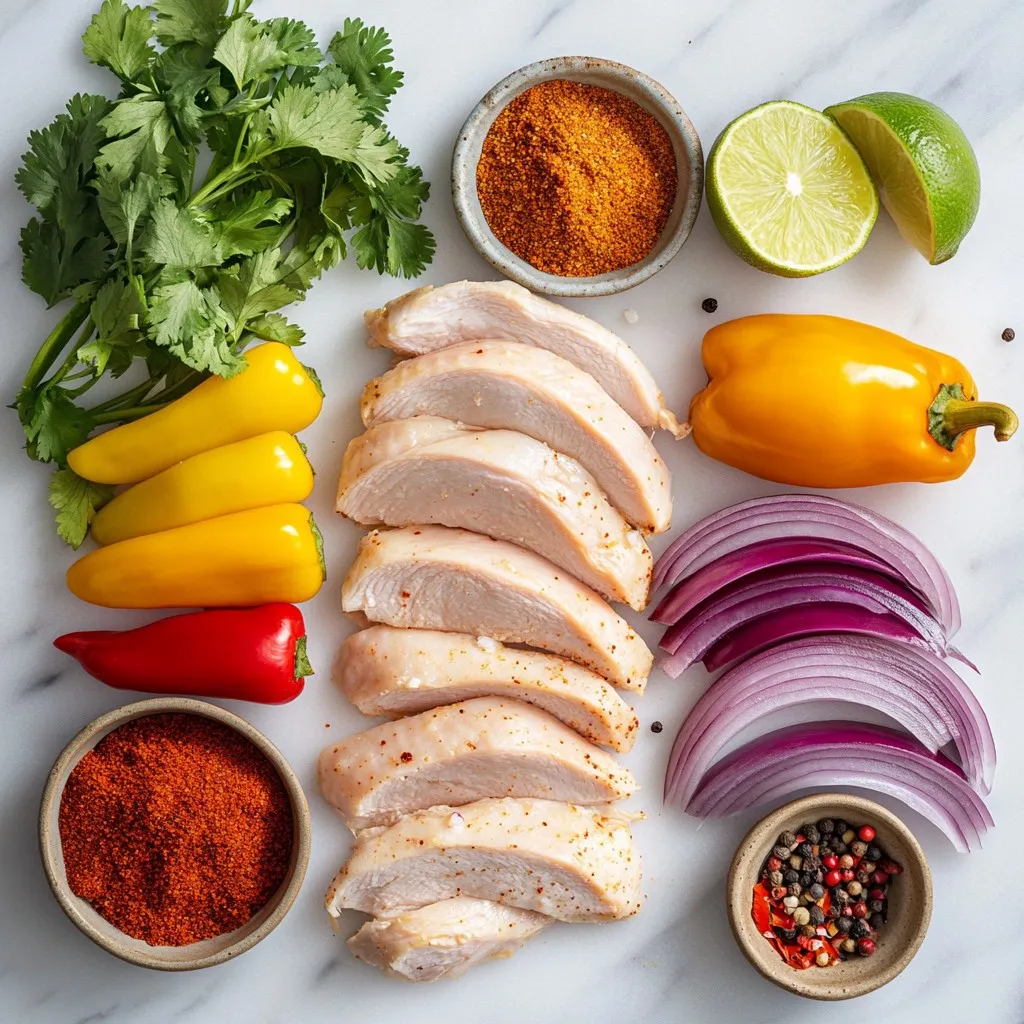
For this recipe, you will need:
- 1.5 lbs boneless, skinless chicken breasts, sliced into thin strips
- 2 bell peppers (one red, one yellow), sliced
- 1 medium red onion, sliced
- 3 cloves garlic, minced
These main ingredients form the heart of your fajitas. The chicken adds protein, while the peppers and onion bring color and crunch.
Spices and Seasonings
To make your fajitas pop, gather these spices:
- 2 tablespoons olive oil
- 2 teaspoons chili powder
- 1 teaspoon cumin
- 1 teaspoon paprika
- ½ teaspoon salt
- ½ teaspoon black pepper
- ½ lime, juiced
These spices give your dish depth and warmth. The chili powder and cumin are key for that classic fajita taste.
Recommended Toppings and Serving Suggestions
When it comes to toppings, think fresh and bright. Here are some great ideas:
- Fresh cilantro, for garnish
- Tortillas for serving (flour or corn)
- Sour cream
- Guacamole
- Salsa
These toppings add a creamy and zesty finish to your fajitas. Serve everything warm for the best experience.

Step-by-Step Instructions
Prepping the Ingredients
First, gather your ingredients. You need:
- 1.5 lbs boneless, skinless chicken breasts, sliced into thin strips
- 2 bell peppers (one red, one yellow), sliced
- 1 medium red onion, sliced
- 3 cloves garlic, minced
- 2 tablespoons olive oil
- 2 teaspoons chili powder
- 1 teaspoon cumin
- 1 teaspoon paprika
- ½ teaspoon salt
- ½ teaspoon black pepper
- ½ lime, juiced
- Fresh cilantro, for garnish
- Tortillas for serving (flour or corn)
Next, preheat your oven to 425°F (220°C). Line a large baking sheet with parchment paper or grease it lightly. This helps with easy cleanup later.
Mixing and Seasoning the Chicken and Vegetables
In a large bowl, add your sliced chicken, bell peppers, onion, and minced garlic. Drizzle the olive oil over the mixture.
Now, sprinkle in the chili powder, cumin, paprika, salt, and black pepper. Squeeze the lime juice on top. Use your hands or a spoon to mix everything well. Make sure every piece is coated with the spices and oil.
Baking Instructions and Cooking Times
Spread the chicken and vegetable mix evenly on the baking sheet. Do not overcrowd the pieces; this helps them roast nicely.
Bake in your preheated oven for 20-25 minutes. Stir the mix halfway through to ensure even cooking. The chicken should be cooked through and the veggies tender.
Once you take it out, let it rest for a few minutes. If you like, add a final squeeze of lime and sprinkle with fresh cilantro. Serve the mixture in warm tortillas. Enjoy your meal!
Tips & Tricks
Achieving Perfectly Cooked Chicken
To get juicy chicken, start with thin strips. They cook faster and stay moist. Use a meat thermometer. The chicken should reach 165°F. Check the thickest part to be sure. When you mix the chicken with the spices, coat it well. This adds flavor and helps keep it juicy. Bake the chicken for 20-25 minutes. Stir halfway through for even cooking.
Ensuring Vegetables Are Tender but Not Overcooked
For tender veggies, slice them thin. This helps them cook fast and evenly. Add bell peppers and red onions to the pan. They add sweetness and crunch. Check them at the 15-minute mark. If they look soft but not mushy, they’re ready. You want vibrant colors for a beautiful dish.
How to Customize Flavor Profiles
To change the flavor, try different spices. Add chipotle for smokiness or oregano for earthiness. You can also swap the lime juice for lemon juice. This gives a fresh twist. If you love heat, add jalapeños or red pepper flakes. Don’t be afraid to experiment! Mix in your favorite veggies or proteins too. This dish is all about your taste.
Pro Tips
- Use Fresh Ingredients: Fresh bell peppers and onions will enhance the flavor and texture of your fajitas, making them more vibrant and delicious.
- Marinate for More Flavor: For an extra boost of flavor, consider marinating the chicken in the spice mixture for 30 minutes to a few hours before cooking.
- Temperature Matters: Ensure your oven is fully preheated before baking to achieve perfectly cooked chicken and tender vegetables.
- Customizable Toppings: Feel free to customize your fajitas with toppings like cheese, jalapeños, or avocado to suit your taste preferences.

Variations
Alternative Proteins (e.g., shrimp, tofu)
You can swap chicken for shrimp or tofu. Shrimp cooks quickly and adds a nice twist. Use about 1.5 pounds of shrimp, peeled and deveined. If you choose tofu, press it first to remove extra moisture. Cut the tofu into cubes, and marinate it just like the chicken. Both options work well with the same spices.
Different Vegetable Combinations
Feel free to mix up the veggies. Zucchini or mushrooms can add more flavor. Try adding corn or even sweet potatoes for a change. Just make sure to cut the vegetables into similar sizes. This helps them cook evenly on the sheet pan.
Serving Ideas Beyond Tortillas
While tortillas are a classic, you can serve fajitas in many ways. Try over rice or quinoa for a hearty meal. You can also use a salad base for a fresh twist. Top with your favorite garnishes like guacamole or salsa, and enjoy!
Storage Info
How to Store Leftovers
To store your leftover chicken fajitas, let them cool first. Then, place them in an airtight container. Make sure to seal it tightly. You can keep them in the fridge for up to three days. For best taste, try to eat them sooner.
Reheating Instructions
When you’re ready to enjoy the leftovers, reheat them in the oven or microwave. To reheat in the oven, set it to 350°F (175°C). Spread the fajitas on a baking sheet. Heat for about 10-15 minutes until warm. If using a microwave, place a portion in a bowl and cover it. Heat in short bursts of 30 seconds until hot.
Freezing Options for Meal Prep
You can also freeze chicken fajitas for future meals. After cooling, place fajitas in a freezer-safe bag. Squeeze out as much air as you can before sealing. They can stay in the freezer for up to three months. To use, thaw them in the fridge overnight. Then, reheat as described earlier.
FAQs
Can I use frozen chicken for this recipe?
Yes, you can use frozen chicken. However, you must thaw it first. Thaw the chicken in the fridge overnight. If you need it quickly, use the microwave. After thawing, slice the chicken into thin strips. This helps it cook evenly with the veggies.
What are some low-carb alternatives for tortillas?
If you want low-carb options, try lettuce wraps or cabbage leaves. These add a crisp texture and fresh taste. You can also use cauliflower tortillas. They are a great option to keep carbs low while enjoying the flavors.
How can I make this recipe spicier?
To add spice, increase the chili powder in the mix. You can also add sliced jalapeños or a pinch of cayenne pepper. For extra heat, top your fajitas with hot salsa. Adjust spice levels to fit your taste buds.
We covered how to make easy sheet pan chicken fajitas. I shared the key ingredients, spices, and toppings you can use. You learned step-by-step instructions for prepping, mixing, and baking. I also gave tips for perfect chicken and tender veggies. Plus, we explored fun variations, storage info, and answered common questions.
Now you can enjoy a tasty, simple meal whenever you want. Happy cookin

Sizzling Sheet Pan Chicken Fajitas
Ingredients
- 1.5 lbs boneless, skinless chicken breasts, sliced into thin strips
- 2 pieces bell peppers (one red, one yellow), sliced
- 1 medium red onion, sliced
- 3 cloves garlic, minced
- 2 tablespoons olive oil
- 2 teaspoons chili powder
- 1 teaspoon cumin
- 1 teaspoon paprika
- 0.5 teaspoon salt
- 0.5 teaspoon black pepper
- 0.5 lime juiced
- 1 bunch fresh cilantro, for garnish
- to taste pieces tortillas for serving (flour or corn)
Instructions
- Preheat your oven to 425°F (220°C) and line a large baking sheet with parchment paper or lightly grease it.
- In a large mixing bowl, combine the sliced chicken, bell peppers, onion, and minced garlic.
- Drizzle the olive oil over the mixture. Then, add the chili powder, cumin, paprika, salt, black pepper, and lime juice. Toss everything together until the chicken and vegetables are evenly coated with the spices and oil.
- Spread the chicken and vegetable mixture in an even layer on the prepared baking sheet. Make sure the pieces are not overcrowded to allow for even roasting.
- Bake in the preheated oven for 20-25 minutes, until the chicken is cooked through and the vegetables are tender, stirring halfway through for even cooking.
- Once done, remove from the oven and let it rest for a few minutes. Give it a final squeeze of lime if desired and sprinkle with fresh cilantro before serving.
- Serve the fajita mixture in warm tortillas and top with your favorite toppings such as sour cream, guacamole, or salsa.


![- 200g rice noodles - 1 tablespoon coconut oil - 1 onion, thinly sliced - 2 garlic cloves, minced - 1 tablespoon ginger, minced - 1 red bell pepper, sliced - 1 cup broccoli florets - 1 carrot, julienned - 1 can (400ml) coconut milk - 3 tablespoons red curry paste - 2 tablespoons soy sauce - 1 tablespoon lime juice - Fresh basil leaves for garnish - Salt and pepper to taste For this recipe, you can switch up the vegetables. Try adding snap peas or zucchini for a new twist. For the best flavor, I recommend brands like Thai Kitchen for red curry paste and Chaokoh for coconut milk. These brands offer great taste and consistency. If you want to make this meal even easier, use pre-chopped vegetables. They save time and still taste fresh. Explore your local market for seasonal veggies too! They add color and flavor to your dish. For the full recipe, check the instructions above to create your own Thai Red Curry Noodles. Enjoy the process and the flavors! Start by boiling water in a large pot. Add the rice noodles and cook them based on the package instructions. Usually, it takes about 4-6 minutes. Stir gently to keep them from sticking. To avoid sticky noodles, drain them right away. Rinse them under cold water to stop the cooking process. Toss them with a little coconut oil to keep them separate. This step makes a big difference! Slice your vegetables neatly for even cooking. Use a sharp knife for best results. For the onion, cut it thinly. Mince the garlic and ginger finely. Slice the red bell pepper and julienne the carrot. Cut the broccoli into small florets. Now, let’s talk about cooking times. Sauté the onion for about 2-3 minutes until it’s soft. Then add the garlic and ginger for one more minute. After that, toss in the bell pepper, broccoli, and carrot. Cook for about 5 minutes until they are tender but still crisp. In a large skillet or wok, pour in the coconut milk. Add the red curry paste and stir well. Mix until the paste is fully dissolved in the milk. This creates a rich, creamy sauce. Next, add the cooked rice noodles. Gently fold them into the sauce. Make sure every noodle gets coated. This is key for great flavor. Let everything simmer for 2-3 minutes to heat through. Serve hot, garnished with fresh basil leaves. This adds a lovely touch to your dish and makes it even more flavorful. Enjoy every bite! For the full recipe, see above. To get the best taste, always use fresh ingredients. Fresh vegetables and herbs boost flavors. Pre-packaged items often lack depth and freshness. When it comes to balancing flavors, think about these three key elements: - Spicy: Use more red curry paste for heat. - Sweet: A teaspoon of sugar can soften strong flavors. - Salty: Soy sauce adds a nice umami kick. Adjust these as needed for your taste. For cooking, I recommend using a wok. A wok heats evenly and helps stir-fry better. If you don't have one, a large skillet works well too. When adding protein, think about these options: - Chicken: Thinly slice for quick cooking. - Tofu: Use firm tofu, cut into cubes, and sauté until golden. - Shrimp: Add shrimp last to avoid overcooking. Cook protein separately, then mix it in at the end. Pair your Thai Red Curry Noodles with side dishes like: - Steamed jasmine rice - A fresh cucumber salad - Spring rolls for a crunchy touch For a nice presentation, serve in deep bowls. Garnish with fresh basil leaves and lime wedges. This adds color and freshness, making your meal look restaurant-quality. {{image_2}} You can easily make Thai Red Curry Noodles vegan or vegetarian. Start by swapping the coconut milk for a plant-based version. Use vegetable broth if you want a lighter taste. For protein, try tofu or tempeh. Both options soak up flavors well. Thai Red Curry Noodles change across Thailand. In the north, cooks add more herbs like cilantro and mint. In the south, seafood is common. You might see shrimp or fish added to the dish. Each region has unique flavors that make the dish special. Feel free to add local veggies, like eggplant or bamboo shoots, to your version. Get creative with your Thai Red Curry Noodles! Add fresh herbs, like basil or cilantro, for a burst of flavor. You can also try different spices. A pinch of cumin or coriander can enhance the taste. If you like heat, add chili flakes or fresh peppers. Change up the recipe by adding new veggies or proteins each time you make it. The options are endless! For the complete recipe, check the [Full Recipe]. After you enjoy your Thai Red Curry Noodles, let any leftovers cool first. Place them in an airtight container. This keeps the flavors fresh. You can store them in the fridge for up to three days. If you want to keep them longer, freeze them in a freezer-safe container. They can last for up to three months in the freezer. When you reheat, avoid using high heat. This helps keep the noodles from getting mushy. The best way is to use a skillet over medium heat. Add a splash of water to help steam the noodles. You can also pop them in the microwave. Just cover the bowl to keep moisture in. To refresh the dish, add fresh basil or a squeeze of lime juice right before serving. To make meals quicker, you can prep some ingredients ahead of time. Slice your veggies like bell peppers and carrots a day before. Cook the rice noodles in advance and store them separately. When you are ready to eat, simply combine the prepped ingredients with the sauce. This way, you can whip up your Thai Red Curry Noodles in no time on busy weekdays! What can I substitute for red curry paste? You can use yellow curry paste or green curry paste. These options have different flavors but still work well. You can also make a homemade version. Just blend some dried red chilies, garlic, and spices. It may taste a bit different but still delicious. Can I make Thai Red Curry Noodles gluten-free? Yes, you can easily make this dish gluten-free. Simply use gluten-free soy sauce or tamari instead of regular soy sauce. Make sure that the rice noodles are also gluten-free. Most rice noodles are naturally gluten-free. How to make this recipe nut-free To make this recipe nut-free, ensure you don't use any nut-based oils or sauces. Coconut oil is safe. Just check your red curry paste to ensure it doesn’t contain nuts. Caloric content and nutritional breakdown This dish is rich in flavor and nutrition. A serving has about 400 calories. It includes healthy fats from coconut milk and fiber from vegetables. The rice noodles provide energy from carbohydrates. What is the origin of Thai Red Curry Noodles? Thai Red Curry Noodles come from Thailand, where curry is a staple. This dish combines the bold flavors of red curry paste with rice noodles. It’s a favorite among locals and visitors. How does this dish differ from other Thai noodle dishes? Thai Red Curry Noodles are creamier and richer than others like Pad Thai. They use coconut milk and red curry paste, giving them a unique taste. Other dishes may focus more on soy sauce or tamarind for flavor. Thai Red Curry Noodles are a delicious and flexible dish. You can choose different veggies and proteins to fit your taste. I shared tips for cooking and serving, so your meal looks and tastes great. Remember to store leftovers well and reheat them with care. These simple steps will help you enjoy this dish again. Keep exploring flavors and making it your own. Happy cooking!](https://dailydishlab.com/wp-content/uploads/2025/07/3b703aa1-219d-4915-aa03-8b54d55df68d-768x768.webp)
