
If you love quick, delicious meals, you’ll enjoy my Garlic Butter Mushroom Skillet. This dish is simple yet bursting with flavor. With just a few fresh ingredients, you can create a tasty treat that’s perfect for any night of the week. In this post, I’ll share easy steps, helpful tips, and fun variations to make your mushroom dish shine. Let’s cook up something delicious!
Why I Love This Recipe
- Delicious Flavor Combination: The rich umami of the mushrooms paired with the buttery garlic creates an irresistible taste that elevates any meal.
- Quick and Easy: This recipe comes together in just 20 minutes, making it a perfect option for busy weeknights or last-minute gatherings.
- Versatile Ingredient: Mushrooms can be used in a variety of dishes, and this recipe can easily be adapted with different herbs or sauces.
- Healthy Option: Mushrooms are low in calories and packed with nutrients, making this dish a healthy choice without compromising on flavor.
Ingredients
Main Ingredients
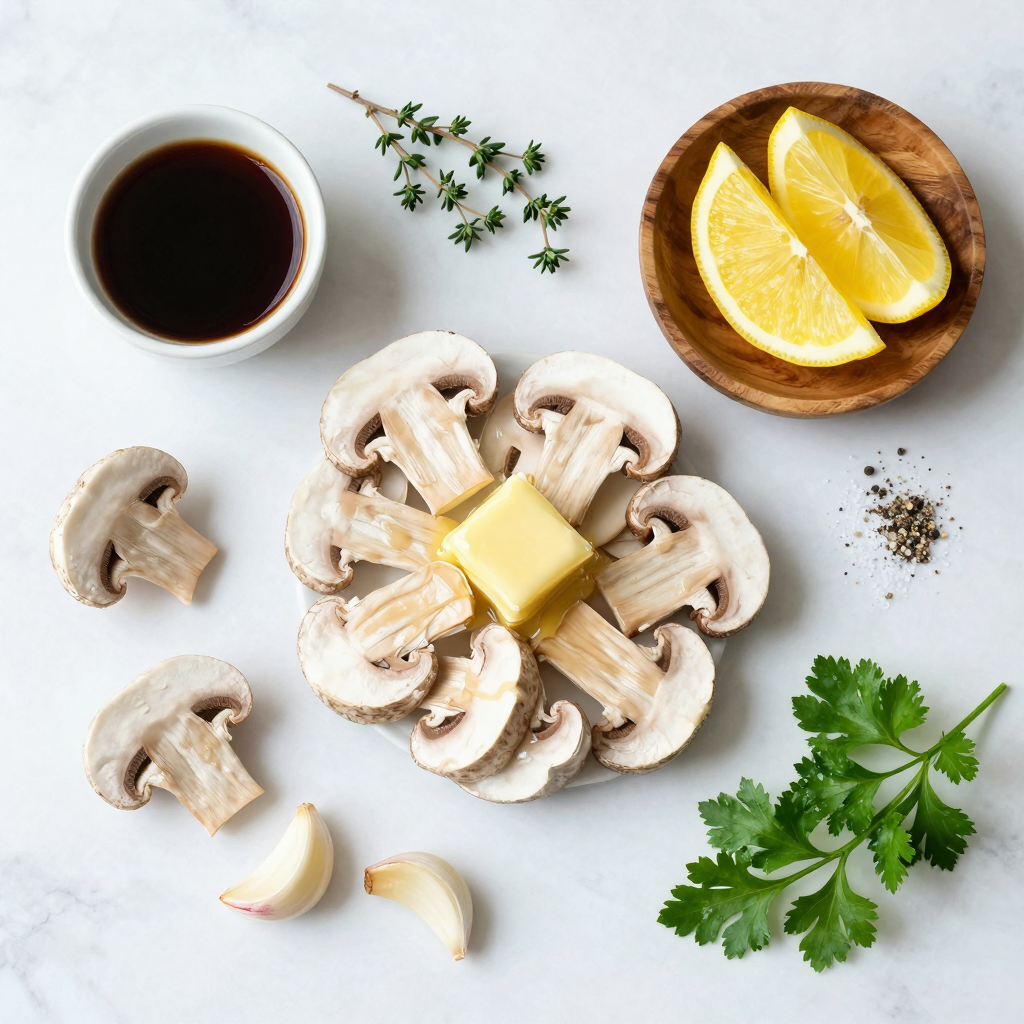
– 1 lb mixed mushrooms (cremini, shiitake, and button)
– 4 tablespoons unsalted butter
– 4 cloves garlic, minced
Seasoning and Flavor Enhancers
– 1 teaspoon fresh thyme leaves
– 1 tablespoon soy sauce
– 1 tablespoon lemon juice
Optional Garnishes
– Salt and pepper to taste
– Fresh parsley, chopped
Using quality ingredients makes a big difference. I like to use a mix of mushrooms like cremini, shiitake, and button. They bring great flavor and texture. Fresh mushrooms are the star of this dish.
For this recipe, I melt unsalted butter in a skillet. It adds richness and helps cook the garlic and mushrooms well. I also use four cloves of minced garlic. Garlic gives a strong, tasty punch.
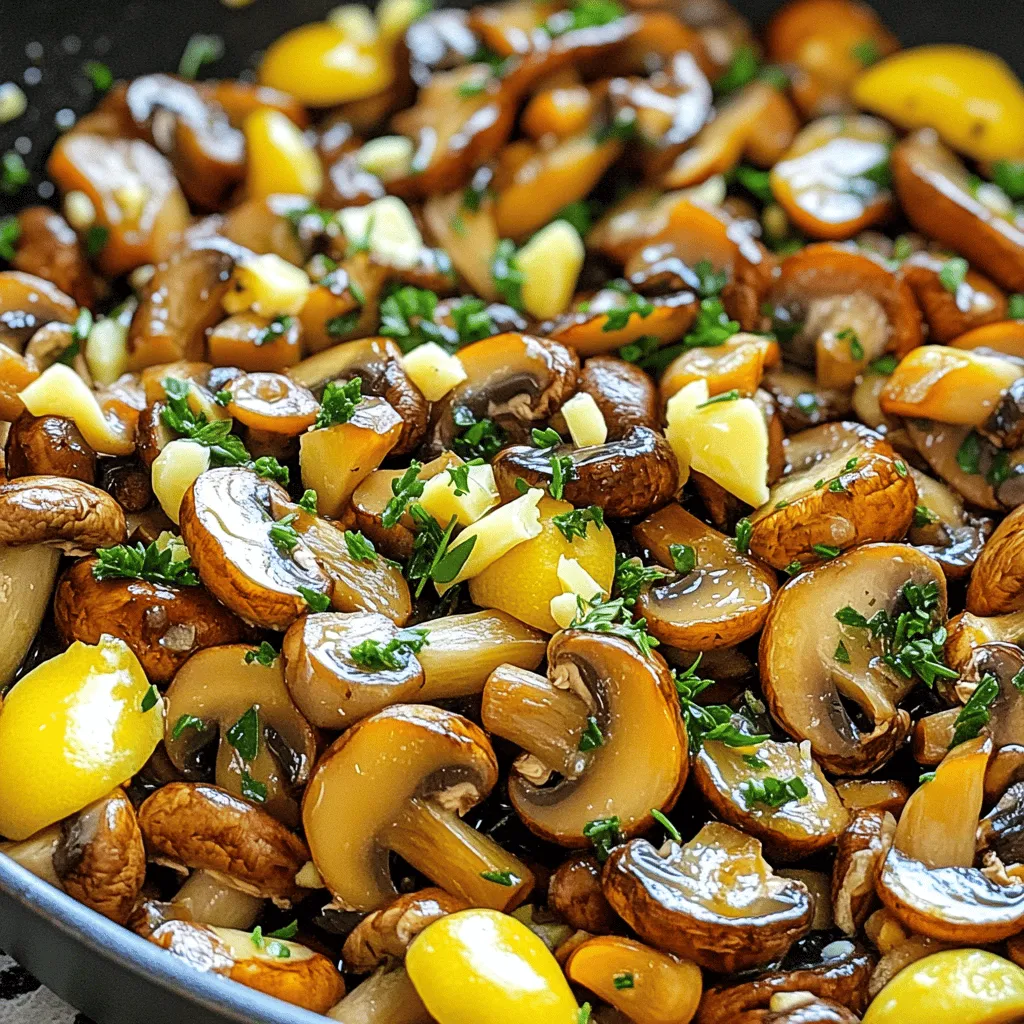
Next, seasoning is key. I add fresh thyme leaves for a nice herbal touch. Soy sauce boosts the umami flavor, while lemon juice adds a hint of brightness. These flavors balance well together.
I also suggest adding salt and pepper to your taste. This step enhances the overall flavor. For a final touch, I love to sprinkle fresh parsley on top. It adds color and freshness.
These ingredients work together to create a simple yet tasty meal that you can enjoy any day!
Step-by-Step Instructions
Preparing the Skillet
– Heat a large skillet over medium heat.
– Add 4 tablespoons of unsalted butter and let it melt.
This step sets the stage for our dish. The butter adds rich flavor and helps the mushrooms cook evenly. Make sure the skillet is hot enough before adding the butter. You want it to sizzle!
Cooking the Mushrooms
– Add 1 pound of sliced mixed mushrooms. Spread them out evenly.
– Cook without stirring for about 3-4 minutes until they start to brown.
– Stir the mushrooms for an additional 2-3 minutes until they are tender and caramelized.
By not stirring at first, the mushrooms can develop a nice golden color. Once they brown, give them a good stir. This helps them cook evenly and brings out their deep flavor. Mushrooms are great at soaking up the butter’s richness.
Adding Flavor
– Incorporate 4 cloves of minced garlic and 1 teaspoon of fresh thyme leaves.
– Stir well for about 1 minute until fragrant.
– Drizzle in 1 tablespoon of soy sauce and 1 tablespoon of lemon juice. Combine everything well to coat the mushrooms.
Garlic and thyme will make your kitchen smell amazing! The soy sauce adds a savory kick, while lemon juice brightens the dish. Remember to taste and add salt and pepper as needed. This will help balance all the flavors. Enjoy the process!
Pro Tips
- Choose Fresh Mushrooms: Select mushrooms that are firm and dry, avoiding any that are slimy or have dark spots for the best flavor and texture.
- Don’t Overcrowd the Pan: Cooking mushrooms in a single layer allows them to brown nicely. If the pan is too crowded, they will steam instead of sauté.
- Adjust Seasoning to Taste: Taste the dish before serving and adjust the salt, pepper, and lemon juice to achieve your desired flavor balance.
- Experiment with Herbs: While thyme is great, feel free to experiment with other herbs like rosemary or parsley to add different flavor profiles to your dish.
Tips & Tricks
Choosing the Right Mushrooms
For great flavor and texture, I recommend using a mix of cremini, shiitake, and button mushrooms. These mushrooms each add their own taste and texture. Clean them gently with a damp paper towel. Do not soak them in water. Slice them evenly to ensure they cook well.
Perfecting the Cooking Technique
Avoid overcrowding the skillet. If you add too many mushrooms, they will steam rather than brown. Cook them in batches if needed. Stir the mushrooms only after a few minutes. This helps them caramelize and develop a rich flavor.
Flavor Enhancements
You can add more herbs like rosemary or basil for extra taste. If you want more heat, try adding red pepper flakes. Adjust the salt and pepper to suit your taste. Taste as you go to find the perfect balance.
Variations
Vegan Adaptation
You can easily make this dish vegan. Just swap the butter with plant-based alternatives like coconut oil or vegan butter. This keeps the same rich flavor without any animal products. For added taste, consider using nutritional yeast or vegan sauces like tamari or coconut aminos. These options can enhance the umami flavor of the mushrooms, making it a true delight.
Serving Suggestions
Garlic Butter Mushroom Skillet pairs well with many foods. You can serve it alongside grilled chicken or steak for a hearty meal. It also goes great with grains like rice or quinoa. For something different, try adding it to pasta for a creamy, savory dish. You can even use it as a topping for baked potatoes to elevate a simple side.
Dietary Modifications
If you need gluten-free options, use tamari instead of soy sauce. This keeps the dish safe for those with gluten sensitivities. You can also choose gluten-free grains like rice or quinoa as a base. For low-sodium options, cut back on soy sauce or use a low-sodium version. Herbs and spices can help boost flavor without the extra salt.
Storage Info
Refrigeration Guidelines
To store leftovers properly, place the Garlic Butter Mushroom Skillet in an airtight container. Let it cool completely before sealing. This helps keep the dish fresh. Store it in the fridge for up to 3 days. When reheating, use a skillet over low heat. Add a splash of water or broth to prevent sticking. Stir occasionally until heated through.
Freezing Options
Can Garlic Butter Mushroom Skillet be frozen? Yes, you can freeze it! Portion the dish into freezer-safe containers. Make sure to leave some space for expansion. It will last in the freezer for up to 3 months. To thaw, place it in the fridge overnight. Reheat on the stovetop or microwave until hot.
Shelf Life
The dish lasts about 3 days in the fridge. Signs of spoilage include an off smell or a slimy texture. If you notice any of these changes, it’s best to toss it. Always trust your senses!
FAQs
Can I use other types of mushrooms?
Yes, you can use different mushrooms! Some great substitutes include:
– Portobello mushrooms for a meaty texture.
– Oyster mushrooms for a delicate flavor.
– Enoki mushrooms for a fun crunch.
Feel free to mix any of these for a unique taste!
How can I make this recipe spicier?
To add heat, try these options:
– Add a pinch of red pepper flakes while cooking.
– Use sriracha or hot sauce for a quick kick.
– Include diced jalapeños for freshness and spice.
Experiment with these to find your perfect heat level!
What can I serve with Garlic Butter Mushroom Skillet?
This dish pairs well with many sides, such as:
– Cooked rice or quinoa for a hearty meal.
– Creamy mashed potatoes for comfort.
– A crisp green salad for freshness.
These options create a balanced and tasty dinner!
This blog post covered how to make a delicious Garlic Butter Mushroom Skillet. We explored the key ingredients, step-by-step instructions, and helpful tips to enhance flavors. I shared variations for dietary needs, along with storage info for leftovers.
Cooking should be fun and simple. I hope you feel ready to try this dish. With easy steps and tasty results, you’ll impress everyone at the table. Enjoy your cooking adventure!


