Garlic Herb Dinner Knots Tasty and Easy Recipe

Are you craving a tasty, homemade bread that’s both easy and fun to make? Look no further! These Garlic Herb Dinner Knots are simple to whip up and packed with flavor. With just a few pantry staples and fresh herbs, you can impress family and friends at any meal. Ready to dive in? Let’s turn your kitchen into a delightful bakery with this step-by-step guide!
Why I Love This Recipe
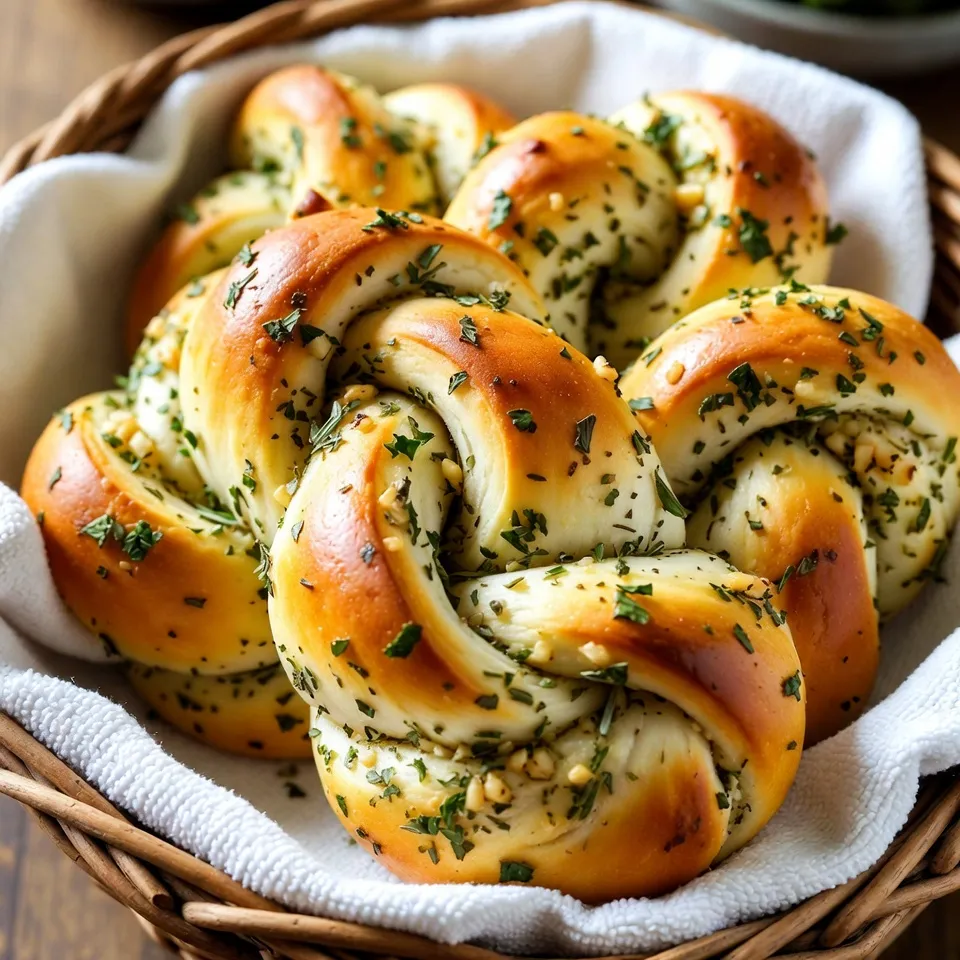
- Flavorful Combination: The mix of garlic, fresh herbs, and butter creates an irresistible flavor profile that elevates these dinner knots.
- Perfect for Any Occasion: These knots are versatile and can be served as an appetizer, side dish, or part of a festive meal.
- Easy to Make: The recipe is straightforward and perfect for bakers of all levels, making it a fun activity to do with family or friends.
- Great for Leftovers: These knots taste amazing even the next day, making them a fantastic addition to lunchboxes or quick snacks.
Ingredients
Dry Ingredients
- 3 cups all-purpose flour
- 1 packet (2 ¼ teaspoons) instant yeast
- 1 teaspoon sugar
- 1 teaspoon salt
Wet Ingredients
- 1 cup warm water (about 110°F)
- 2 tablespoons olive oil
- 2 tablespoons unsalted butter, melted
Flavor Enhancers
- 4 cloves garlic, minced
- 2 tablespoons fresh parsley, finely chopped
- 1 tablespoon fresh rosemary, finely chopped
- Pinch of red pepper flakes (optional)
When making Garlic Herb Dinner Knots, you need a mix of dry and wet ingredients. First, the dry ingredients include all-purpose flour, instant yeast, sugar, and salt. These form the base of your dough. The warm water activates the yeast, while olive oil adds richness. The butter, melted, gives flavor and helps the knots brown nicely.
For the flavor enhancers, minced garlic brings a strong taste. Fresh parsley and rosemary add bright, herbal notes. If you like some heat, consider adding red pepper flakes. This simple mix of ingredients creates a tasty treat that pairs well with many meals.
Gather these items to start your cooking adventure. Each ingredient plays a role in making your knots soft, flavorful, and irresistible.

Step-by-Step Instructions
Preparing the Dough
- Activating the yeast: Start by mixing warm water, sugar, and yeast in a large bowl. Let it sit for about 5 minutes. You want it to become frothy. This means the yeast is active and ready to work.
- Mixing dry and wet ingredients: Gradually add flour and salt to the yeast mixture. Stir until a rough dough forms. This step combines all your ingredients.
- Kneading the dough: Add olive oil and knead the dough for about 5-7 minutes. You can use your hands or a stand mixer with a dough hook. The dough should feel smooth and elastic.
Rising the Dough
- First rise overview: Place the kneaded dough in a lightly greased bowl. Cover it with a damp cloth. Let it rise in a warm spot for about 1 hour. The dough should double in size.
- How to know when it’s ready: The dough is ready when it feels puffy and has grown in size. You can poke it gently, and it should spring back slightly.
Shaping the Knots
- Dividing dough into pieces: Once risen, punch down the dough to release air. Transfer it to a floured surface and divide it into 12 equal pieces.
- Rolling ropes and tying knots: Roll each piece into a rope about 8 inches long. Tie it into a knot and tuck the ends under. This gives the knots their shape.
- Preparing baking sheet: Line a baking sheet with parchment paper. Place the knots on the sheet, leaving some space between each one for rising.
Tips & Tricks
Perfecting the Dough
To make great dinner knots, knead your dough well. Kneading helps develop gluten, making the dough stretchy. Aim for about 5-7 minutes of kneading. If the dough feels sticky, add a touch more flour.
Look for signs of a properly risen dough. It should double in size and feel puffy. When you poke it, the dough should spring back slowly. If it stays flat, it needs more time to rise.
Flavor Infusion
You can make these knots your own by adding herbs or spices. Try adding thyme, basil, or even oregano for a twist. You can mix fresh and dried herbs to suit your taste.
To customize your garlic herb mix, use garlic powder if you want a milder garlic flavor. For a kick, add crushed red pepper or even a sprinkle of parmesan.
Baking Tips
Always check your oven temperature. An accurate oven gives you the best rise and color. Use an oven thermometer if you’re unsure.
Ensure even baking by spacing your knots apart on the baking sheet. This allows hot air to flow around them. Rotate the sheet halfway through baking to help them brown evenly.
Pro Tips
- Use Fresh Herbs: Fresh herbs enhance the flavor of your garlic herb knots. Make sure to use freshly chopped parsley and rosemary for the best taste.
- Knead Properly: Kneading the dough well is crucial for developing gluten, which gives the knots their chewy texture. Aim for at least 5-7 minutes of kneading.
- Check Oven Temperature: Oven temperatures can vary, so keep an eye on your knots while baking. They should be golden brown and smell delicious when done.
- Brush Again After Baking: For an extra burst of flavor, brush the baked knots with any remaining garlic herb butter as soon as they come out of the oven.

Variations
Cheese-Stuffed Garlic Knots
You can make garlic knots even better by adding cheese. Mozzarella is a great choice. Just place a small piece inside each knot before you tie it. This makes them gooey and tasty. You might need to bake them a bit longer. Check for a golden brown color to know they’re done.
Herb Variations
You can switch up the herbs in your knots. Fresh thyme or basil can add a new flavor. Mix dried herbs with fresh for more depth. Dried herbs are stronger, so use less. Fresh herbs give a bright taste, and using both can create a lovely blend.
Spice Alternatives
If you want to change the heat level, try different spices. Instead of red pepper flakes, use cayenne pepper for more heat. You could also add black pepper for a milder kick. This way, you can make the knots just how you like them.
Storage Info
Storing Leftovers
To keep your garlic herb dinner knots fresh, store them in an airtight container. A zip-top bag works well too. Place a paper towel in the bag to absorb moisture. This helps prevent sogginess. Your knots stay fresh for about 2-3 days in the fridge. After that, they may start to dry out.
Reheating Tips
To heat the knots without losing their texture, use the oven. Preheat it to 350°F (175°C). Place the knots on a baking sheet for about 5-7 minutes. This warms them up and keeps them soft. If you’re in a hurry, the microwave is an option. Heat them for about 10-15 seconds. However, they may get a bit chewy.
Freezing Instructions
You can freeze garlic herb dinner knots before or after baking. If freezing before baking, shape the knots and place them on a baking sheet. Freeze them until firm, then transfer them to a freezer bag. They can stay frozen for up to 3 months. To thaw, leave them in the fridge overnight. Bake them directly from the freezer, adding a few extra minutes to the cooking time. If freezing after baking, let them cool first. Then, store them in a similar way. Reheat them in the oven for the best results.
FAQs
What can I serve with Garlic Herb Dinner Knots?
You can serve many tasty dishes with Garlic Herb Dinner Knots. Here are some great options:
- Soups: Tomato soup or minestrone pairs well.
- Salads: A fresh green salad adds crunch.
- Dips: Try olive oil and balsamic vinegar for dipping.
- Main Course: They go well with pasta or grilled chicken.
Each of these complements the soft, garlicky flavor of the knots.
Can I make the dough ahead of time?
Yes, you can make the dough ahead of time. Here are some tips:
- Refrigerate: After kneading, cover the dough and place it in the fridge.
- Time: You can store it for up to 24 hours.
- Bring to Room Temp: Before shaping, let it warm up for about 30 minutes.
This method saves time on busy days while keeping the flavor fresh.
How do I ensure my knots are fluffy?
To make your knots fluffy, focus on these key factors:
- Kneading: Knead the dough well for 5-7 minutes. This builds gluten.
- Rising: Let the dough rise until it doubles in size. A warm spot helps.
- Don’t Rush: Allow the knots to rest before baking.
These steps are vital for getting that light and airy texture you want.
Garlic herb dinner knots are simple and fun to make. We discussed ingredients, from flour to flavor boosters. The steps, like kneading and rising, ensure a great dough. We shared tips for perfect texture and baking. Variations can spice things up, whether you add cheese or herbs. Lastly, proper storage helps keep your knots fresh and tasty. With these tips, you can make delicious knots every time. Enjoy your bakin

Garlic Herb Dinner Knots
Ingredients
- 3 cups all-purpose flour
- 1 packet instant yeast (2 ¼ teaspoons)
- 1 teaspoon sugar
- 1 teaspoon salt
- 1 cup warm water (about 110°F)
- 2 tablespoons olive oil
- 4 cloves garlic, minced
- 2 tablespoons fresh parsley, finely chopped
- 1 tablespoon fresh rosemary, finely chopped
- 2 tablespoons unsalted butter, melted
- a pinch red pepper flakes (optional)
Instructions
- In a large mixing bowl, combine the warm water, sugar, and instant yeast. Let it sit for about 5 minutes until it becomes frothy.
- Gradually add the flour and salt to the yeast mixture, stirring until a rough dough forms.
- Add the olive oil and continue to knead the dough for about 5-7 minutes, until it’s smooth and elastic. You can do this by hand or use a stand mixer with a dough hook.
- Place the dough in a lightly greased bowl, cover with a damp cloth, and let it rise in a warm place for about 1 hour, or until it has doubled in size.
- Once the dough has risen, punch it down and transfer it to a floured surface. Divide the dough into 12 equal pieces.
- Roll each piece into a rope about 8 inches long. Tie it into a knot and tuck the ends under. Place the knots on a baking sheet lined with parchment paper.
- Preheat your oven to 375°F (190°C).
- In a small bowl, mix the melted butter, minced garlic, chopped parsley, rosemary, and red pepper flakes (if using).
- Brush the garlic herb mixture generously over each knot, making sure to get some of the garlic in the crevices.
- Let the knots rest for an extra 20 minutes while the oven heats up.
- Bake the knots in the preheated oven for 15-20 minutes or until they are golden brown.
- Once baked, remove from the oven and brush with any remaining garlic herb butter. Serve warm.


![- 1 cup stone-ground grits (preferably) - 4 cups water or low-sodium chicken broth - 1 lb large shrimp, peeled and deveined - 1 cup sharp cheddar cheese, shredded The heart of shrimp and grits lies in its key ingredients. Stone-ground grits provide a rich, creamy base. They have a coarse texture that enhances the dish. You must use high-quality grits for the best flavor. Large shrimp add a nice sweetness and texture. They should be fresh and deveined for easy cooking. Sharp cheddar cheese brings a salty, rich taste that melts beautifully into the grits. This combination creates a comforting dish that warms the soul. - 4 slices turkey bacon, chopped - Sliced green onions, for garnish While the key ingredients are vital, optional ingredients can elevate your dish. Turkey bacon adds a crispy, smoky flavor. You can cook it in the same skillet as the shrimp. This adds depth and richness to your meal. Sliced green onions provide a fresh, crunchy contrast. They also add a pop of color to your plate. Feel free to add these for extra flair! - 1 teaspoon smoked paprika - ½ teaspoon cayenne pepper (adjust according to spice preference) Seasoning is crucial for flavor. Smoked paprika gives a warm, smoky taste. It enhances the shrimp and grits without overwhelming them. Cayenne pepper adds heat. You can adjust the amount based on your spice preference. Together, these seasonings create a balanced flavor that makes shrimp and grits truly delightful. The right seasoning can transform your dish from good to great! For the full recipe, check out the [Full Recipe]. First, you need to boil water or chicken broth. Use a medium saucepan for this. Bring it to a rolling boil over high heat. Once boiling, gradually whisk in 1 cup of stone-ground grits. This helps avoid lumps. After adding the grits, lower the heat to a gentle simmer. Cover the saucepan and cook for about 20-25 minutes. Stir occasionally until the grits become creamy. Once cooked, stir in 1 cup of sharp cheddar cheese. The cheese gives a rich flavor. Season with salt and pepper to taste. Keep the grits warm over low heat. While the grits cook, grab a large skillet. Heat it over medium heat and add 4 slices of chopped turkey bacon. Cook until crispy, turning occasionally. Use a slotted spoon to remove the bacon. Leave the bacon fat in the skillet. In the same skillet, add 1 small finely chopped onion. Sauté for about 4-5 minutes until soft and translucent. Next, stir in 2 minced garlic cloves, 1 teaspoon of smoked paprika, and ½ teaspoon of cayenne pepper. Cook for about a minute. This mix will smell amazing! Now, add 1 pound of peeled and deveined shrimp. Cook for 3-4 minutes, flipping halfway through. When the shrimp turn pink and opaque, they are ready. Season with salt and pepper to taste. Add 2 tablespoons of unsalted butter and stir gently until melted. To serve, spoon a generous helping of cheesy grits onto each plate. This creamy base is comforting and delicious. Top with the shrimp mixture. This allows all the flavors to blend nicely. Finally, sprinkle the crispy bacon over the dish. Garnish with sliced green onions for a pop of color and crunch. Enjoy this savory shrimp and grits delight! For the full recipe, check out the details above. Using stone-ground grits makes a big difference. They have a rich taste and great texture. These grits cook slowly, giving them a creamy finish. For added creaminess, mix in butter or cream. You can adjust the consistency by changing the liquid amount. If you like thicker grits, use less water. For smoother grits, add more liquid. Seasoning is key for great shrimp. I love using smoked paprika and cayenne pepper. These spices add depth and warmth. You can also try garlic powder or lemon zest for a fresh twist. Cook the shrimp just right; about 3-4 minutes is perfect. They should turn pink and opaque. Overcooking makes them tough, so keep an eye on them. Serving shrimp and grits nicely makes a big impact. Use a large white plate to make the colors pop. Start with a big scoop of cheesy grits as your base. Then, layer the shrimp mixture on top. For a final touch, sprinkle crispy turkey bacon over the dish. Add sliced green onions for color and crunch. Drizzling melted butter adds a nice shine too. These small details make your meal feel special. For the complete recipe, check the Full Recipe. {{image_4}} When it comes to shrimp and grits, the options are endless. You can play with flavors and ingredients to make this dish your own. - Adding andouille sausage: This spicy sausage brings a rich flavor. It adds a nice kick to the dish. Just slice it and sauté with the onions. The smoky taste works well with shrimp. - Using different types of cheese: While sharp cheddar is a classic choice, feel free to experiment. Gouda or pepper jack can give a new twist. Each cheese adds its own character to the creamy grits. - Cauliflower grits: If you're looking for a lighter option, try cauliflower grits. Simply steam cauliflower and blend it until smooth. It gives a similar texture with fewer carbs. - Low-sodium bacon options: You can still enjoy that savory flavor without too much salt. Turkey bacon or even tempeh can work well. These options keep the dish tasty while being healthier. - Cajun-style shrimp and grits: Bring the heat with Cajun spices. Use a blend of paprika, onion powder, and cayenne. This gives a vibrant flavor that will awaken your taste buds. - Incorporating international spices: Try adding spices like curry powder or turmeric. These spices offer a new take on shrimp and grits. They bring warmth and a touch of the exotic to your plate. Feel free to mix and match these ideas to create your perfect shrimp and grits. For the full recipe, check out the details in the main article. To keep your shrimp and grits fresh, store them in airtight containers. This method helps prevent moisture loss and keeps flavors intact. Place the leftovers in the fridge within two hours of cooking. They will stay fresh for up to three days. Beyond that, the shrimp may lose quality and texture. When reheating grits, add a splash of water or broth. This helps restore creaminess. Heat them slowly over low heat. Stir often to avoid sticking. For the shrimp, use a skillet on low heat. This method warms them gently, keeping them tender. Avoid microwaving shrimp as it can make them tough. You can freeze shrimp and grits, but it's best to freeze them separately. For grits, let them cool completely and then transfer to freezer-safe bags. They will last up to three months in the freezer. For shrimp, place them in a single layer on a baking sheet to freeze first. Once frozen, transfer to a bag. This prevents clumping. When ready to eat, thaw both in the fridge overnight. Reheat as described above for the best results. Shrimp and grits come from the Lowcountry of the southern U.S. It started as a breakfast dish for working-class folks. In the early days, fishermen ate shrimp with their grits. Grits are made from ground corn, a staple in southern cooking. Over time, this dish evolved into a beloved meal across the region. Today, chefs put their own spins on it, making it popular in fine dining. To amp up the heat, you can add more cayenne pepper. You can also try hot sauce, like Tabasco, for a kick. Consider diced jalapeños or red pepper flakes for a different flavor. If you prefer a smoky element, add chipotle peppers in adobo sauce. Remember to taste as you go, so you find the right level of heat for you. Yes, you can substitute grits with other grains. Polenta is a popular choice and has a similar texture. Quinoa can also work, offering a nutty flavor and extra protein. Another option is farro, which gives a chewy bite. Just adjust the cooking time and liquid according to the grain you choose. Several sides pair nicely with shrimp and grits. A fresh salad can add a crisp contrast. Consider a simple mixed green salad with a light vinaigrette. Roasted vegetables also work well, adding color and nutrition. You might enjoy collard greens or sautéed green beans for a classic southern touch. Try serving cornbread for a comforting side that complements the dish beautifully. In summary, shrimp and grits is a dish that blends flavor and comfort. We explored key ingredients, from stone-ground grits to large shrimp. I shared steps to prepare creamy grits and flavorful shrimp, plus tips to enhance the taste. You can customize variations like healthy options or Cajun styles. Lastly, I provided storage info to keep your leftovers fresh. Enjoy making this dish your own and impressing those at your table!](https://dailydishlab.com/wp-content/uploads/2025/06/fc5e452b-7ec2-413c-a498-40e4879e0d90-768x768.webp)


![- 500g chicken breast, cubed - 1 large onion, finely chopped - 3 cloves garlic, minced - 1 inch ginger, grated - 2 tablespoons curry powder - 1 teaspoon turmeric powder - 1 teaspoon cumin powder - 400ml coconut milk - 1 tablespoon vegetable oil - Salt and pepper to taste To make my easy chicken curry, I focus on fresh and simple ingredients. Chicken breast is my main protein. The onions, garlic, and ginger create a rich base. The spices, like curry powder, turmeric, and cumin, bring warmth and depth. Coconut milk adds creaminess and a hint of sweetness, balancing the spices. - Fresh herbs like cilantro - Lime wedges for serving If you want to elevate your dish, add fresh herbs like cilantro. It gives a bright flavor and nice color. Lime wedges on the side add a zesty kick when served. They contrast well with the creamy curry. - Large skillet or pan - Measuring cups and spoons Having the right tools makes cooking easier. A large skillet or pan helps with even cooking. Use measuring cups and spoons for accuracy. Proper tools ensure your easy chicken curry turns out perfect every time. For the full recipe, check the section above. To start, I heat vegetable oil in a large skillet over medium heat. I add the finely chopped onion and sauté it for about five minutes. The onion should turn translucent. Next, I stir in the minced garlic and grated ginger. I cook this mixture for another one to two minutes until it smells great. Now comes the fun part: toasting the spices! I sprinkle curry powder, turmeric, and cumin into the pan. I stir well to coat the onions and toast the spices for about one minute. This step brings out their rich flavors. After preparing the base, I add the cubed chicken breast to the pan. I season it with salt and pepper for a balanced taste. It’s important to brown the chicken pieces thoroughly. I cook them for about five to seven minutes, ensuring they turn golden on all sides. Once the chicken is browned, I pour in the coconut milk. I bring the mixture to a gentle simmer and then reduce the heat to low. Covering the pan, I let it cook for 15 to 20 minutes. This allows the chicken to cook through and the sauce to thicken. Before serving, I taste the curry and adjust the seasoning if needed. A fresh garnish of chopped coriander adds a lovely touch. For the full recipe, check the details above. To make your chicken curry perfect, focus on the spice blend. Use fresh spices whenever you can. They add much more flavor than old ones. Toast the spices in the pan before adding other ingredients. This step releases their oils and boosts their taste. You can also adjust the spice levels to match your taste. If you prefer a milder curry, reduce the curry powder. For extra warmth, add a bit more cumin. Using fresh ingredients is key for a tasty curry. Fresh chicken, onions, garlic, and ginger make a big difference. Chop the onion finely to help it cook faster. Mince the garlic and grate the ginger for the best flavor. The coconut milk should be full-fat for a creamy texture. When you cook with quality items, your dish shines. Chicken curry pairs well with simple sides. Serve it over fluffy rice for a filling meal. You can also try naan or roti for a fun twist. These breads soak up the sauce nicely. Garnishing your dish can elevate its look. Sprinkle fresh coriander on top before serving. This adds color and a fresh taste. You might also squeeze some lime juice over the curry. The zest brightens the flavors and adds a nice touch. To manage your cooking time, prep before you cook. Chop all your ingredients first. This makes cooking smoother and faster. While the chicken simmers, clean up your workspace. This keeps your kitchen organized and less stressful. You can also start cooking rice or bread while the curry simmers. This multitasking saves time and lets you serve everything hot. For a quick meal, the full recipe of quick and creamy chicken curry takes just 35 minutes. With these tips, you’ll not only save time but also enjoy a delicious dinner! {{image_2}} You can easily make this chicken curry vegetarian or vegan. Simply replace the chicken with tofu or your favorite vegetables. Some great choices are bell peppers, carrots, and peas. For a delicious twist, use firm tofu. Cut it into cubes and sauté it until golden. This adds a nice texture. When using coconut milk, be sure to pick a full-fat version. It gives a rich flavor. If you want a lighter option, use light coconut milk but add a bit of vegetable broth for depth. You can also add extra spices to boost flavor. Try adding a dash of soy sauce for umami. You can create exciting versions of chicken curry by adding spices from different regions. For an Indian-inspired dish, add garam masala or fenugreek. These spices bring warmth and depth to the curry. If you prefer a Thai-style curry, add lemongrass and kaffir lime leaves. These ingredients bring a fresh and zesty flavor. Use fresh or dried lemongrass, and slice it finely. This will enhance the overall taste and give a unique twist. Adjusting the spice level is easy. To make the curry mild, use less curry powder and skip the hot peppers. For a medium heat, use a bit of chili powder or cayenne. If you like it hot, add fresh chili peppers, like jalapeños or serranos. You can also use hot sauce to kick it up a notch. Just start with a small amount and taste as you go. This way, you can control the heat to your liking. To keep your chicken curry fresh, first let it cool. Then, transfer the leftovers to airtight containers. This helps prevent moisture loss and keeps flavors intact. You can store it in the fridge for up to three days. For longer preservation, consider freezing. Divide the curry into portions, and freeze each in a separate container. It will last up to three months in the freezer. When you're ready to enjoy your chicken curry again, I recommend reheating it on the stove. This method warms the curry evenly. You can also use the microwave; just cover the bowl and heat it in short bursts. Stir in between to avoid hot spots. To maintain flavor and texture, add a splash of coconut milk or water if it seems thick. You can safely eat the leftovers within three days if stored in the fridge. If you freeze the curry, it should remain good for about three months. Always check for changes in smell or color. If you see any signs of spoilage, like a sour smell or odd texture, it’s best to toss it. To make easy chicken curry, follow these key steps: 1. Prepare your ingredients: Chop the onion, garlic, and ginger. 2. Heat oil: In a large pan, heat vegetable oil over medium heat. 3. Sauté onion: Add the chopped onion and cook until soft. 4. Add garlic and ginger: Stir in minced garlic and grated ginger for flavor. 5. Toast spices: Add curry powder, turmeric, and cumin. Stir to mix. 6. Cook chicken: Add cubed chicken, season, and brown on all sides. 7. Simmer with coconut milk: Pour in coconut milk, stir, and simmer until done. 8. Finish and serve: Taste, adjust seasoning, and garnish with coriander. These steps make it easy to create a rich and tasty chicken curry from scratch. Yes, you can use different meats. Here are some options: - Beef: Cut into small cubes, similar to chicken. - Lamb: Use tender pieces for a rich flavor. - Pork: Pork tenderloin works well in this curry. Each meat brings its unique taste. Adjust cooking times based on the meat you choose. The best side dishes for chicken curry include: - Cooked rice: Fluffy rice soaks up the sauce well. - Naan bread: Soft naan is perfect for dipping. - Raita: A yogurt sauce cools the spices. These sides complement the curry's rich flavors. Try mixing and matching to find your favorite! For the full recipe, check out the [Full Recipe]. In this article, we covered the key ingredients for chicken curry, including spices and optional items that boost flavor. You learned step-by-step instructions to cook, simmer, and serve your dish perfectly. We provided tips for enhancements, variations, and storage methods to keep your curry fresh. Cooking chicken curry is easy and fun. Experiment with flavors and share your creations. Enjoy your delicious meal!](https://dailydishlab.com/wp-content/uploads/2025/06/c5f0adf9-706c-4d08-bf07-c5d16fe1346d-768x768.webp)
