Garlic Herb Focaccia Bread Simple and Tasty Recipe

Are you ready to bake a mouthwatering Garlic Herb Focaccia Bread? This simple and tasty recipe will make your kitchen smell amazing! With just a few easy steps, you can create a soft, flavorful bread topped with garlic and fresh herbs. Whether you serve it as a side dish or snack, your friends and family will ask for more. Let’s dive into the recipe and get baking!
Why I Love This Recipe
- Delicious Flavor: This focaccia is infused with aromatic garlic and fresh herbs, creating a delightful taste that elevates any meal.
- Easy to Make: With simple ingredients and straightforward steps, even beginner bakers can successfully create this bread.
- Customizable: You can easily modify the toppings to suit your preference, adding different herbs or cheeses for variation.
- Perfect for Sharing: This recipe yields 12 slices, making it a great addition to gatherings, picnics, or family dinners.
Ingredients
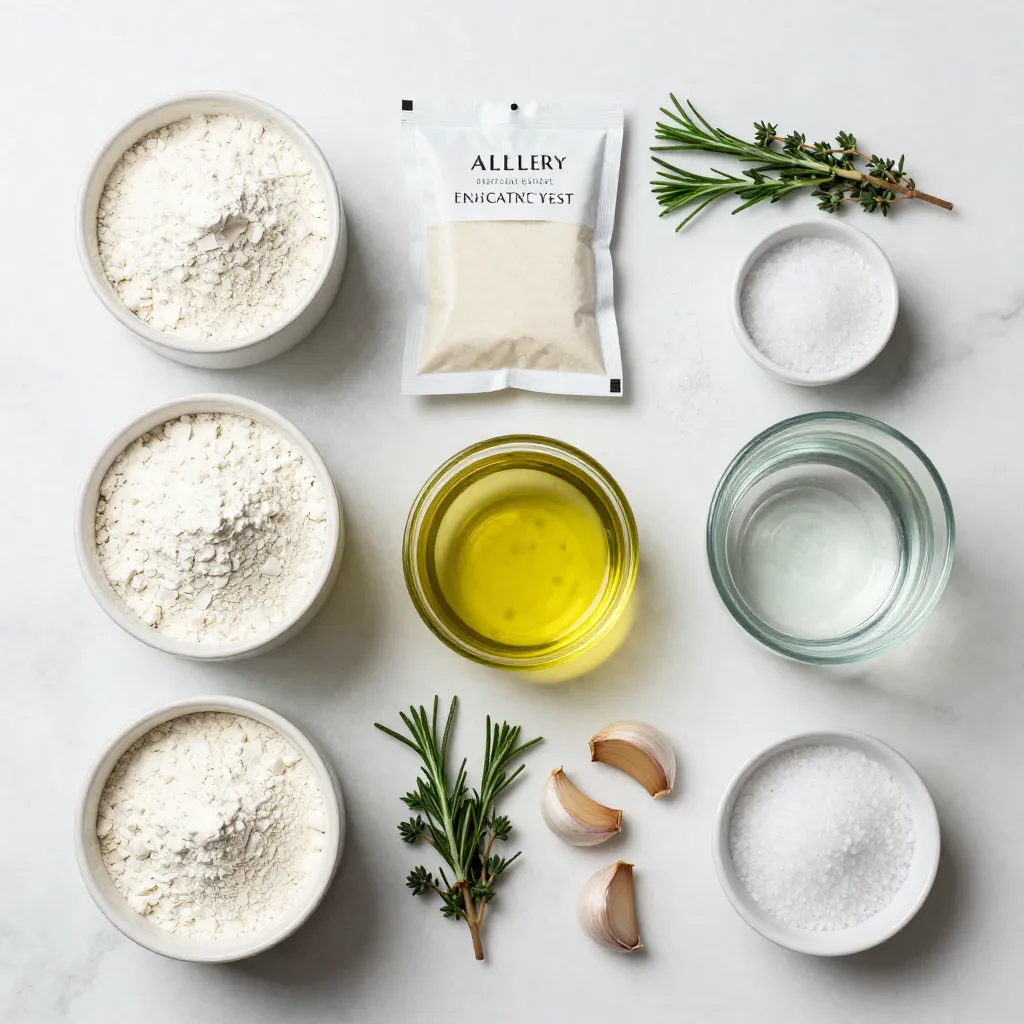
To make garlic herb focaccia bread, you need simple and fresh ingredients. Here’s the list:
- 4 cups all-purpose flour
- 1 packet (2¼ teaspoons) instant yeast
- 1 tablespoon sugar
- 2 teaspoons salt
- 1 ½ cups warm water (110°F/43°C)
- ¼ cup olive oil, plus more for drizzling
- 6 cloves garlic, minced
- 2 tablespoons fresh rosemary, chopped
- 2 tablespoons fresh thyme, chopped
- Coarse sea salt for topping
Each ingredient plays a key role in flavor and texture. The all-purpose flour gives the bread its structure. Instant yeast helps it rise quickly, while sugar feeds the yeast. Salt adds taste, and warm water activates the yeast. Olive oil keeps the bread moist and adds richness. Fresh garlic and herbs offer a burst of flavor. Finally, coarse sea salt gives a nice crunch on top.
When you gather all these ingredients, you set the stage for a delicious focaccia. Make sure to use fresh herbs for the best taste. The aroma of garlic and herbs will fill your kitchen as it bakes.

Step-by-Step Instructions
Prep the Yeast Mixture
Start by mixing warm water, sugar, and yeast in a large bowl. Let it sit for about five minutes. You want it bubbly and foamy. This step wakes up the yeast and helps the bread rise.
Prepare and Knead the Dough
Next, add the flour, salt, and olive oil to the yeast mix. Stir it with a wooden spoon until a rough dough forms. Then, transfer the dough to a floured surface. Knead it for five to seven minutes until it feels smooth and elastic.
Let the Dough Rise
After kneading, place the dough in a greased bowl. Cover it with a damp cloth. Let it rise in a warm spot for one hour. It should double in size, which means it’s ready for the next step.
Shape the Focaccia
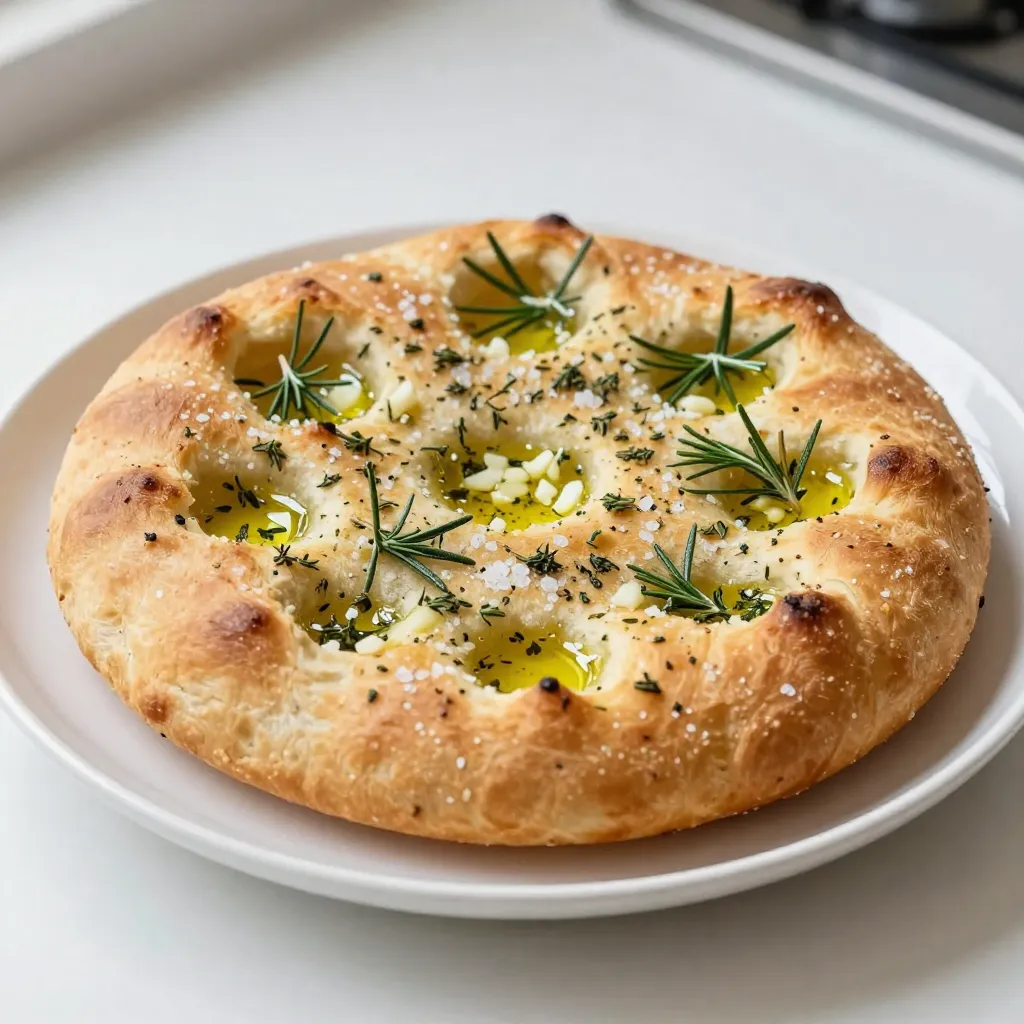
Once the dough has risen, punch it down gently. Move it to a parchment-lined baking sheet. Press it out into a rectangle or circle, about half an inch thick. Use your fingers to make dimples all over the surface. This helps hold the toppings.
Bake the Focaccia
Drizzle olive oil over the dough. Sprinkle minced garlic, rosemary, thyme, and coarse sea salt on top. Cover it loosely with a towel and let it rest for another 30 minutes while your oven preheats to 400°F (200°C). Bake for 20 to 25 minutes, until golden brown. The edges should be crispy. Let it cool for a few minutes before slicing. Enjoy your warm, garlic herb focaccia!
Tips & Tricks
Achieving the Perfect Rise
To get your focaccia to rise well, start with warm water. The water should be around 110°F (43°C). This warmth helps the yeast grow. Mix the yeast with sugar and water, then let it sit for five minutes. You want it bubbly and foamy. This means the yeast is active. After mixing in the flour, knead the dough for about 5-7 minutes. This builds strength in the dough. Place it in a greased bowl, cover it, and let it rise in a warm spot for one hour. It should double in size.
Enhancing Flavor with Herbs
Herbs make focaccia special. Use fresh rosemary and thyme for the best taste. Chop them finely. Mix them into the dough or sprinkle them on top. Garlic adds a nice punch, too. Mince six cloves of garlic and spread them evenly on the dough before baking. The more herbs you use, the more flavor your bread will have. You can also try mixing in dried herbs if fresh ones aren’t available.
Best Olive Oil to Use
The right olive oil is key for great focaccia. I recommend using extra virgin olive oil. It has a rich flavor that enhances the bread. Drizzle some on top before baking and use a bit in the dough. It helps the crust become crispy and adds depth to the taste. Look for high-quality brands for the best results.
Pro Tips
- Use Fresh Herbs: Fresh rosemary and thyme will elevate the flavor profile of your focaccia. If possible, avoid dried herbs for a more vibrant taste.
- Perfect Dimpling: When creating dimples in the dough, use your fingertips to press gently. This helps to hold the olive oil and toppings better, ensuring a flavorful crust.
- Preheat Your Oven: Make sure your oven is fully preheated to 400°F (200°C) before baking. This ensures that the focaccia rises perfectly and develops a crispy crust.
- Let It Rest: Allowing the dough to rest after shaping helps to relax the gluten, resulting in a lighter and fluffier bread.
Variations
Cheese-Stuffed Focaccia
Cheese-stuffed focaccia is a fun twist. You add gooey cheese to the center. Use mozzarella or feta for great taste. Just divide the dough in half. Place cheese in the middle and cover it with the second half. This makes a cheesy delight that melts in your mouth.
Mediterranean Herb Focaccia
Mediterranean herb focaccia uses fresh flavors. You can add oregano, basil, or parsley. Mix these herbs into the dough for a fragrant lift. Top it with sun-dried tomatoes or olives for extra flavor. This variation gives a taste of the Mediterranean with every bite.
Sweet Focaccia with Honey and Nuts
Sweet focaccia is a treat for dessert lovers. Drizzle honey on top before baking. Add chopped nuts like walnuts or almonds for crunch. This focaccia is soft, sweet, and perfect with coffee. It makes a great snack or a light breakfast option.
Storage Info
How to Store Focaccia Bread
To keep your garlic herb focaccia fresh, wrap it tightly in plastic wrap. You can also place it in a zip-top bag. Store it at room temperature for up to three days. If you notice it becoming hard, try toasting it lightly. This will help revive its texture.
Freezing Focaccia Bread
Freezing focaccia is simple. First, let it cool completely. Then, wrap it well in plastic wrap and foil. This helps prevent freezer burn. You can freeze it for up to three months. When you’re ready to enjoy it, thaw it in the fridge overnight.
Reheating Tips
To reheat focaccia, preheat your oven to 350°F (175°C). Place the focaccia on a baking sheet. Heat it for about 10-15 minutes. This will warm it through and make it crispy again. If you want, drizzle a bit of olive oil on top before warming. This adds extra flavor.
FAQs
How do I know when my focaccia is done?
You can tell when focaccia is done by checking its color. It should be golden brown on top. You can also tap the bottom. A hollow sound means it’s cooked through. If it looks light, bake it for a few more minutes.
Can I use active dry yeast instead of instant?
Yes, you can use active dry yeast. Just remember to activate it first. Mix it with warm water and sugar. Let it sit for about 5-10 minutes until it bubbles. Then, add it to your dough like instant yeast.
What can I serve with garlic herb focaccia?
Garlic herb focaccia pairs well with many dishes. Here are some tasty ideas:
- Soups, like tomato or minestrone
- Salads, such as Caesar or mixed greens
- Dips, like olive oil with balsamic vinegar
- Cheeses, including mozzarella and feta
Is it possible to make focaccia without gluten?
Yes, you can make gluten-free focaccia. Use a gluten-free flour blend. Look for recipes that use xanthan gum to help with texture. Follow the rising and baking steps as you would with regular dough.
You learned how to make delicious focaccia bread step by step. From gathering ingredients to using the right oil, each part is key. You can vary the flavors or store your bread for later. Remember, even small changes can bring big taste. Making focaccia is fun and rewarding, whether for a meal or a snack. Embrace your inner baker and enjoy this tasty treat. Remember, practice makes perfect, so keep bakin

Garlic Herb Focaccia Bread
Ingredients
- 4 cups all-purpose flour
- 1 packet instant yeast (2¼ teaspoons)
- 1 tablespoon sugar
- 2 teaspoons salt
- 1.5 cups warm water (110°F/43°C)
- 0.25 cups olive oil, plus more for drizzling
- 6 cloves garlic, minced
- 2 tablespoons fresh rosemary, chopped
- 2 tablespoons fresh thyme, chopped
- 1 pinch coarse sea salt for topping
Instructions
- In a large mixing bowl, combine the warm water, sugar, and instant yeast. Let it sit for about 5 minutes or until bubbly and foamy.
- Add the all-purpose flour, salt, and ¼ cup of olive oil to the yeast mixture. Stir with a wooden spoon until a rough dough forms.
- Transfer the dough to a lightly floured surface and knead for about 5-7 minutes until smooth and elastic.
- Place the dough in a greased bowl, cover it with a damp cloth, and let it rise in a warm place for 1 hour or until doubled in size.
- Once risen, punch down the dough and transfer it to a parchment-lined baking sheet. Press it gently into a rectangle or circle, about ½ inch thick.
- Using your fingers, create dimples all over the surface of the dough. Drizzle olive oil generously over the top, and then sprinkle the minced garlic, rosemary, thyme, and coarse sea salt evenly.
- Cover the dough loosely with a towel and let it rest for another 30 minutes while preheating your oven to 400°F (200°C).
- Bake the focaccia for 20-25 minutes or until golden brown and crispy on the edges.
- Remove from the oven and let it cool for a few minutes before slicing.


![For my Zucchini Quiche Muffins, I use these key ingredients: - 2 medium zucchinis, grated - 4 large eggs - 1 cup milk (dairy or plant-based) - 1 cup all-purpose flour (or whole wheat) - 1 cup shredded cheese (cheddar or feta) - 1/2 teaspoon baking powder - 1/2 teaspoon salt - 1/4 teaspoon black pepper - 1/2 teaspoon garlic powder - 1/4 cup green onions, finely chopped - 1/4 cup bell pepper, finely diced (any color) - Olive oil for greasing muffin tin You can swap out some ingredients for variety. Here are my favorites: - Instead of all-purpose flour, try almond flour for a nutty taste. - Use turkey bacon or cooked sausage for added protein. - If you want a dairy-free option, use nutritional yeast instead of cheese. - For extra greens, add chopped spinach or kale. - You can replace green onions with chives for a milder flavor. These muffins are not just tasty; they are also good for you. Here are some details: - Each muffin has about 120 calories. - They provide a good source of protein from eggs and cheese. - Zucchini adds fiber and vitamins A and C. - These muffins are low in carbs if you choose whole wheat flour. - They make a great snack or meal option for all ages. For the full recipe, check out the detailed instructions and tips! 1. Preheat your oven to 375°F (190°C). Grease a muffin tin with olive oil or use muffin liners. 2. In a large bowl, whisk together four large eggs and one cup of milk. Mix until they are well blended. 3. Grate two medium zucchinis and add them to the egg mixture. If needed, use a sieve to drain excess liquid. This step keeps your muffins from being soggy. 4. Add one cup of all-purpose flour, half a teaspoon of baking powder, and half a teaspoon of salt. Also, include a quarter teaspoon of black pepper and half a teaspoon of garlic powder. Stir gently until just mixed. Don’t overmix; the batter should be a bit lumpy. 5. Fold in one cup of shredded cheese, a quarter cup of chopped green onions, and a quarter cup of diced bell pepper. Mix until everything is evenly distributed. 6. Use a spoon to fill each muffin cup about three-quarters full with the batter. 7. Place the muffin tin in the preheated oven. Bake for 20 to 25 minutes. You want them golden brown on top. 8. About halfway through baking, check on them. This way, you can ensure they rise evenly. 9. To check if the muffins are done, insert a toothpick into the center. If it comes out clean, they are ready. If not, give them a few more minutes. 10. Once baked, let the muffins cool for a few minutes in the tin. Then, transfer them to a wire rack to cool completely. For the full recipe and further details, check the [Full Recipe]. Enjoy these tasty muffins as a snack or a side! To get the best texture in your zucchini quiche muffins, use fresh zucchinis. Grate them finely, and squeeze out any extra water. This keeps the muffins from being soggy. Mix the batter gently. A few lumps are okay; overmixing can make them tough. Use a blend of cheese for more flavor. Cheddar and feta work great together. Store any leftovers in an airtight container. They stay fresh in the fridge for up to three days. For longer storage, freeze them. Place muffins in a freezer bag, and they will last up to three months. Thaw in the fridge overnight before enjoying again. Serve these muffins warm or at room temperature. They pair well with a fresh salad or soup. Top with herbs like parsley for a burst of flavor. You can also sprinkle extra cheese on top before serving. For a fun twist, serve with a dollop of sour cream or yogurt. Enjoy them as a snack, breakfast, or side dish! For the full recipe, check out the detailed instructions above. {{image_2}} You can easily make these muffins vegetarian. Just skip the cheese, or use a plant-based one. Add more veggies like spinach, mushrooms, or kale for a tasty twist. You can even mix in some sun-dried tomatoes for extra color and flavor. This way, you keep the muffins light and fresh! To make these muffins gluten-free, swap the all-purpose flour for a gluten-free blend. Many blends work well in baking. Just make sure to check the labels to avoid any hidden gluten. You can also use almond flour or oat flour for a nutty taste. Both will give you a nice texture. Herbs and spices can make these muffins pop. Try adding thyme, rosemary, or dill for a fragrant touch. You can also mix in a pinch of chili flakes if you like heat. Another idea is to add a sprinkle of smoked paprika for a unique flavor. Don't be afraid to get creative! To keep your zucchini quiche muffins fresh, place them in an airtight container. This helps to keep moisture out. You can store them at room temperature for up to two days. If you want them to last longer, consider the fridge. In the fridge, they can stay fresh for up to a week. Freezing is a great option if you want to save muffins for later. To freeze, first let them cool completely. Then, wrap each muffin tightly in plastic wrap. After that, place them in a freezer bag. Label the bag with the date. You can freeze them for up to three months. When you’re ready to eat, just take out what you need. Reheating zucchini quiche muffins is easy. For the best results, use an oven. Preheat your oven to 350°F (175°C). Place the muffins on a baking sheet. Heat them for about 10-15 minutes. You can also use a microwave. Just heat them for 20-30 seconds. This warms them but may not keep them crisp. Enjoy your muffins warm! For the full recipe, check out the earlier section. Yes, you can use other vegetables! Carrots, spinach, or mushrooms work well. Just remember to chop them small. If you want a burst of flavor, add some sun-dried tomatoes. The key is to keep the total vegetable amount similar to the zucchini. This keeps the muffins tasty and moist. Feel free to mix and match according to what you have at home. It makes cooking fun and creative! Zucchini quiche muffins last about four days in the fridge. To store them, place them in an airtight container. This keeps them fresh and tasty. If you notice any change in smell or texture, it’s best to toss them. You can enjoy them cold or warm them up in the microwave. They make a quick snack or breakfast option! Absolutely! Mini zucchini quiche muffins are a great idea. Use a mini muffin tin instead of a regular one. Just reduce the baking time to about 12-15 minutes. Keep an eye on them, as they cook faster. These bite-sized treats are perfect for parties or snacks. Plus, they are easy to grab and eat on the go. Try making them for your next gathering! For the full recipe, check out the complete instructions above. In this post, we covered how to make delicious zucchini quiche muffins. We explored key ingredients and their substitutions. I shared easy preparation steps and baking tips to ensure perfect results. You learned how to store and reheat your muffins and enjoyed ideas for tasty variations. Embrace these tips to make your own muffin masterpiece. Enjoy experimenting and savor every bite!](https://dailydishlab.com/wp-content/uploads/2025/06/fed823f9-c559-4a2e-ba47-9f1169717efa-768x768.webp)


. To make your Crispy Parmesan Cauliflower Bites truly amazing, use Panko breadcrumbs. They add a great crunch that regular breadcrumbs can't match. When you coat the florets, spray them lightly with olive oil. This helps them get golden and crispy. For a tasty twist, pair the bites with marinara sauce or garlic aioli for dipping. Both options bring out the flavors of the cauliflower. Before serving, sprinkle fresh parsley on top. It adds a pop of color and freshness. Be careful not to overcrowd the baking sheet. If the florets are too close, they will steam instead of crisp. Also, make sure each floret has an even coating of the breadcrumb mix. This ensures every bite is crispy and delicious. {{image_2}} You can easily change the heat of your cauliflower bites. Just add more cayenne or sprinkle in some red pepper flakes. If you love herbs, try Italian seasoning for a fresh twist. These simple changes can make your bites even more exciting. Want a different cheese flavor? Switch it up! Use cheddar for a sharp taste or mozzarella for a milder touch. You can also adjust the cheese amount to fit your taste. More cheese gives a richer flavor, while less keeps it light. If you need a gluten-free version, it's easy! Just swap all-purpose flour with gluten-free flour. You can also use gluten-free breadcrumbs for the coating. This way, everyone can enjoy these tasty bites without worry. Remember to check the Full Recipe for detailed steps and measurements! You should let your cauliflower bites cool completely before storing them. Once cool, place them in an airtight container. This keeps them fresh and tasty. I often use a glass container with a tight lid. It works well to prevent moisture from getting in. For the best texture, reheat your cauliflower bites in the oven. Set your oven to 350°F and bake for 10-15 minutes. This helps regain their crispiness. If you are short on time, you can use the microwave. Just know that they may lose some crunch this way. You can freeze raw coated florets before baking. This makes meal prep super easy. Just coat the florets as usual and place them on a baking sheet. Freeze them for about an hour, then transfer them to a freezer-safe bag. When you are ready to bake, you can bake them directly from frozen. Just add a few more minutes to the baking time. This method makes it simple to enjoy these crispy bites anytime. For the full recipe, check back to the beginning. Crispy Parmesan Cauliflower Bites usually last 3-5 days in the refrigerator. To keep them fresh, store them in an airtight container. This helps maintain their taste and texture. If you notice any signs of spoilage, it’s best to toss them out. Yes, you can prep and coat them ahead of time. Just coat the florets and keep them in the fridge. Bake them just before serving for the best results. This keeps them crispy and hot, perfect for sharing with friends or family. These bites pair well with many dipping sauces. You can try ranch, marinara, or mustard. Each dip adds its own flavor, making your snack even more tasty. Feel free to get creative with sauces you enjoy! For the full recipe, check out the complete details above. Making Crispy Parmesan Cauliflower Bites is simple and fun. We covered key ingredients, from fresh cauliflower to tasty seasonings. I shared step-by-step instructions and tips for achieving that perfect crunch. You can customize these bites to fit your taste or dietary needs. Don’t forget to store them well for later. With a bit of practice, you’ll impress friends and family with this healthy snack. Enjoy the making and sharing of these bites!](https://dailydishlab.com/wp-content/uploads/2025/07/cd5319ec-8bde-454d-b3ba-e0a3ba5bfe99-768x768.webp)