Garlic Parmesan Air Fryer Wings Crispy and Tasty Snack

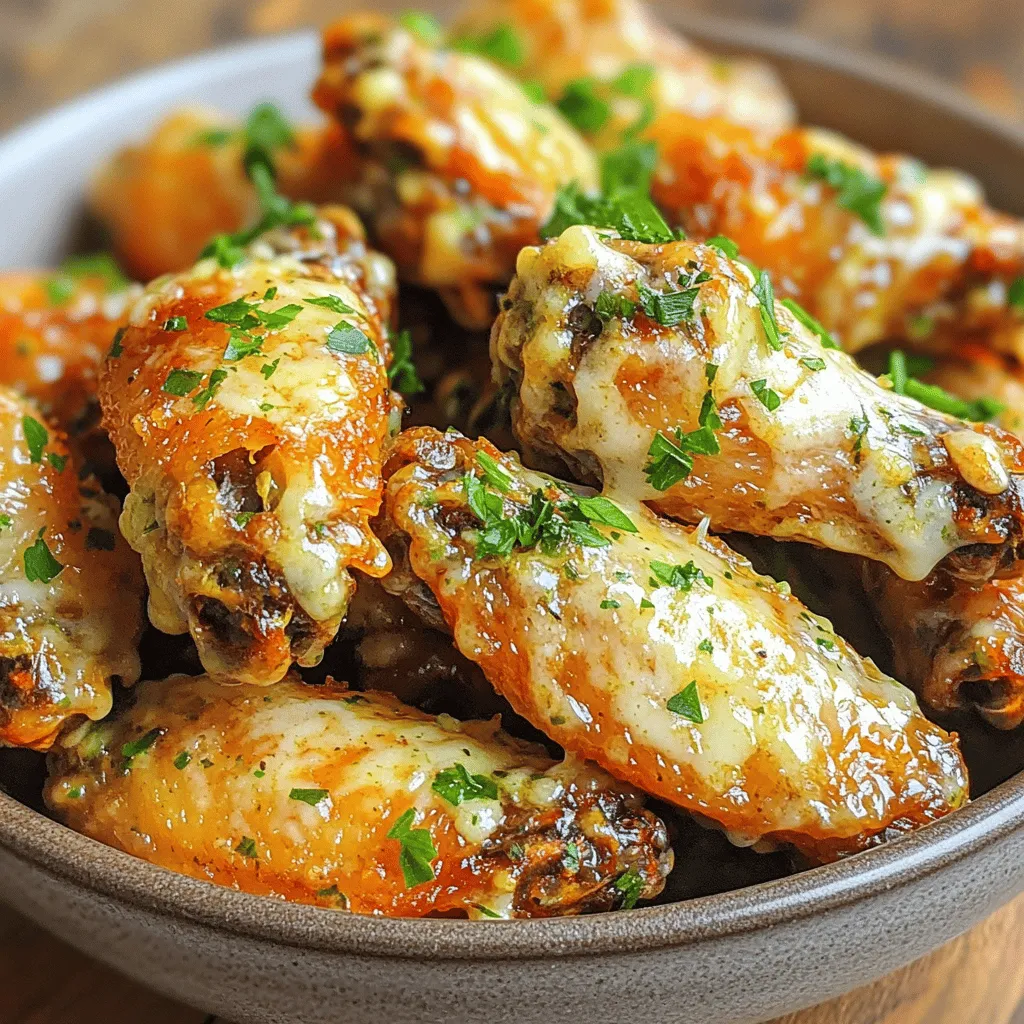
Looking for a quick and tasty snack that rivals your favorite restaurant wings? These garlic Parmesan air fryer wings are the answer! With a crunchy outside and juicy inside, they’re sure to please. Plus, they’re easy to make with just a few simple ingredients you likely have at home. Let’s dive into how to whip up this crispy delight and impress your friends at your next gathering!
Why I Love This Recipe
- Easy Preparation: This recipe requires just a few simple steps, making it perfect for busy weeknights or last-minute gatherings.
- Flavor Explosion: The combination of garlic, Parmesan, and Italian seasoning creates a mouthwatering flavor that will impress your guests.
- Healthier Option: Using an air fryer allows you to enjoy crispy wings without the excess oil, making it a healthier choice.
- Versatile Dish: These wings can be served as an appetizer, a main dish, or even as part of a game day spread!
Ingredients
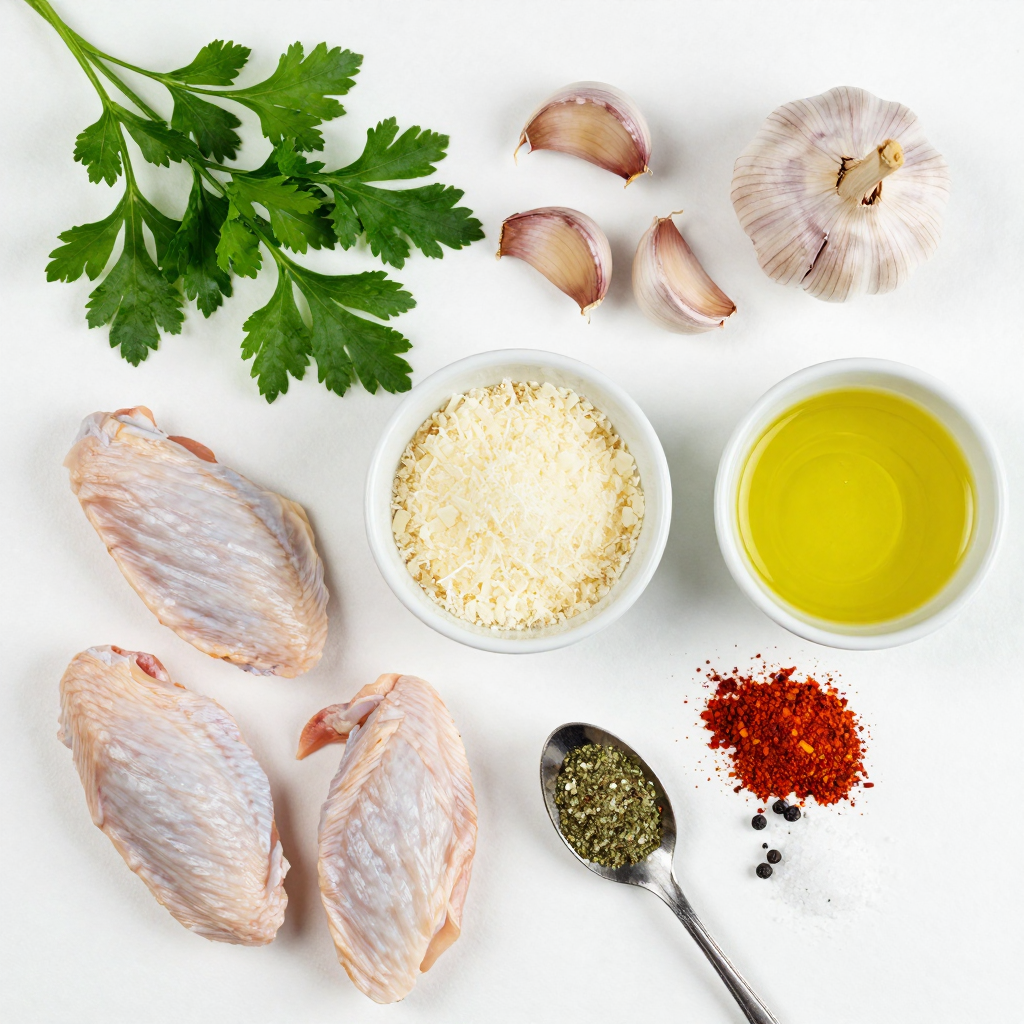
To make Garlic Parmesan Air Fryer Wings, you need fresh and simple ingredients. Here’s what you’ll need:
- 2 pounds chicken wings
- 4 tablespoons olive oil
- 6 cloves garlic, minced
- 1 teaspoon Italian seasoning
- ½ teaspoon paprika
- ½ teaspoon black pepper
- 1 teaspoon salt
- ½ cup grated Parmesan cheese
- 2 tablespoons fresh parsley, chopped (for garnish)
These ingredients combine to create a flavor-packed snack. The chicken wings are juicy and tender inside while crispy outside. The garlic and Parmesan cheese make them rich and tasty.

Step-by-Step Instructions
Preheat the Air Fryer
First, preheat your air fryer to 400°F (200°C). This step is key. It helps make your wings crispy and golden. Take a moment to set it up before you start prepping the wings.
Prepare the Wings
Next, grab a large mixing bowl. Add 2 pounds of chicken wings to it. Pour in 4 tablespoons of olive oil. Then, add 6 minced garlic cloves, 1 teaspoon of Italian seasoning, ½ teaspoon of paprika, ½ teaspoon of black pepper, and 1 teaspoon of salt. Use your hands to mix everything well. Make sure all the wings get a good coat of oil and spices.
Cooking Process
Now, place the wings in the air fryer basket. Lay them in a single layer. This helps them cook evenly. Cook the wings for 25-30 minutes. Halfway through, shake the basket gently. This will ensure even cooking. Keep an eye on them. You want them to be crispy and golden-brown.
Finishing Touches
Once the wings are cooked, take them out carefully. Transfer them to a large bowl. While they are still hot, sprinkle ½ cup of grated Parmesan cheese on top. Toss the wings gently to coat them with cheese. Finally, add 2 tablespoons of chopped fresh parsley for a nice touch. Serve and enjoy your delicious Garlic Parmesan Air Fryer Wings!
Pro Tips
- Dry the Wings: Pat the chicken wings dry with paper towels before coating them with oil and seasonings. This helps achieve a crispier texture.
- Don’t Overcrowd: Ensure the wings are in a single layer in the air fryer basket. This allows for better air circulation and even cooking.
- Adjust Seasoning: Taste the seasoning mixture before coating the wings. Feel free to adjust the garlic or cheese levels to suit your preference.
- Let Them Rest: After air frying, let the wings rest for a few minutes before serving. This helps the juices redistribute and enhances flavor.
Tips & Tricks
Achieving the Perfect Crispiness
To make your wings crispy, use a good amount of olive oil. This helps the wings brown well. Don’t overcrowd the air fryer basket. It’s best to cook in batches. Shake the basket halfway through cooking. This ensures even crispiness all around.
Flavor Enhancements
To boost flavor, try adding more spices. You can use cayenne for heat. A little lemon zest adds freshness. You can also mix in some smoked paprika for a deeper taste. For a cheesy kick, toss in extra Parmesan after cooking. These small changes can make a big difference!
Serving Suggestions
Serve these wings hot, right out of the fryer. They pair well with dipping sauces like ranch or blue cheese. You can also serve them with celery sticks for crunch. For a fun twist, place them on a bed of mixed greens. This makes a tasty and colorful platter for parties.

Variations
Spicy Garlic Parmesan Wings
To make spicy garlic Parmesan wings, add some heat. Use 1-2 teaspoons of cayenne pepper or chili flakes. Mix this with the garlic, olive oil, and other seasonings. This adds a kick that pairs well with the rich cheese. Taste the balance of heat and flavor for the best result.
Herb Garlic Parmesan Wings
For a fresh twist, add herbs to the mix. You can use fresh rosemary, thyme, or basil. Chop them finely and include them in the seasoning mix. These herbs enhance the taste and give the wings a garden-fresh aroma. This variation brings a unique flair to each bite.
Different Cooking Methods
While air frying gives crispy results, you can try other cooking methods. Baking is an option. Spread the wings on a baking sheet and cook at 400°F (200°C) for 40-45 minutes. Broiling is another method. Broil the wings for 5-7 minutes after baking for extra crispiness. Each method offers a different texture, so feel free to experiment!
Storage Info
How to Store Leftovers
After enjoying your garlic Parmesan air fryer wings, let them cool first. Place them in an airtight container. This keeps them fresh and tasty. Store them in the fridge for up to three days. Make sure they are covered well to avoid drying out.
Reheating Tips
When you want to enjoy leftovers, use the air fryer for the best result. Set your air fryer to 350°F (175°C). Heat the wings for about 5-7 minutes. This keeps them crispy on the outside and warm inside. You can also use a microwave, but the wings might get soggy.
Freezing Guidelines
To freeze, pack the wings in a freezer-safe bag. Be sure to remove as much air as possible. Label the bag with the date. They can stay in the freezer for up to two months. When ready to eat, thaw in the fridge overnight. Then, reheat in the air fryer for the best taste.
FAQs
How do I make Garlic Parmesan Air Fryer Wings easier?
You can simplify this recipe in a few ways. First, use pre-seasoned wings. These are found in many stores. Second, you can mix the spices in advance. This saves time when you cook. Lastly, skip the garnishing step if you want a quicker meal. You can still enjoy the great taste without extra steps.
What can I serve with these wings?
These wings pair well with many sides. Try serving them with celery sticks and carrot sticks. They add a nice crunch. A side of ranch or blue cheese dressing also fits well. You can also serve them with a light salad for freshness. Another option is some crispy fries for a classic combo.
Can I use frozen chicken wings for this recipe?
Yes, you can use frozen chicken wings. Just remember to thaw them first. You can do this in the fridge overnight or in cold water. Once thawed, follow the recipe as usual. Cooking time may need adjustment, so check for doneness.
How do I know when my wings are done cooking?
To check if the wings are done, look for a crispy and golden-brown color. The internal temperature should reach 165°F (74°C). Use a meat thermometer for accuracy. If you do not have one, cut into a wing. The meat should be white, not pink. Enjoy your perfectly cooked wings!
You learned how to make delicious Garlic Parmesan Air Fryer Wings. We covered the ingredients, cooking steps, and tips for the best results. Remember to adjust flavors based on your taste and try different variations. Storing and reheating are easy, making these wings a great snack anytime. Enjoy the crispiness and the rich flavor with friends or family. Make wings your new favorite meal today!

Garlic Parmesan Air Fryer Wings
Ingredients
2 pounds chicken wings
4 tablespoons olive oil
6 cloves garlic, minced
1 teaspoon Italian seasoning
½ teaspoon paprika
½ teaspoon black pepper
1 teaspoon salt
½ cup grated Parmesan cheese
2 tablespoons fresh parsley, chopped (for garnish)
Instructions
Start by preheating your air fryer to 400°F (200°C).
In a large mixing bowl, combine the chicken wings, olive oil, minced garlic, Italian seasoning, paprika, black pepper, and salt. Toss everything together until the wings are well-coated.
Place the wings in the air fryer basket in a single layer. Cook them for 25-30 minutes, shaking the basket halfway through to ensure even cooking.
Once the wings are crispy and golden-brown, carefully remove them from the air fryer and transfer to a large bowl.
While the wings are hot, sprinkle the grated Parmesan cheese over them. Toss gently to coat the wings in the cheesy goodness.
Garnish with fresh parsley before serving.
Prep Time: 10 minutes | Total Time: 40 minutes | Servings: 4

Garlic Parmesan Air Fryer Wings
Ingredients
- 2 pounds chicken wings
- 4 tablespoons olive oil
- 6 cloves garlic, minced
- 1 teaspoon Italian seasoning
- 0.5 teaspoon paprika
- 0.5 teaspoon black pepper
- 1 teaspoon salt
- 0.5 cup grated Parmesan cheese
- 2 tablespoons fresh parsley, chopped (for garnish)
Instructions
- Start by preheating your air fryer to 400°F (200°C).
- In a large mixing bowl, combine the chicken wings, olive oil, minced garlic, Italian seasoning, paprika, black pepper, and salt. Toss everything together until the wings are well-coated.
- Place the wings in the air fryer basket in a single layer. Cook them for 25-30 minutes, shaking the basket halfway through to ensure even cooking.
- Once the wings are crispy and golden-brown, carefully remove them from the air fryer and transfer to a large bowl.
- While the wings are hot, sprinkle the grated Parmesan cheese over them. Toss gently to coat the wings in the cheesy goodness.
- Garnish with fresh parsley before serving.


![- 1 can (15 oz) chickpeas, drained and rinsed - 2 tablespoons olive oil - 1 tablespoon Sriracha sauce - 2 tablespoons honey Chickpeas are the heart of this snack. They give crunch and protein. Sriracha sauce adds heat and flavor. Honey brings sweetness to balance the spice. Together, they create a tasty mix. - 1 teaspoon garlic powder - 1 teaspoon smoked paprika - Salt to taste Garlic powder adds depth. Smoked paprika gives a nice, smoky flavor. Salt enhances all the tastes. Each seasoning plays a key role in making this snack special. - Fresh cilantro for garnish (optional) Fresh cilantro adds a burst of color and flavor. It is not a must, but it makes the dish look fresh and bright. You can skip it or use it based on your taste. You can find the [Full Recipe] to make this delicious snack. First, preheat your oven to 400°F (200°C). This step is key for crispy chickpeas. Next, line a baking sheet with parchment paper. This makes for easy clean-up and helps the chickpeas roast evenly. Open the can of chickpeas and drain them well. Rinse them under cold water to remove excess sodium. Then, spread them on a clean kitchen towel. Pat them dry gently to soak up any moisture. This helps them get nice and crunchy. In a mixing bowl, combine 2 tablespoons of olive oil, 1 tablespoon of Sriracha sauce, and 2 tablespoons of honey. Add in 1 teaspoon of garlic powder, 1 teaspoon of smoked paprika, and a pinch of salt. Stir until it's smooth. Now, toss the dried chickpeas into the bowl. Mix well until all the chickpeas are coated evenly in the sauce. Spread the coated chickpeas out in a single layer on your prepared baking sheet. This allows them to roast evenly. Place them in the oven and roast for 25-30 minutes. Halfway through, shake the baking sheet to ensure they cook evenly. You want them golden brown and crispy. Once they are done, take them out of the oven. Let them cool for a few minutes. They will continue to crisp up as they cool. If you like, garnish with fresh cilantro for a pop of color and flavor. Serve them warm or at room temperature for a delightful snack. You can find the full recipe above. To get crispy chickpeas, you must dry them well. After rinsing, spread them on a towel. Pat them gently until they feel dry. This step is key for crunch. Adjust your cooking time if your oven runs hot or cool. Check them often as they roast. You want them golden brown and crunchy, not burnt. Feel free to experiment with spices. Add cumin for warmth or chili powder for more heat. You can mix in onion powder for depth. You can also adjust sweetness and heat to your taste. If you like it sweeter, add more honey. For extra spice, increase the Sriracha. Taste as you go for the best results. Pair these chickpeas with dips like hummus or guacamole. They also work well with a cool drink. You can use them as a snack or add them to salads. They make a great topping on soups for extra crunch. For the full recipe, check out the cooking steps above. {{image_2}} You can change the heat in your Sriracha honey roasted chickpeas. If you want less heat, try using a milder hot sauce. Sweet chili sauce can also add a nice touch. If you crave more spice, add cayenne pepper or chili flakes. Adjust the amount to fit your taste. For a different sweetness, use maple syrup or agave syrup instead of honey. Both options give a nice flavor. If you want to cut down on sugar, try using stevia or monk fruit sweetener. These sugar alternatives can make your snack healthier without losing taste. If you have dietary restrictions, you can still enjoy this snack. Swap honey for agave syrup to make it vegan. You can also try different legumes like black beans or lentils. This way, you can enjoy crispy bites while sticking to your dietary needs. You can store Sriracha honey roasted chickpeas at room temperature. Use an airtight container to keep them fresh. If you live in a very humid area, put them in the fridge. This helps them last longer. Just remember, they might lose some crispiness in the fridge. For the best taste, eat the chickpeas within a week. Keep an eye out for signs of spoilage. If they smell off or have a soft texture, it’s time to toss them. Freshness is key for that crunchy bite you love. To enjoy their crunch again, use an oven to reheat. Set it to 350°F (175°C) and warm them for about 10 minutes. This method keeps them crispy. If you use a microwave, they may turn soft. So, the oven is best for reheating. Enjoy every bite of your tasty snack! Yes, you can use frozen chickpeas. First, thaw them completely. Then, drain and rinse them well. Pat them dry to remove moisture. This helps them crisp up nicely when roasted. You can serve these chickpeas as a snack or a side dish. They pair well with dips like hummus or guacamole. You can also add them to salads for crunch or on top of grain bowls for extra flavor. This recipe is already gluten-free! Just make sure the Sriracha sauce you use does not have added gluten. Always check labels if you have gluten concerns. Yes, you can prep the chickpeas ahead of time. Rinse and dry them, then store them in an airtight container in the fridge. Mix the sauce and keep it separate until you are ready to roast. The chickpeas are done when they are golden brown and crispy. They should feel firm and crunchy when you bite into them. If they feel soft, roast them a bit longer. Enjoy the satisfying crunch! In this post, we explored the tasty world of Sriracha Honey Roasted Chickpeas. You learned about key ingredients like chickpeas, sriracha, and honey. We covered step-by-step instructions for making this snack, plus tips for the best texture. Remember, you can switch ingredients for your taste. These crunchy bites make a great snack or meal side. Enjoy your cooking, and don’t hesitate to try new flavors!](https://dailydishlab.com/wp-content/uploads/2025/06/f8f73e0a-0d80-4e02-8677-78bbb221fc07-768x768.webp)
