Garlic Parmesan Hasselback Potatoes Delightful Recipe

Are you ready to elevate your potato game? These Garlic Parmesan Hasselback Potatoes combine crispy edges with soft, buttery centers and rich garlic flavor. This delightful recipe is simple and guaranteed to impress! You’ll love how easy it is to create a stunning side dish that pairs well with any meal. Let’s dive into the ingredients and steps to make this delicious dish a hit on your dinner table!
Why I Love This Recipe
- Irresistible Flavor: The combination of garlic and Parmesan creates a flavor explosion that is simply irresistible.
- Textural Delight: The unique slicing technique allows for crispy edges while keeping the inside fluffy and tender.
- Easy to Prepare: With minimal prep and just a handful of ingredients, this dish is perfect for any home cook.
- Perfect for Any Occasion: Whether it’s a weeknight dinner or a festive gathering, these potatoes are sure to impress.
Ingredients
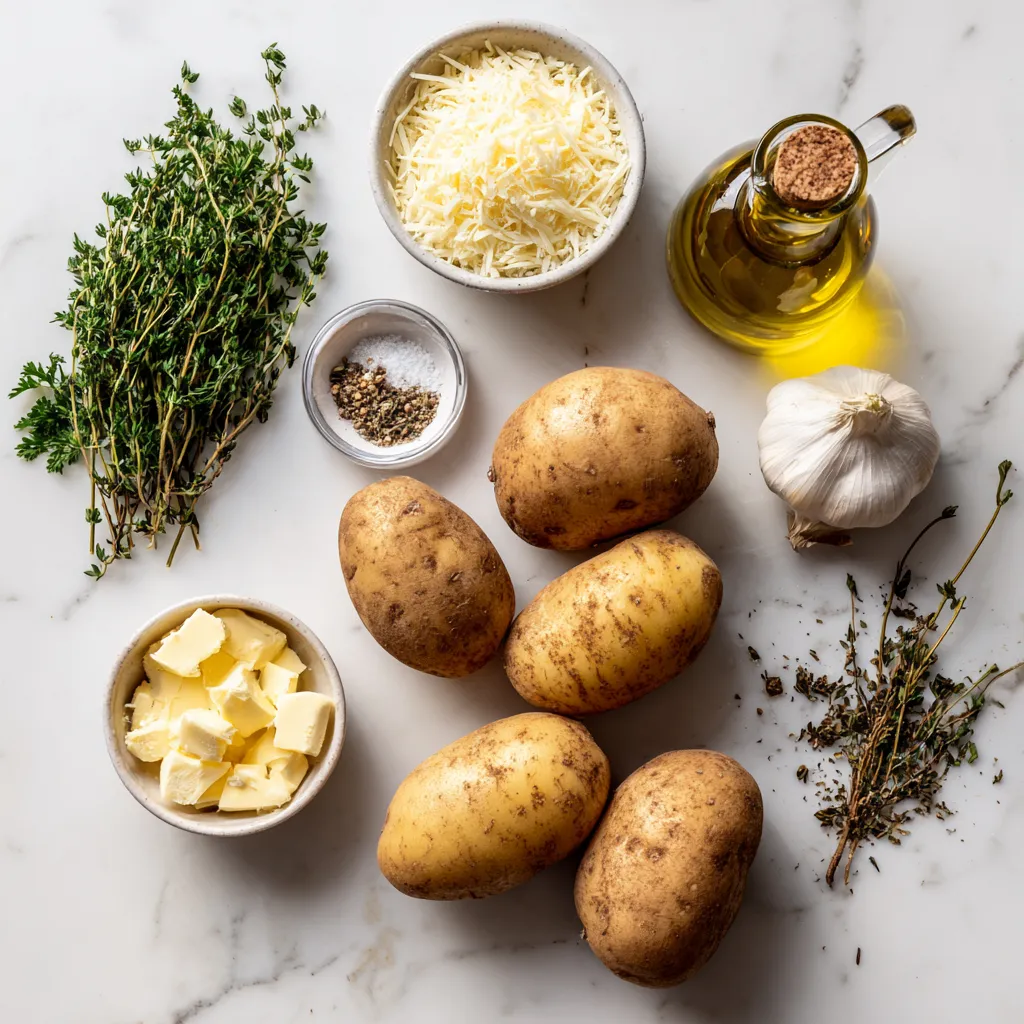
To make Garlic Parmesan Hasselback Potatoes, you will need the following ingredients:
- 4 medium-sized russet potatoes
- 4 cloves garlic, minced
- 1/4 cup unsalted butter, melted
- 1/2 cup grated Parmesan cheese
- 2 tablespoons olive oil
- 1 teaspoon salt
- 1 teaspoon black pepper
- 1 teaspoon dried thyme
- Fresh parsley, chopped for garnish
Each ingredient brings its own flavor and texture. The russet potatoes provide a fluffy inside and a crispy outside. Garlic adds a strong, savory taste. Butter enhances richness, while Parmesan offers that iconic cheesy bite. Olive oil helps with browning, and spices like salt, pepper, and thyme give depth to the dish. Lastly, fresh parsley brightens the plate and adds color.
Gather these items, and you are ready to create a delightful dish that will impress anyone!

Step-by-Step Instructions
Preheating and Preparing Potatoes
- Preheat your oven to 425°F (220°C).
- Wash and dry the russet potatoes. Slice them carefully. Aim for thin cuts, about 1/8 to 1/4 inch apart. Do not cut all the way through. This gives the potatoes their unique “fan” look.
Preparing the Garlic-Butter Mixture
- In a small bowl, mix melted butter, minced garlic, olive oil, salt, black pepper, and dried thyme. Stir well to combine. This mixture will add great flavor to your potatoes.
Applying Mixture and Baking
- Place the sliced potatoes on a baking sheet lined with parchment paper.
- Use a brush to apply the garlic-butter mixture generously. Get it between the slices and on top of each potato.
- Bake the potatoes for 40-50 minutes. Check for tenderness. The edges should turn golden and crispy.
- After about 40 minutes, sprinkle grated Parmesan cheese on top of each potato. Return them to the oven for another 10-15 minutes. The cheese will melt and get a little crispy.
- Once done, take the potatoes out and let them cool for a few minutes. Garnish with fresh chopped parsley before serving.
Tips & Tricks
Perfecting the Slicing Technique
To slice your potatoes evenly, use a sharp knife. Place a chopstick or wooden spoon on each side of the potato. This way, you won’t cut all the way through. Cut thin slices, about 1/8 to 1/4 inch apart. This creates that lovely fan shape. Take your time. Even cuts will help the potatoes cook evenly.
Achieving Crispy Edges
For crispy edges, bake your potatoes at 425°F (220°C). This high heat makes the skins crisp up nicely. Bake for 40-50 minutes until tender. After 40 minutes, add the cheese. This step helps the cheese melt and crisp in the last 10-15 minutes. The result? Perfectly golden, crunchy edges.
Ideal Parmesan Cheese Choices
Choose a good quality Parmesan cheese for the best flavor. Grated Parmesan melts well and adds a nice texture. Look for cheese that feels moist and has a strong, nutty taste. Freshly grated cheese is a great option. It gives a richer flavor than pre-grated cheese. This little change can elevate your dish!
Pro Tips
- Choose the Right Potatoes: Use starchy potatoes like russets for the best texture and flavor, as they crisp up nicely while remaining fluffy inside.
- Don’t Skip the Garlic: For a stronger garlic flavor, let the minced garlic sit in the melted butter for 10 minutes before applying it to the potatoes.
- Experiment with Toppings: Feel free to add additional toppings like crispy bacon bits, chives, or a drizzle of balsamic glaze for a gourmet touch.
- Check for Doneness: Use a fork to check if the potatoes are tender by poking them; they should be soft but still hold their shape.

Variations
Herb and Spice Additions
You can easily switch up the herbs in this dish. Adding rosemary gives a nice, earthy taste. Oregano brings a touch of warmth that pairs well with garlic. Feel free to mix and match your favorites. Just a sprinkle of these herbs can elevate the flavor. Fresh herbs work best for a bright taste, while dried herbs are just fine too.
Cheese Alternatives
While Parmesan cheese is classic, you can try other cheeses. Cheddar adds a sharp flavor that many love. For a creamier texture, go for mozzarella. Feta brings a tangy twist that surprises and delights. Each cheese adds its own special touch to the potatoes. Experiment to find your favorite combo!
Vegan Option
Making a plant-based version is easy and fun. Swap the butter for olive oil or vegan butter. Use nutritional yeast instead of cheese for a cheesy flavor. You can also add a little lemon juice for brightness. This way, everyone can enjoy these tasty potatoes, no matter their diet!
Storage Info
Keeping Leftovers Fresh
To keep leftover Garlic Parmesan Hasselback potatoes fresh, store them in the fridge. Place them in an airtight container. This helps keep moisture in and prevents them from drying out. They will stay tasty for about 3 to 5 days. If you are using a plate, cover it with plastic wrap. This works well too.
Reheating Techniques
To reheat your potatoes, use an oven for the best results. Preheat your oven to 350°F (175°C). Place the potatoes on a baking sheet. Heat them for about 15 to 20 minutes. This keeps the skin crispy and the insides soft. You can also use a microwave if you’re in a hurry. Just know that the skin may not be as crispy. Heat them for 1 to 2 minutes, checking every 30 seconds.
Freezing Options
If you want to freeze your Hasselback potatoes, let them cool first. Wrap each potato tightly in plastic wrap. Then, place them in a freezer bag. They can last up to 2 months in the freezer. When you’re ready to eat, let them thaw in the fridge overnight. Reheat them in the oven for the best taste and texture.
FAQs
Can I make these potatoes ahead of time?
Yes, you can make these potatoes ahead of time. Prepare them up to the baking step. Store them in the fridge for up to a day. When you are ready to bake, take them out and let them sit for a bit. Preheat your oven. Brush on the garlic-butter mixture and bake as usual. This saves time on busy days.
What can I serve with Garlic Parmesan Hasselback Potatoes?
These potatoes pair well with many dishes. Here are some great side options:
- Grilled chicken for a hearty meal.
- A fresh green salad for a light touch.
- Roasted vegetables add color and flavor.
- Steak or pork chops for a classic combo.
These sides balance the rich taste of the potatoes.
Can I use other types of potatoes?
Yes, you can use different potato types. Here are some good options:
- Yukon gold potatoes for a creamy texture.
- Sweet potatoes for a sweet twist.
- Red potatoes for a colorful display.
Each type offers a unique taste, so feel free to experiment.
How do I know when the potatoes are done?
Look for a few signs to tell if the potatoes are done:
- The edges should be crispy and golden brown.
- A fork should easily pierce through the potato.
- The slices should fan out nicely.
These signs mean your potatoes are ready to enjoy!
In this blog post, I covered how to make Garlic Parmesan Hasselback Potatoes. I included a detailed list of ingredients and simple steps for preparation. You learned tips for perfect slicing and ways to achieve crispy edges. Variations allow you to get creative with herbs or cheese. Remember to store leftovers properly and reheat for the best taste. With these tips and tricks, you can enjoy this dish anytime. Happy cookin

Garlic Parmesan Hasselback Potatoes
Ingredients
- 4 medium-sized russet potatoes
- 4 cloves garlic, minced
- 1/4 cup unsalted butter, melted
- 1/2 cup grated Parmesan cheese
- 2 tablespoons olive oil
- 1 teaspoon salt
- 1 teaspoon black pepper
- 1 teaspoon dried thyme
- to taste fresh parsley, chopped (for garnish)
Instructions
- Preheat your oven to 425°F (220°C).
- Wash and dry the russet potatoes. Carefully slice thin, even cuts along each potato, without cutting all the way through, about 1/8 to 1/4 inch apart. This will create the 'fan' look associated with Hasselback potatoes.
- In a small bowl, mix together the melted butter, minced garlic, olive oil, salt, pepper, and dried thyme.
- Place the potatoes on a baking sheet lined with parchment paper. Using a brush, generously apply the garlic-butter mixture between the slices and on the top of each potato.
- Bake the potatoes in the preheated oven for 40-50 minutes, or until they start to become tender. Bake until the edges are crispy and golden brown.
- After 40 minutes, remove them from the oven and sprinkle the grated Parmesan cheese over the top of each potato. Return to the oven for an additional 10-15 minutes, allowing the cheese to melt and become slightly crispy.
- Once done, remove the potatoes from the oven and let them cool for a few minutes. Garnish with fresh chopped parsley before serving.


![To make a delicious Lemon Herb Quinoa Salad, you need a few key items: - 1 cup quinoa, rinsed - 2 cups vegetable broth or water - 1 large cucumber, diced - 1 cup cherry tomatoes, halved - 1 bell pepper (any color), diced - 1/4 red onion, finely chopped - 1/4 cup fresh parsley, chopped - 1/4 cup fresh mint, chopped - Juice of 2 lemons - 3 tablespoons olive oil - Salt and pepper to taste - 1/2 teaspoon garlic powder (optional) These ingredients create a fresh and vibrant taste. Quinoa adds protein, while vegetables give color and crunch. You can boost your salad with some optional ingredients: - Avocado, diced - Feta cheese, crumbled - Chickpeas, rinsed and drained - Nuts or seeds, like almonds or sunflower seeds These additions bring extra flavors and textures. They make the salad more filling and fun to eat. To prepare your Lemon Herb Quinoa Salad, you will need: - A medium saucepan for cooking quinoa - A large mixing bowl for the salad - A whisk for mixing the dressing - A cutting board and knife for chopping veggies Having the right tools makes cooking easier. This way, you can focus on making a tasty dish. For the full recipe, refer to the section provided above. To cook quinoa, start with rinsing 1 cup of quinoa under cold water. This step removes any bitter taste. In a medium saucepan, combine the rinsed quinoa with 2 cups of vegetable broth or water. Bring this mixture to a boil over high heat. Once it boils, lower the heat to a simmer. Cover the pot and let it cook for about 15 minutes. You’ll know it’s done when the liquid is absorbed, and the quinoa is fluffy. After cooking, let it sit covered for 5 more minutes. Then, fluff it with a fork and set it aside to cool. While the quinoa cools, you can prepare the fresh vegetables. Take a large cucumber and dice it. Halve 1 cup of cherry tomatoes. Dice 1 bell pepper, any color you like. Finely chop 1/4 of a red onion. These veggies add color and crunch to the salad. Place them all in a large mixing bowl. Their freshness really makes this salad special. Now it’s time to bring everything together. Add the cooled quinoa to your bowl of vegetables. In a small bowl, whisk the juice of 2 lemons with 3 tablespoons of olive oil. If you like, add 1/2 teaspoon of garlic powder for more flavor. Season with salt and pepper to taste. Pour this dressing over the quinoa and veggies. Toss gently to combine. Finally, fold in 1/4 cup each of chopped parsley and mint. These herbs add a bright, fresh taste. Taste your salad and adjust the seasoning if needed. You can find the full recipe for this Lemon Herb Quinoa Salad in the article. To make quinoa fluffy, rinse it well before cooking. This removes extra starch. Use two cups of liquid for every cup of quinoa. Bring it to a boil, then lower the heat to simmer. Cover it and let it cook for about 15 minutes. After cooking, let it sit covered for five more minutes. Finally, fluff it with a fork. This method gives you light and airy quinoa for your salad. You can change the dressing to add more flavor. Try adding a teaspoon of Dijon mustard for a tangy kick. You could also use balsamic vinegar instead of lemon juice for a sweeter taste. For a spicy touch, add a pinch of red pepper flakes. Mix and match these ideas to find your favorite! I love serving this salad chilled or at room temperature. It looks great in a big bowl or individual cups. You can add lemon slices on top for a bright look. If you're hosting, pair it with grilled chicken or fish. It’s also perfect as a side dish at picnics. For a quick lunch, pack it in a jar for easy transport. This salad is fresh and full of flavor, making it a hit at any meal! For the full recipe, check the recipe section above. {{image_2}} You can easily boost the protein in your Lemon Herb Quinoa Salad. Adding chicken, chickpeas, or tofu makes it heartier. Grilled chicken works well; just slice it and toss it in. For a vegetarian option, try chickpeas. They add nice texture and flavor. Simply rinse and drain canned chickpeas, then mix them in. Tofu is another great option. Use firm tofu, cube it, and pan-fry until golden. This adds a delicious crunch. This salad is perfect for any season! In summer, add fresh corn or diced avocado. Both bring a creamy texture and sweetness. You can even include fruits like diced mango or strawberries for a fun twist. In winter, think about adding roasted vegetables. Try sweet potatoes, Brussels sprouts, or beets. They give warmth and depth to your salad. Adjust your herbs too. In winter, use sage or thyme for a cozy flavor. Dietary needs can change, and this salad is flexible. If you're gluten-free, quinoa is a great choice! However, if quinoa doesn't suit you, try brown rice or millet. For a lighter option, you could use cauliflower rice. If you're avoiding oil, substitute with avocado or Tahini for creaminess. Need a nut-free option? Just leave out the nuts or seeds if you add them. You can still enjoy a fresh, tasty salad! For the full recipe, check out the detailed instructions and enjoy this healthy dish! To keep your Lemon Herb Quinoa Salad fresh, place it in an airtight container. Make sure to seal it tightly. Store it in the fridge. It will stay good for up to five days. The flavors will blend more as it sits. This makes it taste even better! You can freeze quinoa salad, but it may change texture. To freeze, scoop the salad into freezer-safe bags. Remove as much air as possible. Label the bags with the date. When you're ready to eat, thaw it in the fridge overnight. Enjoy it within three months for the best taste. For the best taste, serve your quinoa salad chilled or at room temperature. If it was in the fridge, take it out and let it sit for a bit. This will help the flavors pop! You can also add a splash of lemon juice before serving to brighten it up. Lemon Herb Quinoa Salad is packed with nutrients. Quinoa offers protein, fiber, and essential amino acids. Each serving has about: - 220 calories - 8 grams of protein - 4 grams of fat - 38 grams of carbs - 5 grams of fiber The fresh veggies boost vitamins and minerals, making it a healthy choice. Yes, you can prepare Lemon Herb Quinoa Salad ahead. It stays fresh in the fridge for up to three days. Just store it in an airtight container. The flavors deepen as it sits, which is a bonus! If you lack parsley or mint, try these herbs: - Cilantro - Basil - Dill - Chives Each adds a unique taste. Feel free to mix and match based on what you like best! For the full recipe and more tips, check the [Full Recipe]. In this blog post, we explored how to create a delicious lemon herb quinoa salad. We covered essential and optional ingredients that can boost flavor. I also shared tips for cooking quinoa perfectly and preparing fresh veggies. You learned different ways to enhance the dish, like adding protein or modifying for seasons. Remember to store leftovers well and reheat properly for best taste. Enjoy making this salad your own with easy swaps and additions!](https://dailydishlab.com/wp-content/uploads/2025/07/7d74a881-4284-4d62-884c-d248237a5ed2-768x768.webp)

