
Looking for a tasty and healthy meal option? These Greek Yogurt Chicken Salad Lettuce Wraps are perfect! Packed with protein, crunch, and flavor, they make a great lunch, snack, or light dinner. You’ll love how easy they are to whip up and customize to your taste. Join me as we create a delightful dish that keeps you full and happy. Let’s dive into this refreshing recipe!
Why I Love This Recipe
- Healthy Ingredients: This chicken salad is packed with protein and healthy fats, making it a nutritious choice for any meal.
- Refreshing Flavor: The combination of grapes and dill adds a refreshing sweetness and depth of flavor that is delightful.
- Versatile Wraps: Using lettuce wraps instead of bread makes this dish low-carb and gluten-free, perfect for various dietary needs.
- Quick and Easy: With just 15 minutes of prep time, this recipe is perfect for busy weeknights or quick lunches.
Ingredients
Main Ingredients
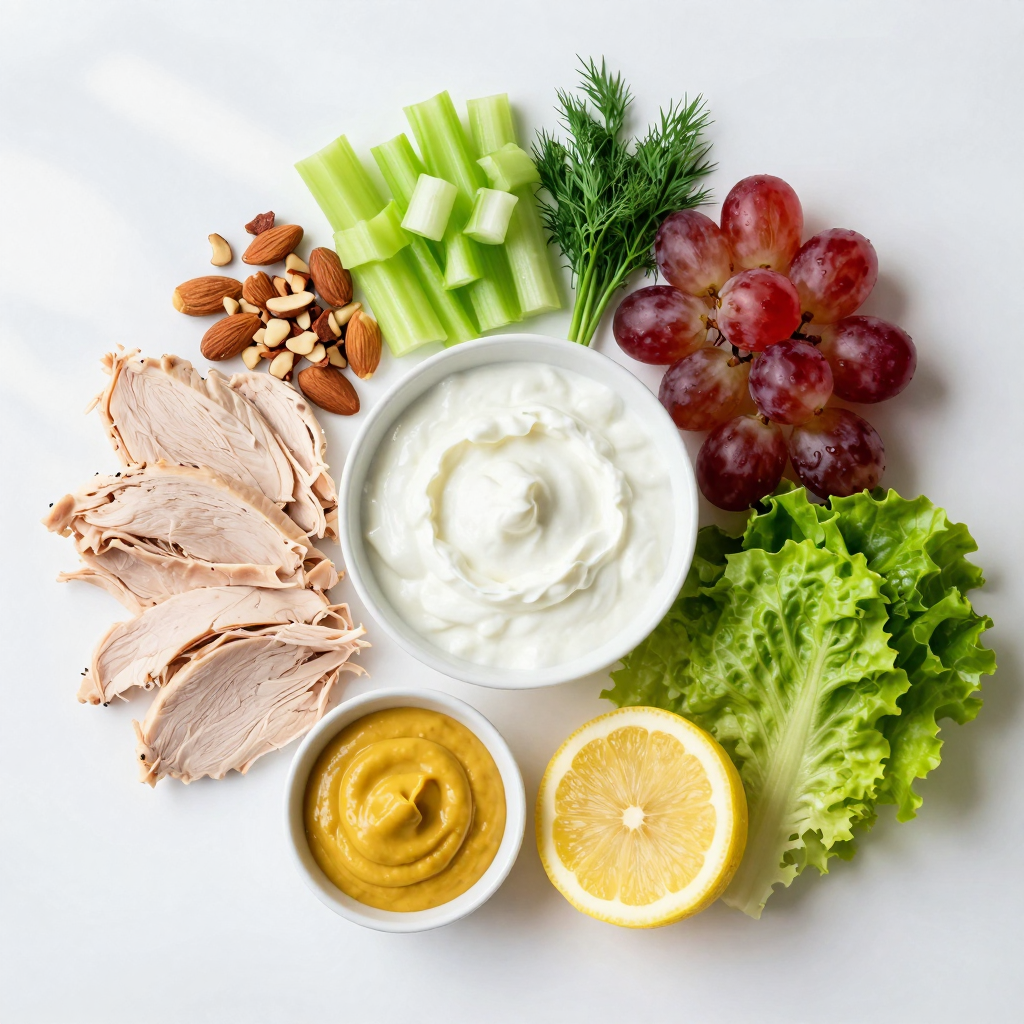
– 2 cups cooked chicken breast, shredded
– 1 cup plain Greek yogurt
– 1/4 cup celery, finely chopped
– 1/4 cup red grapes, halved
Additional Flavors and Textures
– 1/4 cup almonds, chopped
– 2 tablespoons fresh dill, chopped
– 1 tablespoon Dijon mustard
– 1 tablespoon lemon juice
Seasoning and Wrap Base
– Salt and pepper to taste
– 1 head of lettuce (romaine or butter lettuce)
When making Greek yogurt chicken salad lettuce wraps, focus on fresh and high-quality ingredients. Start with the chicken. Cooked chicken breast gives a great base. I shred it into bite-sized pieces.
Next, I mix in Greek yogurt. It makes the salad creamy without extra fat. The yogurt adds protein, too. I add finely chopped celery for crunch. It brings a fresh taste and brightens the dish.
Red grapes bring sweetness. Halving them helps blend their flavor into the salad.
For an extra crunch, I add chopped almonds. They also enhance the flavor profile. Fresh dill adds a pop of brightness and a hint of earthiness.
A touch of Dijon mustard and lemon juice adds zing. They balance the flavors well.
Finally, season with salt and pepper. Taste as you go.
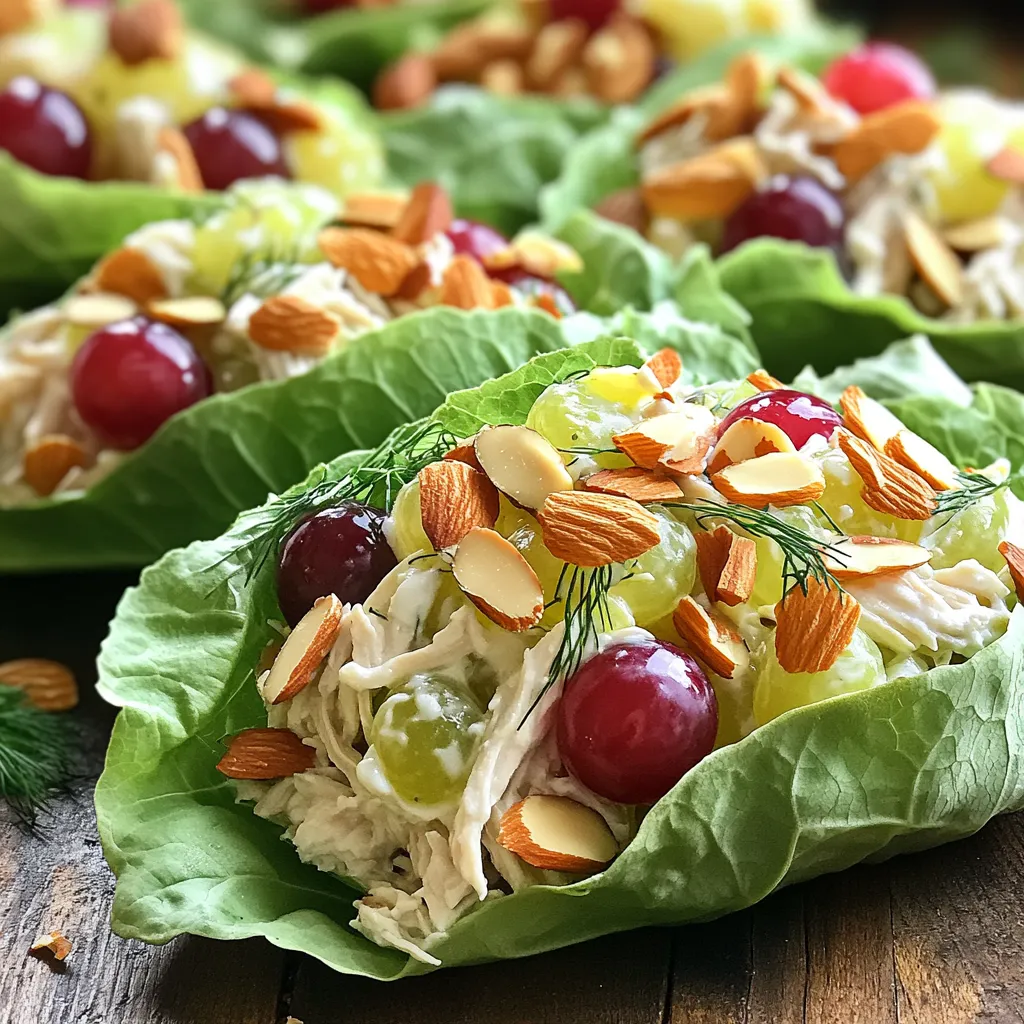
Don’t forget the lettuce! Romaine or butter lettuce works best. The leaves are sturdy enough to hold the filling. They also add a crisp texture.
These ingredients combine to make a light, tasty meal. You can serve them right away or chill them for a refreshing treat.
Step-by-Step Instructions
Preparing the Chicken Salad Mixture
To start, take a large mixing bowl. Add 2 cups of shredded chicken breast and 1 cup of plain Greek yogurt. Mix them well until the chicken is fully coated in yogurt. This gives the salad a creamy base. Next, it’s time to add some crunch and sweetness. Stir in 1/4 cup of finely chopped celery and 1/4 cup of halved red grapes. Then, toss in 1/4 cup of chopped almonds for added texture. Finally, add 2 tablespoons of fresh dill, 1 tablespoon of Dijon mustard, and 1 tablespoon of lemon juice. This blend of flavors brightens the dish.
Finalizing the Salad
Now it’s time to season. Sprinkle in salt and pepper to taste. Mix everything well until it is fully combined. The salad should be creamy with a hint of tartness from the lemon. Take a small taste and adjust the seasoning if needed. If you want a little more zest, add more lemon juice or mustard.
Assembling the Lettuce Wraps
Grab a head of lettuce, either romaine or butter lettuce works great. Carefully separate the leaves. Now, take a spoon and scoop out a generous amount of your chicken salad mixture. Place it in the center of a lettuce leaf. Fold the sides of the lettuce over the filling to create a wrap. Make sure to secure it well so it holds together. Repeat this with the remaining leaves and chicken salad. Serve them right away for the best taste, or chill them for a refreshing bite later. Enjoy your Greek yogurt chicken salad lettuce wraps!
Pro Tips
- Use Rotisserie Chicken: For a quicker option, use store-bought rotisserie chicken to save time on cooking and shredding.
- Add More Crunch: Include additional crunchy vegetables like bell peppers or cucumbers for added texture and flavor.
- Experiment with Herbs: Feel free to substitute fresh dill with other herbs like parsley or basil for a different flavor profile.
- Chill Before Serving: Allow the chicken salad to chill in the refrigerator for about an hour before serving to enhance the flavors.
Tips & Tricks
Storage Tips
To store leftovers, place the chicken salad in an airtight container. This keeps it fresh. You can keep it in the fridge for up to three days. If you have leftovers in the lettuce wraps, eat them within a day for best taste.
You don’t need to reheat this chicken salad. It is best served cold. However, if you want warm chicken, heat it in a pan over low heat until warm.
Serving Suggestions
For a complete meal, serve these wraps with a side of fresh fruit. Sliced apples or a fruit salad work well. You can also add a small bowl of soup for a cozy touch.
These wraps are great as a snack or light lunch. They are easy to pack for picnics or lunch at work. Just keep the chicken salad and lettuce separate until you are ready to eat.
Ingredient Substitute Suggestions
If you want a healthier alternative to Greek yogurt, use low-fat yogurt. You can also try cottage cheese for a different taste.
For a vegan option, replace the chicken with chickpeas or tofu. Use a dairy-free yogurt made from nuts or coconut. This way, you can enjoy the wraps while keeping it plant-based.
Variations
Flavor Profile Variations
You can change the taste of your chicken salad with fun ingredients. Try adding different fruits. Apples add crunch and sweetness. Raisins bring a chewy texture. You can also use fresh herbs. If you want, swap the dill for basil or parsley. Both herbs add a fresh twist.
Protein Options
Want to switch up the protein? You can use turkey instead of chicken. Shredded turkey works just as well. If you prefer a plant-based choice, try tofu. Crumbled tofu soaks up flavors nicely. You can also add beans or chickpeas to make it vegetarian. Both options boost protein and add fiber.
Dressing Alternatives
You can mix up the dressing, too. Try blending avocado for a creamy base. It adds healthy fats and a rich texture. You can also play with mustards or vinegars. Different mustards can change the flavor profile. A splash of balsamic vinegar adds a nice tang. Each dressing option gives your wraps a unique taste.
Nutritional Information
Nutritional Breakdown
Each serving of Greek yogurt chicken salad lettuce wraps contains about:
– Calories: 290
– Protein: 30 grams
– Fats: 10 grams
– Carbohydrates: 20 grams
This dish packs a punch with lean protein from chicken and healthy fats from yogurt and almonds.
Health Benefits of Ingredients
Greek yogurt is a star in this dish. It is high in protein and calcium. Protein helps you feel full longer. Calcium supports strong bones and teeth.
The salad add-ins also offer benefits:
– Celery: Low in calories and high in water. It helps keep you hydrated.
– Red grapes: These add natural sweetness and are rich in antioxidants.
– Almonds: They provide healthy fats and vitamin E, which boosts skin health.
– Dill: This herb has anti-inflammatory properties and adds flavor without extra calories.
Portion Control Tips
Managing your serving sizes is key for any diet plan. Each lettuce wrap can be a single serving. Aim for one to two wraps per meal based on your hunger level.
Balance is important in meal prep. Pair these wraps with a side of fruit or a small salad to round out your meal. This keeps your plate colorful and nutritious.
FAQs
How long can the chicken salad be stored in the fridge?
You can keep Greek yogurt chicken salad in the fridge for up to three days. Make sure to store it in an airtight container. The flavors will blend nicely, making it even tastier. However, lettuce wraps should be eaten fresh. The lettuce can wilt if stored too long.
Can I make Greek yogurt chicken salad ahead of time?
Yes, you can make this chicken salad ahead of time. It’s perfect for meal prep! Just mix all your ingredients and store them in the fridge. You can prepare the chicken salad up to two days in advance. When you’re ready to eat, scoop it into fresh lettuce leaves. This way, the wraps stay crisp and tasty.
What lettuce types work best for wraps?
The best lettuce types for wraps are romaine and butter lettuce. Romaine has a nice crunch and holds the filling well. Butter lettuce is softer and provides a tender bite. Both types add freshness to your meal. You can also try green leaf or iceberg lettuce for different textures.
This chicken salad wraps recipe is easy and tasty. You combine cooked chicken, Greek yogurt, and fresh ingredients for a healthy meal. The tips on serving and storing help keep your meal fresh. You can change ingredients to fit your taste and needs, making it fun to create new flavors.
Remember, this dish is simple to prep and quick to enjoy. Whether you want a snack or a light lunch, these wraps are a great choice for everyone. Enjoy making your own version!


