
If you crave comfort food but want a healthier twist, Greek Yogurt Mac and Cheese is for you! This creamy dish combines smooth cheeses with nutrient-rich Greek yogurt, making it a perfect guilt-free treat. I’ll guide you through easy steps to prepare this indulgent meal. Say goodbye to heavy sauces and hello to a delicious favorite that’s both satisfying and nourishing. Ready to dive in? Let’s get cooking!
Why I Love This Recipe
- Comforting Creaminess: This mac and cheese has a rich, creamy texture thanks to the combination of Greek yogurt and cheese, making it the ultimate comfort food.
- Healthier Twist: Using Greek yogurt adds protein and creaminess without the extra calories of heavy cream, making this a guilt-free indulgence.
- Easy to Customize: You can easily add your favorite vegetables or proteins to this dish, making it versatile for any meal.
- Perfect for Sharing: This recipe serves 4-6 people, making it an ideal choice for family dinners or gatherings.
Ingredients
To make Greek Yogurt Mac and Cheese, you need simple and tasty ingredients. Here’s what you will need:
– 2 cups elbow macaroni
– 1 tablespoon olive oil
– 2 cloves garlic, minced
– 2 tablespoons all-purpose flour
– 2 cups milk (whole or low-fat)
– 1 cup Greek yogurt (plain)
– 2 cups sharp cheddar cheese, grated
– 1 cup mozzarella cheese, grated
– 1 teaspoon Dijon mustard
– Salt and pepper to taste
– ½ teaspoon smoked paprika (optional)
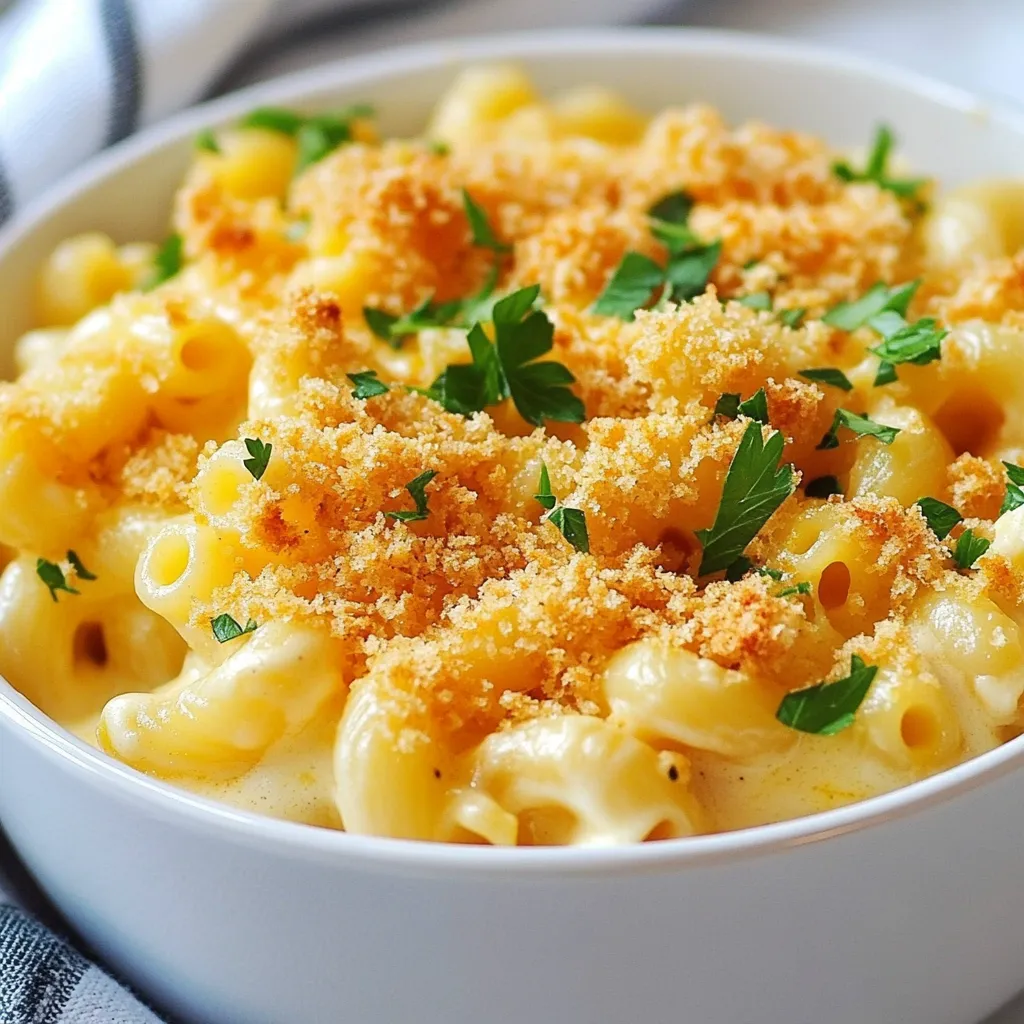
– ⅓ cup breadcrumbs (for topping)
– Fresh parsley, chopped (for garnish)
Each ingredient plays a big role in creating this creamy dish. The elbow macaroni serves as the base and gives that classic shape. Olive oil adds flavor, and garlic gives a nice aroma. Flour thickens the sauce, while milk makes it creamy. Greek yogurt adds tanginess and creaminess. Sharp cheddar and mozzarella bring rich flavors and melt beautifully. Dijon mustard adds a hint of zest, while smoked paprika enhances the taste. Finally, breadcrumbs create a crunchy topping, and parsley adds freshness.
These ingredients blend together to create a comforting meal that is both creamy and delicious.

Step-by-Step Instructions
Cooking the Pasta
Boil a large pot of water. Add a bit of salt to it. When the water bubbles, add 2 cups of elbow macaroni. Cook for 8-10 minutes until it is al dente. Drain the pasta and set it aside for later.
Making the Roux
In a large saucepan, heat 1 tablespoon of olive oil over medium heat. Add 2 cloves of minced garlic. Sauté it for about one minute until it smells nice. Next, stir in 2 tablespoons of all-purpose flour. Cook this for another minute until it turns golden brown.
Adding Milk and Cheese
Whisk in 2 cups of milk slowly. Stir until the mix is smooth. Bring it to a simmer and let it cook for 2-3 minutes. It will thicken a bit. Next, reduce the heat. Stir in 1 cup of Greek yogurt, 2 cups of sharp cheddar cheese, and 1 cup of mozzarella cheese. Add 1 teaspoon of Dijon mustard, a pinch of salt, and pepper. Mix until all the cheese melts and the sauce is creamy.
Combining Pasta with Sauce
Now, add the cooked macaroni to the cheese sauce. Stir well to coat all the pasta with the creamy sauce.
Preparing for Baking
Preheat the oven to 350°F (175°C). Transfer the mac and cheese mix into a greased baking dish. Spread it out evenly.
Adding Breadcrumb Topping and Baking
In a small bowl, mix ⅓ cup of breadcrumbs with a drizzle of olive oil and a pinch of salt. Sprinkle this mixture over the mac and cheese in the baking dish. Bake for 20-25 minutes. You want it to be bubbly and golden brown on top.
Tips & Tricks
Perfecting the Sauce
To achieve the right creaminess in your mac and cheese, focus on the balance of ingredients. Start by cooking the roux well. This helps thicken the sauce without lumps. When you add the milk, whisk it in slowly. This makes for a smooth blend.
Using Greek yogurt adds a creamy texture and tangy flavor. Mix it in on low heat to keep it smooth. Don’t rush this step. The cheese should melt slowly for the best results.
Health Benefits
Greek yogurt is a healthier choice. It has more protein than regular yogurt. This helps make your dish more filling. Plus, it’s lower in fat, which is great for those watching their diet.
Greek yogurt also contains probiotics. These are good for your gut health. This means your comfort food can actually support your wellness. Who knew mac and cheese could be good for you?
Serving Suggestions
For side dishes, consider a fresh salad. A simple green salad pairs well and adds crunch. You might also try roasted vegetables on the side. They bring color and flavor.
For toppings, try adding extra cheese on top before baking. Or sprinkle some crispy bacon for added flavor. Fresh herbs, like parsley, not only look nice but also add freshness. Enjoy your creamy comfort dish in style!
Pro Tips
- Use High-Quality Cheese: Opt for freshly grated cheese rather than pre-packaged varieties for a creamier texture and better flavor.
- Experiment with Cheeses: Feel free to mix different types of cheese like gouda or fontina for a unique twist on the classic flavor.
- Add Vegetables: Incorporate steamed broccoli, spinach, or roasted red peppers to enhance nutrition and add color to your dish.
- Make It Ahead: Prepare the mac and cheese in advance and store it in the fridge. Just bake it when you’re ready to serve!
Variations
Cheese Options
You can mix and match cheeses for your mac and cheese. Try using Gouda, Parmesan, or a blend of all three. Each cheese adds a unique taste. For a sharper flavor, use aged cheddar. If you prefer a milder cheese, stick with mozzarella or Havarti. This flexibility lets you create a dish that suits your taste. You can even experiment with vegan cheese for a dairy-free version.
Flavor Enhancements
Spices and vegetables elevate your dish. Add garlic powder or onion powder for extra flavor. If you love a kick, sprinkle in some cayenne pepper or chili flakes. For a fresh taste, toss in chopped spinach or roasted red peppers. These additions not only enhance the taste but also add color. You can also mix in herbs like thyme or basil for a fresh twist. This way, each bite is a new experience.
Alternative Pasta Types
You can choose different pasta shapes for this dish. Gluten-free pasta works well if you need a gluten-free option. Whole grain pasta adds fiber and a nutty flavor. You can also use penne or shells for a fun texture. Each type of pasta changes the way the sauce coats it. This lets you customize your meal to your diet and preferences. Try different shapes to see which one you like best.
Storage Info
Refrigeration
To keep your Greek yogurt mac and cheese fresh, store leftovers in an airtight container. Make sure to let it cool to room temperature first. Refrigerate within two hours of cooking. It stays good for up to three days. When you’re ready to eat, check for any signs of spoilage, like an off smell or unusual texture.
Freezing
Yes, you can freeze Greek yogurt mac and cheese! To do this, let it cool completely first. Then, transfer it into a freezer-safe container. Leave some space at the top to allow for expansion. It can last up to three months in the freezer. When you want to enjoy it again, just thaw it in the fridge overnight.
Reheating
The best way to reheat Greek yogurt mac and cheese is in the oven. Preheat your oven to 350°F (175°C). Place the mac and cheese in an oven-safe dish and cover it with foil. Heat for about 20 minutes, or until hot throughout. You can also use a microwave, but be careful not to overheat. Stir every minute until warmed.
FAQs
Can I use low-fat Greek yogurt?
Yes, you can use low-fat Greek yogurt in this dish. It will change the texture a bit. Low-fat yogurt may not be as creamy as whole-fat yogurt. The taste will still be good, but it may feel thinner. If you want a richer flavor, stick with whole-fat Greek yogurt.
Is this recipe suitable for kids?
Absolutely! This recipe is very kid-friendly. Kids love mac and cheese, and this version packs in extra protein and flavor. The creamy sauce is smooth and tasty. You can even sneak in some veggies if your kids are open to it. Broccoli or peas work great in this dish!
Can I make this dish ahead of time?
Yes, this dish is great for making ahead. You can prepare it and store it in the fridge for a day. Just follow the steps up to baking. When ready to eat, preheat the oven and bake it. This saves time on busy nights. If you want to freeze it, let it cool first. Then, wrap it well and store it for up to three months.
In this blog post, we explored making a tasty Greek yogurt mac and cheese. We discussed the ingredients needed, from elbow macaroni to sharp cheddar. I shared step-by-step instructions so you can cook with ease. You learned useful tips to enhance flavor and health. Plus, I offered variations to keep things fun. Storing and reheating leftovers was also covered. Now, you have everything you need to create this dish for your family. Enjoy cooking this creamy, nutritious mea


