Grilled Corn on the Cob Irresistible Summer Recipe

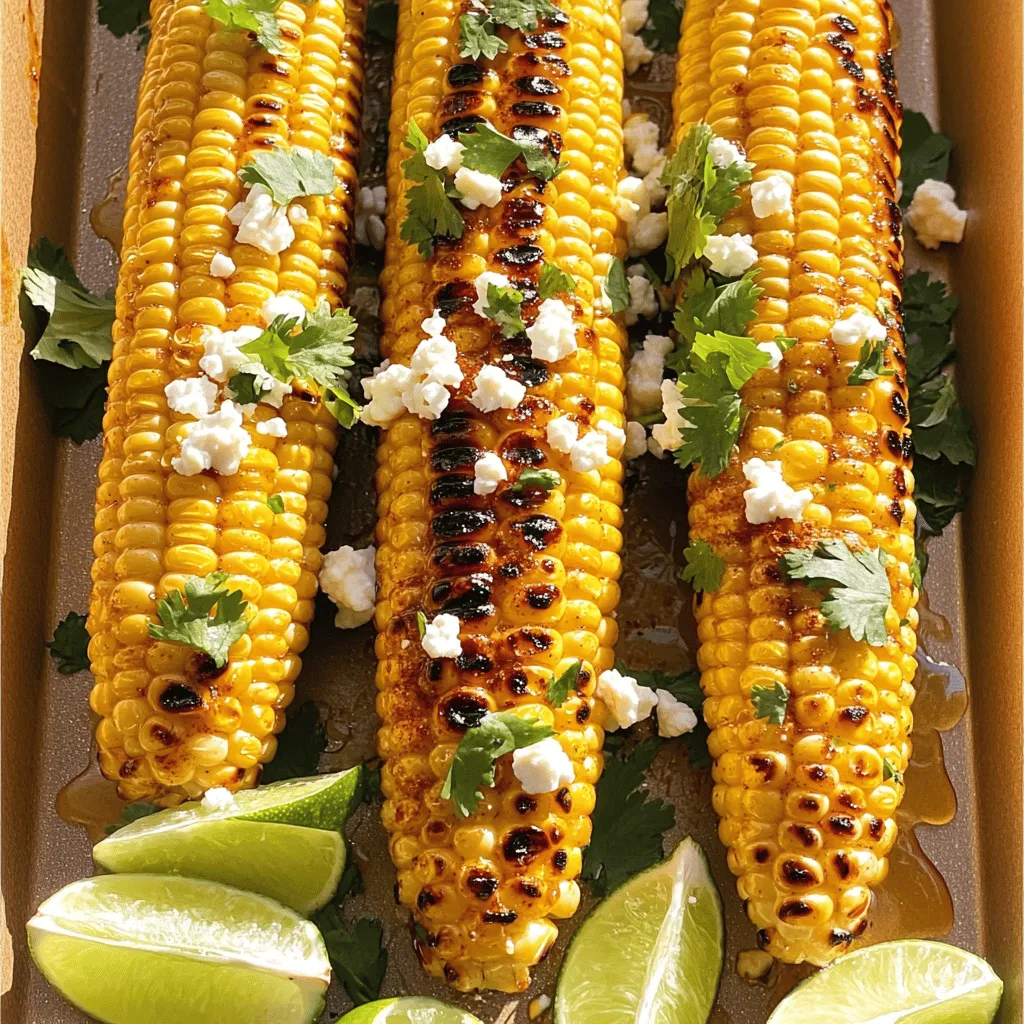
Summer isn’t complete without the sweet taste of grilled corn on the cob. This simple recipe lets you enjoy fresh, juicy corn with a perfect char. Whether you’re having a cookout or a picnic, it’s easy to make and packed with flavor. I’ll guide you through the steps, tips, and tasty toppings to make your corn the star of the meal. Let’s get grilling!
Why I Love This Recipe
- Freshness: This recipe highlights the natural sweetness of fresh corn, making it a perfect summer dish.
- Flavorful Marinade: The combination of smoked paprika and chili powder adds a delightful smoky and spicy kick.
- Customizable: You can easily adjust the toppings with different cheeses or herbs to suit your taste.
- Quick and Easy: This recipe is simple to execute and takes just 25 minutes from start to finish.
Ingredients
Fresh Corn Requirements
To make great grilled corn, start with fresh corn. Look for ears that have bright green husks. The kernels should look plump and juicy. You want corn that is sweet and tender. Four ears of corn work well for this recipe.
Essential Marinade Ingredients
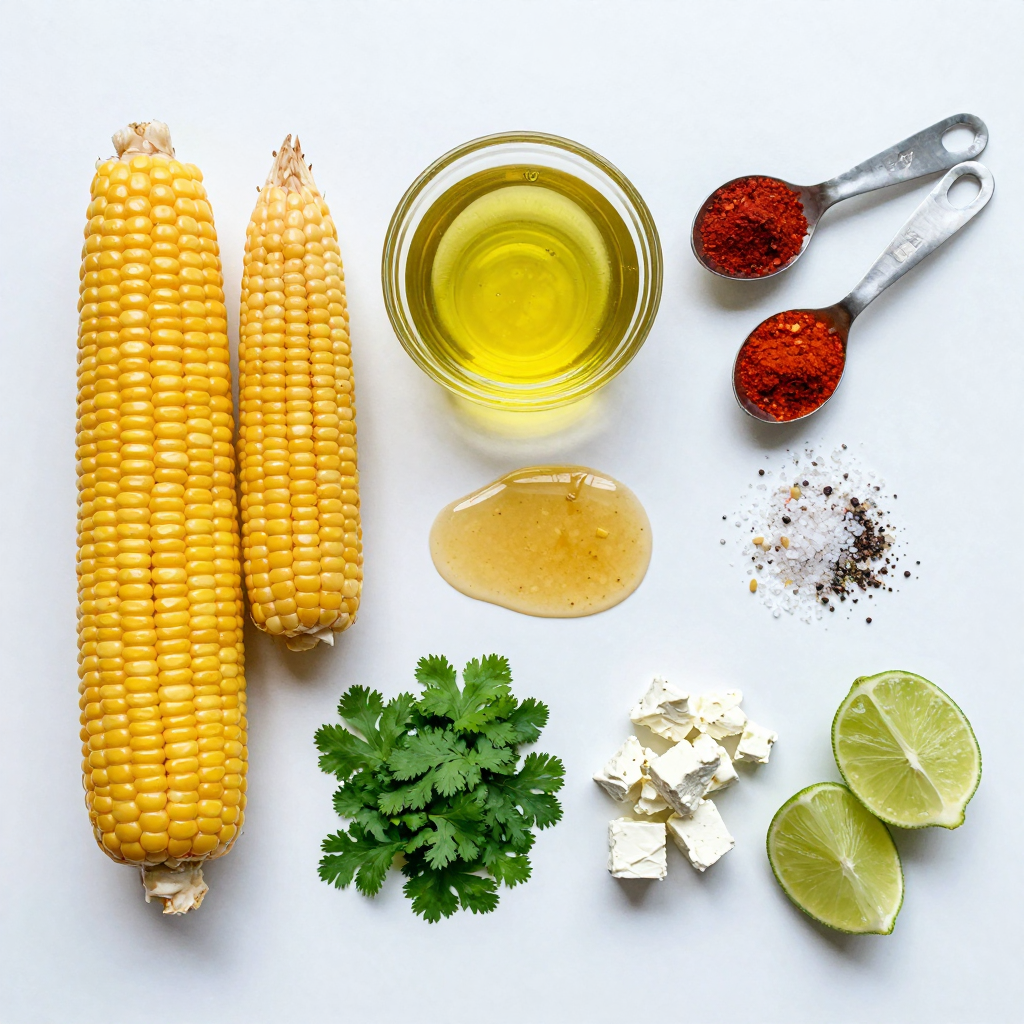
For the best flavor, you need a tasty marinade. Here are the key ingredients:
- 2 tablespoons olive oil
- 1 teaspoon smoked paprika
- 1 teaspoon chili powder
- 1 tablespoon honey
- 1/2 teaspoon salt
- 1/4 teaspoon black pepper
Mix these ingredients together in a bowl. This mixture will give your corn a sweet and spicy kick.
Optional Toppings and Garnishes
Toppings can elevate your corn to new heights. Some fun options include:
- 1/4 cup crumbled feta cheese (optional)
- Fresh cilantro, chopped (for garnish)
- Lime wedges (for serving)
These toppings add creaminess and freshness. They also enhance the flavor of the grilled corn.

Step-by-Step Instructions
Prepping the Corn for Grilling
Start by husking the corn. Remove all the green leaves and silk. Make sure the corn is clean. This helps the marinade stick better. Rinse the corn under cool water to remove any dirt. Pat the corn dry with a clean towel. You want the corn dry so the marinade works well.
Creating the Marinade
In a large bowl, mix together the olive oil, smoked paprika, and chili powder. Add honey, salt, and black pepper. Stir this mix well until it blends into a smooth sauce. This will give the corn a sweet and spicy flavor. Brush the marinade all over the corn. Make sure every part is coated. This step is key for delicious grilled corn.
Grilling Techniques and Timing
Preheat your grill to medium-high heat. Place the marinated corn directly on the grill. Cook for 10 to 15 minutes. Turn the corn every few minutes. This helps it cook evenly and get nice grill marks. Look for tender kernels and a bit of char. When done, take the corn off the grill. Let it cool a bit before serving. You can add crumbled feta cheese for a tasty twist. Enjoy your sweet and spicy grilled corn on the cob!
Pro Tips
- Choose Fresh Corn: The fresher the corn, the sweeter and more flavorful it will be. Look for bright green husks and plump kernels.
- Marinate Longer: For an even deeper flavor, let the corn sit in the marinade for at least 30 minutes before grilling.
- Use Direct Heat: Grilling over direct heat allows for that beautiful char. Keep an eye on the corn to prevent burning.
- Experiment with Toppings: Don’t be afraid to try different toppings like cotija cheese, lime zest, or spicy mayo for added flair.
Tips & Tricks
Best Grilling Temperature
The best grilling temperature for corn is medium-high heat. This means about 400 to 450 degrees Fahrenheit. At this heat, the corn cooks evenly and gets those nice grill marks. If the grill is too hot, the outside can burn before the inside cooks. If it’s too low, the corn can turn mushy.
How to Avoid Burning the Corn
To avoid burning the corn, soak it in water before grilling. Soaking helps keep moisture in. You can soak the corn in water for about 30 minutes. This method also makes the kernels tender. Make sure to turn the corn every few minutes while grilling. This helps it cook evenly and prevents hot spots.
Achieving the Perfect Char
To achieve the perfect char, brush the corn with a marinade. My favorite mix is olive oil, smoked paprika, and chili powder. This adds flavor and helps with browning. Cook the corn for 10 to 15 minutes, turning it regularly. Look for deep brown spots on the kernels. These spots show that they are perfectly charred. Enjoy your sweet and spicy grilled corn on the cob with friends and family.

Variations
Seasoning Alternatives
You can change up the flavors for your grilled corn. Instead of smoked paprika, try using garlic powder or cumin for a new twist. If you love heat, add cayenne pepper to your marinade. For a sweeter taste, consider using brown sugar in place of honey. Mix and match to find your favorite blend!
Different Cheese Options
Cheese adds a creamy taste to grilled corn. Feta cheese is a great choice, but you can also use cotija or Parmesan. Cotija gives a salty flavor, while Parmesan adds a nice sharpness. Crumbled goat cheese can bring a tangy kick. Experiment with different cheeses to find the perfect match!
Themed Toppings for Special Occasions
Get creative with toppings for parties or holidays. For a Mexican fiesta, try adding a drizzle of lime crema and a sprinkle of chili powder. For a barbecue, top with BBQ sauce and shredded cheese. For a summer cookout, try adding fresh herbs like basil or mint. These toppings will wow your guests and make your corn unforgettable!
Storage Info
Storing Leftover Grilled Corn
After you enjoy your grilled corn, you might have some left. Let the corn cool down before storing. Wrap each ear in plastic wrap or foil. Place the wrapped corn in an airtight container. This helps keep the corn fresh for up to three days in the fridge.
Reheating Methods
When you’re ready to eat the leftover corn, it’s easy to reheat. You can use the grill, microwave, or oven. If you choose the grill, preheat it to medium heat. Place the corn on the grill for about five minutes, turning once. For the microwave, put the corn on a plate and cover it with a damp paper towel. Heat for one to two minutes. If you prefer the oven, wrap the corn in foil and bake at 350°F for about ten minutes.
Freezing Grilled Corn for Later Use
Want to save grilled corn for a long time? Freezing is a great option. First, let the corn cool completely. Cut the kernels off the cob, or leave them whole. Place the corn in freezer bags, removing as much air as possible. Seal the bags tightly and label them. You can freeze the corn for up to six months. When you’re ready to use it, just thaw it in the fridge overnight or cook it straight from frozen.
FAQs
How long should I grill corn on the cob?
You should grill corn on the cob for about 10 to 15 minutes. This time allows the kernels to get tender and slightly charred. Turn the corn every few minutes for even cooking. You’ll know it’s ready when you see some nice grill marks and the corn looks bright yellow.
Can I grill corn with the husk on?
Yes, you can grill corn with the husk on. This method keeps the corn moist and adds a unique flavor. Just soak the corn in water for about 30 minutes before grilling. This helps prevent the husks from burning. You can peel back the husk and remove the silk before serving, or leave it on for a rustic look.
What can I serve with grilled corn on the cob?
Grilled corn on the cob pairs well with many dishes. You can serve it with burgers, grilled chicken, or barbecue ribs. It also goes great with salads and dips. For a fun twist, try serving it with lime wedges and crumbled feta cheese. The fresh flavors will enhance your meal.
This blog post covered how to grill corn perfectly, from choosing fresh ingredients to flavorful marinades. We discussed grilling techniques and offered tips to avoid burning the corn. You learned about seasoning variations and how to store leftovers.
Grilled corn can be simple or fancy, based on what you like. Enjoy creating your own versions, and don’t be afraid to experiment. With these steps, your grilled corn will impress everyone at your next meal.

Grilled Corn on the Cob
Ingredients
4 ears of fresh corn, husked
2 tablespoons olive oil
1 teaspoon smoked paprika
1 teaspoon chili powder
1 tablespoon honey
1/2 teaspoon salt
1/4 teaspoon black pepper
1/4 cup crumbled feta cheese (optional)
Fresh cilantro, chopped (for garnish)
Lime wedges (for serving)
Instructions
Preheat the grill to medium-high heat.
In a large bowl, mix together olive oil, smoked paprika, chili powder, honey, salt, and black pepper to create a marinade.
Add the husked corn to the bowl, and brush the marinade all over each ear of corn, ensuring they are well coated.
Place the corn directly on the grill and cook for 10-15 minutes, turning occasionally, until the kernels are tender and charred in spots.
Remove the corn from the grill and allow to cool slightly before handling.
If desired, sprinkle crumbled feta cheese over the grilled corn for a creamy and tangy touch.
Garnish with freshly chopped cilantro and serve with lime wedges on the side for squeezing over the corn.
Prep Time: 10 minutes | Total Time: 25 minutes | Servings: 4

Grilled Corn on the Cob
Ingredients
- 4 ears fresh corn, husked
- 2 tablespoons olive oil
- 1 teaspoon smoked paprika
- 1 teaspoon chili powder
- 1 tablespoon honey
- 0.5 teaspoon salt
- 0.25 teaspoon black pepper
- 0.25 cup crumbled feta cheese (optional)
- 1 bunch fresh cilantro, chopped (for garnish)
- 1 lime wedges (for serving)
Instructions
- Preheat the grill to medium-high heat.
- In a large bowl, mix together olive oil, smoked paprika, chili powder, honey, salt, and black pepper to create a marinade.
- Add the husked corn to the bowl, and brush the marinade all over each ear of corn, ensuring they are well coated.
- Place the corn directly on the grill and cook for 10-15 minutes, turning occasionally, until the kernels are tender and charred in spots.
- Remove the corn from the grill and allow to cool slightly before handling.
- If desired, sprinkle crumbled feta cheese over the grilled corn for a creamy and tangy touch.
- Garnish with freshly chopped cilantro and serve with lime wedges on the side for squeezing over the corn.


![- 2 ripe avocados - 1 cup cherry tomatoes, halved - 1 cup fresh mozzarella balls, drained - 1/4 cup fresh basil leaves, chopped - 2 tablespoons balsamic glaze - 1 tablespoon extra virgin olive oil - Salt and pepper to taste Choosing ripe avocados To pick ripe avocados, look for ones that yield slightly to gentle pressure. They should feel soft but not mushy. Dark green or almost black skin often indicates ripeness. Selecting high-quality mozzarella When picking mozzarella, choose fresh balls packed in water for best taste. They should be creamy and slightly springy to the touch. Avoid dry or crumbly options. Best tomatoes for freshness Select plump cherry tomatoes that shine and feel firm. They should have a sweet smell. Avoid any with wrinkles or blemishes for the freshest results. You need a few tools for this recipe: - A sharp knife - A cutting board - A mixing bowl - A spoon - A serving plate When cutting avocados, safety is key. Always cut away from your body. Make sure you hold the avocado steady. Use a sharp knife to slice easily through the skin. First, cut each avocado in half and remove the pit. If you want more space for stuffing, scoop out a little flesh. Be careful not to break the skin. Next, take your mixing bowl. Combine the halved cherry tomatoes, mozzarella balls, and chopped basil. Now, drizzle the balsamic glaze and olive oil over the mix. Add salt and pepper to taste. Toss everything gently until coated. Then, spoon the mixture into each avocado half. Fill them generously; it makes a nice presentation. For a finishing touch, drizzle a little extra balsamic glaze on top. This adds a nice shine and flavor. To serve, place your stuffed avocados on a colorful plate. This makes the dish pop! For added flair, garnish with extra basil leaves. A sprinkle of cracked black pepper also enhances the look and taste. Enjoy this healthy and flavorful delight! For the full recipe, check out the details above. When making Caprese stuffed avocados, avoid these common mistakes: - Over-mashing the avocado: You want the avocado to be creamy but still chunky. If you mash it too much, the texture will not hold up. - Using unripe ingredients: Always choose ripe avocados and fresh tomatoes. Unripe avocados can ruin the dish. To make your Caprese stuffed avocados even better, try these tips: - Additional spices and herbs: Add a pinch of garlic powder or crushed red pepper for a kick. Fresh oregano can also complement the flavors well. - Variations with cheese types: Instead of mozzarella, try feta or goat cheese for a different flavor profile. Each cheese brings its own texture and taste. Pair your Caprese stuffed avocados with these ideas: - Best pairings as side dishes: Serve with a light salad or crusty bread. These will balance the richness of the avocado. - Ideal occasions for serving: This dish works great for summer picnics, brunches, or casual dinners. The bright colors and fresh flavors make it a showstopper. Remember, you can find the full recipe for Caprese stuffed avocados [here]. {{image_2}} You can change up the cheese or protein in your Caprese stuffed avocados. For cheese, try feta or goat cheese. Both add a nice twist to the dish. If you want extra protein, consider adding grilled chicken or chickpeas. These swaps keep the meal tasty and fun. If you run out of balsamic glaze, you can use a mix of vinegar and honey. This gives you a sweet and tangy flavor. You can also try lemon juice for a fresher taste. These alternatives work well and keep your dish exciting. Making this dish gluten-free is easy. All the ingredients are naturally gluten-free. Just make sure any add-ins you choose are also gluten-free. If you want a vegan version, swap mozzarella for a vegan cheese. You can also use tofu for extra protein. To lower calories, skip the cheese or use less. You can also reduce oil and glaze. This keeps the taste without too many calories. Enjoy your healthy meal without losing flavor. To give your Caprese stuffed avocados an Italian flair, add sun-dried tomatoes or prosciutto. These ingredients bring rich flavors that fit perfectly with the original recipe. For a Mediterranean twist, add olives or artichokes. These ingredients make your dish even more vibrant. You can also use herbs like oregano or thyme for added depth. Each variation keeps your meal fresh and packed with flavor. For the full recipe, check out Caprese Stuffed Avocados. To store leftover stuffed avocados, place them in an airtight container. This keeps them fresh longer. It's best to eat them within a day. If you have extra filling, store it in a small bowl. Cover it tightly with plastic wrap. This keeps the mixture fresh for a few days. For the best taste, eat the filling within three days. Can you freeze stuffed avocados? I recommend not freezing them. The texture of the avocado changes when frozen. However, you can freeze the filling. To do this, place it in a freezer-safe bag. Squeeze out the air before sealing. It can last up to three months in the freezer. When you're ready to eat, thaw it in the fridge overnight. How long can leftovers last? Stuffed avocados are best enjoyed fresh. If stored properly, they last about a day. The filling can last longer, about three days in the fridge. Look for signs of spoilage. If you see mold or an off smell, discard it. Fresh ingredients like tomatoes can spoil quickly, so check them often. To find the best avocados, look for a few signs. First, gently squeeze the avocado in your palm. It should feel slightly soft but not mushy. Next, check the skin color. A dark green or black skin often means it's ripe. Finally, look at the stem. If it comes off easily and reveals green underneath, the avocado is ready. Yes, you can prepare some parts in advance. Chop the tomatoes and basil and mix them with mozzarella. Store this mix in the fridge. Cut the avocados just before serving. This keeps them fresh and tasty. You can also make the balsamic glaze in advance and store it in a jar. To stop avocados from turning brown, use lemon or lime juice. Brush the juice on the cut sides. If your avocado is already brown, you can scoop out the brown part. The green flesh underneath is still good to eat. Store any leftovers in an airtight container to slow down oxidation. This blog post covered a delicious stuffed avocado recipe, highlighting key ingredients, tips for freshness, and easy steps. I shared tricks to enhance flavor, avoid common mistakes, and offered variations for everyone. Remember, using ripe ingredients makes a big difference. You can also adjust the recipe to fit your diet or taste. Enjoy experimenting with this fresh and healthy dish in your kitchen! Embrace the joy of cooking while making something tasty and fun. Happy cooking!](https://dailydishlab.com/wp-content/uploads/2025/06/7cc9200a-b80e-4e13-a62f-626088c82c0b-768x768.webp)

