Honey Garlic Chicken Stir-Fry Flavorful Quick Meal

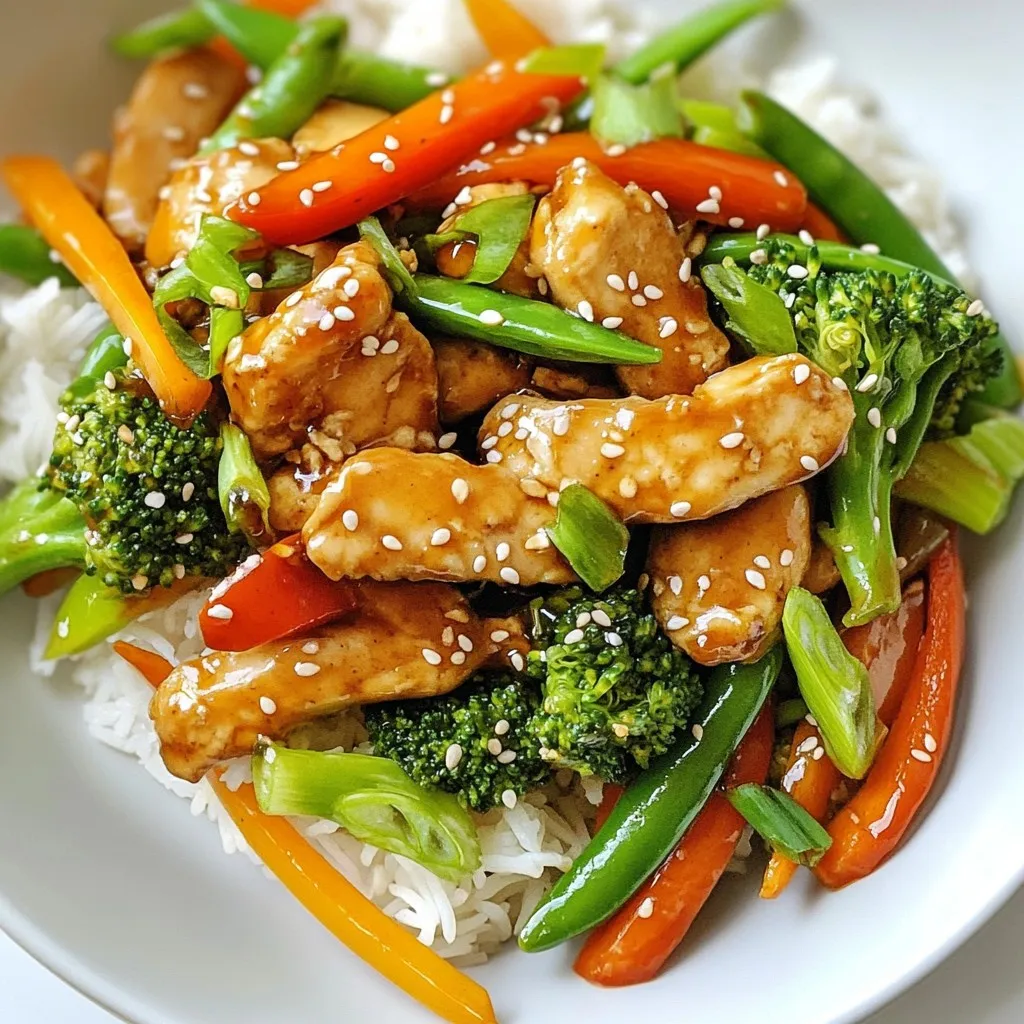
Are you ready for a meal that’s quick, tasty, and packed with flavor? This Honey Garlic Chicken Stir-Fry is the answer! With juicy chicken, sweet honey, and crunchy veggies, you’ll have a dish that delights. In just a few simple steps, you can whip up a dinner that’s sure to impress. Let’s dive into the ingredients and cooking methods that will make your next meal a hit!
Why I Love This Recipe
- Quick and Easy: This honey garlic chicken stir-fry can be prepared in just 20 minutes, making it perfect for busy weeknights.
- Flavorful Sauce: The combination of honey, soy sauce, garlic, and ginger creates a deliciously sweet and savory sauce that enhances the dish.
- Colorful Veggies: With vibrant broccoli, bell peppers, carrots, and snap peas, this recipe is not only tasty but also visually appealing.
- Versatile Ingredients: You can easily swap the chicken for tofu or shrimp and use any vegetables you have on hand, making it adaptable to your preferences.
Ingredients for Honey Garlic Chicken Stir-Fry
Essential Ingredients List
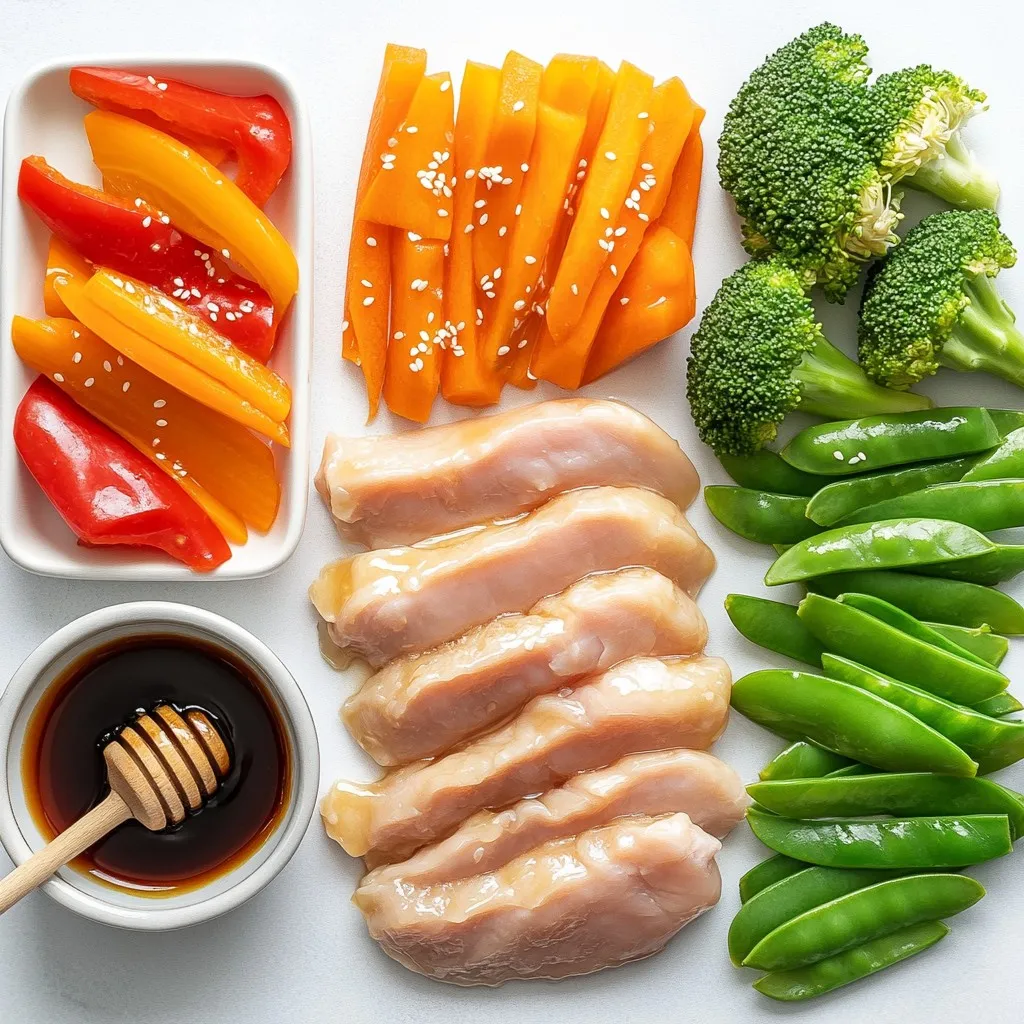
For a delicious Honey Garlic Chicken Stir-Fry, you need a few key items:
- 1 lb boneless chicken breasts, sliced into thin strips
- 2 tablespoons honey
- 3 tablespoons soy sauce (low-sodium preferred)
- 2 cloves garlic, minced
- 1 tablespoon fresh ginger, minced
- 2 tablespoons vegetable oil (or sesame oil for extra flavor)
- 1 cup broccoli florets
- 1 red bell pepper, sliced
- 1 carrot, julienned
- ½ cup snap peas
- Salt and pepper to taste
These ingredients work together to create a sweet and savory dish that’s quick and easy to make.
Optional Garnishes
To make your stir-fry even more appealing, consider these garnishes:
- 2 green onions, sliced
- Sesame seeds
These add a nice touch of color and extra flavor to your meal.
Recommended Cooking Oils
Choosing the right oil can enhance your dish. You can use:
- Vegetable oil: Great for a neutral flavor.
- Sesame oil: Adds a rich, nutty taste.
Using sesame oil can elevate the overall flavor of your stir-fry, giving it that authentic taste.

Step-by-Step Instructions
Preparing the Sauce
To start, grab a small bowl. Mix together 2 tablespoons of honey, 3 tablespoons of soy sauce, 2 minced cloves of garlic, and 1 tablespoon of minced ginger. This sauce brings the sweet and savory flavors together. Set it aside for later.
Cooking the Chicken
Next, heat 2 tablespoons of vegetable oil in a large skillet or wok over medium-high heat. Once the oil is hot, add 1 pound of sliced chicken breasts. Stir-fry the chicken for about 5 minutes. You want it to be browned and fully cooked. Once done, take the chicken out and set it aside.
Stir-Frying the Vegetables
In the same skillet, add a bit more oil if needed. Toss in 1 cup of broccoli florets, 1 sliced red bell pepper, 1 julienned carrot, and ½ cup of snap peas. Stir-fry these for about 3-4 minutes. Cook until the vegetables are tender-crisp. This keeps them bright and crunchy.
Combining Ingredients
Now, return the cooked chicken to the skillet. Pour the honey garlic sauce over the chicken and vegetables. Stir well to coat everything evenly in that tasty sauce. This step blends all the flavors.
Final Adjustments
Cook for an additional 2-3 minutes while stirring occasionally. You want the sauce to thicken slightly. Finally, season with salt and pepper to your taste. Remove from heat, and add some sliced green onions and sesame seeds on top for garnish.
Tips & Tricks
Perfecting the Chicken
To ensure your chicken cooks evenly, slice it thinly. Thin strips cook fast and stay juicy. Heat your skillet well before adding the chicken. This helps create a nice sear. Stir-fry the chicken for about five minutes, until it turns golden brown. Remove the chicken once it’s cooked through. This keeps it tender and avoids overcooking.
Vegetable Cooking Tips
For the veggies, keep them fresh and bright. Cut them into uniform pieces for even cooking. Start with the broccoli and bell pepper, as they take longer to cook. Stir-fry them for about three to four minutes. They should be tender-crisp, meaning they still have a bit of bite. Add the carrots and snap peas later, as they cook faster. This way, your stir-fry will have a great mix of textures.
Sauce Variations
You can easily adjust the sauce to fit your taste. If you like it sweeter, add more honey. For a spicy kick, try adding red pepper flakes or sriracha. You can also switch the soy sauce for teriyaki sauce for a different flavor. Experiment with these options to find what you love best!
Pro Tips
- Marinate for More Flavor: Allow the chicken to marinate in the honey garlic sauce for at least 30 minutes before cooking to enhance the flavor.
- Veggie Variations: Feel free to swap the vegetables for your favorites; bell peppers, zucchini, or asparagus all work well in this stir-fry.
- Thicken the Sauce: If you prefer a thicker sauce, mix a teaspoon of cornstarch with a tablespoon of water and add it to the sauce while cooking.
- Serve with Rice: This stir-fry pairs beautifully with steamed rice or quinoa for a complete meal.

Variations
Alternative Proteins
You can swap chicken for other proteins. Shrimp adds a nice seafood touch. Tofu works great for a vegetarian meal. Beef gives a hearty flavor. Just remember to adjust cooking time. Shrimp cooks quickly, while beef may need more time.
Vegetable Substitutions
Feel free to mix in different vegetables. Snap peas can be replaced with green beans. Zucchini or mushrooms add fun textures. Cauliflower is a great, low-carb choice. Use what you have on hand. This keeps the dish fresh and exciting.
Dietary Adaptations
If you need gluten-free options, use tamari instead of soy sauce. For a low-carb meal, skip the carrots. Add more broccoli and bell peppers. This way, you enjoy the same great taste without extra carbs. Adjust the recipe to fit your needs.
Storage Info
Storing Leftovers
To keep your Honey Garlic Chicken Stir-Fry fresh, store leftovers in an airtight container. Place the container in the fridge. It’s best to eat leftovers within three days for the best taste. Make sure the dish cools down before sealing it up. This helps keep moisture in check.
Reheating Instructions
When reheating, use a skillet or microwave. If using the skillet, add a splash of water or broth. Heat it over low to medium heat, stirring often. This helps the dish stay juicy and prevents it from drying out. In the microwave, cover the dish with a lid or wrap to trap steam. Heat in short bursts, stirring in between.
Freezing Guidelines
To freeze Honey Garlic Chicken Stir-Fry, let it cool completely. Place it in a freezer-safe container. Make sure to leave some space at the top for expansion. It can last up to three months in the freezer. To thaw, move it to the fridge overnight before reheating. This keeps the flavor and texture intact.
FAQs
Can I use frozen chicken or vegetables?
Yes, you can use frozen chicken or vegetables. Here are some best practices:
- Thaw chicken first: For even cooking, thaw the chicken in the fridge overnight.
- Use directly from the freezer: You can add frozen veggies straight into the hot pan. They will cook well if you stir them nicely.
- Increase cooking time: Frozen chicken may need a little extra time to cook through. Make sure it reaches 165°F (75°C) for safety.
Using frozen ingredients can save time and reduce waste. Just be sure to keep an eye on the cooking time.
What can I serve with Honey Garlic Chicken Stir-Fry?
Honey garlic chicken stir-fry goes well with several side dishes:
- Steamed rice: White or brown rice pairs perfectly with the sweet sauce.
- Quinoa: A healthy option that adds a nutty flavor.
- Noodles: Stir-fried or plain noodles are great for soaking up the sauce.
- Salad: A fresh green salad can balance the meal.
These options add variety and make your meal more filling.
How do I adjust the spice level?
You can easily adjust the spice level of your stir-fry. Here are some tips:
- To make it spicier: Add red pepper flakes or a splash of hot sauce. Start with a little, and taste as you go.
- To make it milder: Use less garlic and avoid adding spicy ingredients. You can also add more honey to balance the heat.
These simple changes allow you to create a dish that suits your taste buds perfectly.
You learned how to make Honey Garlic Chicken Stir-Fry, from the sauce to storage. I shared tips on perfecting the chicken and the best veggies to use. You can also explore different proteins and ways to adapt this dish for your needs. With these insights, you can make a tasty meal that you will love. Enjoy cooking and tasting all the great flavors you creat

Honey Garlic Chicken Stir-Fry
Ingredients
- 1 lb boneless chicken breasts, sliced into thin strips
- 2 tablespoons honey
- 3 tablespoons soy sauce (low-sodium preferred)
- 2 cloves garlic, minced
- 1 tablespoon fresh ginger, minced
- 2 tablespoons vegetable oil (or sesame oil for extra flavor)
- 1 cup broccoli florets
- 1 red bell pepper sliced
- 1 carrot julienned
- 0.5 cup snap peas
- 2 green onions sliced (for garnish)
- 1 tablespoon sesame seeds (for garnish)
- Salt and pepper to taste
Instructions
- In a small bowl, mix together the honey, soy sauce, minced garlic, and ginger. Set aside.
- Heat 1 tablespoon of vegetable oil in a large skillet or wok over medium-high heat. Once hot, add the sliced chicken and stir-fry for about 5 minutes, or until browned and fully cooked. Remove the chicken from the skillet and set aside.
- In the same skillet, add the remaining tablespoon of oil. Add the broccoli, red bell pepper, carrot, and snap peas. Stir-fry for about 3-4 minutes until the vegetables are tender-crisp.
- Return the chicken to the skillet. Pour the honey garlic sauce over the chicken and vegetables. Stir well to coat everything in the sauce.
- Cook for an additional 2-3 minutes, stirring occasionally until the sauce thickens slightly.
- Season with salt and pepper to taste. Remove from heat and garnish with sliced green onions and sesame seeds.


. 1. First, preheat your oven to 400°F (200°C). This helps the meatballs cook evenly. 2. Next, line a baking sheet with parchment paper. This makes for easy cleanup later. 3. In a large bowl, combine the ground turkey, breadcrumbs, grated Parmesan, minced garlic, grated ginger, egg, black pepper, and salt. Mix gently until everything is just combined. 4. Using your hands, form the mixture into meatballs. Aim for about 1 to 1.5 inches in diameter. Place them on the prepared baking sheet. 1. In a small bowl, whisk together the honey, soy sauce, and sesame oil. This will be your tasty honey garlic sauce. 2. Brush or drizzle half of the honey garlic sauce over the meatballs. Ensure each meatball gets a good coat. 1. Now, bake the meatballs in the oven for 15 minutes. This helps them cook through. 2. After 15 minutes, take the meatballs out. Drizzle the remaining honey garlic sauce over them. 3. Return the meatballs to the oven for another 10 minutes. They should be golden brown and fully cooked. 4. Once done, remove the meatballs from the oven. Let them rest for a few minutes. 5. Before serving, garnish with chopped cilantro and sprinkle sesame seeds on top for a nice touch. For the full experience of these flavors, check out the Full Recipe. Enjoy your cooking! Choosing the right ground turkey is key. Use lean ground turkey for juicy meatballs. Look for a blend that is 93% lean or higher. This gives a nice balance of flavor and moisture. Mixing techniques matter too. Use your hands, but don’t overmix. Overmixing can make the meatballs tough. Just mix until all the ingredients hold together. This keeps them light and tender. Ensure even cooking by placing meatballs apart on the baking sheet. This allows heat to flow around each one. You can also turn them halfway through baking for a nice brown color all over. Adjusting sweetness and saltiness can enhance your dish. If you like it sweeter, add more honey. For more salt, increase the soy sauce. Taste as you go to get it just right. Try alternative sauces for a twist. You can use teriyaki sauce for a richer taste. Or mix in some sriracha for a spicy kick. These changes can make the meatballs feel new and exciting. Using gluten-free substitutes is easy. Swap regular soy sauce with tamari. This keeps all the great flavor while making it gluten-free. Plus, you can use gluten-free breadcrumbs for the same tasty meatballs. For the full recipe, check the earlier section of this article. {{image_2}} You can easily swap turkey for other meats. Chicken and beef work well in this recipe. They both give great flavor. Just keep the cooking times in mind. If you want a vegetarian option, try plant-based meatballs. They are tasty and healthy. Use lentils or chickpeas as the base. You can also find many brands ready to cook. Experiment with herbs for different flavors. Add basil, parsley, or oregano to mix it up. Each herb brings a new taste to the dish. The air fryer is a quick way to cook these meatballs. Set it to 375°F (190°C). Cook for about 12 minutes, turning halfway. This gives them a nice crispy outside. You can also use a slow cooker. Place the meatballs in the cooker and pour the honey garlic sauce over them. Cook on low for 4 hours. The meatballs will be juicy and full of flavor. Grilling adds a smoky taste. Preheat your grill and cook for about 10 minutes. Turn them often to avoid burning. This method gives a nice char and enhances the flavor even more. For the full recipe, check out the complete guide above. Store your leftover honey garlic turkey meatballs in the fridge. Use an airtight container to keep them fresh. They can last for about 3 to 4 days in the refrigerator. When you want to eat them, simply reheat in the microwave or warm them on the stove. You can freeze these meatballs for later use. Let them cool completely after cooking. Place them in a single layer on a baking sheet. Freeze for about an hour until firm. Then, transfer the meatballs to a freezer-safe bag or container. Label the bag with the date. They should stay good for about 3 months. When you want to enjoy them, take out the meatballs and let them thaw in the fridge overnight. For reheating, you can bake them in the oven at 350°F (175°C) for about 15 minutes. This will help them stay juicy and flavorful. For more details and the full recipe, check out the entire guide! How do I know when turkey meatballs are cooked? Turkey meatballs are done when they reach an internal temperature of 165°F (74°C). Use a meat thermometer to check. The outside should also be golden brown for best taste. Can I make honey garlic turkey meatballs ahead of time? Yes, you can prepare the meatballs ahead of time. Shape them and store them in the fridge for up to 24 hours. This saves time on busy days. What can I serve with honey garlic turkey meatballs? These meatballs pair well with jasmine rice, steamed veggies, or a fresh salad. You can also serve them as appetizers with toothpicks. Is this recipe suitable for meal prep? Absolutely! The meatballs store well in airtight containers. They can last in the fridge for 3 to 4 days, making them perfect for meal prep. Can I substitute honey for another sweetener? Yes, you can use maple syrup or agave nectar. They will give a similar sweetness without the honey flavor. How can I make these meatballs spicier? Add red pepper flakes or sriracha to the meatball mix. You can also drizzle hot sauce over the meatballs before serving for an extra kick. In this post, I shared a simple recipe for honey garlic turkey meatballs. We covered the key ingredients, from ground turkey to delicious sauce options. You learned how to prepare, bake, and store your meatballs. With tips on perfecting texture and flavor, plus variations for all diets, you can make this dish your own. Enjoy making these meatballs and impress your family with your cooking skills!](https://dailydishlab.com/wp-content/uploads/2025/07/69b29533-6935-43ed-a652-e91bcda4bd1d-768x768.webp)


![- 1 lb boneless, skinless chicken breasts - 3 tablespoons olive oil - 2 tablespoons fresh lemon juice - 2 tablespoons Greek yogurt - 3 cloves garlic, minced The main ingredients are key to great flavor. The chicken serves as the base. Use fresh, quality chicken for the best taste. Olive oil adds richness. Lemon juice gives a nice tang. Greek yogurt adds creaminess and helps tenderize the meat. Garlic brings a punch of flavor that everyone loves. - 1 teaspoon dried oregano - 1 teaspoon dried thyme - 1 teaspoon paprika - Salt and pepper to taste Herbs and spices elevate your dish. Oregano is a classic Greek herb. Thyme adds earthiness, while paprika gives a subtle warmth. Salt and pepper enhance all flavors. You can adjust these to fit your taste. Fresh herbs can also work well if you have them on hand. - Wooden or metal skewers - Fresh parsley, chopped (for garnish) - Lemon wedges (for serving) Skewers are a must for souvlaki. If you use wooden skewers, soak them in water first. This prevents burning on the grill. Fresh parsley adds color and freshness on top. Lemon wedges are perfect for squeezing over the chicken. They boost flavor and add brightness to each bite. For the complete recipe, check out the Full Recipe section. In a medium bowl, whisk together the marinade ingredients. Combine 3 tablespoons of olive oil, 2 tablespoons of fresh lemon juice, and 2 tablespoons of Greek yogurt. Next, add 3 minced cloves of garlic, 1 teaspoon of dried oregano, 1 teaspoon of dried thyme, and 1 teaspoon of paprika. Finish with salt and pepper to taste. This mix is key for flavor. Now, take your 1 pound of boneless, skinless chicken breasts. Cut them into 1-inch cubes. Coat the chicken cubes in the marinade. Make sure each piece is well covered. After that, cover the bowl and place it in the refrigerator. Let it marinate for at least 30 minutes or up to 2 hours. This step makes the chicken juicy and tasty. First, preheat your grill or grill pan over medium-high heat. Once hot, thread the marinated chicken onto skewers. If you use wooden skewers, make sure they soaked in water for 30 minutes first. Leave some space between each piece for even cooking. Grill the chicken skewers for about 10 to 12 minutes. Turn them occasionally. Check for doneness by ensuring the internal temperature reaches 165°F (75°C). Once cooked, remove the skewers from the grill. Let them rest for about 5 minutes. This resting time allows the juices to spread throughout the chicken. For a full recipe, refer back to the earlier section. Enjoy your Greek chicken souvlaki with a garnish of fresh parsley and lemon wedges on the side! To get the best flavor from your chicken souvlaki, timing matters. I recommend marinating the chicken for at least 30 minutes. If you have more time, marinate for up to 2 hours. This longer time lets the chicken absorb the marinade's flavors deeply. Remember, the lemon juice helps tenderize the meat, making it juicy and tasty. You can grill souvlaki for that smoky flavor. However, if you don’t have a grill, you can use an oven or stovetop. When grilling, keep the heat medium-high. This way, the chicken gets nice grill marks and cooks evenly. If cooking in the oven, set it to 400°F (200°C). Cook for about 15-20 minutes, flipping halfway. Always check that the chicken reaches an internal temperature of 165°F (75°C) to ensure it’s safe to eat. Juicy chicken is the goal, so don’t overcook it. Presentation makes your dish more appealing. Serve the chicken souvlaki on a large platter. Drizzle some olive oil over the top for shine. Add a bowl of tzatziki sauce for dipping. Pair it with fresh veggies like cucumber and tomato salad. This not only looks great but also adds color and freshness to your meal. For the final touch, garnish with chopped parsley and a few lemon wedges on the side. This makes your meal pop and invites everyone to dig in. For the full recipe, check out the [Full Recipe]. {{image_2}} You can switch up the chicken for lamb or beef. Both meats add great taste. Lamb gives a rich flavor, while beef adds a hearty bite. Use the same marinade for these meats. Just ensure they are cut into similar-sized pieces. This way, they cook evenly. Grill them until they reach the right temperature. For lamb, that’s about 145°F (63°C). For beef, aim for 160°F (71°C). If you want a meat-free meal, try using vegetables or tofu. Bell peppers, zucchini, and mushrooms work well on skewers. Tofu soaks up the marinade nicely. Cut your vegetables into chunks that match the size of meat pieces. Marinate them just like the chicken. Grill the skewers until the veggies are tender and slightly charred. This gives a nice smoky flavor. Don’t be afraid to play with the herbs and spices. If you like more heat, add crushed red pepper flakes. Fresh herbs like basil or mint can also brighten the dish. You can even try adding cumin for a warm, earthy taste. Each tweak can make your souvlaki unique. Just remember to keep the balance of flavors in check. Enjoy the process of experimenting! For the full recipe, check out the original version. To keep your chicken souvlaki fresh, let it cool down first. Place it in an airtight container. Store it in the fridge for up to three days. Make sure to consume it within this time for the best taste. If you have any sides, like tzatziki or salad, store them separately. This keeps flavors fresh and prevents sogginess. When reheating chicken souvlaki, the best method is using an oven or a grill. Preheat your oven to 350°F (175°C). Place the skewers on a baking sheet. Heat for about 10-15 minutes. This method helps keep the chicken juicy. For the grill, warm it up and grill for 5 minutes, turning often. Check that the internal temperature reaches 165°F (75°C) for safe eating. If you want to save chicken souvlaki for later, freezing is a great option. First, let it cool completely. Then, wrap each skewer in plastic wrap. Place them in a freezer-safe bag. Label the bag with the date. You can freeze it for up to three months. To defrost, place the bag in the fridge overnight. Reheat as mentioned above. Enjoy your delicious meal later! The best way to marinate chicken for souvlaki is to use a mix of flavors. A simple marinade includes olive oil, lemon juice, Greek yogurt, garlic, and herbs. I recommend marinating your chicken for at least 30 minutes. For the best flavor, let it sit for up to 2 hours. This longer time helps the flavors soak into the chicken. Be sure to refrigerate the chicken while it marinates. Yes, you can cook Greek chicken souvlaki in the oven. First, preheat your oven to 400°F (200°C). Thread the marinated chicken onto skewers. Place the skewers on a baking sheet lined with parchment paper. Cook for about 15-20 minutes, turning the skewers halfway through. This helps them cook evenly and get a nice color. Check that the chicken is fully cooked before serving. To know if the chicken is fully cooked, use a meat thermometer. The safe internal temperature for chicken is 165°F (75°C). Insert the thermometer into the thickest part of the chicken. If it reads 165°F or higher, your chicken is done. If not, cook it a bit longer and check again. Always ensure your chicken is safe to eat for the best experience. This article covers how to make Greek chicken souvlaki, from ingredients to storage tips. You learned about the main ingredients, marinade prep, cooking methods, and serving ideas. Remember, marinating is key for flavor. Do not shy away from using different proteins or veggies. These variations can lead to new, tasty dishes. Storing and reheating properly will keep your leftovers enjoyable. Now, you’re ready to impress at your next meal with this easy, delicious recipe. Enjoy your cooking adventure!](https://dailydishlab.com/wp-content/uploads/2025/07/2cbb5fd3-8ba9-46d6-bdce-6c8d1fc81688-768x768.webp)