Honey Garlic Chicken Wings Perfectly Savory Delight

Are you ready to conquer your next gathering with a dish everyone will love? Honey Garlic Chicken Wings are the perfect mix of sweet and savory. This simple recipe will impress your friends and family, making you the star of any meal. In this post, I’ll share the ingredients, steps, and tips you need for wings that are crispy, flavorful, and hard to resist. Let’s dive in!
Why I Love This Recipe
- Sweet and Savory Balance: The combination of honey and soy sauce creates a delightful harmony of sweetness and umami that makes these wings irresistible.
- Easy Preparation: With just a few simple ingredients and minimal prep time, these wings can be marinated and baked with ease, perfect for busy weeknights or last-minute gatherings.
- Customizable Heat: The crushed red pepper flakes allow you to adjust the spice level to your liking, making it a versatile recipe for everyone’s taste preferences.
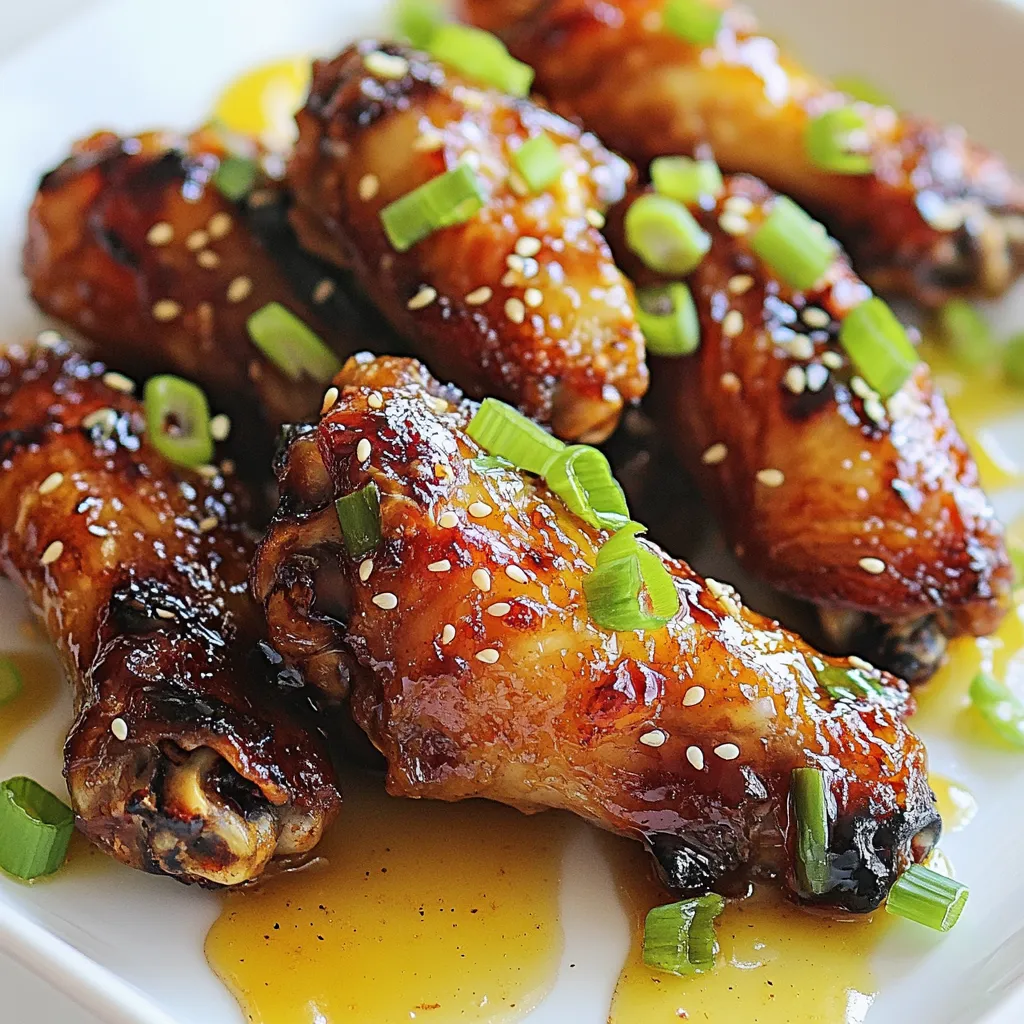
- Impressive Presentation: Garnished with green onions and sesame seeds, these wings look as good as they taste, making them a great centerpiece for any appetizer spread.
Ingredients
Main Ingredients for Honey Garlic Chicken Wings
To make honey garlic chicken wings, you need some simple items. Here’s what you should gather:
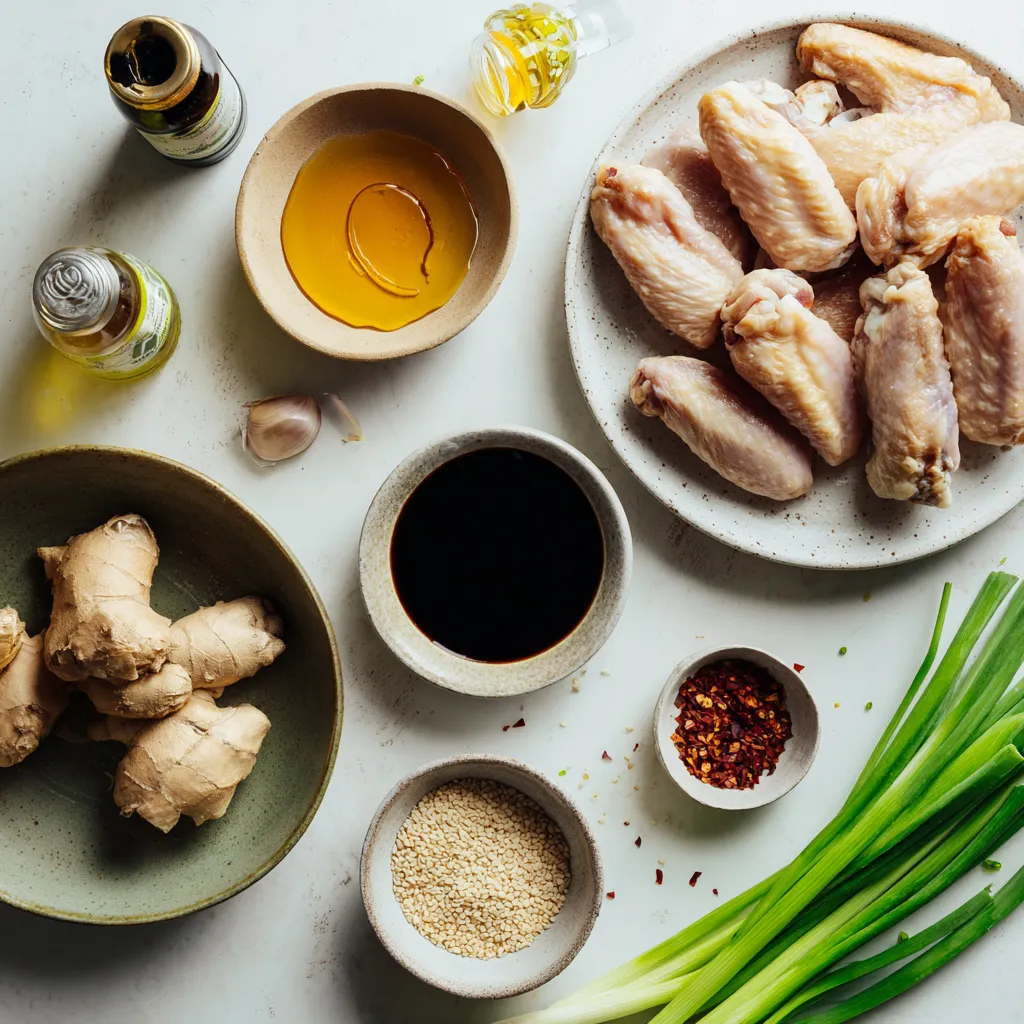
- 2 lbs chicken wings
- 1/2 cup honey
- 1/4 cup soy sauce
- 4 cloves garlic, minced
- 1 tablespoon fresh ginger, grated
- 1 teaspoon crushed red pepper flakes (adjust for heat)
- 1 tablespoon sesame oil
- 1 tablespoon rice vinegar
These ingredients create a sweet and savory flavor that makes the wings special. The honey adds sweetness, while soy sauce gives it a nice salty kick. Garlic and ginger enhance the taste, and the red pepper flakes add a little heat.
Optional Garnishes and Serving Suggestions
You can make your wings look even better with some fun extras. Here are some garnishes you might like:
- 2 green onions, sliced (for garnish)
- Sesame seeds (for garnish)
When serving, arrange the wings on a large platter. Drizzle some extra honey on top for an eye-catching finish. Pair the wings with fresh vegetable sticks and your choice of dipping sauce to complete the dish.
Kitchen Tools and Equipment Needed
Having the right tools makes cooking easier. For this recipe, gather these items:
- Large mixing bowl
- Whisk
- Baking sheet
- Aluminum foil
- Wire rack
- Plastic wrap
These tools help you mix, bake, and present your wings perfectly. With everything ready, you’re set to make a delicious dish everyone will love.

Step-by-Step Instructions
Preparing the Marinade
To make the marinade, grab a large mixing bowl. Add 1/2 cup honey and 1/4 cup soy sauce. Next, toss in 4 minced garlic cloves and 1 tablespoon of fresh ginger. Don’t forget 1 teaspoon of crushed red pepper flakes for a little heat. Finally, mix in 1 tablespoon of sesame oil and 1 tablespoon of rice vinegar. Whisk all these ingredients together until they blend well. This mix will give your wings a sweet and savory flavor.
Marinating the Chicken Wings
Now that your marinade is ready, it’s time for the chicken wings. Use 2 pounds of chicken wings and add them to the bowl. Toss the wings in the marinade until they are fully coated. Cover the bowl with plastic wrap. For the best taste, refrigerate the wings for at least 1 hour. If you have time, let them marinate overnight. This allows the flavors to soak in deeply.
Baking and Basting the Wings
Preheat your oven to 400°F (200°C). While it heats up, line a baking sheet with aluminum foil. Place a wire rack on top of the foil. Arrange your marinated chicken wings on the rack, making sure there is space between each wing. Remember to save the leftover marinade for later. Bake the wings for 25 minutes. After this time, take them out and baste them with the reserved marinade. Flip the wings over and return them to the oven. Bake for another 20 to 25 minutes. When they are done, they should be fully cooked and glistening. If you want them extra crispy, broil them for 2 to 3 minutes. Just keep an eye on them so they don’t burn. Once ready, let the wings rest for a few minutes before serving.
Tips & Tricks
Achieving Extra Crispy Wings
To get your chicken wings crispy, follow a few simple tricks. First, use a wire rack when baking. This lets air flow around the wings. The skin will crisp up nicely. Second, make sure to pat the wings dry before marinating. Dry skin helps them become crispy. Lastly, broil them for 2-3 minutes at the end. Watch closely so they don’t burn.
Flavor Enhancements and Substitutions
You can easily tweak the flavors in this recipe. If you like heat, add more crushed red pepper flakes. For a sweet twist, try maple syrup instead of honey. You can also mix in some lime juice for a tangy kick. If you want to skip soy sauce, use tamari or coconut aminos for a gluten-free option. These swaps keep the dish tasty and fun.
Common Mistakes to Avoid
A few mistakes can ruin your wings. First, don’t skip the marinating step. It adds flavor and moisture. Next, avoid crowding the baking sheet. This can lead to soggy wings. Make sure to space them out. Finally, don’t ignore the basting. Basting keeps the wings juicy and flavorful. Following these tips will help you create perfect honey garlic chicken wings every time.
Pro Tips
- Marinate Longer for Flavor: For the best flavor, marinate the chicken wings overnight. This allows the flavors to penetrate deeply into the meat.
- Use a Wire Rack: Baking the wings on a wire rack allows air to circulate around them, resulting in a crispier texture. It also prevents them from sitting in their own juices.
- Adjust Spice Levels: If you prefer milder wings, reduce or omit the crushed red pepper flakes. You can also add a dash of your favorite hot sauce for a personalized heat level.
- Serve with Dipping Sauce: Pair these wings with a creamy dipping sauce, like ranch or blue cheese, to balance the sweetness of the honey glaze and add a delicious contrast.

Variations
Spicy Honey Garlic Chicken Wings
To make your wings spicier, add more red pepper flakes. Start with two teaspoons instead of one. This gives a nice kick without overwhelming the sweet taste. You can also mix in some hot sauce. A tablespoon or two works well. This blend of sweet and heat makes a great combo.
Honey Garlic BBQ Chicken Wings
For a BBQ twist, add your favorite BBQ sauce to the marinade. Mix equal parts honey and BBQ sauce for a flavorful glaze. You can use store-bought or homemade BBQ sauce. This gives a smoky taste that pairs well with the honey. Bake as usual, and enjoy a new flavor profile.
Air Fryer Honey Garlic Chicken Wings
If you want a quicker option, use an air fryer. Just marinate the wings as usual. Preheat your air fryer to 380°F (193°C). Place the wings in a single layer in the basket. Cook for 25-30 minutes, flipping halfway through. This method gives you crispy wings with less oil. Perfect for a quick snack or meal!
Storage Info
Storing Leftover Chicken Wings
After enjoying your honey garlic chicken wings, store any leftovers in an airtight container. Make sure the wings cool down first. If you store them right, they stay fresh for 3 to 4 days in the fridge. Always label your container with the date, so you know when you made them.
Reheating Instructions
To reheat your wings, preheat your oven to 350°F (175°C). Place the wings on a baking sheet. Reheat them for about 15 to 20 minutes. This method keeps them crispy and tasty. You can also use a microwave if you’re in a hurry. Just heat them for 1 to 2 minutes. However, they may not stay as crispy.
Freezing Chicken Wings
If you want to save your wings for later, freezing is a great option. First, let them cool completely. Then, place them in a freezer-safe bag. Try to remove as much air as possible. Label the bag with the date. They will stay good for about 3 months in the freezer. When you’re ready to eat, thaw them overnight in the fridge before reheating.
FAQs
How long should I marinate chicken wings?
You should marinate chicken wings for at least 1 hour. This time helps the wings soak up the flavors. For the best taste, marinate them overnight. The longer they sit, the more flavor they gain.
Can I use a different type of chicken?
Yes, you can use other chicken parts, like drumsticks or thighs. Just remember that cooking times may change. Wings cook faster than bigger pieces, so adjust your baking time.
What can I serve with Honey Garlic Chicken Wings?
Honey garlic chicken wings go well with many sides. Try fresh vegetable sticks like carrots and celery. A dipping sauce like ranch or blue cheese also pairs nicely. For a full meal, serve with rice or a simple salad.
Honey garlic chicken wings are a great dish that anyone can make. We discussed the key ingredients, tools needed, and simple steps to bake and baste the wings. You also learned tips for extra crispy wings and how to avoid common mistakes. Variations like spicy or BBQ wings add fun twists. Lastly, we covered how to store and reheat your delicious leftovers.
Enjoy making these wings and impress your friends with your cooking skill

Sticky Honey Garlic Chicken Wings
Ingredients
- 2 lbs chicken wings
- 0.5 cup honey
- 0.25 cup soy sauce
- 4 cloves garlic, minced
- 1 tablespoon fresh ginger, grated
- 1 teaspoon crushed red pepper flakes
- 1 tablespoon sesame oil
- 1 tablespoon rice vinegar
- 2 green onions sliced (for garnish)
- 1 tablespoon sesame seeds (for garnish)
Instructions
- Prepare the Marinade: In a large mixing bowl, whisk together the honey, soy sauce, minced garlic, grated ginger, red pepper flakes, sesame oil, and rice vinegar until well combined.
- Marinate the Wings: Add the chicken wings to the bowl, tossing them in the marinade until fully coated. Cover the bowl with plastic wrap and refrigerate for at least 1 hour (or overnight for best flavors).
- Preheat the Oven: Preheat your oven to 400°F (200°C).
- Bake the Wings: Line a baking sheet with aluminum foil and place a wire rack on top. Arrange the marinated chicken wings on the rack, allowing some space between each wing. Reserve the leftover marinade for basting.
- First Bake: Bake the wings in the preheated oven for 25 minutes.
- Baste and Flip: After 25 minutes, remove the wings and baste them with the reserved marinade. Flip the wings over and return to the oven.
- Second Bake: Bake for an additional 20-25 minutes, or until the wings are cooked through and have a nice glaze. If you want them extra crispy, broil for an additional 2-3 minutes, keeping a close eye to prevent burning.
- Serve: Remove the wings from the oven and let them rest for a few minutes. Garnish with sliced green onions and sesame seeds before serving.


![To make delicious zucchini corn fritters, gather these simple ingredients: - 2 medium zucchinis, grated - 1 cup sweet corn (fresh, canned, or frozen) - 1/2 cup all-purpose flour - 1/4 cup cornmeal - 2 large eggs - 1/4 cup green onions, finely chopped - 1 teaspoon garlic powder - 1 teaspoon onion powder - 1/2 teaspoon paprika - Salt and pepper to taste - Olive oil for frying - Optional: fresh cilantro or parsley for garnish These ingredients work together to create a tasty and crispy fritter. The zucchini and corn give it a sweet taste, while the spices add flavor. The flour and cornmeal help bind the mixture, ensuring your fritters hold their shape. Using fresh ingredients makes a big difference. I always prefer freshly grated zucchini and sweet corn when available. This helps the fritters taste better. Don't forget to check out the Full Recipe for detailed instructions on how to make these fritters come to life! Grating and Moisture Removal Start by grating the zucchinis with a box grater. Use medium-sized zucchinis for the best texture. After grating, place the zucchini in a clean kitchen towel. Squeeze the towel tightly to remove excess moisture. This is key for crispy fritters. If you skip this step, your fritters may turn out soggy. Combining Ingredients In a large mixing bowl, combine your drained zucchini with sweet corn. You can use fresh, canned, or frozen corn. Add all-purpose flour, cornmeal, and eggs to the bowl. Toss in chopped green onions, garlic powder, onion powder, paprika, salt, and pepper. Mix everything until it is well combined. Your batter should be thick and sticky. Heating the Skillet Heat a non-stick skillet over medium heat. Add enough olive oil to coat the bottom of the pan lightly. This helps the fritters fry evenly and get golden brown. Frying Process Once the oil is hot, scoop about 1/4 cup of the fritter mixture onto the skillet. Flatten each scoop slightly with a spatula. Cook for about 3-4 minutes on each side. Watch for a golden color to know they are done. If they brown too fast, lower the heat a bit. Draining Excess Oil Once the fritters are cooked, transfer them to a plate lined with paper towels. This step helps absorb any excess oil. It makes them less greasy and more enjoyable. Garnishing Options Serve the fritters warm. You can garnish them with fresh cilantro or parsley for a nice pop of color. They pair perfectly with sour cream or a zesty avocado sauce. These simple additions elevate the dish even more. For the full recipe, refer to the [Full Recipe]. Importance of Moisture Removal To get crispy fritters, you must remove excess moisture from the zucchini. Grating the zucchini is just the first step. After grating, use a clean kitchen towel to squeeze out as much water as you can. This simple step makes all the difference. Wet fritters become soggy and won’t crisp up well. Adjusting Cooking Temperature Cooking temperature is key. If the pan is too hot, the fritters burn outside but stay raw inside. If it's too low, they soak up oil and become greasy. I recommend medium heat. This allows the fritters to cook evenly and turn golden brown. Pay attention while frying. Adjust the heat as needed to keep them from burning. Adding Herbs or Spices You can easily boost the flavor of your fritters. Try adding fresh herbs like cilantro or parsley. These add a fresh taste and color. You can also use spices like cumin or chili powder for a kick. Experiment with flavors to find what you enjoy most. Serving Suggestions Serve your fritters warm for the best taste. They go great with a dollop of sour cream or yogurt. For a twist, try a zesty avocado sauce. This adds creaminess and a bright flavor. You can also serve them alongside a fresh salad for a light meal. Recommended Frying Pan A non-stick skillet works best for frying these fritters. It helps prevent sticking and makes flipping easier. If you don’t have non-stick, use a well-seasoned cast iron pan. Both options help achieve that perfect golden crust. Tools for Grating and Mixing For grating zucchini, a box grater is perfect. It gives you nice, even shreds. You will also need a large mixing bowl to combine all the ingredients. A sturdy spatula helps mix everything well, ensuring all the flavors blend. For the best results, keep your tools handy and clean to make cooking smooth. {{image_2}} To make your zucchini corn fritters gluten-free, you can substitute the all-purpose flour. Use a gluten-free flour blend instead. This will keep the fritters light and crispy. You can also use almond flour or chickpea flour for added flavor and texture. Cornmeal is a great choice too, as it adds crunch. If you want to make these fritters vegan, you can replace the eggs with flaxseed meal. Mix one tablespoon of flaxseed meal with three tablespoons of water. Let it sit for about five minutes until it thickens. You can also use unsweetened applesauce as a binder; about 1/4 cup should work well. Adding cheese can elevate your fritters. A sharp cheddar or feta cheese adds great taste. Mix in about 1/2 cup of grated cheese to the batter. You can also incorporate different vegetables like grated carrots or bell peppers for extra flavor and color. Each adds a unique twist to the base recipe. For the full recipe, check out the detailed steps above. After you enjoy your zucchini corn fritters, store any leftovers for later. Here’s how to do it right: - Refrigeration Tips: Place the fritters in an airtight container. They can last up to three days in the fridge. If you want to keep them crispy, place a paper towel in the container. This helps absorb moisture. - Best Practices for Freezing: If you want to freeze them, layer the fritters with parchment paper in a freezer-safe bag. They freeze well for up to three months. When you’re ready to eat, thaw overnight in the fridge before reheating. To enjoy your fritters again, follow these simple steps: - Methods for Best Results: The best way to reheat fritters is on the stove. Heat a non-stick skillet over medium heat. Add a little olive oil and cook for about two minutes on each side. This keeps them nice and crispy. - Avoiding Sogginess: To keep them from getting soggy, avoid using the microwave. The microwave steams them and removes their crunch. Always opt for stovetop reheating for the best texture. Now you can enjoy your delicious zucchini corn fritters any time! To make zucchini corn fritters, start with simple steps. First, grate two medium zucchinis and squeeze out moisture. This step helps the fritters stay crispy. Next, combine the zucchini with one cup of sweet corn, half a cup of flour, and a quarter cup of cornmeal. Add two large eggs, a quarter cup of chopped green onions, garlic powder, onion powder, paprika, salt, and pepper. Mix until well-blended. Heat olive oil in a skillet over medium heat. Scoop about a quarter cup of the mixture for each fritter. Cook for 3-4 minutes on each side. This quick recipe will give you crispy and tasty fritters. You can find the full recipe at the beginning of this article. Yes, you can bake zucchini corn fritters. Preheat your oven to 400°F (200°C). Line a baking sheet with parchment paper. Shape the fritters and place them on the sheet. Brush the tops lightly with olive oil for a golden finish. Bake for about 20-25 minutes or until they are crisp and golden brown. Baking is a healthier option and still gives great results. Zucchini corn fritters pair well with many side dishes. Consider serving them with a dollop of sour cream or Greek yogurt. A zesty avocado sauce adds a nice touch too. You can also serve them with a fresh salad for a balanced meal. Try adding a side of salsa for a fun flavor kick. These options enhance the experience of enjoying your fritters. To keep your fritters from falling apart, moisture removal is key. Squeeze out as much liquid from the grated zucchini as possible. Use enough flour and cornmeal to bind the ingredients. Eggs act as a binder, so don’t skip them. Mixing well will also help combine everything evenly. If the mixture feels too wet, add a bit more flour until it holds together. In this post, I covered how to make delicious Zucchini Corn Fritters. We went over the ingredients, from zucchini to sweet corn, and shared tips for crispy results. You learned how to prepare, cook, and store your fritters. I encourage you to try different variations and flavors. Experiment with herbs or make it gluten-free. No matter how you create them, these fritters will be a tasty addition to your meals. Enjoy your cooking!](https://dailydishlab.com/wp-content/uploads/2025/07/ca44245d-9b60-45de-8deb-be1df19ec037-768x768.webp)
![- 2 medium zucchinis, cut into fries - 1 cup breadcrumbs (preferably whole wheat or panko for extra crunch) - 1/2 cup grated Parmesan cheese - 1 teaspoon garlic powder - 1 teaspoon paprika - 1/2 teaspoon salt - 1/2 teaspoon black pepper - 2 large eggs, beaten - Cooking spray or olive oil for drizzling When choosing zucchinis, look for medium-sized ones that feel firm. Avoid any that are soft or have blemishes. Fresh zucchinis taste better and give the best results. For breadcrumbs, I suggest using either whole wheat or panko. Whole wheat adds a nutty flavor, while panko gives extra crunch. Both options work well, but I lean toward panko for that delightful crisp. Using fresh ingredients is key. Fresh herbs, spices, and cheese enhance the taste of your baked zucchini fries. They make your snack not just tasty but also healthy. Always choose high-quality ingredients for the best results. For the full recipe, check the detailed instructions above. Enjoy your cooking! Start by preheating your oven to 425°F (220°C). This high heat helps achieve that crispy texture we love. While the oven heats, line a baking sheet with parchment paper. This step makes cleanup easy and prevents sticking. Make sure the parchment paper is flat against the pan. Any wrinkles can cause uneven cooking. Next, let's coat those zucchini fries. First, beat your eggs in a shallow bowl. This will help the breadcrumbs stick. Now, prepare the breadcrumb mixture. In another bowl, mix the breadcrumbs, grated Parmesan, garlic powder, paprika, salt, and pepper. The mix should be evenly combined. For coating, take each zucchini fry and dip it into the eggs. Let the extra drip off for a cleaner look. Then, roll it in the breadcrumb mix. Press gently to ensure the crumbs stick well. This step is key for a crispy bite. Now, it's time to bake. Place the coated zucchini fries on the baking sheet. Make sure they are in a single layer and not touching. This spacing helps them crisp up. Lightly spray or drizzle with olive oil for an extra crispy finish. Bake the fries for 20 to 25 minutes. Flip them halfway through to ensure even cooking. You know they are done when they turn golden brown and crisp. Let them cool for a few minutes before serving. Enjoy your crispy and flavorful baked zucchini fries! For the full recipe, check out the [Full Recipe]. To get your zucchini fries extra crispy, focus on the coating. I recommend using panko breadcrumbs. They add more crunch than regular breadcrumbs. Mix them with grated Parmesan, garlic powder, paprika, salt, and pepper for a tasty coating. Even spacing on the baking sheet is key. Place the zucchini fries in a single layer. Make sure they don’t touch each other. This allows hot air to circulate around each fry, making them crispier. You can customize the spice levels to fit your taste. If you like heat, add cayenne pepper or chili powder. For a milder flavor, stick to garlic and herbs. Fresh herbs can enhance the flavor. Try adding chopped parsley or basil to the breadcrumb mix. This adds a fresh taste that pairs well with zucchini. If you want to try air frying, it’s a great option. Air fryers cook food quickly and make it crispy. Set the temperature to 400°F (200°C) and cook for about 15 minutes, shaking the basket halfway through. Grilling zucchini fries is another fun method. Brush them with olive oil and grill them over medium heat. This gives them a smoky flavor while still keeping them crispy. For the full recipe, check out the detailed steps provided earlier. {{image_2}} You can switch up the cheese for your baked zucchini fries. For a vegan option, use nutritional yeast. It adds a cheesy flavor without dairy. You can also use vegan cheese shreds. They melt well and give a nice texture. If you prefer traditional cheese, try mozzarella or cheddar. Both add a creamy taste. Parmesan is great for a salty kick. Mixing different cheeses can create even more flavor. Want a gluten-free option? Use almond flour or crushed rice cereal instead of breadcrumbs. These options still give that crunchy texture. For more crunch, add nuts or seeds to your coating mix. Chopped almonds or sunflower seeds work well. They boost nutrition and flavor. You can even try crushed cornflakes for a unique twist. Experiment with spices to give your fries a new taste. Try adding cayenne pepper for heat or Italian herbs for a fresh flavor. You can mix garlic powder with onion powder for depth. Incorporating other vegetables can add variety, too. Try mixing in carrot or sweet potato sticks. They can add color and taste. Just keep the size similar so they cook evenly. To keep your zucchini fries fresh, use airtight containers. Glass containers work great. You can also use plastic ones that seal well. Store them in the fridge. They stay good for about 3 days. When reheating, use the oven for the best results. Preheat it to 350°F (175°C). Place the fries on a baking sheet. Heat for about 10 minutes. This keeps them crispy. The microwave works too, but it may make them soft. If you use the microwave, heat for 1-2 minutes on a plate. You can freeze your leftover fries for later. Lay them flat on a baking sheet and freeze until solid. Then, move them to a freezer bag. They stay good for about 2 months. When you're ready to eat them, thaw overnight in the fridge. Reheat in the oven for a crispy finish. Always avoid refreezing once they are thawed. To make baked zucchini fries crispy, you need to focus on a few key steps. First, choose the right breadcrumbs. Whole wheat or panko breadcrumbs add great crunch. Dip the fries in beaten eggs to help the coating stick. Make sure to press the breadcrumbs onto the zucchini well. Common mistakes include overcrowding the baking sheet. Ensure the fries are in a single layer. This allows hot air to circulate and crisp them up. Also, lightly spray the fries with cooking spray or drizzle with olive oil before baking. This step enhances the crispiness. Using frozen zucchini is not ideal for baked zucchini fries. Frozen zucchini contains more water, which affects texture. When you bake it, the fries may turn out soggy instead of crispy. Fresh zucchini gives you the best flavor and crunch. If you only have frozen zucchini, thaw it first. Pat it dry with paper towels to remove excess moisture. This may improve the final result, but fresh is always better for this recipe. Zucchini fries taste great with many dips. Here are some popular options: - Marinara sauce - Ranch dressing - Garlic aioli - Spicy ketchup - Yogurt dip You can also make your own dips to match your taste. Mixing Greek yogurt with herbs makes a refreshing dip, while a spicy aioli adds a kick. Try different combinations to find your favorite! In this post, I shared how to make delicious zucchini fries. We covered selecting the best ingredients, baking techniques, and tips for a perfect crunch. Fresh ingredients matter for great taste. Remember to space your fries evenly for crispiness. Experiment with flavors and cooking methods for variety. Finally, store your leftovers correctly to keep them tasty. Enjoy making these versatile fries, and don’t hesitate to try new combinations!](https://dailydishlab.com/wp-content/uploads/2025/06/7c2e4ba5-05a6-4328-aa36-1f6df44662bb-768x768.webp)