Honey Garlic Glazed Chicken Drumsticks Flavor Boost

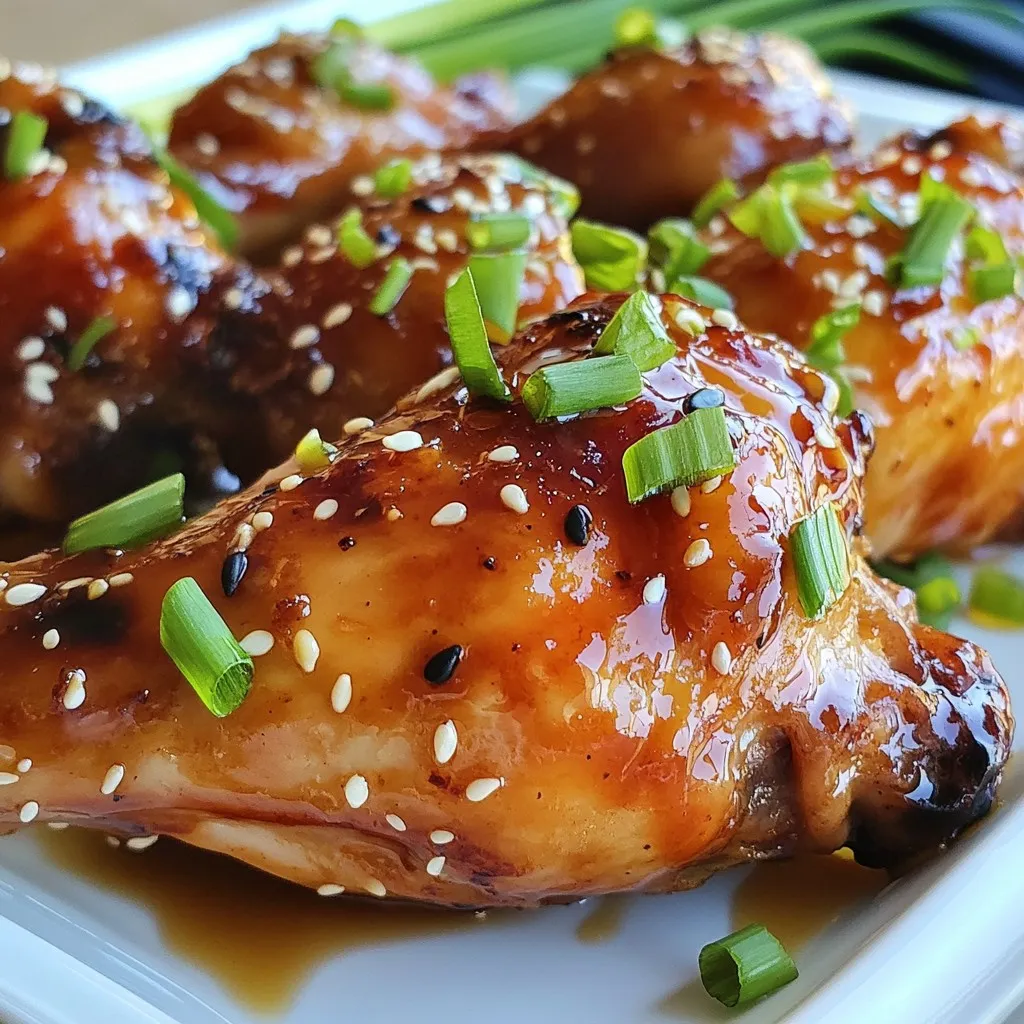
Are you ready to take your chicken drumsticks to the next level? This Honey Garlic Glazed Chicken Drumsticks recipe combines sweet honey, savory soy sauce, and aromatic garlic for an unbeatable flavor boost. I’ll guide you through the simple steps to marinate, bake, and transform your drumsticks into a delicious meal. Let’s dive in and make your next dinner a finger-licking success!
Why I Love This Recipe
- Sweet and Savory Combination: The honey in the glaze creates a delightful sweetness that perfectly balances the savory soy sauce and garlic, making each bite incredibly flavorful.
- Easy to Prepare: With minimal prep time and simple ingredients, this recipe is perfect for busy weeknights or when you want to impress guests without spending all day in the kitchen.
- Crispy Skin: Baking the drumsticks on a wire rack ensures the skin gets crispy while the meat stays juicy, giving you that perfect texture contrast.
- Versatile Dish: These glazed drumsticks can be served with rice, salads, or even as a party appetizer, making them a versatile choice for any meal or occasion.
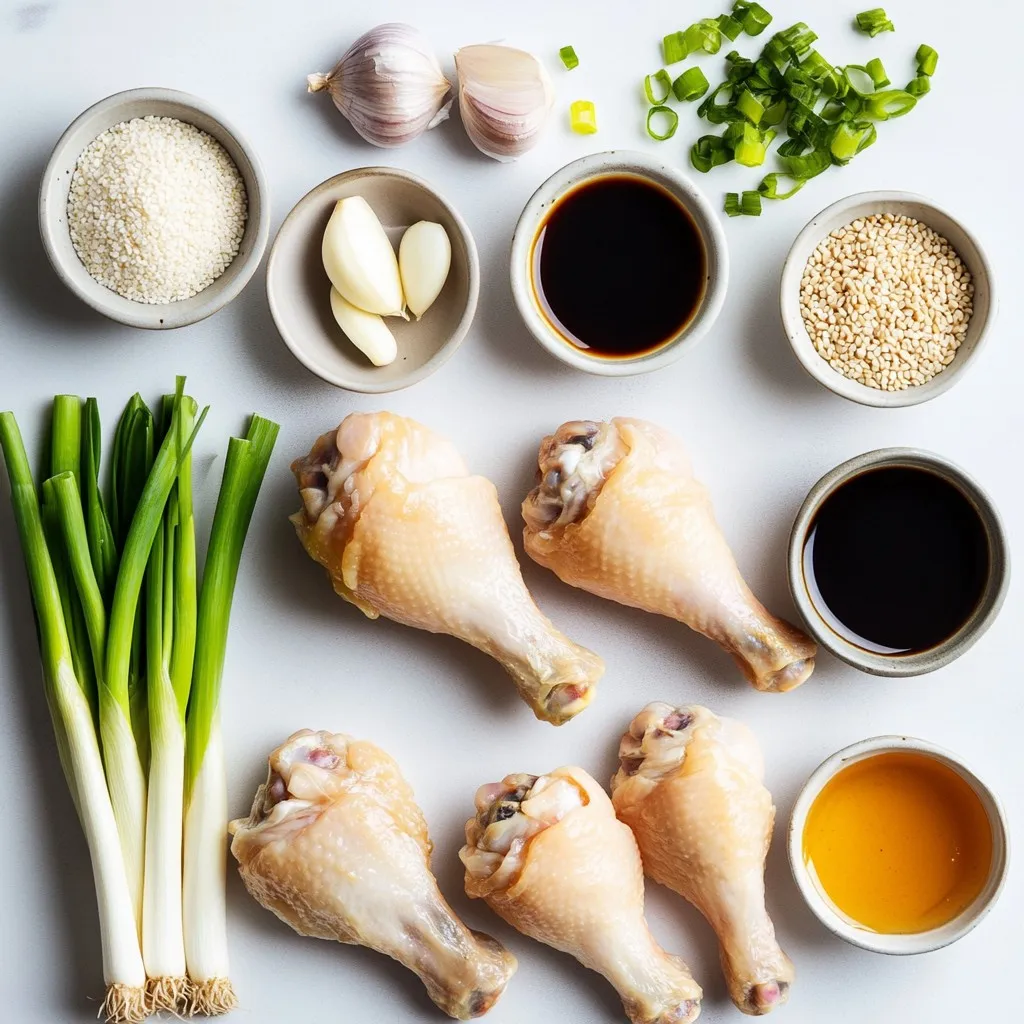
Ingredients
Main Ingredients Needed
- 8 chicken drumsticks
- 1/2 cup honey
- 1/4 cup soy sauce (low sodium preferred)
- 4 cloves garlic, minced
- 1 tablespoon freshly grated ginger
The main ingredients in this dish really make it shine. Chicken drumsticks are great for their flavor and juiciness. Honey gives it a nice sweetness. Low sodium soy sauce adds salty depth without overpowering. Garlic and ginger bring warmth and zest to the mix. Together, they create a bold and tasty base for the glaze.
Additional Ingredients for the Glaze
- 1 teaspoon sesame oil
- 1/2 teaspoon black pepper
- 1 tablespoon cornstarch
- 2 tablespoons water
The sesame oil provides a nutty aroma that enhances the dish. Black pepper adds a subtle heat. Cornstarch and water will thicken the glaze, making it cling nicely to the chicken. This thick glaze gives each bite a burst of flavor.
Garnishing Options
- Chopped green onions
- Sesame seeds
Garnishes are key to a great presentation. Chopped green onions add a fresh crunch and a pop of color. Toasted sesame seeds give a nutty finish and look appealing. These simple additions elevate the dish, making it look as good as it tastes.

Step-by-Step Instructions
Preparing the Marinade
To make the marinade, grab a medium bowl. Add 1/2 cup honey, 1/4 cup low-sodium soy sauce, and 4 minced garlic cloves. Next, add 1 tablespoon of freshly grated ginger, 1 teaspoon of sesame oil, and 1/2 teaspoon of black pepper. Whisk the mixture until it combines well. This blend creates a sweet and savory flavor that coats the chicken nicely.
Marinating the Chicken
Place 8 chicken drumsticks into a large resealable plastic bag or a shallow dish. Pour the marinade over the drumsticks. Make sure each piece is well-coated. Seal the bag or cover the dish with plastic wrap. For the best taste, marinate in the fridge for at least 1 hour. You can also let it sit for up to 12 hours. Longer marination gives the chicken a deeper flavor.
Baking the Drumsticks
First, preheat your oven to 400°F (200°C). Line a baking sheet with foil to help with cleanup. Place a wire rack on top of the sheet. This allows heat to circulate around the chicken. Remove the drumsticks from the marinade, letting the excess drip off. Place the drumsticks on the wire rack.
In a small saucepan, bring the leftover marinade to a boil over medium-high heat. In a separate bowl, mix 1 tablespoon of cornstarch with 2 tablespoons of water until smooth. Add this mixture to the boiling marinade and stir continuously. Cook until the sauce thickens, about 2 minutes, then remove from heat.
Brush some of the thickened glaze over the drumsticks before baking. Bake the drumsticks for 25-30 minutes. Halfway through cooking, baste them with more glaze. This gives a nice, sticky finish. Once cooked, let the drumsticks rest for 5 minutes. Drizzle any leftover glaze on top for an extra glossy look.
Tips & Tricks
Maximizing Flavor
To make your honey garlic glazed chicken drumsticks stand out, marination is key. I suggest a simple mix of honey, soy sauce, garlic, ginger, and black pepper. This blend adds depth and richness to the meat.
- Marination tips for enhanced taste:
- Ensure all drumsticks are well-coated in the marinade.
- Use a resealable bag or shallow dish for even coverage.
- Ideal marination timeframes:
- Marinate for at least 1 hour for a good flavor.
- For the best taste, aim for 6 to 12 hours.
Cooking Techniques
The choice between baking and grilling can affect your results. Both methods work well, but each gives a different texture.
- Baking vs. grilling the chicken drumsticks:
- Baking provides even heat and a crispy skin.
- Grilling adds a smoky flavor but requires more attention.
- How to achieve crispy skin:
- Use a wire rack to allow air circulation.
- Brush the drumsticks with thickened glaze halfway through cooking.
Common Mistakes to Avoid
When cooking, even small errors can spoil your dish. Here are a couple of common traps.
- Over-marinating and its effects:
- Marinating too long can make the chicken mushy.
- Stick to the recommended times for best results.
- Not checking chicken doneness:
- Always check the internal temperature.
- Aim for 165°F (74°C) to ensure safety and flavor.
Pro Tips
- Marinate for Maximum Flavor: For the best flavor, marinate the chicken drumsticks for at least 12 hours. This allows the marinade to penetrate deeply into the meat, resulting in a more flavorful dish.
- Use a Meat Thermometer: To ensure the chicken is cooked through, use a meat thermometer. The internal temperature should reach 165°F (75°C) for safe consumption.
- Keep the Skin Crispy: Baking on a wire rack allows hot air to circulate around the chicken, ensuring that the skin becomes crispy. Avoid covering the drumsticks while baking.
- Customize Your Glaze: Feel free to adjust the sweetness or saltiness of the glaze by adding more honey or soy sauce according to your taste preferences.

Variations
Alternative Ingredients
You can change the honey in this recipe if you want. Maple syrup or agave syrup works great. Both add sweetness and flavor. For soy sauce, you can use tamari for a gluten-free option. Coconut aminos also give a nice flavor. These swaps let you enjoy the dish while fitting your diet.
Cooking Methods
Grilling adds a smoky flavor to honey garlic chicken drumsticks. Preheat your grill and cook each side for 10-12 minutes. Use a meat thermometer to check for doneness. You can also use a slow cooker for a set-it-and-forget-it method. Cook on low for 6-8 hours for tender chicken. An Instant Pot is another great choice. Cook on high pressure for about 10 minutes, then let it release naturally.
Flavor Enhancements
Want an extra kick? Try adding spices like cayenne or smoked paprika. They bring heat and depth to the dish. You can also mix in fresh herbs like cilantro or basil. These add bright notes that pair well with honey and garlic. Feel free to experiment with flavors to make this dish your own!
Storage Info
Proper Storage Techniques
To store leftovers in the fridge, let the drumsticks cool first. Place them in an airtight container. This keeps the chicken fresh. You can also wrap them tightly in plastic wrap. Do not leave them out for more than two hours.
For best results, use glass or BPA-free plastic containers. These containers help prevent any unwanted smells. They also keep your drumsticks from drying out.
Freezing Instructions
To freeze cooked drumsticks, let them cool completely. Then, place them in a freezer-safe bag. Squeeze out as much air as you can. This helps prevent freezer burn. You can freeze them for up to three months.
When you want to eat them, thaw the drumsticks in the fridge overnight. This keeps the texture nice. If you need them fast, use the microwave. Set it to defrost, checking every minute.
For reheating, bake them at 350°F (175°C) for about 15 minutes. This warms them through while keeping the skin crispy. You can also reheat in the air fryer for extra crispiness.
Shelf Life
Honey garlic glazed chicken can be stored in the fridge for up to four days. If frozen, try to eat them within three months for the best taste. Always check for off smells or changes in color before eating leftovers.
FAQs
What temperature should chicken drumsticks be cooked to?
You should cook chicken drumsticks to an internal temperature of 165°F (74°C). This ensures they are safe to eat. Use a meat thermometer to check the temperature. Place it in the thickest part of the drumstick, avoiding the bone. Cooking to this temperature keeps the meat juicy and tender.
How long can I marinate chicken drumsticks?
You can marinate chicken drumsticks for 1 to 12 hours. For a quick flavor boost, one hour is fine. However, marinating longer, up to 12 hours, gives a deeper taste. Just don’t go beyond 12 hours; it can make the meat mushy. Find the sweet spot that works for your schedule.
Can I use skinless chicken for this recipe?
You can use skinless chicken if you prefer. Skinless pieces may cook faster, so watch the time. You might miss some of the crispy texture, but the glaze will still add flavor. Consider adjusting your cooking time to avoid drying out the meat.
Are there gluten-free options for this recipe?
Yes, you can make this recipe gluten-free. Use tamari or coconut aminos instead of soy sauce. Both options give a similar taste without gluten. You can find them in health food stores or online. Enjoy your honey garlic chicken without worrying about gluten!
This article covered how to make honey garlic glazed chicken drumsticks. We explored key ingredients, step-by-step instructions, and cooking tips for great flavor. I shared variations to suit your taste and storage advice for leftovers.
Now you can enjoy tasty drumsticks with simple steps. Feel free to experiment with ingredients and cooking methods. With these tips, you’ll always have a delicious meal read


![- 1 pound Italian sausage (spicy or sweet) - 9 oz cheese tortellini (fresh or frozen) - 1 medium onion, finely chopped - 3 cloves garlic, minced (about 1 tablespoon) - 3 medium carrots, diced into small pieces - 2 celery stalks, diced - 6 cups chicken broth (low-sodium for a healthier option) - 1 can (14 oz) diced tomatoes, undrained - 2 cups fresh spinach, roughly chopped - 1 teaspoon Italian seasoning (or to taste) - Salt and pepper to taste - 2 tablespoons olive oil I love using Italian sausage in this soup. You can choose spicy for a bold taste or sweet for a milder flavor. The cheese tortellini adds a nice touch. I prefer fresh tortellini, but frozen works well too. The veggies bring color and taste to the soup. I use onion, garlic, carrots, and celery. These give a lovely base. I always add diced tomatoes and chicken broth. They create a rich, tasty broth. Spinach adds a fresh finish and a pop of green. - Fresh basil leaves - Grated Parmesan cheese Garnishes make this soup special. Fresh basil leaves add a fresh burst of flavor. Grated Parmesan cheese gives a salty finish. You can sprinkle them on top before serving. - Different types of sausage - Additional vegetables (e.g., bell peppers, zucchini) - Seasoning alternatives You can change this soup to fit your taste. Try different sausages for a new twist. Adding bell peppers or zucchini boosts the veggie count. For seasoning, feel free to mix it up. A dash of red pepper flakes can add heat. For the complete instructions, check out the Full Recipe. First, we need to prep our veggies. Start by chopping: - 1 medium onion - 3 medium carrots - 2 celery stalks - 3 cloves garlic Chop the onion and carrots into small pieces. Dice the celery into small bits. For the garlic, mince it finely. Set these aside. Next, let’s prepare the sausage. Remove the casing from 1 pound of Italian sausage. Crumble the sausage into small pieces. This will help it cook evenly. Now, let’s cook! In a large pot, heat 2 tablespoons of olive oil over medium heat. Add the chopped onion, diced carrots, and celery. Sauté these for about 5 minutes. You want them soft, and the onion should look clear. After that, add the minced garlic. Cook for about 1 minute. Keep stirring until the garlic smells great. Next, add the crumbled sausage to the pot. Brown the sausage for 7-8 minutes. Stir it often, so it cooks evenly and gets nice color. Once the sausage is browned, it’s time to add the broth. Pour in 6 cups of chicken broth and 1 can of diced tomatoes (don’t drain them). Add 1 teaspoon of Italian seasoning. Mix everything well and bring it to a boil. When it boils, lower the heat to medium-low. Carefully add 9 ounces of cheese tortellini to the pot. Let it simmer for 5-7 minutes until the tortellini is al dente. Next, gently stir in 2 cups of chopped fresh spinach. Cook until the spinach wilts, which takes about 2 minutes. Taste the soup and season with salt and pepper as you like. Serve this warm in bowls. You can add fresh basil leaves and sprinkle some grated Parmesan cheese on top for extra flavor. For the full recipe, check out the details above! To avoid overcooking the tortellini, add it to the pot only when the soup reaches a boil. This helps keep the pasta firm. Cook the tortellini for about 5 to 7 minutes, just until it's tender but still has a bit of bite. Stir it gently to avoid sticking. To ensure the flavors meld together, let the soup simmer for a few minutes after adding the tortellini. This allows the spices and ingredients to blend nicely. Taste the soup before serving. Adjust salt and pepper to make the flavors pop. Pair your soup with warm, crusty bread for a hearty meal. A simple side salad adds freshness to the table. If you serve a larger group, consider making a double batch. Soup is easy to share, and it tastes even better the next day. For a lighter option, use low-sodium broth. This helps control the salt without losing flavor. Swap out regular sausage for lean sausage or turkey sausage. This small change cuts down on fat while keeping the dish satisfying. {{image_4}} For a spicy kick, you can try spicy sausage tortellini soup. Use spicy Italian sausage instead of sweet. This adds a nice warmth to the dish. You can also add red pepper flakes for more heat. Adjust the amount to your taste. If you want a lighter option, consider a vegetarian tortellini soup. Replace the sausage with mushrooms or lentils for protein. You can use vegetable broth instead of chicken broth. This keeps the soup flavorful and satisfying. Incorporating seasonal vegetables can enhance the soup's taste. In spring, add fresh peas or asparagus. In summer, try zucchini or bell peppers. Fall brings great choices like diced butternut squash or sweet potatoes. In winter, root vegetables add heartiness. For different occasions, you can adjust the soup. For a cozy night, keep it simple. For a festive meal, add a splash of cream. This makes the soup rich and creamy for special gatherings. If you need gluten-free options, look for gluten-free tortellini. Many brands offer great choices. You can also use rice or quinoa instead of tortellini. This keeps the meal filling while meeting dietary needs. For vegan substitutes, swap the sausage for plant-based alternatives. Use vegetable broth and skip the cheese. Adding beans or lentils can boost protein. You still get a hearty soup without animal products. For the full recipe and more cooking tips, check the [Full Recipe]. To store your Sausage Tortellini Soup, first let it cool down. - Place the soup in an airtight container. - Store it in the refrigerator if you plan to eat it soon. The soup stays fresh for about 3 to 4 days in the fridge. If you want to save it for later, freezing is a great option. - Pour the cooled soup into freezer-safe bags or containers. - Make sure to leave some space for expansion. Frozen soup can last for up to 3 months. Reheating the soup properly keeps its flavor intact. - The best ways to reheat are on the stove or in the microwave. - If using the stove, heat it in a pot over medium heat. Stir it often to ensure even heating. - If using a microwave, heat it in short bursts. - Stir in between to avoid hot spots. For storage containers, use glass or BPA-free plastic. These types resist stains and are safe for reheating. The soup lasts about 3 to 4 days in the fridge. To maximize freshness, store it properly. - Keep the soup sealed tightly to prevent air exposure. - This helps avoid spoilage and keeps flavors strong. If you notice any off smell or change in color, it's best to discard it. By following these tips, you can enjoy your Sausage Tortellini Soup even days later. You can swap tortellini for different types of pasta, like penne or shell pasta. Rice is another option. Both will work well in this soup. Just adjust cooking times based on what you choose. Yes, you can make this soup ahead of time. Cook it fully, then cool it down. Store it in an airtight container. Place it in the fridge for up to three days. Reheat it on the stove or microwave when ready to eat. Sausage Tortellini Soup lasts about three to four days in the fridge. To keep it fresh, store it in an airtight container. Check for any signs of spoilage before you eat it. Yes, you can use frozen vegetables in this soup. They are quick and easy. Just add them at the same time as the tortellini. Frozen veggies cook fast, so keep an eye on them. This soup is freezer-friendly! Let it cool completely before freezing. Store it in a freezer-safe container. When ready to eat, thaw it in the fridge overnight. Reheat on the stove or microwave without losing flavor. Enjoy this tasty meal anytime! For the full recipe, check out the link! In this article, we explored how to make a hearty Sausage Tortellini Soup. We covered the key ingredients, including Italian sausage, fresh tortellini, and common vegetables. I shared tips on preparation, cooking, and serving. You also learned about variations for flavor, dietary needs, and storage. Remember, this soup is versatile and simple to make. You can customize it to fit your taste and dietary goals. Enjoy your cooking and the delightful taste of this comforting dish!](https://dailydishlab.com/wp-content/uploads/2025/06/6131aa1e-cc84-4164-90dd-a9e6e2f2c232-768x768.webp)


![- 2 cans (15 oz each) of white beans (cannellini or great northern), drained and rinsed - 1 medium onion, chopped - 4 cloves garlic, minced - 4 cups vegetable broth - 1 cup coconut milk (or heavy cream for a richer flavor) - 2 tablespoons olive oil - 1 teaspoon dried thyme - 1 teaspoon smoked paprika - Salt and pepper to taste - Fresh parsley, chopped (for garnish) When making creamy garlic white bean soup, you need simple and fresh ingredients. White beans serve as the base. They provide creaminess and protein. I prefer cannellini or great northern beans. Both are soft and smooth. A medium onion adds depth and sweetness to the soup. Garlic brings strong flavor. I use four cloves for a nice kick. Vegetable broth adds rich taste. You can use homemade or store-bought broth. Coconut milk gives the soup its creamy texture. For a richer taste, heavy cream works well too. Olive oil is essential for sautéing the onion and garlic. Dried thyme and smoked paprika add warmth and earthiness. Season with salt and pepper to make the flavors pop. Finally, fresh parsley brightens the dish when you serve it. This soup is easy to make and very satisfying. You can find the full recipe for this dish above. This soup is not only tasty but also healthy. It is high in fiber and protein due to the beans. The coconut milk adds healthy fats. Each serving provides a good balance of nutrients. You can change some ingredients to suit your taste. If you want a different bean, try chickpeas or navy beans. Red onion works well instead of yellow. For a spicy kick, add a pinch of red pepper flakes. If you need a dairy-free option, stick with coconut milk. This soup is flexible and can fit many diets. Start by gathering all your ingredients. You need two cans of white beans, an onion, garlic, vegetable broth, coconut milk, olive oil, dried thyme, smoked paprika, salt, and pepper. Chop the onion into small pieces. Mince the garlic cloves. Drain and rinse the beans well to remove excess sodium. This prep work makes cooking quick and easy. In a large pot, heat the olive oil over medium heat. Once hot, add the chopped onion. Sauté for about five minutes or until the onion turns clear. Next, add the minced garlic. Cook it for two more minutes. This helps to release the garlic’s flavor. Stir in the drained white beans, thyme, smoked paprika, salt, and pepper. Mix everything well to coat the beans in flavor. Now, pour in the vegetable broth. Bring the mixture to a boil. When it starts to boil, lower the heat and let it simmer for 15 to 20 minutes. This time allows the flavors to blend. After simmering, it’s time to blend the soup. I recommend using an immersion blender for this. Blend until the soup is smooth and creamy. If you want some texture, blend just half of the soup. This way, you still have chunks of beans to enjoy. Stir in the coconut milk and heat the soup for another five minutes. Taste it and adjust the seasoning if needed. Serve hot and garnish with fresh parsley. For the full recipe, check out the details above. Enjoy your creamy garlic white bean soup! To make your soup nice and creamy, blend well. I use an immersion blender. This tool lets you puree the soup right in the pot. If you want some texture, blend only half. For extra creaminess, add coconut milk or heavy cream. This makes the soup rich and smooth. Good seasonings can make a big difference. I love using dried thyme and smoked paprika. These give the soup depth and warmth. You can also add a pinch of cayenne for some heat. Don't forget to taste and adjust the salt and pepper. This will bring out all the flavors. Serve your soup hot, topped with fresh parsley. This adds color and a fresh taste. You can pair it with crusty bread or a light salad. For a complete meal, try adding grilled chicken or sautéed greens. Enjoy it with friends or family for a cozy meal. Check out the Full Recipe for more tips! {{image_2}} You can easily add protein to your creamy garlic white bean soup. For a heartier meal, try adding cooked chicken or turkey. Just shred the meat and stir it in during the last few minutes of cooking. If you want a plant-based option, add cooked quinoa or chickpeas. Both will blend well with the creamy texture of the soup without overpowering its flavor. This soup is naturally vegetarian. To make it vegan, simply use coconut milk instead of heavy cream. The coconut milk gives a rich taste and keeps it creamy. You can also add nutritional yeast for a cheesy flavor without dairy. This way, you can enjoy a warm, fulfilling dish that fits your dietary needs. To boost the flavor, try adding fresh herbs like rosemary or basil. They add a nice touch and aroma. You can also play with spices. A pinch of red pepper flakes gives a nice kick. If you love a smoky flavor, add more smoked paprika. For a fresh twist, squeeze a little lemon juice right before serving. These simple changes keep the soup exciting each time you make it. For the full recipe, check out the detailed cooking steps! Store any leftover creamy garlic white bean soup in an airtight container. Make sure it is cool before sealing the lid. You can keep it in the fridge for up to four days. If you want to enjoy it later, storing it properly will keep it fresh. You can freeze this soup for longer storage. Use freezer-safe containers or bags. Leave some space at the top, as the soup will expand when it freezes. The soup can last in the freezer for up to three months. When you're ready to eat it, thaw it in the fridge overnight. To reheat the soup, pour it into a pot over medium heat. Stir it gently as it warms. You can also microwave it in a safe bowl. Heat in short bursts, stirring in between. If the soup seems too thick, add a splash of vegetable broth or water to reach your desired consistency. Enjoy it warm for a cozy meal! For the full recipe, check out the link provided. Creamy garlic white bean soup lasts about 4 to 5 days in the fridge. Keep it in a sealed container. This way, it stays fresh and safe to eat. Always check for any off smells or changes in color before enjoying leftovers. Yes, you can use dried beans. Just soak them overnight before cooking. Use about 1 cup of dried beans for this soup recipe. After soaking, cook them until tender, then follow the recipe as usual. This adds a nice texture and flavor to your soup. You can serve white bean soup with crusty bread or a fresh salad. Grilled cheese sandwiches also pair nicely. For a heartier meal, try a side of roasted vegetables. These sides can bring out the yummy garlic flavor in the soup. Yes, you can make this soup ahead of time. It tastes even better the next day as the flavors blend. Just store it in the fridge after cooking. Reheat it on the stove when ready to serve. Absolutely! This soup is packed with fiber and plant-based protein. White beans are great for your heart. The garlic adds flavor and has health benefits too. It’s a wholesome choice for any meal. Yes, this soup freezes well. Let it cool completely before transferring it to freezer-safe containers. It can last for up to 3 months in the freezer. Just thaw in the fridge overnight and reheat when ready to eat. If you want a kick, add red pepper flakes or hot sauce. Stir in these spicy additions during cooking. This will give your creamy garlic white bean soup a warm, zesty flavor that wakes up your taste buds. For a richer flavor, you can use heavy cream instead of coconut milk. This will give the soup a creamier texture. You can also add more garlic for a stronger taste. Experiment with flavors to find your perfect mix. To make the soup more filling, add diced potatoes or carrots during cooking. You can also stir in cooked grains like quinoa or rice. These options will add bulk and nutrients to your meal. Yes! Fresh parsley adds a nice touch. You can also use croutons or a drizzle of olive oil for extra flavor. Garnishing makes the soup look appealing and adds a bit of crunch. For the full recipe, check out the [Full Recipe]. This blog post covered how to make creamy garlic white bean soup. We went through ingredients, nutritional info, and cooking steps. I shared tips for a creamy texture and flavor must-haves. You learned about serving options and variations too. In summary, this soup is easy and healthy. Feel free to customize it to fit your taste. Enjoy making it for friends, family, or yourself!](https://dailydishlab.com/wp-content/uploads/2025/07/b682e594-aaaa-4098-8015-8011c3b1faa4-768x768.webp)
