Honey Garlic Glazed Salmon Tasty and Easy Dish

Are you ready to make a dish that’s both tasty and easy? Honey Garlic Glazed Salmon is the perfect choice. This meal bursts with flavor and takes just minutes to prepare. With simple ingredients and quick steps, you can impress your family or friends. In this blog post, I’ll guide you through everything—from gathering ingredients to cooking tips. Let’s dive in and create something delicious together!
Why I Love This Recipe
- Simple Ingredients: This recipe uses everyday ingredients that are easy to find, making it accessible for anyone to try.
- Quick Cooking Time: With only 20 minutes from start to finish, it’s perfect for a delicious weeknight dinner.
- Flavorful Glaze: The honey garlic glaze adds a sweet and savory depth that elevates the salmon to a whole new level.
- Healthy & Nutritious: Salmon is rich in omega-3 fatty acids, making this dish both tasty and beneficial for your health.
Ingredients
Main Ingredients for Honey Garlic Glazed Salmon
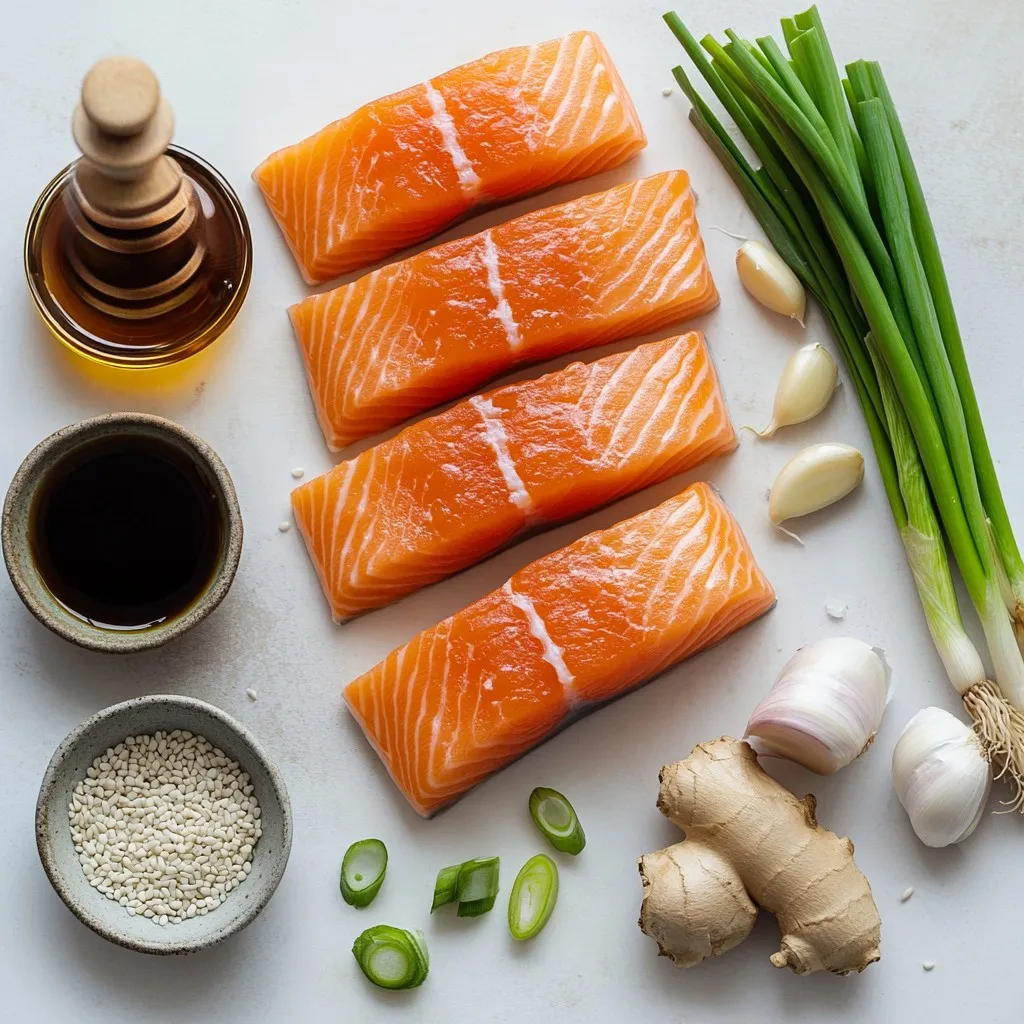
To make this tasty dish, you will need:
- 4 salmon fillets (about 6 oz each)
- 1/4 cup honey
- 3 tablespoons soy sauce (or tamari for gluten-free)
- 3 cloves garlic, minced
- 1 tablespoon fresh ginger, grated
- 1 tablespoon sesame oil
- Salt and pepper to taste
These main ingredients give the salmon a sweet and savory flavor. The honey adds a nice glaze, while the garlic and ginger bring warmth and depth.
Pantry Staples
You might already have a few of these items at home. Check for:
- Sesame oil
- Soy sauce or tamari
- Salt and pepper
These staples help create the sauce that makes this dish shine.
Optional Garnishes
For extra flair, consider these garnishes:
- 1 tablespoon sesame seeds
- 2 green onions, sliced
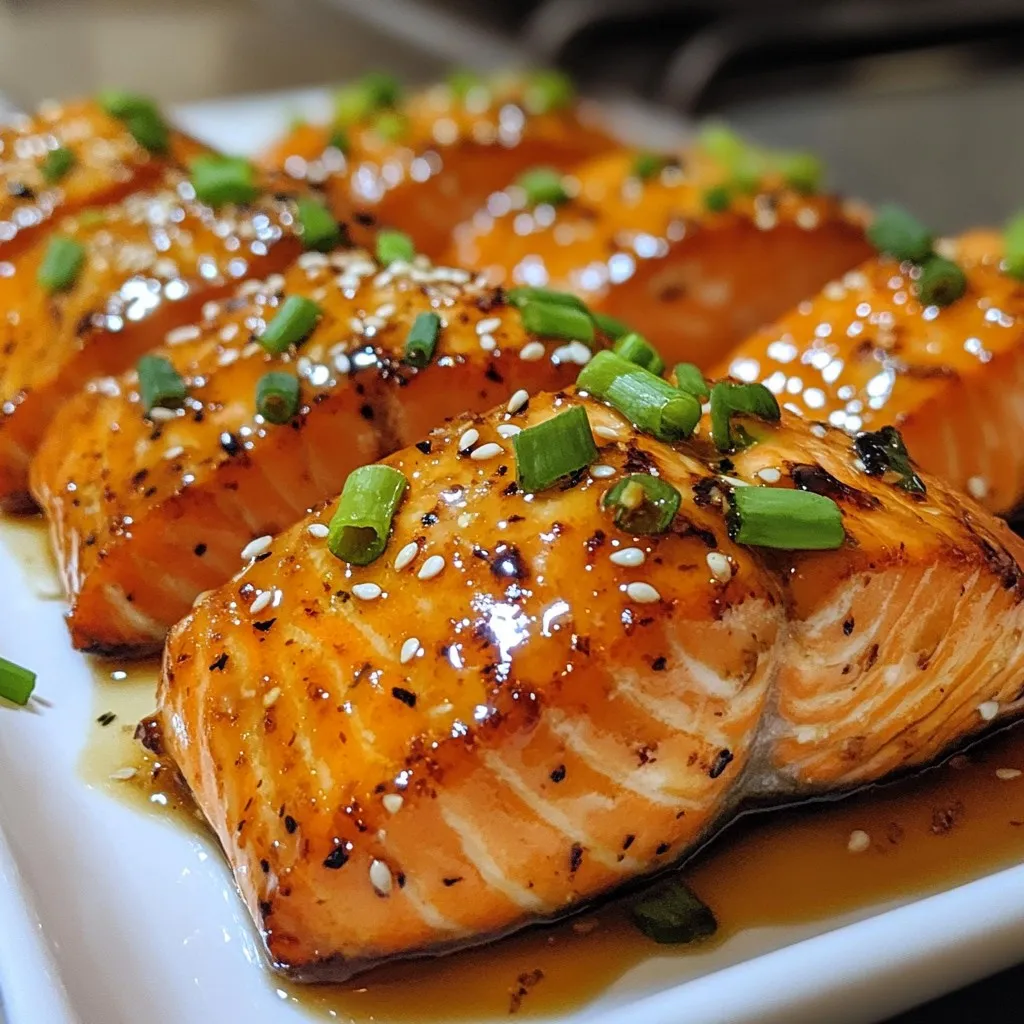
These add a nice crunch and bright color to your plate. Plus, they enhance the overall look of the dish.

Step-by-Step Instructions
Preparation Steps
To start, gather all your ingredients. You need:
- 4 salmon fillets (about 6 oz each)
- 1/4 cup honey
- 3 tablespoons soy sauce
- 3 cloves garlic, minced
- 1 tablespoon fresh ginger, grated
- 1 tablespoon sesame oil
- Salt and pepper to taste
- 1 tablespoon sesame seeds (for garnish)
- 2 green onions, sliced (for garnish)
In a small bowl, whisk the honey, soy sauce, garlic, ginger, and sesame oil together. Make sure it is well mixed. Next, season the salmon fillets with salt and pepper on both sides. This adds flavor.
Cooking Method Explained
Now, heat a large skillet over medium heat. Add a drizzle of sesame oil. Once the oil is hot, place the salmon fillets skin-side down in the skillet. Cook for about 4-5 minutes. You want the skin to be crispy.
After that, carefully flip the salmon fillets. Pour the honey garlic mixture over them. Cook for another 4-5 minutes. Baste the fillets with the sauce. This helps the salmon soak in the flavors. Once cooked to your liking, remove the salmon from the skillet. Let it rest for a minute.
Final Touches
To serve, drizzle the remaining sauce from the pan over the salmon fillets. This adds a nice shine and flavor. Finally, garnish with sesame seeds and sliced green onions. These add a fresh crunch and color to your dish. Enjoy your honey garlic glazed salmon!
Tips & Tricks
How to Achieve Perfectly Cooked Salmon
To cook salmon just right, start with fresh fillets. Look for bright, pink flesh. Season the salmon with salt and pepper evenly. Heat your skillet until it’s hot. Place the salmon skin-side down first. This helps get a crispy skin. Cook for 4-5 minutes, then flip it. Pour the honey garlic sauce over the salmon. Cook for another 4-5 minutes. Baste the fish to keep it moist. Your salmon should be opaque and flake easily with a fork.
Flavor Enhancements
To make the flavors pop, add fresh herbs. Chopped cilantro or basil can elevate the dish. A splash of lime juice adds a bright twist. You can also mix in some chili flakes for heat. If you want a sweeter glaze, add more honey. For a touch of acidity, try rice vinegar. These small tweaks can transform your dish into something special.
Cooking Substitutions
If you don’t have salmon, try using another fish like trout or tilapia. For a vegetarian option, use tofu. Just press and marinate it in the sauce. If you need a gluten-free option, swap soy sauce for tamari. You can also use maple syrup instead of honey for a different flavor. These substitutions keep your meal tasty while meeting dietary needs.
Pro Tips
- Use Fresh Ingredients: For the best flavor, use fresh garlic and ginger. They will enhance the taste of the honey garlic glaze significantly.
- Adjust Cooking Time: Cooking time may vary based on the thickness of the salmon fillets. Use a meat thermometer to ensure they reach 145°F for perfect doneness.
- Let it Rest: Allow the salmon to rest for a minute after cooking. This helps the juices redistribute, making the fish more tender and flavorful.
- Experiment with Garnishes: Don’t hesitate to add additional garnishes like chopped cilantro or a squeeze of lime for an extra burst of flavor.

Variations
Alternative Proteins
You can swap salmon for other proteins to change things up. Try using chicken breasts. They cook well with the same honey garlic sauce. You can also use firm tofu for a tasty vegetarian option. Just make sure to press the tofu first to remove extra moisture. This helps it absorb more flavor.
Different Flavor Profiles
Feel free to get creative with flavors. Swap soy sauce with coconut aminos for a milder taste. Add a splash of lime juice for a zesty kick. You might even try adding sriracha for some heat. Mixing in fresh herbs, like cilantro or basil, can also give the dish a fresh twist.
Serving Suggestions
Serve your honey garlic glazed salmon over rice or quinoa. Both of these grains soak up the sauce nicely. Pair it with steamed veggies like broccoli or snap peas for a colorful plate. You can also serve it on a bed of greens for a light salad option. Don’t forget to drizzle extra sauce on top for added flavor!
Storage Info
Refrigeration Guidelines
After cooking your honey garlic glazed salmon, let it cool. Place the salmon in an airtight container. It will stay fresh in the fridge for about 3 days. Make sure to store it within two hours of cooking for best results. When ready to eat, check for any off smells or changes in texture.
Freezing Techniques
If you want to save some salmon for later, freezing is a great option. Wrap each fillet tightly in plastic wrap. Then, place the wrapped fillets in a freezer bag. This way, they won’t get freezer burn. Your salmon can last up to 3 months in the freezer. When you’re ready, thaw it in the fridge overnight before cooking.
Reheating Instructions
To reheat your salmon, use the oven for best taste. Preheat your oven to 350°F (175°C). Place the salmon on a baking sheet and cover it with foil. Heat for about 10-15 minutes or until warmed through. You can also use a microwave, but the oven keeps it moist and flavorful. Enjoy your tasty dish again!
FAQs
How long to cook salmon for perfect doneness?
Cook salmon for about 8-10 minutes total. Start with 4-5 minutes skin-side down. Then, flip it and cook for another 4-5 minutes. The salmon should flake easily with a fork when done. If you prefer your salmon less cooked, reduce the time slightly. Always check for doneness with a fork or knife.
Can I use different types of fish?
Yes, you can use other fish like trout or sea bass. These fish work well with the honey garlic sauce. The cooking time may vary slightly based on the thickness of the fish. Adjust the cooking time to ensure it’s cooked through but not dry. Experimenting with different fish can add variety to your meals.
How to make this recipe gluten-free?
To make this recipe gluten-free, swap soy sauce for tamari. Tamari is a gluten-free version of soy sauce. Ensure all other ingredients are gluten-free as well. The rest of the recipe remains the same. Enjoy the same great taste without the gluten!
This blog post shared simple steps to make honey garlic glazed salmon. We discussed key ingredients, preparation steps, and cooking methods. You learned tips for perfect cooking and flavor boosts. I also covered variations, storage tips, and answered common questions.
With this guide, you can make a great meal easily. Enjoy cooking and feel proud of your dis

Honey Garlic Glazed Salmon
Ingredients
- 4 fillets salmon (about 6 oz each)
- 0.25 cup honey
- 3 tablespoons soy sauce (or tamari for gluten-free)
- 3 cloves garlic, minced
- 1 tablespoon fresh ginger, grated
- 1 tablespoon sesame oil
- to taste salt and pepper
- 1 tablespoon sesame seeds (for garnish)
- 2 green onions, sliced (for garnish)
Instructions
- In a small bowl, whisk together the honey, soy sauce, minced garlic, ginger, and sesame oil until well combined.
- Season the salmon fillets with salt and pepper on both sides.
- Heat a large skillet over medium heat and add a drizzle of sesame oil.
- Once the oil is hot, place the salmon fillets skin-side down in the skillet. Cook for about 4-5 minutes or until the skin is crispy.
- Flip the salmon fillets and pour the honey garlic mixture over them.
- Cook for an additional 4-5 minutes, basting the fillets with the sauce until they are cooked to your liking and the sauce has thickened slightly.
- Remove the salmon from the skillet and let it rest for a minute.
- To serve, drizzle remaining sauce from the pan over the salmon fillets and garnish with sesame seeds and sliced green onions.


![To make Easy Vegetable Pad Thai, you need just a few key items. Here’s what you’ll need: - 8 oz rice noodles - 2 tablespoons vegetable oil - 1 red bell pepper, julienned - 1 green bell pepper, julienned - 1 carrot, shredded - 3 green onions, chopped (whites and greens separated) - 2 cloves garlic, minced - 1 cup bean sprouts - 2 large eggs (optional for non-vegetarians) - 3 tablespoons soy sauce - 1 tablespoon tamarind paste - 1 tablespoon brown sugar - 1 tablespoon lime juice - Salt and pepper to taste - Crushed peanuts and lime wedges for garnish These ingredients create a bright and fresh flavor. Each one adds its own twist to the dish. You can easily change this recipe to fit your taste. Here are some optional ingredients you might like: - Tofu or tempeh for protein - Broccoli or snap peas for more veggies - Chili flakes for heat - Cilantro for extra flavor - Sesame oil for a nutty taste These additions help you make the dish your own. Feel free to mix and match based on what you have at home. For this recipe, you want to use the right rice noodles. Here are the best types to choose from: - Flat rice noodles: These are the most common for Pad Thai. They soak up flavors well. - Thin rice vermicelli: Great for a lighter dish, but cook them less time. - Thick rice noodles: Chewy and satisfying, but they may need longer cooking. I recommend going for flat rice noodles. They give you that authentic flavor and texture you crave. For the full recipe, check out the details above. To start, cook the rice noodles. Follow the package instructions closely. Usually, this means boiling them in water for about 5 to 7 minutes. You want them soft but not mushy. Once they are ready, drain them in a colander. Rinse with cold water to stop the cooking. Set the noodles aside. Next, let's prepare the vegetables. Take your red and green bell peppers and slice them into thin strips, called julienne. Shred the carrot finely using a grater or a sharp knife. For the green onions, chop them into small pieces but keep the white and green parts separate. Mince the garlic into tiny bits. Once you finish, everything will be ready to cook. Now, it's time to bring everything together. In a large wok or skillet, heat the vegetable oil over medium-high heat. Add the minced garlic first and stir for about 30 seconds. It should smell great! Then, toss in the julienned peppers and shredded carrot. Stir-fry these for about 3 to 4 minutes. They should soften but still have a little crunch. If you want eggs, push the veggies to one side of the pan. Crack the eggs in the empty space and scramble them. Mix the cooked eggs with the veggies. Add the drained rice noodles to the wok. Next, add the chopped green onion whites, bean sprouts, soy sauce, tamarind paste, brown sugar, and lime juice. Toss everything together until well mixed and heated through. Taste and add salt and pepper as needed. Your Easy Vegetable Pad Thai is ready! Serve it hot, garnished with crushed peanuts and lime wedges. For the full recipe, check out the details above. Enjoy! To get great flavor in your Easy Vegetable Pad Thai, focus on the sauce. Use fresh ingredients like lime juice and tamarind paste. They add a nice tang. Make sure to taste as you mix. Adjust the soy sauce and sugar to your liking. If you want more heat, add some chili flakes. This will make your dish pop! Cooking your veggies just right is key. Start with high heat in your wok or skillet. This helps keep them crisp. Cut your vegetables into thin strips for even cooking. Stir-fry them quickly. This usually takes just a few minutes. Add bean sprouts last, as they need only a brief cook. This way, they stay crunchy. For the best experience, serve your Pad Thai hot. Top it with crushed peanuts; they add a nice crunch. A squeeze of lime juice brightens the flavors too. You can also add fresh herbs like cilantro for a fresh touch. Serve it with lime wedges on the side for extra zing. For a fun twist, pair it with spring rolls or a light salad. To see the full details, check the Full Recipe. {{image_2}} You can easily make this dish gluten-free. Use rice noodles, which are naturally gluten-free. Instead of soy sauce, try tamari. Tamari tastes similar but has no gluten. Always check labels to be sure. Tofu is a great option for plant-based protein. It adds texture and absorbs flavors well. Use firm tofu for the best results. Cut it into cubes and sauté until golden. If you eat eggs, they work too. Just scramble them before mixing with the veggies. Both choices are tasty and filling. Want more heat? Add red pepper flakes or chili paste. Start with a small amount; you can always add more. If you like it mild, skip the spicy ingredients. The beauty of this dish is you can customize it to your taste. Enjoy experimenting with flavors! To keep your leftover Pad Thai fresh, place it in an airtight container. Make sure to cool it down first. Store it in the fridge. It should last for about three days. Reheat your Pad Thai in a pan for the best texture. Add a splash of water or soy sauce. This helps make it moist again. Heat it on low, stirring gently. You can also use the microwave. Just cover it to keep moisture in. If you want to save Pad Thai for later, freezing is a good option. Cool it completely before packing it. Use freezer-safe containers or bags. It can last up to three months in the freezer. When ready to eat, thaw it in the fridge overnight before reheating. For best results, eat it within a month. For the full recipe, check out the Easy Vegetable Pad Thai. To make the sauce, mix soy sauce, tamarind paste, brown sugar, and lime juice. This blend gives the dish a sweet and tangy flavor. You want to balance these ingredients to your taste. I suggest starting with the amounts listed in the Full Recipe. Adjust to make it perfect for you! Absolutely! You can swap in any veggies you like. Broccoli, snap peas, and zucchini work great. Use what you have on hand. Just remember to cut them into small pieces for even cooking. The goal is to keep a nice crunch while adding color to your dish! If you can't find tamarind paste, you can use lime juice or a mix of vinegar and sugar. This will mimic the tangy flavor of tamarind. Another option is to use a store-bought pad Thai sauce that contains tamarind. Experiment to find what you enjoy best! To make this dish shine, you need fresh and colorful ingredients. Here’s what you’ll need: - 8 oz rice noodles - 2 tablespoons vegetable oil - 1 red bell pepper, julienned - 1 green bell pepper, julienned - 1 carrot, shredded - 3 green onions, chopped (whites and greens separated) - 2 cloves garlic, minced - 1 cup bean sprouts Feel free to tweak this recipe to fit your taste. Here are some extras: - 2 large eggs (optional for non-vegetarians) - Crushed peanuts for garnish - Lime wedges for garnish For the best texture, I suggest flat rice noodles. Look for the wide ones labeled as "Pad Thai noodles." They soak up flavors well and make the dish more satisfying. If you prefer thinner noodles, rice vermicelli works too. Just keep an eye on cooking time, as they cook faster. Check out the [Full Recipe] for detailed steps. You now have all you need for an Easy Vegetable Pad Thai. You learned about key ingredients, cooking steps, and how to customize your dish. Remember to use fresh veggies for great taste. Adjust flavors to fit your style, whether that’s adding spice or protein. Store any leftovers properly for a tasty meal later. Enjoy creating this dish and impressing yourself with your cooking skills. Now, grab your ingredients and get started on this delightful, vibrant meal!](https://dailydishlab.com/wp-content/uploads/2025/06/ea2fad35-4884-4485-94ec-1f29792ad057-768x768.webp)


