Honey Lime Chicken Fajitas Flavorful and Easy Recipe

Are you ready to spice up your dinner plans? My Honey Lime Chicken Fajitas offer a simple and tasty twist on a classic dish. This easy recipe combines zesty lime and sweet honey for a flavor punch you won’t forget. From marinating techniques to cooking tips, I’ll guide you every step of the way. Let’s dive into the world of fajitas that are both fun and flavorful!
Why I Love This Recipe
- Sweet and Tangy Flavor: The combination of honey and lime creates a delightful sweet and tangy flavor profile that complements the chicken perfectly.
- Quick and Easy: This recipe is simple to prepare, taking only 30 minutes from start to finish, making it perfect for busy weeknights.
- Customizable: You can easily swap out the vegetables or add your favorite toppings, allowing for personalization to suit your taste.
- Healthy and Delicious: With lean chicken and fresh vegetables, these fajitas are a nutritious meal option that doesn’t compromise on flavor.
Ingredients
Complete Ingredient List
To make Honey Lime Chicken Fajitas, you need:
- 1 lb chicken breast, sliced into thin strips
- 1 bell pepper (red, yellow, or green), sliced
- 1 onion, sliced
- 3 tablespoons honey
- 2 tablespoons lime juice (freshly squeezed)
- 2 tablespoons olive oil
- 1 teaspoon chili powder
- 1 teaspoon cumin
- 1 teaspoon garlic powder
- Salt and pepper to taste
- Flour or corn tortillas, for serving
- Fresh cilantro, for garnish
- Avocado slices, for serving
These ingredients blend to make a tasty dish. The honey adds sweetness, while lime juice gives it a nice tang.
Ingredient Substitutions
You can make some changes to fit your taste or needs:
- Use chicken thighs instead of breasts for more flavor.
- Try different bell peppers for a unique taste.
- If you don’t have honey, maple syrup works well.
- Use lime zest if fresh juice isn’t available.
- Swap olive oil for avocado oil or canola oil.
- For a milder dish, skip the chili powder or use paprika instead.
These swaps can help you enjoy this dish no matter what you have.
Nutritional Information
Each serving of Honey Lime Chicken Fajitas offers:
- Calories: 320
- Protein: 25g
- Fat: 14g
- Carbohydrates: 30g
- Fiber: 3g
- Sugar: 6g
This meal is balanced and healthy. It provides good protein and healthy fats while being low in sugar. Enjoy this dish without guilt!

Step-by-Step Instructions
Marinating the Chicken
First, grab a medium bowl. In this bowl, whisk together 3 tablespoons of honey, 2 tablespoons of lime juice, and 2 tablespoons of olive oil. Add in 1 teaspoon of chili powder, 1 teaspoon of cumin, and 1 teaspoon of garlic powder. Don’t forget to add salt and pepper to taste. This mixture is the magic marinade!
Now, slice 1 pound of chicken breast into thin strips. Place the chicken in the bowl, making sure every piece gets coated well. Let it sit for at least 15 minutes. If you have time, marinate it for up to 1 hour in the fridge. The longer it sits, the more the flavors soak in!
Cooking the Chicken and Vegetables
Next, heat a large skillet on medium-high heat. Once it’s hot, add the marinated chicken. Cook for about 6 to 8 minutes, stirring often. You want the chicken to be fully cooked and slightly caramelized.
After the chicken is cooked, add sliced bell pepper and onion to the skillet. Cook everything together for another 5 to 7 minutes. This will make the veggies tender but still crisp. Taste your mix and adjust the seasoning if needed. Once it’s just right, take it off the heat.
Assembling the Fajitas
Now it’s time to warm up your tortillas. You can do this in a separate skillet or over a flame for a few seconds on each side until they’re soft.
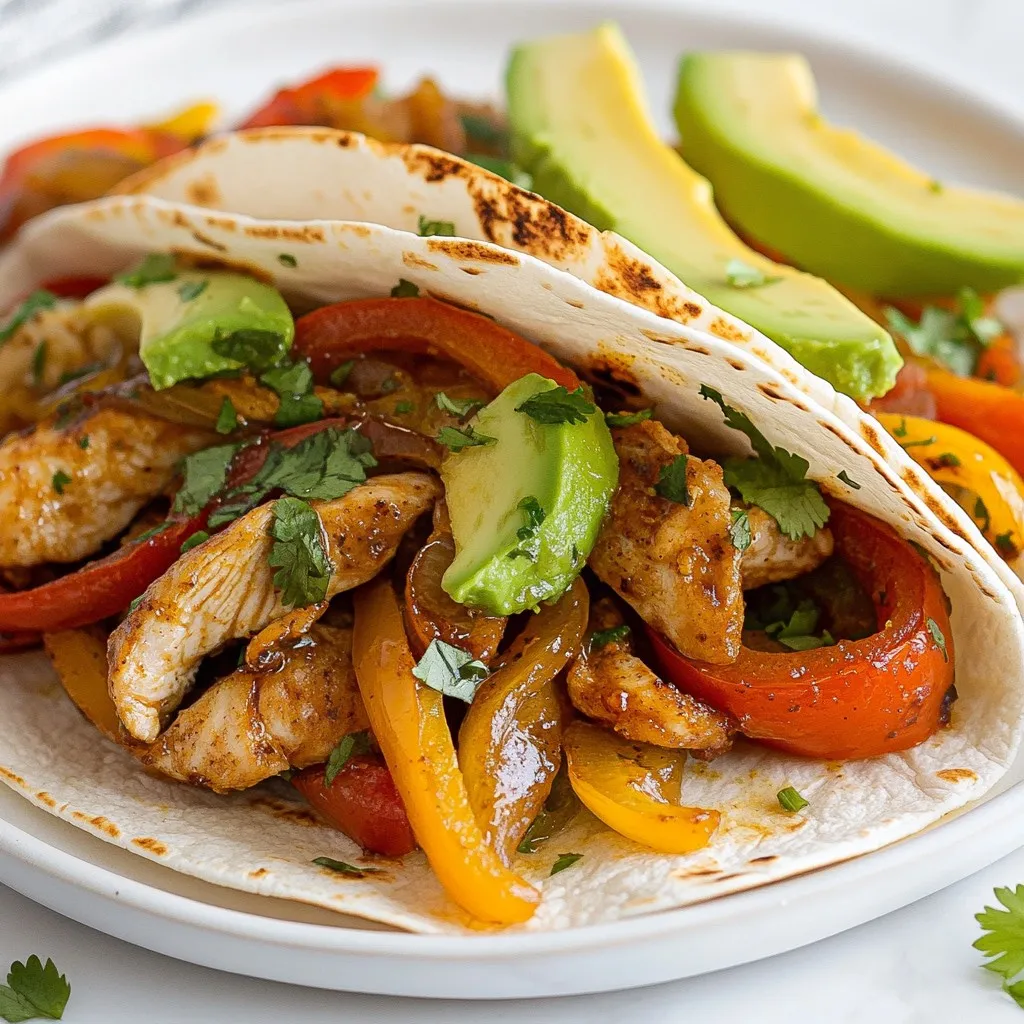
To serve, place a scoop of the chicken and veggie mix on each tortilla. Top it off with fresh avocado slices and a sprinkle of cilantro. You can roll or fold the tortillas around the filling. Enjoy every bite of these tasty fajitas!
Tips & Tricks
How to Achieve the Best Flavor
To get the best flavor in your Honey Lime Chicken Fajitas, marinate the chicken well. I suggest marinating for at least 15 minutes. If you have time, let the chicken sit for up to an hour. This gives the spices time to soak in. The honey and lime juice balance sweetness and tang. Use fresh lime juice for a bright taste.
Cooking Tips for Perfect Fajitas
When cooking, heat the skillet well. A hot skillet gives the chicken a nice sear. Cook the chicken for 6-8 minutes. Stir it occasionally for even cooking. Add the bell pepper and onion after the chicken is done. Cook them for 5-7 minutes. This keeps the veggies crisp and bright. Taste and season as you go. This way, you can adjust to your liking.
Serving Suggestions
Serve your fajitas with warm tortillas. You can use flour or corn based on your taste. Fresh avocado slices add creaminess. Garnish with chopped cilantro for color and flavor. You can also add salsa or sour cream. These toppings make each bite even better. Enjoy your meal with friends or family for a fun dinner!
Pro Tips
- Marinate for Maximum Flavor: Allow the chicken to marinate for at least 30 minutes or up to 1 hour for a more intense flavor profile.
- Use Fresh Ingredients: Opt for fresh lime juice and high-quality honey to elevate the taste of your fajitas.
- Customize Your Veggies: Feel free to add other vegetables like zucchini or mushrooms for added texture and flavor.
- Serve with Toppings: Enhance your fajitas with toppings like sour cream, cheese, or salsa for a delicious twist.

Variations
Vegetarian Honey Lime Fajitas
You can easily make a vegetarian version of honey lime fajitas. Just swap the chicken for hearty vegetables. Great options include zucchini, mushrooms, and eggplant. The marinade works well with these veggies, too. Marinate them just like the chicken. Cook them in the skillet until they are tender and sweet. You’ll still get that great honey lime flavor.
Other Protein Options
If you want to try other proteins, there are many choices. Shrimp is a quick and tasty option. Marinate uncooked shrimp for about 15 minutes. Then cook them until they turn pink. You can also use beef strips for a heartier meal. Just remember to adjust cooking times based on your protein choice. Each option brings a new taste to your fajitas.
Spicy Honey Lime Fajitas
To make your fajitas spicy, add some heat to the marinade. Mix in jalapeños or cayenne pepper for an extra kick. You can also use spicy chili powder instead of regular. If you like it really hot, add diced serrano peppers to the skillet while cooking. This extra spice pairs well with the sweet honey and tart lime.
Storage Info
How to Store Leftovers
To store leftovers, first let the fajitas cool down. Place them in an airtight container. Make sure to keep the chicken, vegetables, and tortillas separate. This way, they won’t get soggy. Store the container in the fridge. Leftovers can stay fresh for up to three days.
Reheating Instructions
To reheat your fajitas, take the chicken and veggies out of the container. Heat them in a skillet over medium heat. Stir often for even warming. This should take about five to seven minutes. For the tortillas, warm them in a dry skillet for about thirty seconds on each side. This brings back their softness.
Freezing Tips
If you want to freeze the fajitas, it’s best to freeze the chicken and veggies together. Use a freezer-safe bag and remove all the air. Write the date on the bag and store it in the freezer. They can last for up to three months. When you’re ready to eat, thaw overnight in the fridge before reheating.
FAQs
Can I use chicken thighs instead of breasts?
Yes, you can use chicken thighs. They are juicy and full of flavor. Thighs cook well in the marinade. Just slice them into thin strips. Follow the same cooking steps as for chicken breasts.
What can I serve with Honey Lime Chicken Fajitas?
You can serve many tasty sides with your fajitas. Here are a few ideas:
- Rice or quinoa for a hearty base
- Black beans for extra protein
- Salsa for a fresh kick
- Sour cream for creaminess
- Chopped lettuce for crunch
- Fresh lime wedges for extra zest
These sides will make your meal fun and filling.
How do I make fajitas in the oven?
Making fajitas in the oven is easy! Here’s how:
1. Preheat your oven to 400°F (200°C).
2. Mix the chicken and veggies with the marinade in a large bowl.
3. Spread everything on a baking sheet in one layer.
4. Bake for 20-25 minutes until the chicken is cooked through.
5. Stir halfway to ensure even cooking.
This method saves time and gives you delicious fajitas with less fuss.
In this post, we covered how to make tasty Honey Lime Chicken Fajitas. First, I shared key ingredients and swaps for your needs. Then, I provided simple steps for marinating, cooking, and assembling. I included tips for flavor and cooking techniques that make a difference. We also explored fun variations like vegetarian options and storage tips for leftovers.
Now, you can enjoy these fajitas any time. Happy cookin

Honey Lime Chicken Fajitas
Ingredients
- 1 lb chicken breast, sliced into thin strips
- 1 piece bell pepper (red, yellow, or green), sliced
- 1 piece onion, sliced
- 3 tablespoons honey
- 2 tablespoons lime juice (freshly squeezed)
- 2 tablespoons olive oil
- 1 teaspoon chili powder
- 1 teaspoon cumin
- 1 teaspoon garlic powder
- to taste salt and pepper
- as needed flour or corn tortillas, for serving
- as needed fresh cilantro, for garnish
- as needed avocado slices, for serving
Instructions
- In a medium bowl, whisk together the honey, lime juice, olive oil, chili powder, cumin, garlic powder, salt, and pepper to create a marinade.
- Add the sliced chicken to the marinade, ensuring all pieces are well-coated. Allow it to marinate for at least 15 minutes (or up to 1 hour in the fridge for more flavor).
- Heat a large skillet over medium-high heat. Once hot, add the marinated chicken and cook for about 6-8 minutes, stirring occasionally, until the chicken is cooked through and slightly caramelized.
- Add the sliced bell pepper and onion to the skillet with the chicken. Sauté everything together for an additional 5-7 minutes until the vegetables are tender but still crisp.
- Taste and adjust seasoning if necessary. Once everything is cooked to your liking, remove from heat.
- Warm your tortillas in a separate skillet or directly over a flame for a few seconds on each side until pliable.
- Serve the fajitas by placing a scoop of the chicken mixture on each tortilla. Top with fresh avocado slices and garnish with chopped cilantro.
- Roll or fold the tortillas around the filling and enjoy!


![- 200g rice noodles - 1 tablespoon coconut oil - 1 onion, thinly sliced - 2 garlic cloves, minced - 1 tablespoon ginger, minced - 1 red bell pepper, sliced - 1 cup broccoli florets - 1 carrot, julienned - 1 can (400ml) coconut milk - 3 tablespoons red curry paste - 2 tablespoons soy sauce - 1 tablespoon lime juice - Fresh basil leaves for garnish - Salt and pepper to taste For this recipe, you can switch up the vegetables. Try adding snap peas or zucchini for a new twist. For the best flavor, I recommend brands like Thai Kitchen for red curry paste and Chaokoh for coconut milk. These brands offer great taste and consistency. If you want to make this meal even easier, use pre-chopped vegetables. They save time and still taste fresh. Explore your local market for seasonal veggies too! They add color and flavor to your dish. For the full recipe, check the instructions above to create your own Thai Red Curry Noodles. Enjoy the process and the flavors! Start by boiling water in a large pot. Add the rice noodles and cook them based on the package instructions. Usually, it takes about 4-6 minutes. Stir gently to keep them from sticking. To avoid sticky noodles, drain them right away. Rinse them under cold water to stop the cooking process. Toss them with a little coconut oil to keep them separate. This step makes a big difference! Slice your vegetables neatly for even cooking. Use a sharp knife for best results. For the onion, cut it thinly. Mince the garlic and ginger finely. Slice the red bell pepper and julienne the carrot. Cut the broccoli into small florets. Now, let’s talk about cooking times. Sauté the onion for about 2-3 minutes until it’s soft. Then add the garlic and ginger for one more minute. After that, toss in the bell pepper, broccoli, and carrot. Cook for about 5 minutes until they are tender but still crisp. In a large skillet or wok, pour in the coconut milk. Add the red curry paste and stir well. Mix until the paste is fully dissolved in the milk. This creates a rich, creamy sauce. Next, add the cooked rice noodles. Gently fold them into the sauce. Make sure every noodle gets coated. This is key for great flavor. Let everything simmer for 2-3 minutes to heat through. Serve hot, garnished with fresh basil leaves. This adds a lovely touch to your dish and makes it even more flavorful. Enjoy every bite! For the full recipe, see above. To get the best taste, always use fresh ingredients. Fresh vegetables and herbs boost flavors. Pre-packaged items often lack depth and freshness. When it comes to balancing flavors, think about these three key elements: - Spicy: Use more red curry paste for heat. - Sweet: A teaspoon of sugar can soften strong flavors. - Salty: Soy sauce adds a nice umami kick. Adjust these as needed for your taste. For cooking, I recommend using a wok. A wok heats evenly and helps stir-fry better. If you don't have one, a large skillet works well too. When adding protein, think about these options: - Chicken: Thinly slice for quick cooking. - Tofu: Use firm tofu, cut into cubes, and sauté until golden. - Shrimp: Add shrimp last to avoid overcooking. Cook protein separately, then mix it in at the end. Pair your Thai Red Curry Noodles with side dishes like: - Steamed jasmine rice - A fresh cucumber salad - Spring rolls for a crunchy touch For a nice presentation, serve in deep bowls. Garnish with fresh basil leaves and lime wedges. This adds color and freshness, making your meal look restaurant-quality. {{image_2}} You can easily make Thai Red Curry Noodles vegan or vegetarian. Start by swapping the coconut milk for a plant-based version. Use vegetable broth if you want a lighter taste. For protein, try tofu or tempeh. Both options soak up flavors well. Thai Red Curry Noodles change across Thailand. In the north, cooks add more herbs like cilantro and mint. In the south, seafood is common. You might see shrimp or fish added to the dish. Each region has unique flavors that make the dish special. Feel free to add local veggies, like eggplant or bamboo shoots, to your version. Get creative with your Thai Red Curry Noodles! Add fresh herbs, like basil or cilantro, for a burst of flavor. You can also try different spices. A pinch of cumin or coriander can enhance the taste. If you like heat, add chili flakes or fresh peppers. Change up the recipe by adding new veggies or proteins each time you make it. The options are endless! For the complete recipe, check the [Full Recipe]. After you enjoy your Thai Red Curry Noodles, let any leftovers cool first. Place them in an airtight container. This keeps the flavors fresh. You can store them in the fridge for up to three days. If you want to keep them longer, freeze them in a freezer-safe container. They can last for up to three months in the freezer. When you reheat, avoid using high heat. This helps keep the noodles from getting mushy. The best way is to use a skillet over medium heat. Add a splash of water to help steam the noodles. You can also pop them in the microwave. Just cover the bowl to keep moisture in. To refresh the dish, add fresh basil or a squeeze of lime juice right before serving. To make meals quicker, you can prep some ingredients ahead of time. Slice your veggies like bell peppers and carrots a day before. Cook the rice noodles in advance and store them separately. When you are ready to eat, simply combine the prepped ingredients with the sauce. This way, you can whip up your Thai Red Curry Noodles in no time on busy weekdays! What can I substitute for red curry paste? You can use yellow curry paste or green curry paste. These options have different flavors but still work well. You can also make a homemade version. Just blend some dried red chilies, garlic, and spices. It may taste a bit different but still delicious. Can I make Thai Red Curry Noodles gluten-free? Yes, you can easily make this dish gluten-free. Simply use gluten-free soy sauce or tamari instead of regular soy sauce. Make sure that the rice noodles are also gluten-free. Most rice noodles are naturally gluten-free. How to make this recipe nut-free To make this recipe nut-free, ensure you don't use any nut-based oils or sauces. Coconut oil is safe. Just check your red curry paste to ensure it doesn’t contain nuts. Caloric content and nutritional breakdown This dish is rich in flavor and nutrition. A serving has about 400 calories. It includes healthy fats from coconut milk and fiber from vegetables. The rice noodles provide energy from carbohydrates. What is the origin of Thai Red Curry Noodles? Thai Red Curry Noodles come from Thailand, where curry is a staple. This dish combines the bold flavors of red curry paste with rice noodles. It’s a favorite among locals and visitors. How does this dish differ from other Thai noodle dishes? Thai Red Curry Noodles are creamier and richer than others like Pad Thai. They use coconut milk and red curry paste, giving them a unique taste. Other dishes may focus more on soy sauce or tamarind for flavor. Thai Red Curry Noodles are a delicious and flexible dish. You can choose different veggies and proteins to fit your taste. I shared tips for cooking and serving, so your meal looks and tastes great. Remember to store leftovers well and reheat them with care. These simple steps will help you enjoy this dish again. Keep exploring flavors and making it your own. Happy cooking!](https://dailydishlab.com/wp-content/uploads/2025/07/3b703aa1-219d-4915-aa03-8b54d55df68d-768x768.webp)
. First, preheat your oven to 350°F (175°C). This makes sure your casserole cooks evenly. Next, grab a large baking dish. Spread a thin layer of alfredo sauce on the bottom. This helps prevent sticking. Now, let’s sauté some garlic and onion. In a skillet, heat a tablespoon of oil over medium heat. Add the minced garlic and diced onion. Cook until the onion is clear, about 4-5 minutes. This step brings out great flavor. Next, add the shredded chicken, black beans, corn, cumin, chili powder, salt, and pepper. Mix well and cook for 3-4 minutes. This allows the flavors to blend nicely. Now, let’s dip the tortillas in alfredo sauce. Coat both sides lightly for the best flavor. Lay 6 tortillas flat in the baking dish. Overlap them slightly, if needed. Next, it's time to assemble the layers. Spread half of the chicken and bean mixture over the tortillas. Then, sprinkle half of the shredded cheese on top. Repeat this process with the remaining tortillas and chicken mixture. Finish by pouring the rest of the alfredo sauce and topping with the last of the cheese. To bake, cover the dish with aluminum foil, shiny side in. Bake for 25 minutes. This keeps moisture in. After that, remove the foil and bake for another 10-15 minutes. You want the cheese to be bubbly and golden brown. Let the casserole cool for 5 minutes before serving. Garnish with fresh cilantro for a tasty touch. For the full recipe, check out the complete details. You can make this casserole a day before. Just prepare each part and store them in the fridge. Keep the tortillas, chicken mixture, and sauce separate until you are ready to bake. This way, the flavors blend well. When ready, layer as directed in the Full Recipe. Bake it straight from the fridge for about 10 extra minutes. Taste is key. Adjust the seasoning to fit your preference. If you like it spicier, add more chili powder. For a creamier texture, stir in a bit more alfredo sauce. You can also mix in a splash of milk or cream for extra richness. This makes every bite so much better. Pair your casserole with simple side dishes like a fresh salad or rice. These balance the cheesy richness of the enchiladas. For garnish, sprinkle fresh cilantro on top. You could also add sliced green onions or diced tomatoes for color. This makes your dish look as good as it tastes! {{image_2}} You can switch up the protein in this dish. Instead of chicken, try beef or shrimp. Ground beef adds a nice flavor. Shrimp gives a light touch. Both options work well with the creamy sauce. For a vegetarian version, use black beans or lentils. They add protein and keep it satisfying. Boost the flavor by adding spices. Try a pinch of cayenne for heat. You can also mix in smoked paprika for a smoky taste. Adding vegetables makes it even better. Bell peppers, spinach, or zucchini all work great. They add color and nutrients to your meal. If you need a gluten-free meal, corn tortillas are your best choice. They hold up well and taste great. You can also find gluten-free alfredo sauce at the store. Check labels to ensure it meets your needs. This way, everyone can enjoy the casserole without worry. For the full recipe, be sure to check out the ingredients and instructions. To keep your Chicken and Cheese Enchiladas Alfredo Casserole fresh, use airtight containers. Glass or plastic containers with tight lids work best. This keeps the casserole from drying out and helps it stay tasty. In the fridge, the casserole lasts about three to four days. You can freeze the casserole before or after baking. If you freeze it before baking, wrap it tightly in plastic wrap and then again in foil. This helps prevent freezer burn. If you choose to freeze it after baking, wait for it to cool first. Then, store it in a freezer-safe container. When you are ready to eat, thaw the casserole overnight in the fridge. To reheat, place it in the oven at 350°F (175°C) until warm all the way through. You can also microwave it for a quicker option, but check often to avoid overcooking. Enjoy your delicious casserole, even days later! For the full recipe, check out the complete details. How to reheat Chicken and Cheese Enchiladas Alfredo Casserole? To reheat, preheat your oven to 350°F (175°C). Place the casserole in a baking dish and cover with foil. Bake for about 20 minutes or until hot. You can also use a microwave. Heat in short intervals, stirring in between, until warm. Can I make it ahead of time? Yes, you can prepare the casserole a day before. Assemble it and store it in the fridge. Just bake it when you’re ready to serve. This saves time and adds flavor as it sits. What can I serve with Chicken and Cheese Enchiladas Alfredo Casserole? I love serving this casserole with a fresh salad or some Mexican rice. You can also add guacamole, sour cream, or fresh salsa. These sides balance the richness and make the meal more delicious. What’s the best way to adjust the spice level? To change the spice level, you can add more or less chili powder. If you want it milder, skip the chili powder. For more heat, add diced jalapeños or a dash of hot sauce. How to tell when it's done baking? You’ll know it’s done when the cheese is bubbly and golden brown. The casserole should be hot all the way through. A knife inserted in the center should come out warm. Enjoy the full recipe to make this dish shine! This blog post covered a delicious Chicken and Cheese Enchiladas Alfredo Casserole. We discussed the key ingredients, including chicken, tortillas, and cheese. I offered tips on how to prepare, layer, and bake the dish for perfect results. Remember to try the variations to suit your taste. In summary, this dish is easy to make and full of flavor. It works well for gatherings or busy weeknights. Enjoy this tasty casserole and make it your own!](https://dailydishlab.com/wp-content/uploads/2025/06/c52f16b1-e126-40f1-801c-467dac7db649-768x768.webp)

![For these tasty bowls, you need: - 2 boneless, skinless chicken breasts - 1 cup jasmine rice - 1 cucumber, thinly sliced - 1 carrot, julienned - Fresh cilantro leaves for garnishing - Lime wedges for serving - Sliced red chili (optional, for heat) These ingredients create a base full of flavor and texture. The chicken offers protein, while the jasmine rice adds a nice touch of sweetness. The veggies give crunch and freshness. The marinade brings all the flavors together. Here’s what you need: - 3 tablespoons fish sauce - 2 tablespoons honey - 1 tablespoon soy sauce (low-sodium is fine) - 2 cloves garlic, minced - 1 tablespoon fresh ginger, grated - 1/2 teaspoon black pepper This mix makes the chicken tender and packed with taste. Fish sauce adds a salty depth, while honey balances it with sweetness. Garlic and ginger provide warmth and depth. Feel free to add more veggies to your bowls. Some great options include: - Bell peppers, sliced - Snap peas, trimmed - Radishes, thinly sliced You can also switch up the garnishes. Consider adding: - Chopped green onions - Sesame seeds - Fresh mint leaves These additions enhance the meal's look and flavor. They also add extra nutrients, making your meal even better. For the full recipe, check out the Vietnamese Chicken Meal Prep Bowls section. To start, you need to make the marinade. In a mixing bowl, whisk together: - 3 tablespoons fish sauce - 2 tablespoons honey - 1 tablespoon soy sauce - 2 cloves garlic, minced - 1 tablespoon fresh ginger, grated - 1/2 teaspoon black pepper Mix well until everything blends together. This marinade gives the chicken a great flavor. Next, add the chicken breasts to the bowl. Make sure each breast is coated with the marinade. Cover the bowl and let it sit in the fridge for at least 30 minutes. If you have time, let it marinate for up to 2 hours for more flavor. While the chicken marinates, it’s time to cook the jasmine rice. In a medium pot, combine: - 1 cup jasmine rice - 1 3/4 cups water or low-sodium chicken broth - A pinch of salt Bring the mixture to a boil over medium-high heat. Once it boils, lower the heat and cover with a lid. Let it simmer for about 15 minutes until the rice is fluffy. After cooking, keep it covered for an extra 5 minutes. This helps the rice steam and become perfect. Now, heat a non-stick skillet on medium-high heat. Add a little cooking oil once it’s hot. Carefully place the marinated chicken in the skillet. Cook each side for 6-7 minutes. You want the chicken to be golden-brown and fully cooked. Use a meat thermometer to ensure it reaches 165°F (75°C). Once cooked, take the chicken out of the skillet. Let it rest for a few minutes on a cutting board. After it rests, slice the chicken into thin strips. This makes it tender and easy to eat. Now for the fun part: assembling the bowls! Start by dividing the cooked jasmine rice into 4 airtight containers. Top each serving of rice with sliced chicken. Then, add: - Thinly sliced cucumber - Julienned carrots Garnish each bowl with fresh cilantro leaves. Place lime wedges on the side for a burst of flavor when you eat. If you like some heat, add sliced red chili on top. Allow the bowls to cool before sealing them with lids. You can store them in the fridge for up to 4 days. These meal prep bowls are perfect for quick lunches or dinners. For the complete recipe, check out the [Full Recipe]. To make meal prep easy, I like to set up a workspace. First, gather all your tools. This includes cutting boards, knives, and bowls. Having everything close by cuts down on time. I also recommend cooking in batches. Make extra rice or chicken. This way, you can use them in other meals too. To ensure juicy chicken, marinate it well. A good marinade adds flavor and moisture. I suggest marinating for at least 30 minutes. For best results, go for 2 hours. When cooking, use medium-high heat. This helps create a nice golden color. Always check the chicken's temperature. It should reach 165°F (75°C). Letting it rest after cooking is key. This keeps the juices in the meat. There are many ways to boost flavor in your meal prep bowls. Try adding fresh herbs like mint or basil. You can also squeeze lime juice over each bowl. For extra crunch, add chopped peanuts or cashews. If you like spice, toss in some sliced chili. These small touches make a big difference. For the full recipe, check out the complete guide on Vietnamese Chicken Meal Prep Bowls. {{image_4}} You can easily swap chicken for other proteins. Shrimp is a great choice. Cook the shrimp for just 2-3 minutes until they turn pink. Tofu works well too. Use firm tofu and press it first to remove extra moisture. This helps it absorb flavors. Another option is beef. Use thinly sliced flank steak instead of chicken. Cook it quickly over high heat for a tender bite. If you want a vegetarian or vegan meal prep bowl, try using tempeh or seitan. Both have a great texture and soak up flavors well. Marinate them just like the chicken. Cook tempeh for about 5-7 minutes in a skillet. For a vegan option, skip the fish sauce and use soy sauce instead. You can also add more veggies like bell peppers or mushrooms for added taste and nutrition. Make your bowls unique with different toppings. Try adding sliced radishes for crunch. You can also add avocado for creaminess. Fresh herbs like mint or basil work wonders too. For extra flavor, drizzle some sriracha or hoisin sauce on top. You can even add nuts for a tasty crunch. These simple tweaks let you enjoy a new meal every time. To see the full recipe, check out the [Full Recipe]. To keep your Vietnamese Chicken Meal Prep Bowls fresh, use airtight containers. Divide the bowls into four portions. Store rice, chicken, and veggies separately if you can. This will help maintain texture and flavor. Let the meal prep bowls cool before sealing them. This step helps prevent steam from making everything soggy. When you're ready to enjoy your meal prep bowls, use the microwave. Place a bowl in the microwave for 1-2 minutes. Stir halfway through to heat evenly. Check that the chicken reaches 165°F (75°C) before eating. If you prefer, you can reheat on the stove. Just add a splash of water to prevent sticking. These bowls last for up to four days in the fridge. After that, the flavors may fade. Always check for any off smells or changes in color before eating. If you want to store them longer, consider freezing. Just make sure to label them, so you know what's inside. Enjoy your delicious meal prep with confidence! To make Vietnamese Chicken Meal Prep Bowls, start with chicken breasts. First, mix fish sauce, honey, soy sauce, garlic, ginger, and black pepper in a bowl. This creates a tasty marinade. Coat the chicken in this marinade and let it sit for 30 minutes in the fridge. While it marinates, cook jasmine rice in water or broth for about 15 minutes. Heat a skillet, add oil, and cook the chicken for 6-7 minutes on each side until it’s golden and reaches 165°F. Slice the chicken and assemble the bowls with rice, chicken, cucumber, and carrots. Don’t forget the cilantro and lime! For more details, check the Full Recipe. Vietnamese Chicken Meal Prep Bowls pair well with light sides. Here are some great choices: - Steamed broccoli - Pickled vegetables - Fresh spring rolls - Asian-style slaw - Edamame These sides add color and different textures to your meal. They also keep the meal fresh and exciting. Yes, you can freeze Vietnamese Chicken Meal Prep Bowls. Just make sure to cool them completely before sealing them in airtight containers. They can last in the freezer for up to three months. When you want to eat them, thaw them in the fridge overnight and reheat in the microwave. This keeps your meal fresh and tasty. Vietnamese Chicken Meal Prep Bowls are healthy and balanced. Here is a rough idea of the nutrition per serving: - Calories: 400 - Protein: 30g - Carbohydrates: 45g - Fat: 10g - Fiber: 3g - Sugar: 6g This dish provides protein, carbs, and healthy fats. You can adjust ingredients for your dietary needs. In this blog post, we covered the key ingredients and step-by-step instructions for making Vietnamese Chicken Meal Prep Bowls. We discussed marinades and cooking tips to ensure great flavor. You can also explore various protein options and learn how to store and reheat these bowls effectively. These meal prep bowls are easy to customize and perfect for busy days. With simple steps and tasty ingredients, you can enjoy delicious, healthy meals throughout the week. Happy cooking!](https://dailydishlab.com/wp-content/uploads/2025/06/450469d4-7878-479c-828a-ae6f4f51905d-768x768.webp)

![Here’s what you need for Easy Sheet Pan Salmon Fajitas. Gather these ingredients for a fun and tasty meal: - 1 lb salmon fillet, cut into bite-sized pieces - 2 bell peppers (any color), sliced - 1 medium onion, sliced - 3 tablespoons olive oil - 2 teaspoons chili powder - 1 teaspoon ground cumin - 1 teaspoon garlic powder - 1/2 teaspoon smoked paprika - Salt and pepper to taste - 8 small flour or corn tortillas - Fresh cilantro, for garnish - Lime wedges, for serving These ingredients work together to create a dish that is both simple and full of flavor. The salmon brings a rich taste, while the vegetables add crunch and color. Each spice adds a unique depth, making every bite exciting. You can find the full recipe to guide you through the cooking process. Enjoy crafting this delightful meal! - Preheat your oven to 400°F (200°C). - Line a baking sheet with parchment paper. - In a large bowl, combine sliced bell peppers and onion with 3 tablespoons of olive oil, chili powder, ground cumin, garlic powder, smoked paprika, salt, and pepper. - Toss well to coat the veggies evenly. - Spread the seasoned vegetables on one side of the sheet pan. - Coat salmon pieces with olive oil and place them on the other side of the pan. - Bake everything for 15-20 minutes. Check for doneness to ensure the salmon is cooked through. - Warm the tortillas in a dry skillet or microwave until soft. - Once done, assemble salmon and veggies in the warm tortillas. - Add fresh cilantro and a squeeze of lime juice for extra flavor. You can find the complete instructions in the Full Recipe. Enjoy your cooking! I love to play with flavors. For a zestier kick, add more chili powder. If you prefer a milder taste, reduce it. You can also mix in some lime zest for a fresh twist. For a smoky flavor, increase the smoked paprika. Experiment with spices to find what you love. Cooking time depends on the salmon's thickness. Thicker pieces need a bit more time, while thinner ones cook faster. Check your salmon at 15 minutes. If it flakes easily with a fork, it's done! Different ovens heat unevenly, so keep an eye on your dish. If your oven runs hot, reduce the time slightly. These salmon fajitas shine with simple sides. A fresh avocado salad pairs well. You can also serve with black beans or corn on the side. For dips, try a creamy avocado sauce or salsa. A cold drink, like lemonade or iced tea, complements the meal perfectly. Enjoy your colorful, tasty dish! {{image_2}} You can switch salmon for chicken or tofu. Chicken works well because it absorbs flavors nicely. Cut chicken into small pieces like the salmon. Cook it for about 20-25 minutes. Tofu is a great choice for a plant-based option. Press it to remove extra water, then cut it into cubes. Bake it for 15-20 minutes too. Both options are tasty and keep the dish simple. Feel free to add more veggies for fun and flavor. Zucchini, corn, or mushrooms are great choices. Slice zucchini into thin rounds and add it to the mix. Corn can bring a sweet crunch. You can chop mushrooms and toss them in for extra depth. Mixing different vegetables keeps every bite exciting. Don’t be shy to use what you like! Want it spicier? Add more chili powder or fresh jalapeños. You can sprinkle red pepper flakes for an extra kick. If you prefer it milder, use less chili powder. You can also add more lime juice to balance the heat. Adjusting spice levels makes this dish fun for everyone. Your taste buds will thank you! For the complete recipe, check out the [Full Recipe]. To store your leftover salmon fajitas, first let them cool. This step helps keep the food fresh. Use an airtight container for best results. You can separate the salmon, veggies, and tortillas or store them together. If you store them together, the tortillas may get soggy. I recommend using glass containers or heavy-duty plastic bags. When you reheat salmon fajitas, you want to keep them moist. The best method is to use the oven. Preheat your oven to 350°F (175°C). Place the salmon and veggies on a baking sheet. Cover them with foil to trap moisture. Heat for about 10-15 minutes. You can also use a skillet over medium heat. Just add a splash of water to help steam them. If you prefer the microwave, use a microwave-safe dish. Cover it with a damp paper towel. Heat in short bursts, checking often. Freezing salmon fajitas is simple. Pack the leftovers in airtight containers or freezer bags. Remove as much air as possible. They can last up to three months in the freezer. When ready to eat, thaw them in the fridge overnight. Reheat them as mentioned above. This keeps the flavor and texture nice. You’ll have a quick meal ready to go! For the full recipe, visit the section above. Yes, you can prep ahead. Chop the veggies and salmon in advance. Store them in the fridge. You can mix the spices and keep them in a small jar. This way, you save time when cooking. Just remember to bake everything fresh for the best taste. Salmon fajitas pair well with many sides. Here are some tasty options: - Rice or quinoa for a filling base - Black beans for extra protein - A fresh salad with lime dressing - Guacamole for a creamy touch - Chips for a crunchy contrast You can easily lighten up this dish. Try these tips: - Use less oil when roasting the veggies - Add more vegetables like zucchini or corn - Choose whole wheat tortillas for more fiber - Skip the cheese or use a low-fat option - Serve with a side of steamed veggies To reheat salmon fajitas, use a skillet. Warm it over medium heat. Add the salmon and veggies, and cover with a lid. This keeps them moist. You can also use the microwave. Heat in short bursts to avoid drying them out. Just remember, fresh is always best! This recipe highlights the joy of making salmon fajitas. You learned about the key ingredients, step-by-step instructions, and helpful tips. I shared ideas for variations and storage. Remember, you can customize flavors and spices to suit your taste. Whether you enjoy it with chicken, tofu, or extra veggies, it’s all about creating a meal you love. Use these pointers to enjoy cooking and eating. Your salmon fajitas can be a hit at every meal. Cooking should be fun and tasty!](https://dailydishlab.com/wp-content/uploads/2025/07/cbf1539a-7436-4928-932a-7fda2b4117aa-768x768.webp)