
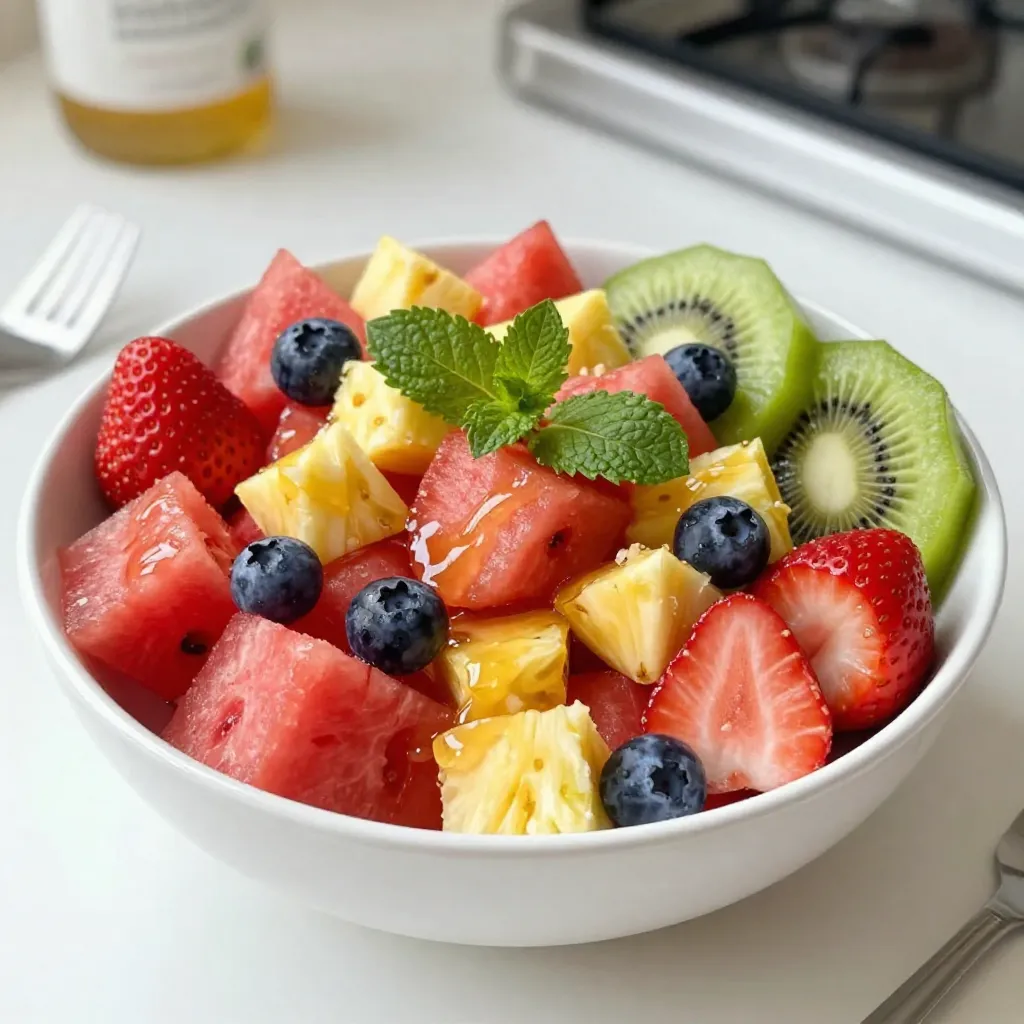
Looking for a quick and tasty treat? My Honey Lime Fruit Salad is just what you need! This refreshing dish bursts with vibrant colors and flavors from fresh, juicy fruits. With a simple honey lime dressing, it’s easy to whip up for any occasion. Get ready to impress your friends and family with this delightful salad that’s perfect for summer gatherings or a light snack. Let’s dive into the recipe!
Why I Love This Recipe
- Refreshing Flavor: This fruit salad combines a variety of fresh fruits, creating a burst of refreshing flavor that is perfect for warm days.
- Quick and Easy: With just a few simple steps, this salad can be prepared in under 15 minutes, making it a hassle-free option for any occasion.
- Health Benefits: Loaded with vitamins and antioxidants, this fruit salad is not only delicious but also a nutritious choice for a snack or dessert.
- Versatile and Customizable: You can easily swap in your favorite fruits or whatever is in season, making this recipe adaptable to your taste preferences.
Ingredients
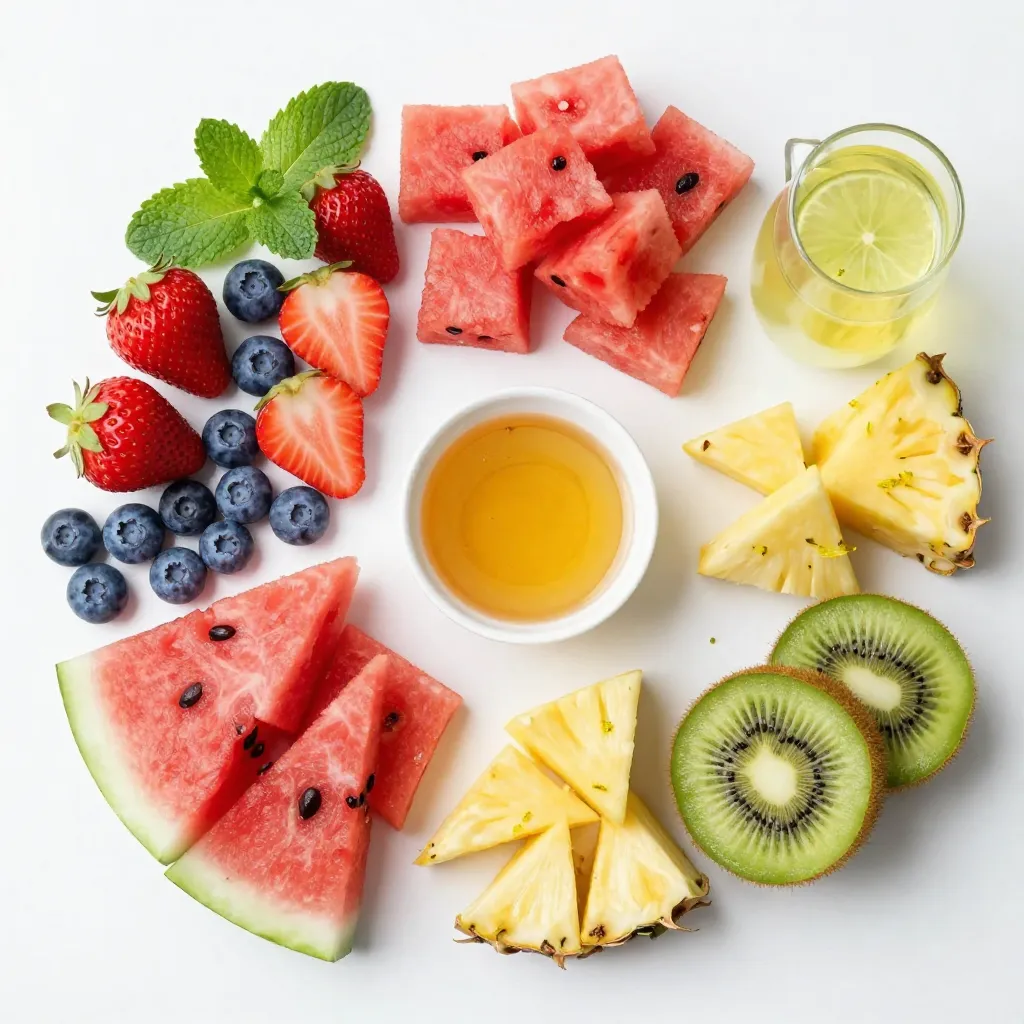
List of Fresh Fruits
– 2 cups watermelon, cubed
– 1 cup strawberries, sliced
– 1 cup blueberries
– 1 cup pineapple, diced
– 2 kiwis, peeled and sliced
This fruit salad shines because of its fresh fruits. Watermelon adds a sweet crunch. Strawberries bring bright color and juicy flavor. Blueberries offer a burst of sweetness. Pineapple adds tropical flair and zing. Kiwis give a tangy twist. Each fruit works together to create a beautiful dish.
Honey Lime Dressing Components
– 1/4 cup honey
– 2 tablespoons fresh lime juice
– Zest of 1 lime
The honey lime dressing is simple yet special. Honey adds natural sweetness, making the fruit even better. Fresh lime juice gives a nice tang, balancing the sweetness. The zest of lime adds a pop of flavor and aroma. Together, they coat the fruit perfectly.
Optional Garnishes
– Fresh mint leaves
Fresh mint leaves are a lovely touch. They add a splash of green and a hint of cool flavor. Placing them on top makes the salad look bright and fresh. You can use them or leave them out, based on your taste.
Step-by-Step Instructions
Preparing the Fruit
Start with the watermelon. Cut it into cubes about one inch wide. This size helps everyone enjoy the juicy bites. Next, take your strawberries. Slice them into thin pieces. Their bright red color adds a nice touch. For the kiwis, peel them and slice them. You want half-moon shapes that are easy to eat. Lastly, take the pineapple. Dice it into small chunks. The sweet and tangy flavor will brighten up the salad.
Making the Honey Lime Dressing
In a small bowl, add the honey. Then, pour in the fresh lime juice. Use a whisk to mix them well. Add some lime zest for extra flavor. The zest gives a nice citrus aroma. Make sure the dressing is smooth and combined. This dressing is the star of the show!
Combining Ingredients
Now, grab a large mixing bowl. Toss the cubed watermelon, sliced strawberries, blueberries, diced pineapple, and sliced kiwis into it. Drizzle the honey-lime dressing over the fruit. Gently toss everything together. Make sure all the fruit gets coated in the dressing. Let the salad sit for about ten minutes. This time helps the flavors meld together. It makes each bite taste even better!
Tips & Tricks
Choosing the Best Fruits
To make the best Honey Lime Fruit Salad, pick ripe fruits. Use seasonal fruits for the best taste. In summer, watermelon and strawberries shine. In winter, consider citrus fruits for zest.
When choosing fruit, look for these signs of ripeness:
– Watermelon: Heavy for its size, with a dull skin.
– Strawberries: Bright red, with green caps.
– Blueberries: Deep blue, plump, and firm.
– Pineapple: Sweet scent at the base and slight give when pressed.
– Kiwis: Soft to the touch but not mushy.
Adjusting Sweetness
You can adjust the sweetness of the salad with honey. If it’s too sweet, add more fruit to balance it. To make it sweeter, drizzle in more honey.
If you prefer alternatives, try:
– Maple syrup: Adds a rich flavor.
– Agave nectar: A light and sweet option.
– Stevia: A no-calorie sweetener for a lighter touch.
Presentation Ideas
For gatherings, make your salad pop! Serve in a big bowl or individual cups. Layer fruits for a colorful display.
Creative plating methods:
– Use a hollowed-out pineapple as a bowl.
– Arrange fruits in a rainbow for a stunning effect.
– Add mint leaves for a fresh touch and color contrast.
Each of these tips helps make your salad not only tasty but also a feast for the eyes!
Pro Tips
- Use Fresh Ingredients: Always choose ripe and fresh fruits for the best flavor and texture in your salad.
- Chill Before Serving: Let the fruit salad chill in the refrigerator for 30 minutes before serving to enhance the taste.
- Experiment with Fruits: Feel free to add or substitute other seasonal fruits like mango or peaches for variety.
- Mint for Freshness: Adding mint not only beautifies the dish but also adds a refreshing flavor that complements the fruits.
Variations
Adding Other Fruits
You can add many fruits to your Honey Lime Fruit Salad. Here are some tasty ideas:
– Mango slices for a sweet twist
– Orange segments for a citrus burst
– Grapes for a juicy pop
– Raspberries for tartness
If you want a tropical vibe, try using fruits like papaya or dragon fruit. They bring fun colors and flavors that excite the palate.
Flavor Enhancements
To make this salad even better, add spices. A pinch of cinnamon brings warmth. A bit of chili powder adds a kick. These spices can change the whole taste.
You can also stir in yogurt for creaminess. Greek yogurt works well, adding protein and a smooth texture. It makes the salad richer and more filling.
Dietary Modifications
If you’re vegan, this salad is naturally friendly. Just ensure your honey is plant-based. You can also use maple syrup as a sweet option.
For gluten-free needs, this salad is perfect as is! All the fruits and the dressing are gluten-free. You can enjoy it without worry.
Feel free to mix and match these ideas to make your perfect Honey Lime Fruit Salad!
Storage Info
How to Store Leftover Fruit Salad
To keep your honey lime fruit salad fresh, use airtight containers. Glass or plastic containers work well. Make sure the lid seals tightly. This helps prevent the fruit from going bad. Store the salad in the fridge right away. This keeps it cool and fresh for later.
Shelf Life
You can store the fruit salad for up to three days. After that, the fruit may start to spoil. Look for signs like mushy fruit or a sour smell. If you see any of these signs, it’s best to throw it away.
Preparing in Advance
For meal prep, you can cut the fruit a day ahead. Keep the cut fruit in airtight containers in the fridge. Mix the honey lime dressing when you are ready to serve. This way, the fruit stays crisp and doesn’t get soggy. Enjoy the fresh taste!
FAQs
Can I use frozen fruit for this salad?
Using frozen fruit is a great option. Frozen fruit is often picked at peak ripeness. This means it can taste just as good as fresh fruit. However, there are some downsides. Frozen fruit can lose its shape and texture when thawed. It may also release extra juice, making the salad watery. If you use frozen fruit, drain any extra liquid before serving.
What can I use instead of honey?
If you want to swap honey, you have options. Maple syrup or agave nectar can work well. Both sweeteners add a different flavor. Keep in mind that these sweeteners may change the taste of the dish. You can also use sugar or stevia for a lower-calorie choice. Just adjust the amount to your liking.
How long should I let the salad sit before serving?
Letting the salad sit for about 10 minutes is best. This time helps the fruit soak in the honey-lime dressing. The flavors blend better this way. If you want a stronger taste, you can let it sit a bit longer. Just keep the salad covered in the fridge if you wait. This keeps the fruit fresh and tasty.
This blog post showed you how to make a fresh fruit salad with honey lime dressing. We covered the best fruits to use, how to prepare them, and tips for adding your touch. Always choose ripe fruit for the best taste. Consider using alternative sweeteners if honey isn’t for you. Store leftover salad properly to keep it fresh. With these steps, you can create a delightful dish for any gathering. Enjoy experimenting with flavors and variations to make it your ow


