

Looking for a dinner that’s easy and packed with flavor? You’re in the right place! Honey Mustard Chicken Thighs are juicy, flavorful, and perfect for any night of the week. With simple ingredients like honey, Dijon mustard, and tender chicken, you can create a dish that’s sure to impress your family. Join me as we dive into a step-by-step guide to baking these mouth-watering thighs to perfection!
Why I Love This Recipe
- Easy to Prepare: This recipe only takes 10 minutes of prep time, making it perfect for busy weeknights.
- Flavorful Marinade: The combination of honey and Dijon mustard creates a sweet and tangy flavor that complements the chicken beautifully.
- Perfectly Crispy Skin: With the skin-on thighs baked to a golden crisp, each bite is packed with texture and taste.
- Versatile Dish: This chicken pairs wonderfully with various sides, from roasted vegetables to a fresh salad, making it a flexible meal option.
Ingredients
Main Ingredients
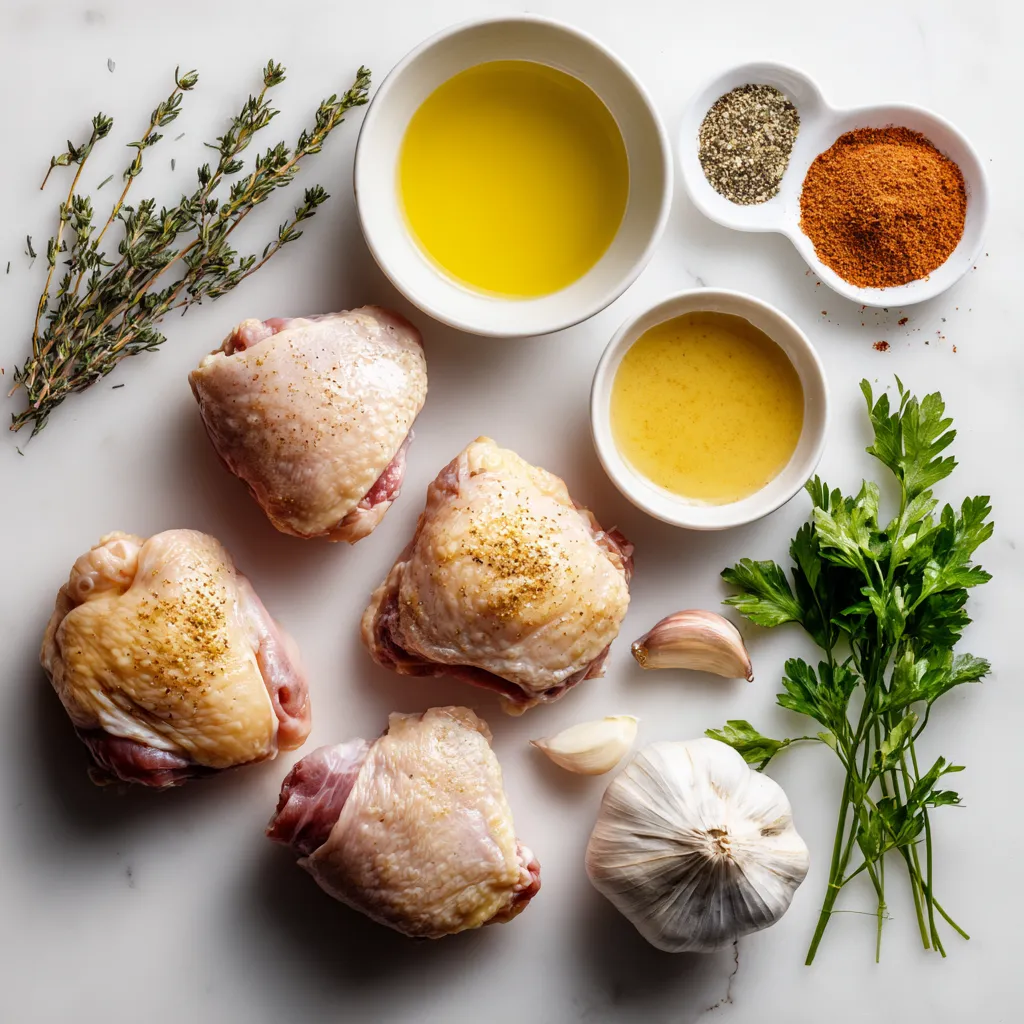
– 4 bone-in, skin-on chicken thighs
– ¼ cup honey
– ¼ cup Dijon mustard
– 2 tablespoons olive oil
– 2 cloves garlic, minced
The main ingredients for honey mustard chicken thighs create a burst of flavor. The bone-in, skin-on chicken thighs give a juicy texture and rich taste. Honey adds sweetness, while Dijon mustard brings a tangy kick. Olive oil helps blend the flavors, and minced garlic adds depth.
Seasonings
– 1 teaspoon dried thyme
– ½ teaspoon paprika
– Salt and pepper to taste
– Fresh parsley, chopped (for garnish)
Seasonings enhance the dish. Dried thyme adds an earthy note, while paprika gives warmth and color. Salt and pepper balance the flavors, making every bite delicious. Fresh parsley brings a pop of color and freshness at the end. This mix of ingredients creates a dish that is both simple and full of flavor.
Step-by-Step Instructions
Preparation Steps
First, you need to preheat your oven to 400°F (200°C). This step ensures the chicken cooks evenly and gets that nice crisp skin. While the oven heats, you can prepare the honey mustard marinade. In a medium bowl, whisk together the following:
– ¼ cup honey
– ¼ cup Dijon mustard
– 2 tablespoons olive oil
– 2 cloves garlic, minced
– 1 teaspoon dried thyme
– ½ teaspoon paprika
– Salt and pepper to taste
Mix until smooth. This sauce is the star of the dish.
Marinating the Chicken
Next, place your chicken thighs in a baking dish, skin-side up. Pour the honey mustard marinade over the chicken, covering each piece well. Now, how long should you marinate? Let the chicken sit for at least 30 minutes. For even better flavor, marinate in the refrigerator for up to 4 hours. This step allows the chicken to soak in all those tasty flavors.
Cooking the Chicken
Once marinated, it’s time to bake. Place the baking dish in your preheated oven. Bake the chicken for 35-40 minutes. You want the chicken to reach an internal temperature of 165°F (75°C). This ensures it is safe to eat. The skin should be golden and crispy when done.
For extra caramelization, you can broil the chicken for the last 2-3 minutes. Keep an eye on it to prevent burning. After baking, let the chicken rest for 5 minutes before serving. Garnish it with fresh chopped parsley for a lovely touch!
Tips & Tricks
Achieving Crispy Skin
To get crispy skin on your chicken thighs, aim for a high cooking temperature. Bake at 400°F (200°C). This heat ensures the skin crisps up while the meat cooks. After baking, you can broil the chicken for the last 2-3 minutes. Broiling gives the skin an extra caramelized finish. Just keep an eye on it to avoid burning.
Perfecting the Marinade Flavor
For the best flavor, marinate the chicken for at least 30 minutes. However, if you can, let it sit in the fridge for up to 4 hours. This time allows the flavors to soak into the meat. You can also enhance the marinade. Try adding a splash of apple cider vinegar for tang or some hot sauce for a kick.
Serving Suggestions
When serving, think about great side dishes. Roasted veggies or a fresh salad pair well with the chicken. You can also serve it with rice or quinoa for a filling meal. For plating, arrange the chicken nicely on a platter. Garnish with fresh parsley for color and a touch of elegance. This makes your dish look even more enticing.
Pro Tips
- Marinate Longer for More Flavor: Allowing the chicken to marinate for at least 2 hours, or overnight if possible, will enhance the flavor profile significantly, making the chicken more succulent.
- Use a Meat Thermometer: To ensure your chicken is perfectly cooked, use a meat thermometer to check that the internal temperature reaches 165°F (75°C).
- Experiment with Mustard Varieties: For different flavor profiles, try using whole grain mustard or spicy brown mustard in place of Dijon.
- Serve with Sides: Pair your honey mustard chicken thighs with roasted vegetables or a fresh salad for a complete meal.
Variations
Honey Mustard Variants
You can change the mustard in this recipe. Try whole grain mustard for a grainy texture. If you want heat, use spicy mustard. For a sweet twist, swap honey for maple syrup or agave nectar. Each option adds a new flavor to your dish, making it fun to experiment.
Cooking Method Alternatives
Grilling honey mustard chicken gives it a nice smoky flavor. Marinate the chicken as usual, then grill over medium heat for about 6-7 minutes on each side. You can also use a slow cooker for a hands-off method. Just place the marinated chicken in the slow cooker. Cook it on low for 4-5 hours or on high for about 2-3 hours. This makes the chicken very tender and juicy.
Dietary Substitutions
If you need a gluten-free option, check your mustard label. Some mustards contain gluten. Use gluten-free soy sauce in place of regular soy sauce if you want to add a salty note. For those on a keto or paleo diet, skip the honey. Use a sugar substitute like erythritol to keep it low-carb. Enjoy these variations to fit your diet and taste!
Storage Info
Storing Leftovers
To keep your honey mustard chicken thighs fresh, use airtight containers. Glass or plastic containers work well. Make sure they seal tightly. This keeps air out and prevents drying. Store the chicken in the fridge. It stays good for up to four days. If you want to store it longer, freezing is a great option.
Reheating Instructions
When reheating, avoid the microwave if you can. Microwaves can dry out the chicken. Instead, use an oven or stovetop. Preheat your oven to 350°F (175°C). Place the chicken in a baking dish with a splash of water. Cover it with foil. Heat for about 20 minutes. This keeps it juicy and warm.
You can also freeze the cooked chicken. Wrap each piece in foil first, then place it in a freezer bag. It stays tasty for up to three months. When you want to eat it, thaw it in the fridge overnight before reheating. Enjoying your honey mustard chicken thighs later is always a treat!
FAQs
How long should I marinate honey mustard chicken thighs?
You should marinate the chicken thighs for at least 30 minutes. This time allows the flavors to soak in. If you have more time, marinate them in the fridge for up to 4 hours. Longer marination gives you deeper flavor. Remember, the honey and mustard mix tenderizes the meat.
What temperature should chicken thighs be cooked to?
Chicken thighs need to reach an internal temperature of 165°F (75°C). This temperature ensures the chicken is safe to eat. Using a meat thermometer helps you check this easily. Cooking to the right temperature keeps the meat juicy. Undercooked chicken can lead to foodborne illness, so be careful.
Can I use boneless chicken thighs?
Yes, you can use boneless chicken thighs in this recipe. They will cook faster than bone-in thighs. Adjust your baking time to about 25-30 minutes. Check the internal temperature to ensure they are done. Boneless thighs are still delicious and will absorb the marinade well.
In this post, we covered how to prepare honey mustard chicken thighs. We discussed key ingredients like chicken, honey, and Dijon mustard. We explored marinating and cooking techniques for juicy, flavorful chicken. Tips ensured crispy skin and enhanced flavors. You now have variations and storage suggestions for leftovers.
This dish is simple yet satisfying. Enjoying your meal is as important as making it. Happy cookin


