Instant Pot Garlic Herb Potatoes Flavorful and Easy Dish

Are you craving a simple yet flavorful side dish? Look no further than Instant Pot Garlic Herb Potatoes! This fuss-free recipe packs a punch of garlic and herbs, perfect for any meal. With just a few ingredients and the magic of the Instant Pot, you’ll have tender, aromatic potatoes ready in no time. Dive into this guide for step-by-step instructions and tips to make your cooking experience a breeze!
Why I Love This Recipe
- Easy Preparation: This recipe requires minimal prep time, making it perfect for a quick weeknight dinner.
- Flavorful Garlic & Herbs: The combination of garlic, oregano, and thyme infuses the potatoes with a deliciously aromatic flavor.
- Versatile Side Dish: These garlic herb potatoes pair wonderfully with a variety of main courses, from grilled meats to vegetarian dishes.
- Instant Pot Efficiency: The Instant Pot cooks the potatoes perfectly in just 6 minutes, saving time and energy.
Ingredients
To make Instant Pot Garlic Herb Potatoes, you need the following items:
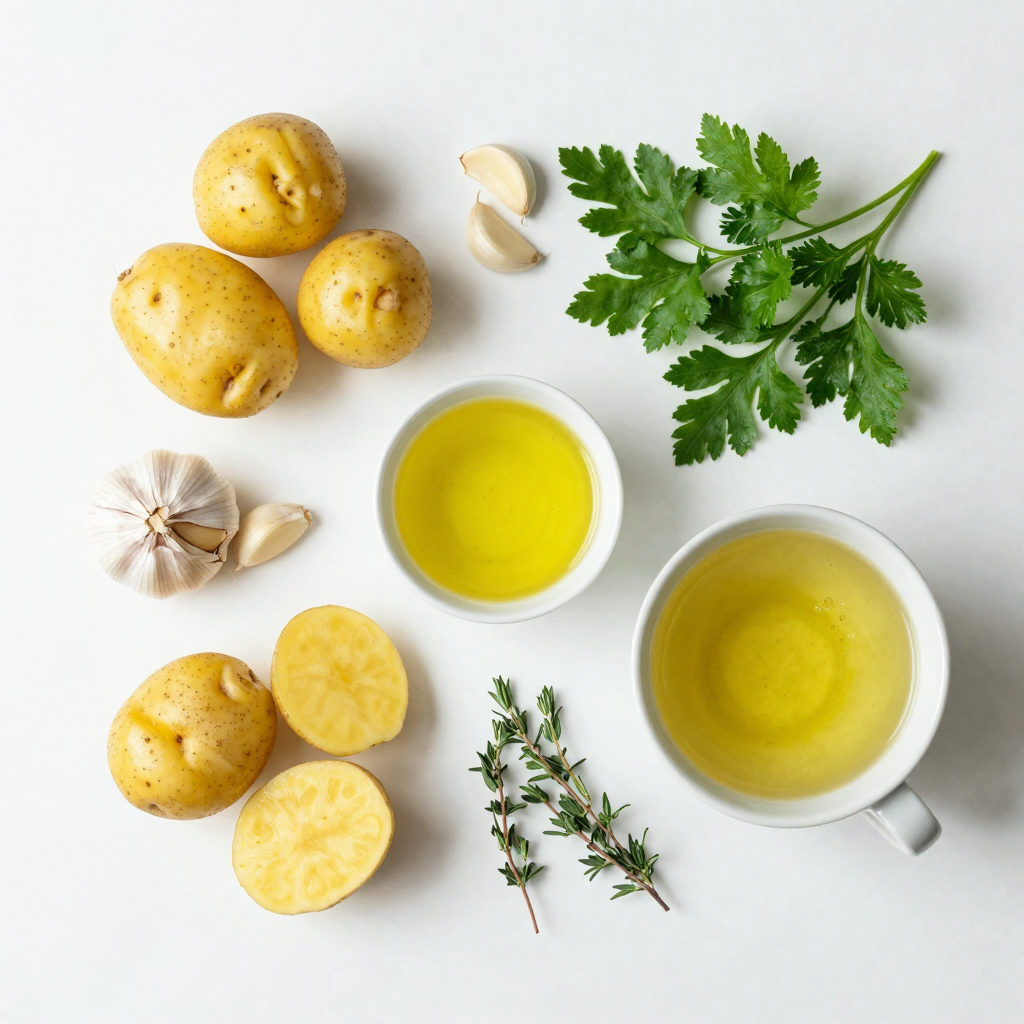
- 2 pounds baby potatoes (red or yellow), washed and halved
- 4 garlic cloves, minced
- 1/4 cup vegetable or chicken broth
- 3 tablespoons olive oil
- 2 teaspoons dried oregano
- 1 teaspoon dried thyme
- Salt and pepper to taste
- Fresh parsley, chopped (for garnish)
These simple ingredients blend well together. The garlic adds a strong flavor, while the herbs bring freshness. The baby potatoes are tender and cook evenly in the Instant Pot. Using broth gives the potatoes a rich taste. You can also use chicken broth for a deeper flavor.
I love using fresh parsley for garnish. It adds a pop of color and hints of brightness to the dish. You can adjust the salt and pepper according to your taste. Feel free to experiment with herbs or spices you enjoy.

Step-by-Step Instructions
Prep Potatoes
Start by washing 2 pounds of baby potatoes. Halve each potato and place them in a large bowl. Add 3 tablespoons of olive oil. Next, mix in 4 minced garlic cloves, 2 teaspoons of dried oregano, 1 teaspoon of dried thyme, salt, and pepper. Toss everything until the potatoes are well coated. This step packs the potatoes with flavor.
Add Broth
Now, pour 1/4 cup of vegetable or chicken broth into the Instant Pot. This broth will create the steam needed to cook the potatoes perfectly. It adds moisture and flavor to the dish.
Set Potatoes
Place the seasoned potatoes in a steamer basket or directly into the broth. If you use a steamer basket, ensure it sits above the broth. This helps steam the potatoes evenly without them sitting in liquid.
Cooking
Close the Instant Pot lid and set the steam release valve to the sealing position. Select Manual or Pressure Cook mode. Set the timer for 6 minutes at high pressure. This short cooking time makes it quick and easy.
Quick Release
Once the cooking time is up, perform a quick release of the pressure. Turn the steam release valve to the venting position. Wait until all the steam escapes, then carefully remove the lid.
Finishing Touches
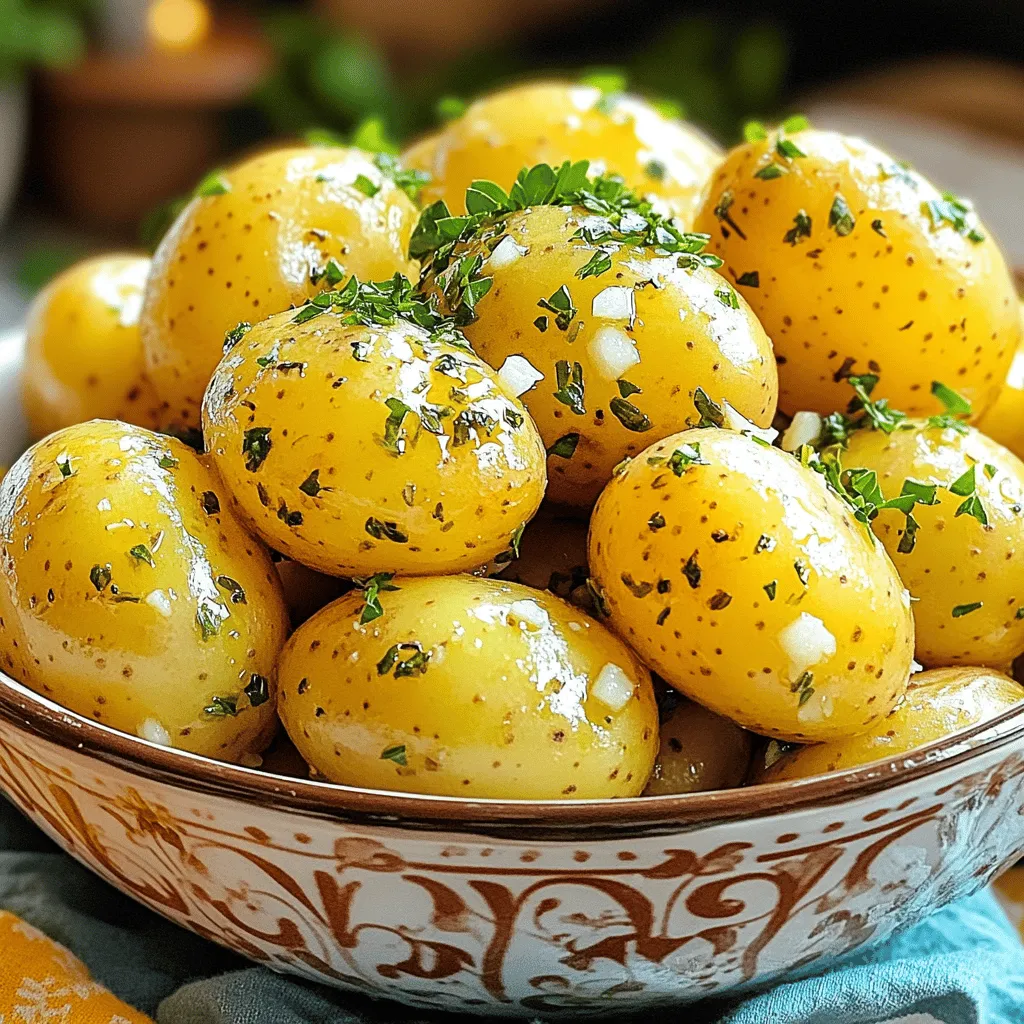
Fluff the potatoes gently with a fork. This helps keep them light and airy. Taste them and adjust the seasoning if needed. You can add more salt, pepper, or herbs to suit your taste.
Garnish & Serve
Transfer the garlic herb potatoes to a serving bowl. For a fresh touch, garnish with chopped parsley. Serve warm and enjoy this flavorful dish!
Pro Tips
- Choose the Right Potatoes: Yellow or red baby potatoes work best for this recipe, as they hold their shape and have a creamy texture when cooked.
- Adjust Seasoning: Always taste your potatoes after cooking. You can adjust the seasoning with more salt, pepper, or herbs to suit your preference.
- Use Fresh Herbs: While dried herbs are convenient, fresh herbs can elevate the flavor of your garlic herb potatoes significantly.
- Perfect Pairing: These garlic herb potatoes pair beautifully with grilled meats or roasted vegetables, making them a versatile side dish for any meal.
Tips & Tricks
Choosing the Right Potatoes
For this recipe, I recommend baby potatoes. They cook evenly and stay tender. Red or yellow baby potatoes work best. Their creamy texture and flavor shine through in this dish. If you want, you can use larger potatoes. Just cut them into smaller pieces for even cooking.
Enhancing Flavor
To boost the taste of your garlic herb potatoes, try adding fresh herbs. Rosemary, chives, or dill can give a nice twist. A pinch of red pepper flakes adds a bit of heat. You might even sprinkle some grated cheese on top for a rich touch. Experiment with spices you love to find your favorite mix.
Cooking Time Adjustments
Cooking time can change based on potato size. For baby potatoes, six minutes is perfect. If you use larger chunks, increase the time to eight or ten minutes. Always check for doneness with a fork. If it goes in easily, your potatoes are ready. Adjust the time if needed for a perfect result.

Variations
Herb Substitutions
You can change the herbs for different tastes. For a fresh twist, try rosemary or basil. Both herbs bring a bright flavor to the dish. You can also use dill for a lighter, grassy note. The key is to pick herbs you enjoy. Mix and match to find your favorite combo!
Vegan Options
To make this dish plant-based, simply swap the chicken broth with more vegetable broth. You can also use a splash of lemon juice for added zest. This keeps the potatoes full of flavor without any animal products. Enjoy the same great taste while sticking to your dietary choices!
Add-ins
Want more than just potatoes? You can add other veggies like carrots or green beans. They cook fast and soak up the flavor. If you want protein, add chickpeas or cooked lentils. This adds heartiness to the dish. Feel free to get creative and make it your own!
Storage Info
Refrigeration
After making Instant Pot garlic herb potatoes, let them cool. Place them in an airtight container. They will stay fresh in the fridge for up to four days. Make sure to label the container with the date. This helps you keep track of how long they have been stored. When you want to eat them again, just open the container.
Freezing
You can freeze garlic herb potatoes if you have leftovers. First, let them cool completely. Then, place them in a freezer-safe bag or container. Try to remove as much air as possible. They can last up to three months in the freezer. When you are ready to eat them, let them thaw in the fridge overnight. This keeps the taste fresh.
Reheating Methods
To reheat garlic herb potatoes, you have a few good options. The best way is to use the oven. Preheat it to 350°F (175°C). Place the potatoes on a baking sheet and cover them with foil. Heat them for about 15 to 20 minutes. This keeps them crispy. You can also use a microwave if you’re in a hurry. Just place them in a microwave-safe bowl, cover, and heat for 1 to 2 minutes. Check to see if they are warm enough. Adjust the time as needed. The goal is to enjoy your flavorful dish without losing texture.
FAQs
Can I use different types of potatoes?
Yes, you can use many potato types for this recipe. I often use baby red or yellow potatoes. They cook well and have a nice texture. You can also try Yukon Gold or fingerling potatoes. Each type brings a unique taste. Just remember to keep the size uniform for even cooking.
How long does it take to cook potatoes in an Instant Pot?
Cooking time depends on potato size. For baby potatoes, it takes about 6 minutes at high pressure. If you use larger potatoes, cut them into halves or quarters. This helps them cook faster. Always check for doneness with a fork. They should be tender but not mushy.
Can I add cheese to the garlic herb potatoes?
Adding cheese can make the dish even tastier! I suggest using grated Parmesan or cheddar. Stir it in after cooking for a creamy finish. Cheese pairs well with the garlic and herbs. Just ensure you add it while the potatoes are hot for the best melt.
What’s the best way to serve garlic herb potatoes?
Garlic herb potatoes are great as a side dish. They pair well with grilled meats or roasted chicken. You can also serve them with a fresh salad for a light meal. For a fun twist, top them with sour cream or yogurt. Add fresh herbs for color and taste.
Is it necessary to peel the potatoes?
You don’t need to peel the potatoes for this recipe. The skins add texture and flavor. Plus, they hold nutrients that are good for you. Just make sure to wash them well. If you prefer peeled potatoes, go for it! It’s all about what you like.
In this blog post, I walked you through making garlic herb potatoes in an Instant Pot. You learned about key ingredients, step-by-step instructions, and useful tips for adding flavor. I shared storage tips and answered common questions.
Using this simple recipe, you can create a tasty side dish. Enjoy experimenting with herbs and variations to make it your own. Trust me; once you try these potatoes, they will become a staple in your meals.

Instant Pot Garlic Herb Potatoes
Ingredients
2 pounds baby potatoes (red or yellow), washed and halved
4 garlic cloves, minced
1/4 cup vegetable or chicken broth
3 tablespoons olive oil
2 teaspoons dried oregano
1 teaspoon dried thyme
Salt and pepper to taste
Fresh parsley, chopped (for garnish)
Instructions
Prep Potatoes: In a large mixing bowl, toss the halved potatoes with olive oil, minced garlic, oregano, thyme, salt, and pepper. Ensure the potatoes are well coated.
Add Broth: Pour the vegetable or chicken broth into the Instant Pot. It will create steam to cook the potatoes.
Set Potatoes: Place the seasoned potatoes in a steamer basket or directly in the broth. If using a steamer basket, ensure it’s elevated above the broth.
Cooking: Close the Instant Pot lid and set the steam release valve to the sealing position. Select the Manual or Pressure Cook mode and set the timer for 6 minutes on high pressure.
Quick Release: Once the cooking time is complete, perform a quick release of the pressure by turning the steam release valve to the venting position. Carefully remove the lid when the pressure has fully released.
Finishing Touches: Open the lid and fluff the potatoes gently with a fork. Taste and adjust seasoning if needed.
Garnish & Serve: Transfer the garlic herb potatoes to a serving bowl, garnish with fresh chopped parsley, and serve warm.
Prep Time: 10 mins | Total Time: 30 mins | Servings: 4

Instant Pot Garlic Herb Potatoes
Ingredients
- 2 pounds baby potatoes (red or yellow), washed and halved
- 4 cloves garlic, minced
- 0.25 cup vegetable or chicken broth
- 3 tablespoons olive oil
- 2 teaspoons dried oregano
- 1 teaspoon dried thyme
- to taste salt and pepper
- for garnish fresh parsley, chopped
Instructions
- In a large mixing bowl, toss the halved potatoes with olive oil, minced garlic, oregano, thyme, salt, and pepper. Ensure the potatoes are well coated.
- Pour the vegetable or chicken broth into the Instant Pot. It will create steam to cook the potatoes.
- Place the seasoned potatoes in a steamer basket or directly in the broth. If using a steamer basket, ensure it’s elevated above the broth.
- Close the Instant Pot lid and set the steam release valve to the sealing position. Select the Manual or Pressure Cook mode and set the timer for 6 minutes on high pressure.
- Once the cooking time is complete, perform a quick release of the pressure by turning the steam release valve to the venting position. Carefully remove the lid when the pressure has fully released.
- Open the lid and fluff the potatoes gently with a fork. Taste and adjust seasoning if needed.
- Transfer the garlic herb potatoes to a serving bowl, garnish with fresh chopped parsley, and serve warm.

![- 1 cup long-grain white rice - 2 cups vegetable broth - 1/4 cup fresh cilantro, finely chopped - 2 tablespoons lime juice - Zest of 1 lime - 1 tablespoon olive oil - 1 teaspoon garlic powder - 1/2 teaspoon cumin - Salt and pepper to taste - Additional herbs (e.g., parsley, green onions) - Jalapeños for heat - Avocado for creaminess Cilantro lime rice is simple yet packed with flavor. This dish shines with its fresh ingredients. The long-grain white rice serves as the base. I like using vegetable broth instead of water for extra taste. Fresh cilantro adds a vibrant kick. The lime juice and zest give it a refreshing twist. Garlic powder and cumin round out the taste beautifully. You can customize it with optional ingredients. Add more herbs for depth. If you like spice, toss in jalapeños. For a creamy touch, include avocado. Follow the [Full Recipe] to see how to combine these ingredients perfectly. Enjoy how easy it is to make this dish your own! 1. Rinse the rice Start by rinsing 1 cup of long-grain white rice under cold water. Do this until the water runs clear. Rinsing helps remove excess starch. This simple step keeps the rice fluffy and light. 2. Combine rice and broth Next, take the rinsed rice and put it in a medium saucepan. Add 2 cups of vegetable broth to the pan. This broth adds rich flavor to the rice. 1. Bring to a boil Place the saucepan on the stove over medium-high heat. Bring the mixture to a boil. Watch it closely so it doesn’t overflow. 2. Reduce heat and simmer Once it boils, reduce the heat to low. Cover the pot and let it simmer. Cook for 18 to 20 minutes. The rice will become tender, and the broth will be absorbed. 1. Fluff and mix in additional ingredients After cooking, remove the pot from heat. Keep it covered for 5 more minutes to let the rice steam. Then, fluff the rice gently using a fork. Add 1 tablespoon of olive oil, 2 tablespoons of lime juice, and the zest of 1 lime. Sprinkle in 1 teaspoon of garlic powder and 1/2 teaspoon of cumin. Add salt and pepper to taste. 2. Taste and adjust seasoning Finally, stir in 1/4 cup of finely chopped fresh cilantro. Mix well so all the flavors blend. Taste your rice and adjust the seasoning if needed. You can add more lime juice or salt based on your preference. This is how you can create a bright, zesty Cilantro Lime Rice that pairs perfectly with many dishes. For the full recipe, check the earlier section! To make fluffy rice, rinsing is key. Rinsing removes extra starch. This helps prevent the rice from being sticky. Just put the rice in a fine mesh strainer. Run cold water over it until the water runs clear. After cooking, let the rice steam. Once you take the pot off the heat, keep it covered. Let it sit for 5 more minutes. This extra time lets the rice absorb steam. The result is light, fluffy rice. You can make this rice even better with a few tweaks. Try adding lime zest. The zest gives a bright flavor that pops in your mouth. You can also add spices like chili powder or smoked paprika. These will give it a new twist that you’ll love. Many people overcook their rice. This makes it mushy and unappetizing. Always check the rice a few minutes before the suggested cooking time. Another mistake is not tasting as you cook. Tasting helps you adjust flavors. If you find it needs more salt or lime juice, add a bit. Always trust your taste buds! For the full recipe, check out the complete instructions provided above. {{image_2}} You can swap rice for quinoa in this recipe. Quinoa cooks faster than rice. Use 1 cup of quinoa and 2 cups of vegetable broth. Bring it to a boil, then reduce heat. Cook for 15 minutes until tender. Fluff it like rice, and mix in the lime and cilantro. This gives a nutty flavor and is also gluten-free. Try adding coconut milk for a creamy twist. Use 1 cup of coconut milk and 1 cup of broth. This makes the rice rich and sweet. When mixing, adjust the lime juice to balance the sweetness. Coconut cilantro rice works great with spicy dishes. For a kick, add chili powder or fresh chilies. Mix in 1 teaspoon of chili powder when you add the spices. You can also swap the vegetable broth with spicy broth. The heat boosts the flavor and adds excitement to your meal. For more details, check the Full Recipe. To keep your cilantro lime rice fresh, use these tips: - Refrigeration tips: Let the rice cool to room temperature. Then, place it in the fridge. Store it in an airtight container. This keeps moisture in and prevents it from drying out. Your rice can last for about 4 to 5 days in the fridge. - Best containers for storage: Use glass or plastic containers with tight lids. These help keep the rice fresh. Label the containers with the date you made the rice. This way, you can keep track of how long it has been stored. Want to save some for later? Follow these steps to freeze your rice: - How to freeze portions efficiently: Divide the rice into smaller portions. This makes it easier to thaw later. Use freezer bags or containers. Remove as much air as possible before sealing. This helps to prevent freezer burn. - Reheating methods: To reheat, let the rice thaw in the fridge overnight. If you're in a hurry, you can microwave it straight from the freezer. Add a splash of water to keep it moist. Heat in short bursts, stirring in between, until warm. Enjoy your tasty cilantro lime rice anytime! To make great cilantro lime rice, start by rinsing the rice. This removes extra starch and makes the rice fluffy. Use two cups of vegetable broth for cooking. It adds a nice flavor. After cooking, let the rice steam for five more minutes. This step makes a big difference. Then, mix in lime juice, zest, and chopped cilantro. Taste it before serving. Adjust the salt and lime juice to your liking. Yes, this dish is already vegan! It uses vegetable broth and olive oil. If you want to add more flavor, try using different spices. You can also add veggies like bell peppers or corn. They will mix well with the rice. This way, you can create a tasty, colorful dish. Cilantro lime rice can last about four to five days in the fridge. Store it in an airtight container. If it starts to smell sour or looks dry, it's time to toss it. To keep it fresh, reheat only the portion you want to serve. You can use brown rice, but it takes longer to cook. Brown rice needs about 45 minutes to become tender. The flavor will be nuttier and more earthy. Adjust the vegetable broth to three cups for better results. Brown rice is a great choice for added nutrients. Cilantro lime rice is simple and full of flavor. You learned how to prepare it with key ingredients like rice, vegetable broth, and lime. The step-by-step instructions ensure you get fluffy rice every time. Tips on storing and variations let you customize and enjoy this dish later. Remember, cooking is all about trial and error. Don’t be afraid to experiment with flavors. Enjoy making and sharing your cilantro lime rice!](https://dailydishlab.com/wp-content/uploads/2025/06/503ca899-6dce-4c01-b610-1df73e26138f-768x768.webp)

![For the base of this dish, you need: - 8 oz. rice noodles - 2 tablespoons vegetable oil - 1 tablespoon fresh ginger, minced - 4 cloves garlic, minced - 1 bell pepper, julienned (any color) - 1 cup broccoli florets - 1 cup snap peas - 2 green onions, chopped - 3 tablespoons soy sauce - 1 tablespoon sesame oil - 1 tablespoon honey (or maple syrup for a vegan option) - Sesame seeds for garnish - Fresh cilantro for garnish - Salt and pepper to taste These ingredients create a vibrant and tasty dish. The ginger and garlic add warmth and depth. The bright veggies make every bite a treat. To boost the flavor, consider adding: - Red pepper flakes for heat - Mushrooms for a savory touch - Carrots for added sweetness and color - Cashews for crunch and richness These options can enhance the dish and make it your own. You can swap ingredients based on your needs: - Use gluten-free noodles if you need a gluten-free option. - Replace soy sauce with tamari for a gluten-free sauce. - For a vegan dish, make sure to use maple syrup instead of honey. These swaps let everyone enjoy a delicious Ginger Garlic Noodle Stir Fry. Check out the Full Recipe for more details on how to put it all together! First, you need to make your rice noodles. Boil water in a pot. Add 8 oz. of rice noodles and cook them according to the package instructions. This usually takes about 5-7 minutes. Once they are soft, drain them in a colander. Rinse them with cold water to stop the cooking. Toss the noodles with a bit of oil. This will help keep them from sticking together. Now, let’s get cooking! Heat 2 tablespoons of vegetable oil in a skillet or wok over medium-high heat. Wait until the oil shimmers. Add 1 tablespoon of minced ginger and 4 cloves of minced garlic. Stir them quickly for about 30 seconds. You want them fragrant, not burnt. Next, toss in your julienned bell pepper. Stir-fry this for 2-3 minutes until it's slightly soft. Now, add 1 cup of broccoli florets and 1 cup of snap peas. Keep stirring for another 3-4 minutes. Your veggies should be bright and tender-crisp. If they look dull or mushy, you’ve cooked them too long! In a small bowl, mix together 3 tablespoons of soy sauce, 1 tablespoon of sesame oil, and 1 tablespoon of honey or maple syrup. Pour this sauce over the cooked veggies. Add your prepared rice noodles to the skillet. Toss everything together gently. Make sure the noodles and veggies are well combined and heated through. Finally, season your dish with salt and pepper to taste. Fold in 2 chopped green onions for a fresh touch. Serve your Ginger Garlic Noodle Stir Fry hot. Garnish with sesame seeds and fresh cilantro for that perfect finish. This dish is not only easy but also packed with flavor. Enjoy your meal! For the full recipe, check out the details above. To get the best texture, keep your heat high. Hot oil helps cook food fast. Cut your veggies thin for quick cooking. Stir them often to avoid burning. Don't crowd the pan; it can make your veggies soggy. Work in batches if needed. You want that crisp bite! Start with fresh ginger and garlic. They create a strong base for flavor. Sauté them quickly to release their oils. Use a mix of sauces for depth. Soy sauce adds saltiness, while sesame oil gives richness. Honey or maple syrup offers a sweet touch. Taste as you go to balance flavors. One big mistake is overcooking the veggies. They should stay bright and crunchy. Avoid using old oil; it can ruin the taste. Don't skip the seasoning; it elevates the dish. Lastly, remember to toss everything together well. This ensures each bite is packed with flavor. Make sure to check out the [Full Recipe] for all the steps! {{image_2}} You can easily make this dish vegetarian or vegan. Just skip the meat and use more veggies. Try adding mushrooms, zucchini, or carrots for extra taste. Use maple syrup instead of honey to keep it vegan. This keeps the dish sweet and delicious. Adding protein can make your meal heartier. Chicken works well and cooks quickly. Simply cut it into bite-sized pieces and stir-fry it before adding veggies. Tofu is another great choice. Use firm tofu and cube it. Fry until golden for a tasty crunch. Shrimp also adds flavor. Cook them until they turn pink, then mix them in. You can change the taste by swapping some ingredients. Instead of rice noodles, try whole wheat or soba noodles for a different texture. Use dark soy sauce for a richer flavor. Add chili flakes or sriracha if you like heat. You can also try different vegetables like bok choy or asparagus for variety. For the full recipe and more tips, check out the Full Recipe section! After you enjoy your Ginger Garlic Noodle Stir Fry, store any leftovers. Use an airtight container. This helps keep it fresh. Let the stir fry cool to room temperature first. Avoid putting hot food in the fridge. This can raise the temperature inside, which is not safe. Place the container in the fridge. It will last up to three days. When you’re ready to eat leftovers, reheat carefully. Use a skillet for best results. Heat it on medium heat. Add a splash of water or oil to keep it moist. Stir it gently until heated through. This keeps the noodles from getting too dry or sticky. You can also use the microwave. Just cover the bowl with a damp paper towel. Heat for one minute at a time, stirring in between. You can freeze Ginger Garlic Noodle Stir Fry for later. Use a freezer-safe container or bag. Make sure to remove as much air as possible. This helps prevent freezer burn. It will stay good for up to two months. When you’re ready to eat it, thaw it overnight in the fridge. Reheat it in a skillet for best taste and texture. You can follow the steps for reheating leftovers. Using this method keeps the flavors fresh. For the full recipe, check out the previous sections. Making Ginger Garlic Noodle Stir Fry takes about 20 minutes total. You need 10 minutes to prep and another 10 to cook. This quick time makes it perfect for busy days when you want a tasty meal fast. Yes, you can use different noodles for this recipe. Options like egg noodles or udon work well. You can also try whole wheat or gluten-free noodles if you prefer. Just remember to adjust the cooking time based on the noodles you choose. Ginger and garlic offer many health benefits. Ginger can help with digestion and reduce nausea. It also has anti-inflammatory properties. Garlic can boost your immune system. It may help lower blood pressure and improve heart health. Both add flavor and nutrition to your meals, making them great choices in cooking. You've learned to make a delicious Ginger Garlic Noodle Stir Fry. We covered key ingredients, techniques, and helpful tips to ensure your dish shines. Dietary variations allow everyone to enjoy this meal. Proper storage keeps leftovers fresh, while reheating maintains great flavor. Follow these steps and you'll impress at the dinner table. Remember, with practice, you'll master this stir fry and tweak it to fit your taste. Enjoy cooking and sharing this simple, tasty dish!](https://dailydishlab.com/wp-content/uploads/2025/07/2e7dc7f2-8fff-4ba0-8595-d5dc5059986b-768x768.webp)


