Irresistible No-Bake Strawberry Cheesecake Bars Recipe

Get ready to indulge in a dessert that’s as easy as it is delicious! My Irresistible No-Bake Strawberry Cheesecake Bars combine creamy filling and fresh strawberries for a treat that will wow your taste buds. With simple steps and minimal baking, this recipe is perfect for all skill levels. Join me as I guide you through every tasty layer of this sweet masterpiece!
Why I Love This Recipe
- Easy to Make: This no-bake recipe requires minimal effort, making it perfect for any occasion.
- Refreshing Flavor: The combination of fresh strawberries and creamy cheesecake is a delightful treat.
- Perfect for Summer: These bars are a light and refreshing dessert, ideal for warm weather gatherings.
- Customizable: You can easily adapt this recipe with different fruits or flavors to suit your taste.
Ingredients
Essential Ingredients for No-Bake Strawberry Cheesecake Bars
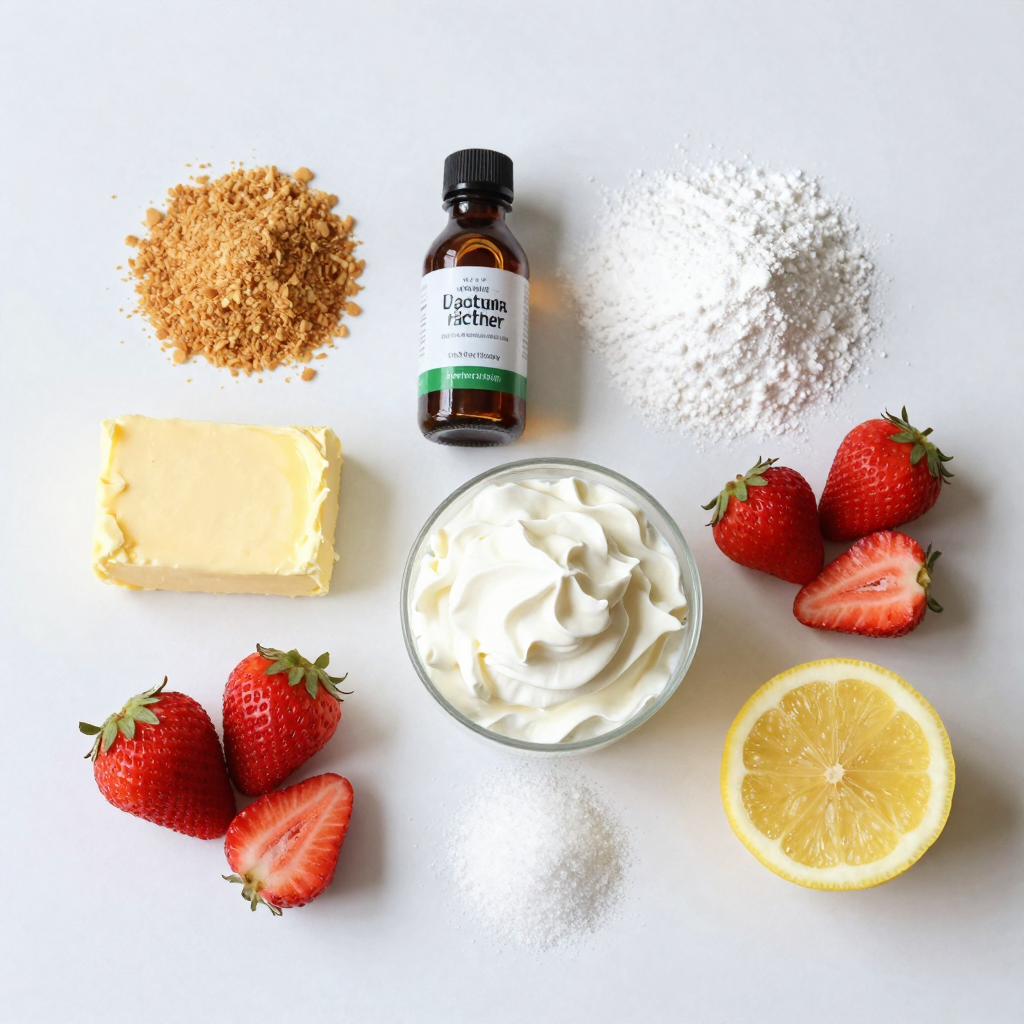
For this simple dessert, you will need:
- 1 ½ cups graham cracker crumbs
- ½ cup unsalted butter, melted
- 1 cup cream cheese, softened
- ½ cup powdered sugar
- 1 teaspoon vanilla extract
- 1 cup heavy whipping cream
- 2 cups fresh strawberries, hulled and sliced
- 2 tablespoons lemon juice
- 2 tablespoons granulated sugar (for the strawberries)
These ingredients create a creamy filling and a crunchy crust. The fresh strawberries add a burst of flavor.
Optional Ingredients for Customized Flavor
You can change the taste by adding:
- A pinch of salt for balance
- Lemon zest for a zesty kick
- A splash of almond extract for a nutty flavor
These extras can make your bars unique. Feel free to mix and match!
Tools and Equipment Needed
To make these bars, gather:
- Mixing bowls
- A spatula
- An 8×8 inch square baking dish
- A hand mixer or whisk
- A sharp knife for slicing
Having the right tools helps the process go smoothly. Enjoy making these delightful treats!

Step-by-Step Instructions
Preparing the Graham Cracker Crust
To start, gather your ingredients. You need graham cracker crumbs and melted butter. In a mixing bowl, combine 1 ½ cups of graham cracker crumbs with ½ cup of melted unsalted butter. Mix them well until all crumbs are coated. Next, press this mixture firmly into the bottom of an 8×8 inch square baking dish. Make sure it forms a flat, even layer. Once you finish, place the dish in the fridge. This helps the crust set while you make the filling.
Making the Cream Cheese Filling
Now it’s time to make the filling. In a clean bowl, beat 1 cup of softened cream cheese until it’s smooth. Gradually add ½ cup of powdered sugar and 1 teaspoon of vanilla extract while mixing. Keep mixing until the mixture is fully combined and fluffy. This step is key for a creamy filling.
Whipping the Cream and Combining
For this step, grab another bowl. Pour in 1 cup of heavy whipping cream. Whip it until stiff peaks form. This usually takes a few minutes. Once done, gently fold the whipped cream into your cream cheese mixture. Be careful not to deflate the whipped cream. This folding keeps your filling light and airy.
Adding the Strawberry Topping
After the filling is ready, pour it over the chilled graham cracker crust. Smooth the top with a spatula. Then, refrigerate it for at least 4 hours, or until it’s firm. While it sets, prepare the strawberries. In a small bowl, toss 2 cups of hulled and sliced strawberries with 2 tablespoons of granulated sugar and 2 tablespoons of lemon juice. Let them sit for about 15 to 20 minutes. This helps the strawberries release their juices. Once your cheesecake is firm, remove it from the fridge and top it with the macerated strawberries. Allow their juice to drizzle over the cheesecake for extra flavor. Now, slice and serve these delicious bars!
Pro Tips
- Chill the Ingredients: Ensure your cream cheese and heavy whipping cream are well chilled before mixing. This helps achieve a smoother filling and better whipped cream texture.
- Graham Cracker Texture: For a crunchier crust, pulse the graham crackers into finer crumbs and mix with the melted butter thoroughly. This creates a firmer base that holds up well when sliced.
- Strawberry Preparation: Let the strawberries macerate for longer than 20 minutes if time allows. This enhances their flavor and ensures they release more juice, creating a delightful topping.
- Serving Suggestions: For an extra touch, serve with whipped cream on the side or a drizzle of chocolate sauce to complement the strawberry flavor.
Tips & Tricks
How to Achieve a Creamy Texture
To get a creamy texture, use softened cream cheese. Cold cream cheese makes lumps. Beat it until smooth before adding sugar. This helps mix well. When you fold in whipped cream, do it gently. This keeps air in the cream. A light texture is key.
Best Practices for Whipping Heavy Cream
Start with cold heavy cream for the best results. Use a chilled bowl and beaters. This helps the cream whip faster. Whip until stiff peaks form, but don’t over-whip. If you over-whip, the cream can turn grainy. Stop when it looks fluffy and holds shape.
Presentation Tips for Serving
For serving, slice the bars neatly with a sharp knife. Use a warm knife for clean cuts. Place the bars on a colorful platter for a pop of color. Add fresh mint leaves as a garnish. Drizzle some strawberry sauce over the top for extra flair. This makes your dessert look even more inviting.

Variations
Different Fruit Toppings
You can switch up the fruit on these bars. Try blueberries, raspberries, or peaches. Each fruit adds a new taste. Fresh fruit makes these bars bright and fun. For a tropical twist, use mango or pineapple. The choice is yours!
Alternative Crusts (e.g., Oreo, Gluten-Free)
The crust can change to suit your taste. Use crushed Oreos for a chocolatey twist. You can also try gluten-free graham crackers if you need. This way, everyone can enjoy the bars. A nut-based crust adds a nice crunch too!
Flavor Additions (e.g., chocolate, citrus)
Adding flavors can take these bars to a new level. Mix in melted chocolate for a rich taste. A bit of lemon zest makes them zingy and fresh. You might even add a splash of orange juice for a sweet twist. These flavors can make your cheesecake bars unforgettable!
Storage Info
How to Store No-Bake Strawberry Cheesecake Bars
To store your no-bake strawberry cheesecake bars, keep them in an airtight container. This helps to maintain their freshness. If you do not have a container, you can cover the dish tightly with plastic wrap. Make sure the bars are completely cool before covering them.
How Long They Last in the Fridge
These cheesecake bars stay fresh for about 4 to 5 days in the fridge. The longer they sit, the softer the crust becomes. I recommend enjoying them within this timeframe for the best taste and texture.
Freezing Options and Tips
You can freeze these cheesecake bars if you want to keep them longer. To do this, cut the bars into squares first. Wrap each piece tightly in plastic wrap and then place them in a freezer-safe bag. They can last up to 2 months in the freezer. When you want to enjoy them, let them thaw in the fridge overnight. This keeps them creamy and delicious.
FAQs
Can I use frozen strawberries instead of fresh?
Yes, you can use frozen strawberries. They work well in this recipe. However, fresh strawberries taste better. If you use frozen, let them thaw and drain excess juice. This helps keep the bars from getting soggy.
How do I know when the cheesecake is set?
You’ll know the cheesecake is set when it feels firm to the touch. It should hold its shape when you slice it. Refrigerate for at least four hours for best results. If you are unsure, check after four hours.
Can I make this recipe gluten-free?
Yes, you can make these bars gluten-free. Use gluten-free graham cracker crumbs for the crust. Many brands offer tasty options. Just make sure to check the labels for any hidden gluten.
What’s the best way to cut cheesecake bars?
Cutting cheesecake bars requires a sharp knife. Dip the knife in hot water first, then wipe it dry. This helps make a clean cut. Slice into squares or rectangles, depending on your preference. Clean the knife between cuts for neat edges.
You now know the key parts to make no-bake strawberry cheesecake bars. Start with the essential ingredients and tools. Follow the step-by-step instructions for a smooth and creamy filling. Use my tips for the best texture and great presentation. Feel free to try various toppings and crusts to make the recipe your own. Proper storage will keep your bars fresh and tasty for longer. Enjoy creating these treats and impressing your friends and family!

No-Bake Strawberry Cheesecake Bars
Ingredients
1 ½ cups graham cracker crumbs
½ cup unsalted butter, melted
1 cup cream cheese, softened
½ cup powdered sugar
1 teaspoon vanilla extract
1 cup heavy whipping cream
2 cups fresh strawberries, hulled and sliced
2 tablespoons lemon juice
2 tablespoons granulated sugar (for the strawberries)
Instructions
Prepare the crust: In a mixing bowl, combine the graham cracker crumbs and melted butter until well mixed. Press the mixture firmly into the bottom of an 8×8 inch square baking dish to form an even layer. Place in the fridge to set while preparing the filling.
Make the filling: In another bowl, beat the softened cream cheese until smooth. Gradually add the powdered sugar and vanilla extract, mixing until fully combined.
Whip the cream: In a separate bowl, whip the heavy cream until stiff peaks form. Gently fold the whipped cream into the cream cheese mixture until fully blended, being careful not to deflate the whipped cream.
Pour the filling: Spread the cream cheese mixture evenly over the set graham cracker crust. Smooth the top with a spatula, then refrigerate for at least 4 hours or until firm.
Prepare the strawberries: In a small bowl, toss the hulled and sliced strawberries with granulated sugar and lemon juice. Let them macerate for about 15-20 minutes to release their juices.
Assemble: Once the cheesecake is firm, remove it from the refrigerator. Top with the macerated strawberries, allowing their juices to drip onto the cheesecake.
Slice and serve: Use a sharp knife to slice the bars into squares or rectangles. Serve immediately or keep refrigerated until ready to enjoy.
Prep Time: 20 minutes | Total Time: 4 hours 20 minutes | Servings: 9
– Presentation Tips: Serve the bars on a colorful platter, garnished with fresh mint leaves for a refreshing touch. A drizzle of strawberry sauce made from the macerated strawberries can also enhance the presentation.

No-Bake Strawberry Cheesecake Bars
Ingredients
- 1.5 cups graham cracker crumbs
- 0.5 cup unsalted butter, melted
- 1 cup cream cheese, softened
- 0.5 cup powdered sugar
- 1 teaspoon vanilla extract
- 1 cup heavy whipping cream
- 2 cups fresh strawberries, hulled and sliced
- 2 tablespoons lemon juice
- 2 tablespoons granulated sugar (for the strawberries)
Instructions
- Prepare the crust: In a mixing bowl, combine the graham cracker crumbs and melted butter until well mixed. Press the mixture firmly into the bottom of an 8x8 inch square baking dish to form an even layer. Place in the fridge to set while preparing the filling.
- Make the filling: In another bowl, beat the softened cream cheese until smooth. Gradually add the powdered sugar and vanilla extract, mixing until fully combined.
- Whip the cream: In a separate bowl, whip the heavy cream until stiff peaks form. Gently fold the whipped cream into the cream cheese mixture until fully blended, being careful not to deflate the whipped cream.
- Pour the filling: Spread the cream cheese mixture evenly over the set graham cracker crust. Smooth the top with a spatula, then refrigerate for at least 4 hours or until firm.
- Prepare the strawberries: In a small bowl, toss the hulled and sliced strawberries with granulated sugar and lemon juice. Let them macerate for about 15-20 minutes to release their juices.
- Assemble: Once the cheesecake is firm, remove it from the refrigerator. Top with the macerated strawberries, allowing their juices to drip onto the cheesecake.
- Slice and serve: Use a sharp knife to slice the bars into squares or rectangles. Serve immediately or keep refrigerated until ready to enjoy.


. Start by gathering your dry ingredients. In a large bowl, combine: - 1 cup rolled oats - 1/4 cup vanilla protein powder - 1 cup unsweetened shredded coconut - Pinch of sea salt Stir these ingredients well until they blend nicely. This mix forms a solid base for your protein bites. Next, make the binding mixture. In a separate bowl, blend together: - 1/2 cup almond butter (or your favorite nut butter) - 1/4 cup honey or maple syrup - 1 teaspoon vanilla extract Mix these until smooth and creamy. This mixture will help hold your bites together. Now comes the fun part! Pour the almond butter mixture over your dry ingredients. Mix everything well until they are fully combined. Carefully fold in: - 1 cup pitted and chopped fresh cherries Make sure the cherries are evenly spread throughout the mixture. Using your hands, shape the mixture into small balls, about 1 inch in size. If your mixture feels too sticky, wet your hands slightly. This will help you form the bites with ease. Place each formed bite on a parchment-lined baking sheet or plate. To let them set, refrigerate the bites for at least 30 minutes. This step firms them up, making them perfect for snacking. You can find the full recipe for these delicious Cherry Coconut Protein Bites to create your nutritious snack! To make your Cherry Coconut Protein Bites less sticky, you can try a few tricks. If the mixture is too wet, add more rolled oats or shredded coconut. This helps absorb extra moisture. When forming the bites, dampen your hands with a little water. This simple step prevents sticking and makes shaping easier. Also, if you chill the mixture for about 10 minutes before forming, it will firm up. This makes it easier to handle. When serving these bites, presentation matters! Arrange them on a colorful platter to make them pop. You can use fresh cherries and a sprinkle of shredded coconut as fun garnishes. Try placing the bites in neat rows or in a circular pattern. This adds a nice touch and invites people to enjoy them. A bright and cheerful display makes these bites even more appealing at parties or snack times. Cherries and coconut pack a nutritional punch. Cherries are rich in vitamins and antioxidants. They help reduce inflammation and support heart health. Coconut provides healthy fats that can boost energy. Plus, it may help improve digestion. Together, they make these bites not only tasty but also nutritious. With each bite, you enjoy flavor and health benefits. These bites are a smart snack choice for any time of day. For the full recipe, check out the earlier section. {{image_2}} You can change the taste of your Cherry Coconut Protein Bites easily. Swap out the cherries for other fruits. Dried cranberries or diced apples work great. You can also try different nut butters. Peanut butter or cashew butter add unique flavors. Instead of honey, use maple syrup or agave for sweetness. Each choice brings a new twist to the bites. Want to make these bites vegan? Just replace honey with maple syrup. Use a plant-based protein powder too. For a gluten-free option, choose gluten-free oats. This way, you keep the bites healthy and tasty for everyone. Feel free to add extras to your bites. Chia seeds or flaxseeds boost nutrition and texture. Dark chocolate chips add sweetness and richness. A pinch of cinnamon or nutmeg brings warmth to the flavor. You can mix and match based on what you like. Each variation makes these protein bites special and fun. Enjoy exploring different combinations with the full recipe! To keep your Cherry Coconut Protein Bites fresh, store them in an airtight container. This will help maintain their taste and texture. Make sure to place the container in the fridge. The cool temperature keeps the bites firm and safe to eat. Avoid leaving them at room temperature for too long. If they get warm, they may become too sticky. You can enjoy your homemade Cherry Coconut Protein Bites for up to one week. After a week, they might lose their flavor and texture. For the best taste, try to eat them fresh. If you notice any odd smells or changes in texture, it's best to toss them out. Freshness matters for both taste and health. Want to save some bites for later? You can freeze them! First, place the protein bites on a baking sheet in a single layer. Freeze them for about 2 hours, or until solid. Once frozen, transfer the bites to a freezer-safe bag or container. They can last up to three months in the freezer. When you want to enjoy them, take out the desired amount. Let them thaw in the fridge for a few hours or overnight. Enjoy your tasty snack anytime! For the full recipe, check out the details above. Cherry Coconut Protein Bites can last up to one week in the fridge. Keep them in an airtight container to keep them fresh. If you're like me and love to snack on these bites, you'll want to enjoy them within this time frame for the best flavor and texture. Yes, you can use frozen cherries! Just remember to thaw them first. This way, you will avoid excess moisture in your mixture. They will still offer that sweet, fruity taste you want in your protein bites. If you don’t have almond butter, feel free to use any nut or seed butter. Options like peanut butter or sunflower seed butter work great. Each choice will add a unique flavor while still binding your bites nicely. Absolutely! These protein bites are perfect for meal prep. You can make a big batch and store them for quick snacks during the week. They are easy to grab and are full of good energy, making them a smart choice for busy days. For the full recipe, check out the steps provided above. In this article, we explored how to make Cherry Coconut Protein Bites. We reviewed fresh and dry ingredients, such as cherries and oats. You learned the step-by-step process to create these tasty bites. Tips for texture and serving ideas helped enhance your experience. Don’t forget to customize your bites with your favorite flavors. Store them properly to keep them fresh. Enjoy the health benefits while satisfying your sweet tooth! These bites are simple, tasty, and perfect for any time.](https://dailydishlab.com/wp-content/uploads/2025/07/0dfc7ece-2245-4abb-9db4-f4477681fe67-768x768.webp)