Jalapeño Lime Chicken Wings Zesty Flavor Explosion

Are you ready to elevate your snack game? These Jalapeño Lime Chicken Wings pack a zesty punch that will have your taste buds dancing. With fresh ingredients like juicy chicken wings, vibrant jalapeños, and tangy lime, this recipe is both easy and fun to make. Dive into this mouthwatering guide, and learn how to create wings that will impress your friends and family at any gathering. Let’s get started on this flavor explosion!
Why I Love This Recipe
- Bold Flavor Combination: The mix of jalapeños and lime brings a bright and spicy flavor that elevates the chicken wings to a whole new level.
- Easy Preparation: With simple ingredients and straightforward steps, these wings are quick to prepare, making them perfect for any occasion.
- Healthier Baking Method: Baking the wings instead of frying allows for a crispy texture without the added calories and grease.
- Customizable Heat: By adjusting the amount of jalapeños or leaving the seeds in, you can easily tailor the spice level to your preference.
Ingredients
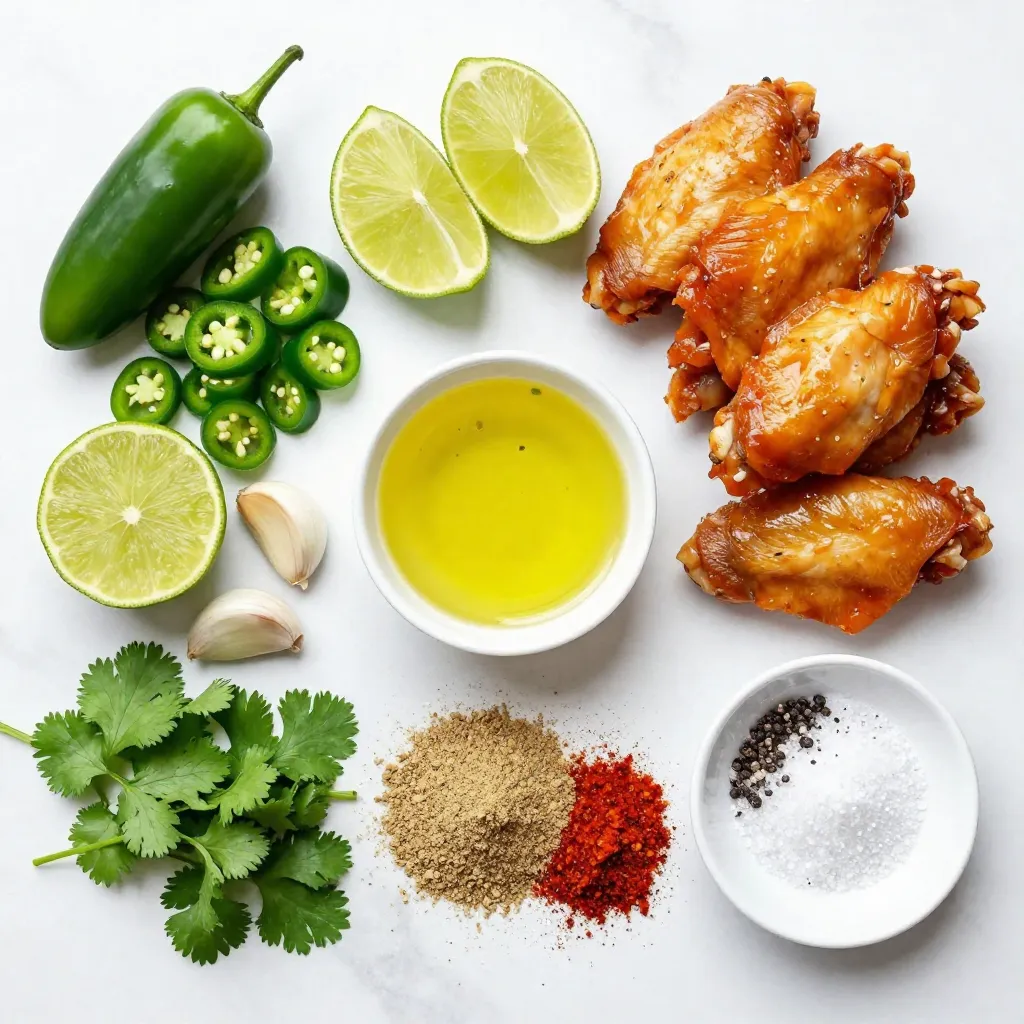
Let’s dive into the tasty ingredients for Jalapeño Lime Chicken Wings. Each item plays a key role in creating that zesty flavor explosion.
- Chicken wings: Use 2 lbs of chicken wings for a great base.
- Fresh jalapeños: Grab 2 fresh jalapeños and chop them finely. Remove the seeds for less heat if you prefer.
- Lime juice and zest: You will need 1/4 cup of fresh lime juice and the zest of 1 lime for that bright flavor.
- Olive oil: Use 3 tablespoons of olive oil to help the wings cook and add richness.
- Garlic, cumin, and smoked paprika: Add 3 cloves of minced garlic, 1 teaspoon of ground cumin, and 1 teaspoon of smoked paprika for depth.
- Seasoning options: Don’t forget salt and pepper to taste, and fresh cilantro for garnish.
These ingredients combine to make your wings truly shine. Each one adds its own special touch, making every bite a delight. Enjoy the process of cooking and the burst of flavors that follow!


Step-by-Step Instructions
Preheating the Oven
First, I preheat the oven to 400°F (200°C). This high heat helps the wings get crispy. I also line a baking sheet with parchment paper. This makes for easy cleanup later.
Preparing the Marinade
Next, I make the marinade. In a large bowl, I mix minced garlic, chopped jalapeños, lime juice, and lime zest. Then, I add olive oil, ground cumin, and smoked paprika. A pinch of salt and pepper adds flavor. I stir everything well until it combines nicely.
Marinating the Wings
Now, I add the chicken wings to the bowl. I toss the wings until they are fully coated in the marinade. It’s important to cover the bowl, so the wings soak up all the flavors. I let them sit in the fridge for at least 30 minutes. For the best taste, I recommend marinating them overnight.
Baking the Wings
After marinating, I place the wings in a single layer on the baking sheet. I bake them in the preheated oven for about 40-45 minutes. Halfway through, I turn them to ensure an even bake. They should turn golden brown and crispy.
Garnishing and Serving
When the wings are ready, I take them out and let them cool slightly. Then, I move them to a serving platter. I sprinkle chopped cilantro on top for a fresh touch. I also serve lime wedges on the side for an extra zesty kick. Enjoy your flavorful feast!
Tips & Tricks
How to Achieve Crispy Wings
To make your wings crispy, you need to follow a few steps. First, make sure to dry the wings well before marinating. Moisture can make wings soggy. Then, coat the wings evenly in the marinade. This helps with crisping. When baking, use a wire rack on the baking sheet. This allows hot air to circulate around the wings. Bake them at 400°F (200°C) for a golden finish. Turning the wings halfway through helps them crisp up all over.
Marinade Time for Maximum Flavor
Marinating is key for tasty wings. Aim for at least 30 minutes in the fridge. If you want a stronger flavor, marinate overnight. The lime juice and jalapeños soak into the meat. This makes every bite packed with zesty goodness. Don’t skip this step; it’s where the magic happens.
Recommended Cooking Tools
To make cooking easier, gather a few key tools. You’ll need a large mixing bowl for your marinade. A baking sheet lined with parchment paper or foil helps with cleanup. Use a wire rack to bake the wings. Finally, have some tongs ready to turn the wings while they cook. These tools will help you create the best Jalapeño Lime Chicken Wings.
Pro Tips
- Marinate Longer for Flavor: For an even more intense flavor, marinate the chicken wings overnight. This allows the spices and jalapeño to infuse the meat more thoroughly.
- Adjusting Spice Level: If you prefer milder wings, ensure to remove all the seeds and membranes from the jalapeños. Alternatively, use less jalapeño for a subtler heat.
- Getting Crispy Skin: For extra crispy wings, pat the chicken wings dry with paper towels before marinating. This removes excess moisture and helps achieve a crunchier texture during baking.
- Broil for Extra Crispiness: If the wings aren’t as crispy as you like after baking, switch your oven to broil for the last 2-3 minutes. Keep an eye on them to prevent burning!
Variations
Spicy Jalapeño Lime Wings
If you want more heat, try spicy jalapeño lime wings. Use more jalapeños or leave some seeds in. You can also add a splash of hot sauce to the marinade. This extra kick makes your wings zesty and exciting. Combine the spice with fresh lime for a great taste.
Honey-Lime Chicken Wings
For a sweeter twist, make honey-lime chicken wings. Add 1/4 cup of honey to the marinade. This sweetness balances the heat from the jalapeños. The honey caramelizes during baking, giving a nice glaze. You get a sweet and tangy flavor that is hard to resist.
Grilled Jalapeño Lime Wings
Grilling adds a smoky flavor to your wings. Marinate the wings just like before. Then, grill them over medium heat. Cook for about 20-25 minutes, turning often to avoid burning. This method gives a nice char and keeps the wings juicy. Enjoy the smoky, zesty taste!
Storage Info
Storing Leftover Wings
After enjoying your Jalapeño Lime Chicken Wings, store any leftovers right away. Place them in an airtight container. They will stay fresh for up to three days in the fridge. To keep them from drying out, you can cover the wings with a bit of foil before sealing the container. This helps keep the flavor locked in.
Reheating Tips
To reheat the wings, use your oven for the best results. Preheat your oven to 350°F (175°C). Spread the wings on a baking sheet in a single layer. Heat them for about 10 to 15 minutes. This method keeps the wings crispy and tasty. You can also use a microwave, but they may not be as crunchy.
Freezing Instructions
If you want to save wings for later, freezing is a great option. First, let the wings cool completely. Arrange them in a single layer on a baking sheet. Freeze them for about one hour until firm. Then, transfer the wings to a freezer-safe bag or container. They can stay in the freezer for up to three months. When ready to eat, just thaw them overnight in the fridge and reheat as mentioned above.
FAQs
What can I serve with Jalapeño Lime Chicken Wings?
You can serve many sides with these wings. They pair well with:
- Celery sticks
- Carrot sticks
- Ranch dressing
- Blue cheese dressing
- Corn on the cob
- Potato wedges
- Rice or quinoa
These sides help balance the heat and add freshness to your meal.
Can I make this recipe ahead of time?
Yes, you can. Marinate the wings up to one day in advance. Keep them in the fridge. When ready, just bake them as per the recipe. This saves time on busy days.
How can I adjust the spice level of the wings?
To change the spice level, use fewer jalapeños. You can also remove the seeds for less heat. If you want more spice, add chili powder or cayenne pepper. Adjust to fit your taste.
What are the best sides for chicken wings?
Great sides for chicken wings include:
- French fries
- Coleslaw
- Macaroni and cheese
- Chips and salsa
- Garlic bread
These sides add fun and flavor to your chicken wing feast.
This blog post covered tasty Jalapeño Lime Chicken Wings. We explored ingredients, from chicken wings to spices. I shared step-by-step instructions for preparing, marinating, and baking. We also discussed tips for crispy wings and creative variations.
In the end, enjoy your wings any way you like. These are fun to make and share. Trust me, they’ll become a hit at your next gathering! Enjoy cooking and experimenting with flavor

Jalapeño Lime Chicken Wings
Ingredients
- 2 lbs chicken wings
- 2 fresh jalapeños, finely chopped (seeds removed for less heat)
- 0.25 cup fresh lime juice
- 1 zest lime
- 3 tablespoons olive oil
- 3 cloves garlic, minced
- 1 teaspoon ground cumin
- 1 teaspoon smoked paprika
- to taste salt and pepper
- for garnish fresh cilantro, chopped
Instructions
- Preheat your oven to 400°F (200°C) and line a baking sheet with parchment paper or aluminum foil for easy cleanup.
- In a large mixing bowl, combine the minced garlic, chopped jalapeños, lime juice, lime zest, olive oil, ground cumin, smoked paprika, salt, and pepper. Mix well to create a marinade.
- Add the chicken wings to the bowl and toss them in the marinade until they are fully coated. Cover the bowl and let it marinate in the fridge for at least 30 minutes, or up to overnight for maximum flavor.
- Place the marinated wings in a single layer on the prepared baking sheet. Bake them in the preheated oven for about 40-45 minutes, turning halfway through, until they are golden brown and crispy.
- Once the wings are done, remove them from the oven and let them cool slightly. Transfer the wings to a serving platter and garnish with freshly chopped cilantro. Serve with lime wedges on the side for an extra zesty kick.
Notes

Jalapeño Lime Chicken Wings
Ingredients
- 2 pounds chicken wings
- 2 tablespoons olive oil
- 2 tablespoons lime juice
- 1 tablespoon jalapeño, minced
- 1 teaspoon garlic powder
- 1 teaspoon salt
- 1 teaspoon black pepper
- 1 teaspoon cumin
Instructions
- Preheat the grill to medium-high heat.
- In a large bowl, combine olive oil, lime juice, minced jalapeño, garlic powder, salt, black pepper, and cumin.
- Add chicken wings to the bowl and toss to coat evenly.
- Let the wings marinate for at least 15 minutes.
- Place the wings on the grill and cook for about 30 minutes, turning occasionally, until fully cooked and crispy.
- Serve hot with lime wedges.


![- 2 ripe avocados - 1 cup cherry tomatoes, halved - 1 ball of fresh mozzarella, sliced These main ingredients create the heart of your Caprese avocado toast. Ripe avocados give a rich, creamy base. Cherry tomatoes add a sweet and juicy burst. Fresh mozzarella brings a soft, milky flavor that ties it all together. - 1/4 cup fresh basil leaves - 2 tablespoons balsamic glaze - 1 tablespoon olive oil - Salt and pepper to taste Fresh basil leaves add a fragrant touch. Balsamic glaze gives a sweet and tangy finish. Olive oil enhances the richness. Don’t forget to season with salt and pepper for a full flavor experience. - 4 slices of whole grain - 4 slices of sourdough Choosing the right bread is key. Whole grain bread offers a nutty flavor and healthy fiber. Sourdough gives a tangy taste and a chewy texture. Both options will hold up well under the toppings. With these ingredients, you can easily create a fresh and flavorful Caprese avocado toast. Check out the Full Recipe for more details on how to bring this dish to life! Toasting the bread is key. You want it crispy but not burnt. I recommend using whole grain or sourdough. Start by placing your bread slices in a toaster or on a skillet. Toast them until they turn a nice golden brown. This crispiness will hold up well against the creamy avocado. It adds a great texture to your Caprese avocado toast. Next, grab your ripe avocados. Cut each avocado in half and remove the pit. Use a spoon to scoop the flesh into a bowl. Mash the avocado with a fork. You can make it smooth or leave some chunks for texture. Season it with salt and pepper. This step is vital for flavor. A well-mashed avocado will elevate your toast. Now comes the fun part: assembling your toast. Start by spreading a generous layer of mashed avocado on each slice of bread. Next, place sliced fresh mozzarella on top of the avocado. Follow this with halved cherry tomatoes. The colors and flavors mix beautifully. Drizzle olive oil over the toast and sprinkle fresh basil leaves on top. Lastly, add a drizzle of balsamic glaze. This adds sweetness and tang. For a bit more kick, sprinkle some extra salt and freshly cracked pepper. Enjoy your fresh and flavorful Caprese avocado toast! For the complete recipe, check out the [Full Recipe]. To get the best avocado mash, start with ripe fruit. A ripe avocado is slightly soft when you press it. Cut the avocado in half, remove the pit, and scoop the flesh into a bowl. Use a fork to mash it. Aim for a creamy, yet chunky texture. If you like, you can add a splash of lemon juice. This keeps the color bright and adds a nice flavor. You can boost the flavor of your Caprese Avocado Toast easily. Try adding a pinch of garlic powder or onion powder. A dash of red pepper flakes adds a bit of heat. Fresh herbs like chives or dill can give a fresh twist. For a savory touch, sprinkle some feta cheese on top. These extras make your toast pop with taste and excitement. Caprese Avocado Toast is great on its own, but you can pair it with more. A fresh side salad adds crunch and color. You can also serve it with a light soup. For a heartier meal, add a poached egg on top. This boosts protein and makes your toast filling. You can find the full recipe above to get started right away! {{image_2}} You can easily make a vegan version of Caprese avocado toast. Instead of fresh mozzarella, try using vegan cheese. Look for brands that melt well and are made from nuts or soy. For the balsamic glaze, ensure it has no added dairy. You can also use a splash of lemon juice for added zest. These swaps keep the flavor while making it vegan-friendly. Want to boost the protein in your toast? Try adding a poached egg on top. The yolk adds creaminess and richness. If you enjoy meat, prosciutto pairs well with the flavors. Just layer it on the toast before adding the basil. You can also sprinkle seeds or nuts for crunch, like pine nuts or sunflower seeds. These options make your meal more filling and tasty. Don't be afraid to play with flavors. Instead of balsamic glaze, use a fruity vinegar like raspberry or fig. These can bring a new twist to your dish. You can also swap olive oil for flavored oils, such as garlic or chili oil. Each change can create a unique taste. Experiment to find your favorite combination! For more details on the Caprese avocado toast, check the Full Recipe. To store leftover ingredients, keep the avocados in an airtight container. This helps slow down browning. Place sliced tomatoes and mozzarella in their own containers. You can keep them fresh by adding a bit of olive oil. Store everything in the fridge and use within two days for the best taste. You should not freeze the assembled toast. Freezing changes the texture of the bread and avocado. However, you can freeze the ingredients separately. Just mash ripe avocados before freezing. Use a bit of lemon juice to help keep the color. Frozen tomatoes and mozzarella work well in cooked dishes but lose their fresh taste when thawed. To maintain ingredient quality, buy the freshest produce you can find. Store avocados at room temperature until ripe. Once ripe, place them in the fridge. Keep tomatoes out of the fridge to avoid losing flavor. Use fresh basil right away for the best aroma. To keep your balsamic glaze fresh, seal it tightly and store it in a cool, dark place. Following these tips helps ensure you enjoy Caprese Avocado Toast at its best, as shown in the Full Recipe. Caprese Avocado Toast is a tasty dish that combines fresh ingredients. It features ripe avocados, juicy tomatoes, and creamy mozzarella. This dish takes inspiration from the classic Caprese salad, which hails from Italy. It's perfect for breakfast, lunch, or a snack. The vibrant colors and flavors make it a delight to eat. To make your avocado toast creamy, choose ripe avocados. They should yield slightly when you press them. Mash them well with a fork until smooth. You can add a little olive oil for extra creaminess. Mixing in salt and pepper will enhance the flavor, too. If you want a twist, try adding a squeeze of lemon juice. This not only adds creaminess but also keeps the avocado fresh. Yes, you can prep some parts of this recipe ahead of time. You can mash the avocado and store it in an airtight container. Just remember to add lemon juice to keep it green. Slice the tomatoes and mozzarella ahead of time as well. Keep them in the fridge until you are ready to assemble the toast. For the best taste, toast the bread right before serving. This keeps it crispy and delicious. For the full recipe, check out the previous section. In this article, we explored the delicious world of Caprese Avocado Toast. We broke down the key ingredients like ripe avocados and fresh mozzarella. You learned how to toast the bread for the right crunch and prepare a creamy avocado mash. I shared tips for perfecting flavor and serving options. Try different variations and toppings to make it your own. Remember to store ingredients properly for freshness. Enjoy creating this simple yet tasty dish that offers endless possibilities!](https://dailydishlab.com/wp-content/uploads/2025/07/79be3167-b52a-4185-ab5b-4217b6e27db0-768x768.webp)


![- 1 can (15 oz) chickpeas, rinsed and drained - 2 tablespoons olive oil - Spices: smoked paprika, cayenne pepper, garlic powder, ground cumin - Garnish: Salt and fresh parsley, chopped - Substitute olive oil with avocado oil - Alternative spices and blends for different flavors Using the right ingredients is key to making these spicy roasted chickpeas. First, start with a can of chickpeas. Rinse them well and drain them. This step removes excess sodium and gets rid of any canning liquid. Next, grab some olive oil. You can also use avocado oil if you prefer a different taste. The oil helps the spices stick and makes the chickpeas crispy. Now let's talk spices! I love using smoked paprika for that deep, smoky flavor. Adjust the cayenne pepper to match your spice level. Garlic powder adds a nice kick, while ground cumin brings warmth. Finally, don't forget the salt! It enhances all the flavors. For a fresh touch, chop some parsley to sprinkle on top. This makes your dish look and taste great. If you want to mix it up, try different spices or blends. You could add curry powder for an Indian twist or taco seasoning for a Mexican flair. There are so many options! For the full recipe, check out the complete steps to make this snack. - Preheat your oven to 400°F (200°C). - Rinse and dry the chickpeas thoroughly. Start by preheating your oven. This step helps the chickpeas roast evenly. While the oven heats, grab a can of chickpeas. Rinse them well under cold water. Use a colander to drain the chickpeas. It's key to dry them with a clean kitchen towel. Removing moisture will make the chickpeas crisp. - Toss the chickpeas with olive oil. - Mix in spices for optimal flavor coating. Next, place the dried chickpeas in a mixing bowl. Pour in two tablespoons of olive oil. This oil helps the spices stick and adds flavor. Now, it’s time to add the spices. Use smoked paprika, cayenne pepper, garlic powder, ground cumin, and salt. Mix everything well, so each chickpea gets coated. This step really boosts the taste. - Spread seasoned chickpeas on a baking sheet. - Roast and shake pan halfway through for even cooking. Now, line a baking sheet with parchment paper. Spread the coated chickpeas in a single layer. This spacing helps them roast evenly. Place the baking sheet in your preheated oven. Roast them for 25-30 minutes. Halfway through, shake the pan to move the chickpeas around. This action ensures they cook well and get crispy. When they are golden brown, they are ready. Let them cool a bit before tasting. You can adjust the seasoning at this point. If you want to make them even better, garnish with fresh parsley before serving. For the full recipe, refer to the section above. To get that perfect crunch, start by drying the chickpeas thoroughly. After rinsing, drain them well. Then, pat them with a clean towel. The less moisture, the crispier they get. Also, do not overcrowd the baking sheet. Give them space to roast evenly. If they touch, they will steam instead of crisp. You can adjust the spice levels to your taste. If you like it hot, add more cayenne pepper. For a milder flavor, reduce it. You can also add extra herbs or citrus zest before serving. Fresh herbs like rosemary or thyme add a great twist. A touch of lemon zest brightens the flavors. Keep an eye on the roasting time. You want them golden brown, not burnt. Check for doneness by looking at the color. They should be crispy and firm to the touch. If they feel soft, give them a few more minutes. The right timing ensures a delightful crunch. {{image_2}} You can switch up the flavors of your spicy roasted chickpeas easily. Try using curry powder for a warm and earthy taste. Taco seasoning gives a fun, zesty kick. If you're in the mood for something sweet, mix cinnamon and sugar. This creates a tasty dessert version that is hard to resist. For a cheesy flavor, sprinkle in some nutritional yeast. This adds a delightful twist and boosts nutrients. You can also mix in seeds or nuts. This adds extra crunch and makes your snack even more satisfying. These roasted chickpeas are not just a snack. Use them as a topping for salads to add texture and taste. They also work great in wraps, giving a crunchy surprise. Pair them with dips like hummus or tzatziki for a fun flavor combo. Enjoy your crunchy treat in many ways! For the complete recipe, check out the [Full Recipe]. To keep your spicy roasted chickpeas crunchy, store them in an airtight container. This helps prevent moisture from making them soggy. They stay good for about 3 to 5 days at room temperature. Make sure to place them in a cool, dry spot away from sunlight. If you store them in the fridge, they may lose their crunch faster. If your chickpeas lose their crunch, you can easily fix them. Preheat your oven to 400°F (200°C). Spread the chickpeas on a baking sheet. Bake for about 10 minutes or until they are crispy again. Keep an eye on them so they don’t burn. If your chickpeas smell off or feel too soft, it’s best to discard them. Enjoy them fresh for the best taste! For the full recipe, check out the details above. Spicy roasted chickpeas can last about four to five days when stored properly. Keep them in an airtight container at room temperature. Avoid storing them in the fridge, as moisture can make them soggy. If you want them to stay crunchy, check the container daily. Yes, you can use dried chickpeas. First, soak them in water overnight. This helps them soften. After soaking, cook them in boiling water for about 1 to 1.5 hours until tender. Once cooked, drain and dry them well before following the full recipe for roasting. Chickpeas are packed with nutrients. They are rich in protein and fiber. This makes them great for your diet. They also help keep you full longer. Chickpeas are low in fat and have no cholesterol. They support heart health and help with digestion. Enjoying chickpeas can be a tasty way to boost your health. Spicy roasted chickpeas are easy and fun to make. We covered main and optional ingredients, step-by-step roasting instructions, and storage tips. You can also tailor flavors with various spices and add ingredients for crunch. These chickpeas make a tasty snack or a top-notch salad addition. When you try this recipe, I hope you enjoy every bite and explore your favorite flavors. Keep experimenting for the best version that suits you!](https://dailydishlab.com/wp-content/uploads/2025/06/6814540d-e3cb-4f17-9659-76d9cffed5c2-768x768.webp)