

Get ready for a treat you won’t forget! My Lemon Blueberry Cheesecake Crescent Bites blend zesty lemon, sweet blueberries, and creamy cheese in every bite. This delightful snack is perfect for parties or a quick dessert at home. Plus, it’s super easy to make! Join me as we dive into the ingredients and steps to create these irresistible bites that everyone will love.
Why I Love This Recipe
- Easy to Make: This recipe requires minimal prep time and simple ingredients, making it perfect for quick dessert cravings.
- Delicious Flavor Combination: The tangy lemon pairs beautifully with sweet blueberries, creating a delightful taste experience.
- Great for Any Occasion: Whether it’s a family gathering or a casual get-together, these bites are sure to impress your guests.
- Perfectly Portable: These crescent bites are easy to transport, making them an ideal treat for picnics or parties.
Ingredients
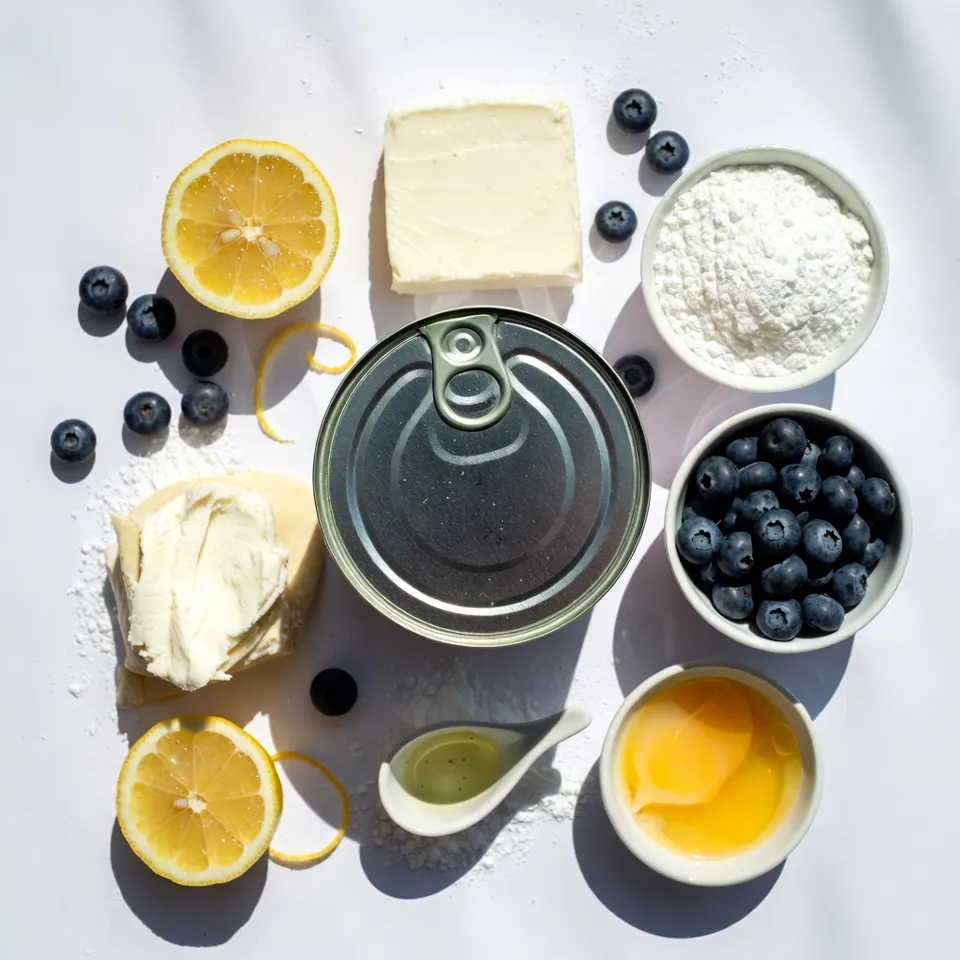
When making Lemon Blueberry Cheesecake Crescent Bites, the right ingredients make all the difference. Here’s what you’ll need:
– 1 can (8 oz) refrigerated crescent roll dough
– 8 oz cream cheese, softened
– 1/4 cup powdered sugar
– 1 tablespoon lemon juice
– Zest of 1 lemon
– 1 teaspoon vanilla extract
– 1 cup fresh blueberries
– 1 egg, beaten (for egg wash)
– Additional powdered sugar for dusting
Each item plays a key role in creating these bites. The crescent roll dough gives a flaky base. Cream cheese adds a rich, smooth filling. Sweeteners, like powdered sugar, balance the tartness of the lemon. Fresh blueberries burst with flavor, enhancing every bite. The egg wash helps achieve that perfect golden color. Dusting with powdered sugar adds a lovely finish.
Feel free to explore fresh ingredients. Seasonal blueberries work well. Always use quality cream cheese for the best texture. Enjoy your cooking adventure!
Step-by-Step Instructions
Preparation Steps
1. Preheat your oven to 375°F (190°C). This temperature helps the bites bake evenly.
2. Line a baking sheet with parchment paper. This keeps the bites from sticking.
3. Make the cream cheese filling. In a bowl, mix 8 oz of softened cream cheese, 1/4 cup powdered sugar, 1 tablespoon lemon juice, lemon zest, and 1 teaspoon vanilla extract. Beat until smooth.
4. Unroll the crescent roll dough. Separate it into triangles. Each triangle will hold the filling.
5. Spoon the cream cheese mixture onto the wide end of each crescent triangle. Use about a tablespoon for each.
6. Add a few fresh blueberries on top of the cream cheese. This adds flavor and color.
7. Roll the dough from the wide end to the narrow tip. Pinch the edges to seal in the filling. This keeps the creamy goodness inside.
Baking Instructions
1. Place the rolled crescent bites on the prepared baking sheet.
2. Brush the tops with the beaten egg. This gives them a golden finish as they bake.
3. Bake in the preheated oven for 12-15 minutes. Watch for a nice golden brown color.
4. Once baked, cool slightly before dusting with powdered sugar. This adds a sweet touch.
5. Serve warm or at room temperature. Enjoy these delightful bites right away for the best taste!
Tips & Tricks
Perfecting the Cheesecake Filling
To make the best cheesecake filling, start with softened cream cheese. This helps create a smooth texture. Use a hand mixer for an even creaminess. Mix in powdered sugar slowly to avoid clumps.
Add lemon juice and zest for a bright taste. If you want extra flavor, try a pinch of cinnamon or nutmeg. These spices add warmth and depth. You can also mix in a touch of almond extract for a nutty twist.
Crescent Roll Handling
Crescent roll dough can be tricky. To avoid tears, handle it gently. Make sure your hands are dry. If the dough sticks, use a bit of flour on your work surface.
When rolling, start from the wide end. This helps keep the filling inside. Pinch the edges well to seal them. If you notice any openings, press them closed. This way, your filling won’t escape while baking.
For easy rolling, try chilling the dough slightly. Cold dough is less sticky and easier to work with. These tips will help you create perfect Lemon Blueberry Cheesecake Crescent Bites every time!
Pro Tips
- Chill the Filling: For a firmer filling, chill the cream cheese mixture for about 30 minutes before spooning it onto the crescent dough.
- Use Fresh Blueberries: Fresh blueberries will give the best flavor and texture. If using frozen, ensure they are fully thawed and drained to avoid excess moisture.
- Seal Well: Pinch the edges of the crescent dough firmly to prevent the filling from leaking out during baking.
- Experiment with Flavors: Feel free to add other fruits like raspberries or strawberries, or even a bit of almond extract for a different twist!
Variations
Flavor Modifications
You can change the fruit in this recipe. Instead of blueberries, try raspberries or strawberries. Both fruits give a tasty twist. You can also use mixed berries for fun. Each fruit brings its own flavor and color.
Adding different extracts or spices can enhance the bites. Try almond extract for a nutty taste. A pinch of cinnamon can add warmth. These small changes can make each batch unique and exciting.
Dietary Alternatives
If you need gluten-free options, look for gluten-free crescent roll dough. Many brands now offer this. It allows everyone to enjoy these treats without worry.
For those following a vegan diet, you can swap cream cheese for vegan cream cheese. Many brands taste great and work well in recipes. Just check the packaging for best results.
Storage Info
How to Store Leftovers
To keep your Lemon Blueberry Cheesecake Crescent Bites fresh, store them in the fridge. Place them in an airtight container. This helps maintain the creamy filling and flaky dough. They will stay good for about 3 to 4 days.
If you want to keep them longer, freezing is great too. Wrap each bite tightly in plastic wrap. Then, put them in a freezer-safe bag. They can last up to 2 months in the freezer. Just be sure to label the bag with the date.
Reheating Tips
When you are ready to enjoy your bites again, reheating is key. An oven is the best option. Preheat your oven to 350°F (175°C). Place the bites on a baking sheet for about 10 minutes. This method will help maintain their texture.
If you are in a hurry, you can use a microwave. Heat each bite for about 15 to 20 seconds. Check to make sure they are warm, but do not overheat them. After reheating, serve with a light dusting of powdered sugar for a lovely finish. Enjoy them warm or at room temperature!
FAQs
Common Questions
Can I make these ahead of time?
Yes, you can make these bites ahead. Prepare the filling and roll the crescents. Store them in the fridge for up to a day. When ready, just bake them as directed. This saves time and lets you enjoy fresh bites later.
What can I substitute for cream cheese?
You can use mascarpone cheese or Greek yogurt as a substitute. Both will give a creamy feel. If you want a non-dairy option, try using cashew cream. Blend soaked cashews with lemon juice for a similar taste.
Baking Concerns
What should I do if my crescent rolls are too doughy?
If they are too doughy, try baking them a little longer. Keep an eye on them to avoid burning. If it happens often, check your oven’s temperature. An oven thermometer can help to ensure accurate heat.
How do I prevent the filling from oozing out during baking?
To stop the filling from oozing, pinch the edges tightly. This seals the dough. Also, don’t overfill the crescents. Use about a tablespoon of filling for each roll. This keeps your bites neat and tasty.
In this blog post, I shared a simple recipe for crescent roll cheesecake bites. We covered key ingredients, like cream cheese, blueberries, and crescent dough. Then, I walked you through step-by-step instructions for perfect preparation, baking, and serving. I offered tips for a creamy filling, easy dough handling, and tasty variations. Finally, we discussed proper storage methods and answered common questions. Enjoy making these bites at home and get creative with flavors. You’ll love sharing these treats with friends and family. Happy bakin


