

Get ready to elevate your grilling game with Lemon Garlic Chicken Skewers! These skewers bring bright flavors and simple steps that anyone can follow. I’ll guide you through marinating juicy chicken, assembling colorful vegetables, and achieving grill perfection. Whether you want a quick dinner idea or a crowd-pleaser for your next cookout, this recipe has you covered. Let’s dive into the details and make your cookout a flavorful delight!
Why I Love This Recipe
- Flavorful Marinade: The combination of lemon juice, garlic, and spices creates a zesty and aromatic marinade that infuses the chicken with incredible flavor.
- Healthy Ingredients: This recipe uses lean chicken and a variety of colorful vegetables, making it a nutritious option for any meal.
- Grill-Friendly: These skewers are perfect for grilling, giving the chicken a beautiful char and smoky flavor that’s hard to resist.
- Easy Preparation: With simple steps and minimal prep time, this dish is quick to make, ideal for weeknight dinners or weekend gatherings.
Ingredients
Main Ingredients
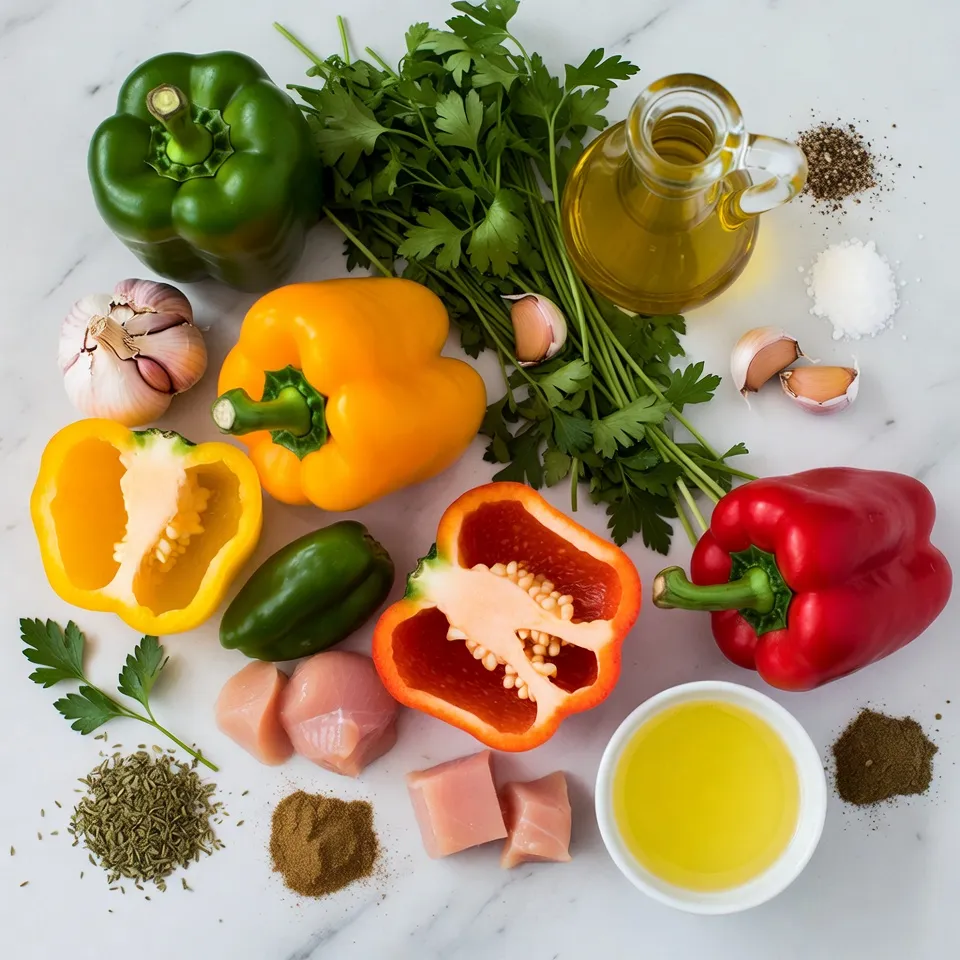
– 1 lb boneless, skinless chicken breast, cut into 1-inch cubes
– 1/4 cup freshly squeezed lemon juice
– 3 tablespoons olive oil
– 4 cloves garlic, minced
– 1 teaspoon dried oregano
– 1 teaspoon ground cumin
– Salt and black pepper to taste
– 1 cup bell peppers (red, yellow, green), cut into 1-inch pieces
– 1 medium red onion, cut into wedges
For the Lemon Garlic Chicken Skewers, the chicken is the star. I use boneless and skinless chicken breast for a tender bite. Cut them into 1-inch cubes. This size helps with even cooking.
Next, let’s talk about the marinade. Combining lemon juice, olive oil, minced garlic, oregano, and cumin creates a bright flavor. The acid from the lemon juice tenderizes the chicken. It also adds that zesty kick we love. Don’t forget salt and pepper for balance.
Now, for vegetables. I love using bell peppers and red onions. They add color and sweetness when grilled. Make sure to cut them into 1-inch pieces. This size matches the chicken cubes well and cooks evenly.
Optional Garnishes
– Fresh parsley, chopped (for garnish)
– Additional seasonings
To finish, I like to add fresh herbs like parsley. It brings freshness and a pop of color. If you want more flavor, consider extra seasonings. A sprinkle of paprika or chili powder can add warmth. Feel free to get creative!
Step-by-Step Instructions
Preparing the Marinade
First, grab a medium bowl. You will whisk together some simple ingredients. Add 1/4 cup of fresh lemon juice. Pour in 3 tablespoons of olive oil. Next, add 4 minced garlic cloves. Sprinkle in 1 teaspoon of dried oregano and 1 teaspoon of ground cumin. Season with salt and black pepper to your taste. Whisk these together until mixed well.
Now it’s time to marinate the chicken. Cut 1 pound of boneless, skinless chicken breast into 1-inch cubes. Add the chicken to the marinade. Use a spatula or spoon to coat the chicken pieces well. Cover the bowl tightly. Place it in the fridge for at least 30 minutes. For even better flavor, let it sit for up to 2 hours.
Assembling the Skewers
If you use wooden skewers, soak them in water for 30 minutes. This step helps prevent them from burning on the grill. While the skewers soak, prepare your vegetables. Cut bell peppers into 1-inch pieces. You can use red, yellow, or green peppers. Also, cut a medium red onion into wedges.
After soaking, it’s time to thread the chicken and veggies onto the skewers. Start with a piece of chicken, then add a bell pepper, followed by an onion wedge. Repeat this pattern until the skewer is full. Aim for a nice mix of chicken and colorful veggies.
Grilling the Skewers
Now, preheat your grill or grill pan over medium-high heat. Lightly oil the grill grates to stop the skewers from sticking. Once the grill is hot, place the skewers on it. Cook them for about 12 to 15 minutes. Make sure to turn them occasionally for even cooking. You want the chicken to be fully cooked. The internal temperature should reach 165°F or 75°C. You should see nice char marks on the chicken and veggies.
After grilling, remove the skewers from the heat. Let them rest for a few minutes. This step helps the juices settle. Finally, garnish with fresh chopped parsley before serving. Enjoy your flavorful lemon garlic chicken skewers!
Tips & Tricks
Achieving the Best Flavor
To make these lemon garlic chicken skewers burst with flavor, marination is key. Use a simple mix of lemon juice, olive oil, minced garlic, oregano, and cumin. This blend gives the chicken a fresh and zesty kick.
– Marinate the chicken for at least 30 minutes. For even more taste, marinate for up to 2 hours. This allows the flavors to soak in deeply.
– You can change the spices to suit your taste. Try adding paprika for smokiness or chili powder for heat.
Cooking Techniques
You can grill these skewers or cook them in the oven. Grilling gives a nice char that enhances flavor.
– If you grill, preheat the grill to medium-high. Lightly oil the grill grates to prevent sticking.
– If you use the oven, place the skewers on a baking sheet. Set the oven to 400°F (200°C) and cook for about 20 minutes.
To check for doneness, use a meat thermometer. The chicken should reach an internal temperature of 165°F (75°C).
Serving Suggestions
Pair these skewers with simple sides for a great meal. Rice or couscous works well. You can also serve with a fresh salad.
– For fun presentation, arrange the skewers on a large platter. Add colorful bell peppers and onion wedges around them.
– Don’t forget to garnish with fresh parsley for a pop of color. You can also drizzle some extra lemon juice over the top before serving.
Pro Tips
- Marinate Longer for Flavor: For the best flavor, allow the chicken to marinate for at least 1-2 hours, or even overnight if possible. This helps the flavors penetrate the chicken more deeply.
- Use Fresh Ingredients: Fresh garlic and freshly squeezed lemon juice will enhance the flavor of the marinade significantly compared to pre-packaged alternatives.
- Skewer Variations: Feel free to add other vegetables such as zucchini, cherry tomatoes, or mushrooms to the skewers for added color and flavor.
- Check Doneness: Always use a meat thermometer to ensure the chicken is cooked to a safe internal temperature of 165°F (75°C) before serving.
Variations
Different Proteins
You can easily swap chicken for other meats. Try pork or shrimp for a tasty twist. Use 1 pound of pork tenderloin cut into cubes or shrimp, peeled and deveined. Each option brings unique flavors while keeping the dish fresh and fun.
If you want a vegetarian option, use firm tofu. Press the tofu to remove excess water, then cut it into cubes. Marinate it just like the chicken. You can also add mushrooms for a hearty touch.
Flavor Profiles
Adding spices or herbs can change the whole taste. Try smoked paprika for a smoky kick or fresh basil for a hint of sweetness. You can also mix in some red pepper flakes for heat.
If you want to switch up the citrus, lime juice works great too. It gives a zesty flavor that pairs well with the garlic. Try orange juice for a sweeter, fruitier taste. These small changes can make your skewers exciting every time you grill!
Storage Info
Refrigeration
To store leftovers, let the skewers cool down. Place them in an airtight container. This way, they stay fresh. You can keep them in the fridge for up to 3 days. After that, they may lose taste and texture.
Freezing Skewers
You can freeze the skewers if you want to save them for later. Wrap each skewer in plastic wrap. Then, put them in a freezer bag. This helps prevent freezer burn. They can last in the freezer for up to 3 months.
To reheat, thaw them in the fridge overnight. Once thawed, you can grill them again until hot. This keeps their flavor and juiciness. Enjoy your tasty lemon garlic chicken skewers even after storing!
FAQs
How long do I need to marinate the chicken?
You should marinate the chicken for at least 30 minutes. This helps the chicken soak up the lemon and garlic flavors. For an even better taste, you can marinate it up to 2 hours. Just remember, longer is better, but don’t go past 2 hours.
Can I use different vegetables?
Yes, you can use many types of vegetables! Bell peppers are great, but onions, zucchini, and cherry tomatoes work well, too. Feel free to mix your favorites. Just make sure they are cut to the same size as the chicken cubes for even cooking.
What is the best way to determine if the chicken is cooked?
The best way is to check the internal temperature. Use a meat thermometer to see if it reaches 165°F (75°C). If you don’t have a thermometer, cut into a piece. The meat should be white, not pink, and the juices should run clear.
How do I make this recipe low-carb?
To make this dish low-carb, skip the bell peppers and onions. You can replace them with low-carb options like zucchini or mushrooms. You can also serve the skewers over a bed of greens instead of rice or bread for a lighter meal.
This blog post covers the essentials for making tasty skewers. We explored main ingredients like chicken and veggies, plus marinades that boost flavor. I shared step-by-step instructions on preparing and grilling. You learned tips for the best taste, how to cook, and serving ideas. We also discussed variations and storage methods to maximize freshness.
Skewers are fun to make and share. Enjoy experimenting with your unique flavors and ingredient
<!-- /wp:post-conte

