Lemon Garlic Salmon Orzo Delightful and Easy Recipe

Are you looking for a delightful and easy recipe that packs a punch of flavor? Look no further! My Lemon Garlic Salmon Orzo combines fresh salmon with silky orzo pasta, creating a dish that’s both tasty and satisfying. In this post, I’ll guide you through every step, from sourcing fresh ingredients to cooking your salmon perfectly. Get ready to impress your family and enjoy a meal that’s as simple as it is delicious!
Why I Love This Recipe
- Fresh Flavors: The combination of lemon and garlic gives this dish a vibrant and refreshing taste that is perfect for any season.
- Quick and Easy: With a total cooking time of just 25 minutes, this meal is perfect for busy weeknights when you want something delicious without the fuss.
- Nutritious and Filling: Packed with protein from the salmon and healthy carbs from the orzo, this dish is both satisfying and good for you.
- Versatile Ingredients: You can easily substitute the salmon with other proteins like chicken or shrimp, and the spinach can be swapped for any green you have on hand.
Ingredients
Complete ingredient list
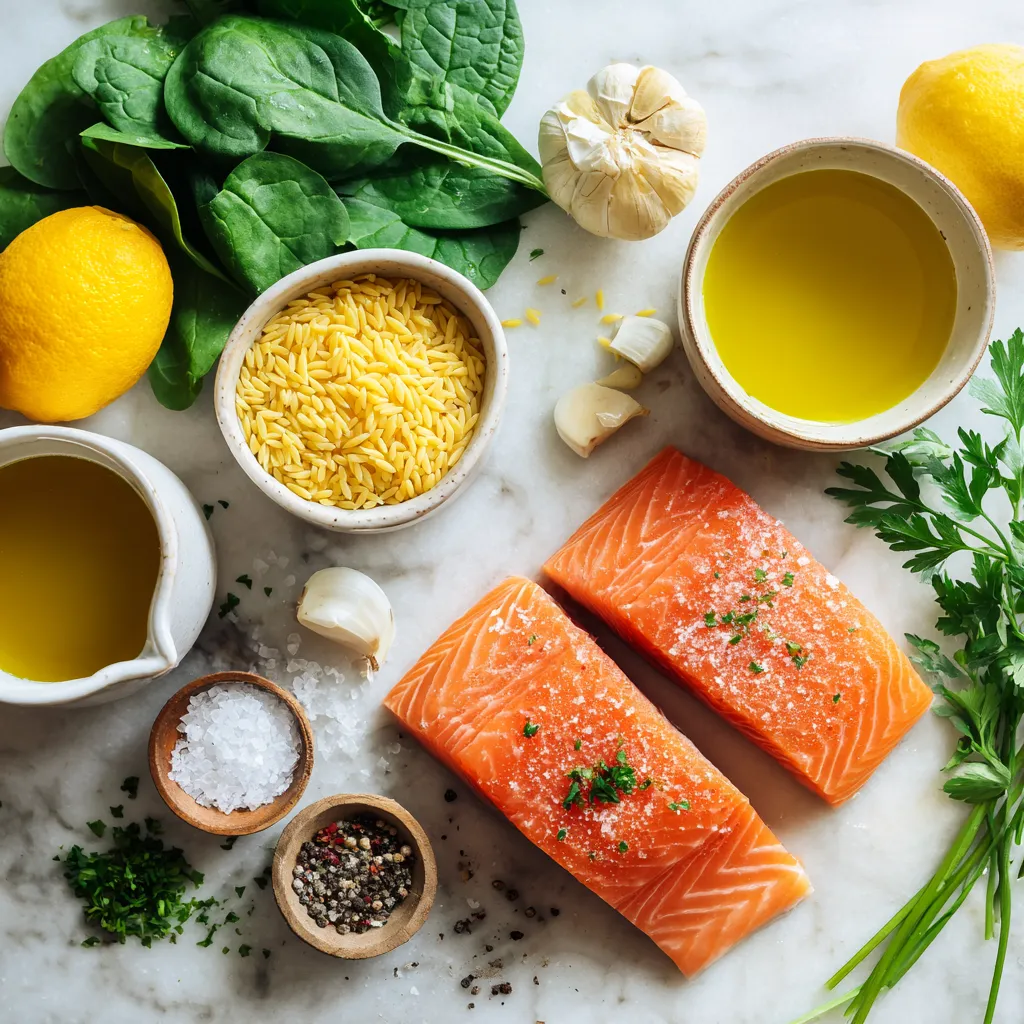
To make Lemon Garlic Salmon Orzo, gather these items:
- 2 salmon fillets (about 6 oz each)
- 1 cup orzo pasta
- 2 tablespoons olive oil
- 3 cloves garlic, minced
- 1 lemon (zest and juice)
- 2 cups vegetable broth
- 1 cup baby spinach
- 1/4 cup fresh parsley, chopped
- Salt and pepper to taste
- Lemon slices for garnish
Substitutions for key ingredients
You can swap ingredients if needed. Here are some easy swaps:
- Use chicken broth instead of vegetable broth for more flavor.
- Try quinoa or rice if you don’t have orzo.
- For a dairy option, add a bit of feta cheese.
- If you lack fresh parsley, use dried herbs or another fresh herb like basil.
Tips for sourcing fresh salmon
When looking for fresh salmon, follow these tips:
- Check for bright, clear eyes. This means the fish is fresh.
- The flesh should look moist and firm, not dull or dry.
- Smell the fish. It should smell like the ocean, not too fishy.
- Buy from a trusted market or fishmonger for the best quality.
These details help you make a great Lemon Garlic Salmon Orzo dish. Enjoy cooking!

Step-by-Step Instructions
Cooking the orzo
First, grab a medium pot. Pour in 2 cups of vegetable broth and bring it to a boil. When it bubbles, add 1 cup of orzo pasta. Cook the orzo until it is al dente, which takes about 8 to 10 minutes. This means it should be firm but not hard. Once done, drain the orzo and set it aside.
Perfectly cooking the salmon
While the orzo cooks, take a skillet and heat 1 tablespoon of olive oil over medium-high heat. Season 2 salmon fillets with salt and pepper. Place the salmon skin-side down in the hot skillet. Cook it for about 4 to 5 minutes. You want the skin to be crispy. Then, flip the salmon and cook for another 3 to 4 minutes. When it flakes easily with a fork, it is ready. Remove the salmon from the skillet and set it aside.
Combining ingredients for the final dish
In the same skillet, add another tablespoon of olive oil. Toss in 3 minced garlic cloves and sauté for about 30 seconds until you smell the garlic. Next, add the drained orzo, lemon zest, and lemon juice. Stir in 1 cup of baby spinach and mix well. The spinach will wilt down nicely. Then, flake the cooked salmon and gently fold it into the orzo mixture. Taste it and adjust the salt and pepper as needed. Serve this warm, garnished with fresh parsley and lemon slices. Enjoy the delightful flavors!
Tips & Tricks
How to achieve the best flavor
To boost flavor, use fresh garlic and lemon. Fresh ingredients make a big difference. When cooking salmon, cook it skin-side down first. This gives a crispy skin, adding texture. Make sure to season the salmon well with salt and pepper. Also, let the orzo absorb the lemon juice and zest. This adds brightness to each bite.
Common mistakes to avoid
Avoid overcooking the salmon. It should flake easily but stay moist. If you cook it too long, it may dry out. Another common mistake is not draining the orzo properly. Excess water can make the dish watery. Also, don’t skip the baby spinach. It adds both flavor and color to the dish.
Serving suggestions for Lemon Garlic Salmon Orzo
Serve the orzo on a large plate, then place the salmon on top. Garnish with lemon slices and parsley for a pretty look. You can pair this dish with a light salad or grilled veggies. A glass of white wine complements the flavors well. Enjoy this dish warm for the best taste experience!
Pro Tips
- Perfectly Cooked Salmon: To achieve perfectly cooked salmon, use a meat thermometer; the internal temperature should reach 145°F (63°C) for optimal doneness.
- Flavorful Orzo: For added depth of flavor, consider toasting the orzo in the skillet with a little olive oil before boiling it in vegetable broth.
- Fresh Herbs: Use fresh parsley for garnish, as it elevates the dish with a burst of flavor and a pop of color. You can also experiment with dill or basil!
- Leftover Storage: Store any leftovers in an airtight container in the refrigerator for up to 2 days. Reheat gently on the stove with a splash of broth to keep the orzo moist.

Variations
Alternative proteins to use
You can swap the salmon for other proteins. Chicken breast works well. Just cook it until it’s done inside. Shrimp is another option. Cook it until it turns pink. Tofu is great for a plant-based meal. You can marinate it with lemon and garlic for flavor.
Adding seasonal vegetables
Using seasonal veggies makes your dish fresh and colorful. Try adding asparagus in spring, or zucchini in summer. In fall, roasted butternut squash gives a nice touch. In winter, use hearty greens like kale. Just sauté them briefly to keep their crunch.
Spice options for more flavor
To boost the flavor, add different spices. A pinch of red pepper flakes gives heat. Fresh dill or thyme can add a nice herbal note. For a smoky taste, try paprika. These spices pair well with lemon and garlic, enhancing your dish.
Storage Info
Best practices for storing leftovers
After enjoying your Lemon Garlic Salmon Orzo, store any leftovers in an airtight container. This keeps the dish fresh and safe to eat later. Ensure the orzo and salmon cool to room temperature before sealing. I recommend using glass containers for easy reheating. Store the leftovers in the fridge. They will stay good for up to three days.
Reheating instructions
To reheat, you can use the microwave or stovetop. If using a microwave, place the orzo in a microwave-safe bowl. Add a splash of water to keep it moist. Heat for one to two minutes, stirring halfway through. For the stovetop, warm the orzo in a skillet over low heat. Add a bit of olive oil or broth to keep it from drying out. Heat until warmed through. Gently reheat the salmon in the same way to keep it tender.
Freezing tips and duration
You can freeze Lemon Garlic Salmon Orzo if you want to save it for later. First, let it cool completely. Then, scoop portions into freezer-safe bags or containers. Remove as much air as possible. Label your containers with the date. This dish will freeze well for about one month. When ready to eat, thaw it overnight in the fridge. Reheat using the methods above. Enjoy your delicious meal even after freezing!
FAQs
Can I prepare Lemon Garlic Salmon Orzo in advance?
Yes, you can prepare Lemon Garlic Salmon Orzo ahead of time. Cook the orzo and salmon separately. Store them in the fridge in airtight containers. When you want to serve, just reheat everything together in a skillet. This method keeps flavors fresh.
What can I serve with this dish?
You can serve Lemon Garlic Salmon Orzo with a simple salad. A side of roasted vegetables pairs well too. Garlic bread adds a nice touch. You might also enjoy a light white wine with it. These options enhance the meal without overwhelming it.
Is orzo a healthy pasta option?
Orzo can be a healthy choice. It is made from whole grains, which provide fiber. This pasta is low in fat and calories. It also cooks quickly, making it a great option for busy days. Just watch your portion sizes to keep it balanced.
This blog post covered how to make Lemon Garlic Salmon Orzo, from choosing fresh ingredients to cooking tips. You have learned about ingredient substitutions, easy cooking steps, and ways to enhance flavor. Remember to avoid common mistakes and explore fun variations. Proper storage will keep your leftovers tasty. Overall, this dish is not only delicious but also easy to prepare. Enjoy making it and impress your friends and family with this healthy mea

Lemon Garlic Salmon Orzo
Ingredients
- 2 fillets salmon (about 6 oz each)
- 1 cup orzo pasta
- 2 tablespoons olive oil
- 3 cloves garlic, minced
- 1 lemon zest and juice
- 2 cups vegetable broth
- 1 cup baby spinach
- 0.25 cup fresh parsley, chopped
- to taste salt and pepper
- for garnish lemon slices
Instructions
- In a medium pot, bring the vegetable broth to a boil. Add the orzo and cook according to package instructions until al dente, about 8-10 minutes. Drain and set aside.
- While the orzo cooks, heat 1 tablespoon of olive oil in a skillet over medium-high heat. Season the salmon fillets with salt and pepper.
- Place the salmon in the skillet skin-side down and cook for about 4-5 minutes until the skin is crispy. Flip the salmon and cook for another 3-4 minutes, or until it flakes easily with a fork. Remove from skillet and set aside.
- In the same skillet, add the remaining tablespoon of olive oil. Add minced garlic and sauté for about 30 seconds until fragrant.
- Add the cooked orzo to the skillet along with lemon zest, lemon juice, and baby spinach. Toss everything together until the spinach is wilted and the ingredients are well combined.
- Flake the cooked salmon and gently fold it into the orzo mixture. Taste and adjust seasoning with salt and pepper as needed.
- Serve warm, garnished with fresh parsley and lemon slices.


![Here’s what you need for the Greek Yogurt Chicken Salad: - 2 cups cooked chicken breast, shredded - 1 cup plain Greek yogurt - 1/2 cup celery, diced - 1/2 cup red grapes, halved - 1/4 cup walnuts, toasted and chopped - 1/4 cup red onion, finely chopped - 2 tablespoons fresh dill, chopped - 1 tablespoon lemon juice - Salt and pepper to taste Each ingredient adds flavor and texture to this tasty salad. The chicken gives protein, while Greek yogurt makes it creamy. The celery brings crunch, and the grapes add a sweet touch. Walnuts give a nice bite, and dill adds freshness. I always prefer fresh ingredients for my salads. Fresh celery makes the dish crisp. Fresh dill offers a bright flavor that dried can't match. Use fresh grapes for sweetness. Dried ingredients can work in some recipes, but not here. They lack the same flavor and texture. You can swap some ingredients to fit your taste. Try using plain yogurt if you don't have Greek yogurt. For a nut-free version, leave out the walnuts. You can also use chicken thighs for a richer taste. Add other fruits like apples or berries to mix it up. This recipe is flexible, so feel free to get creative! Check the Full Recipe for more ideas. Start by gathering your ingredients. You need cooked chicken, Greek yogurt, and some fresh veggies. In a large bowl, add 2 cups of shredded chicken and 1 cup of plain Greek yogurt. Mix them well until the chicken gets fully coated. Next, toss in 1/2 cup of diced celery, 1/2 cup of halved red grapes, and 1/4 cup of toasted walnuts. Add 1/4 cup of finely chopped red onion and 2 tablespoons of fresh dill. Lastly, drizzle in 1 tablespoon of lemon juice and sprinkle with salt and pepper. Gently fold the mix together. Make sure everything is blended well. Shredding chicken can be simple. First, use cooked chicken breasts for the best taste. You can use two forks to pull apart the chicken. Alternatively, you can shred it with your hands for a quicker method. If you have a stand mixer, it can shred chicken in seconds. Just place the chicken in the bowl and mix on low speed. This will save time and give you perfect shreds. Chilling your chicken salad is key. After mixing, cover the bowl with plastic wrap or a lid. Place it in the refrigerator for at least 30 minutes. This helps the flavors blend well. The chill makes every bite refreshing. Once chilled, serve your salad on leafy greens. You can also wrap it in whole grain wraps. Enjoy your tasty Greek yogurt chicken salad! For the full recipe, check out the details above. To season your Greek yogurt chicken salad, start with salt and pepper. These basics bring out the flavors. You can add a squeeze of lemon juice for a fresh taste. Fresh dill adds a nice herby note. Mix and taste as you go. Adjust the seasoning to suit your preference. Remember, seasoning makes all the difference. For the best flavor, use fresh ingredients. Fresh celery and grapes add crunch and sweetness. Toast the walnuts before adding them. This step brings out their rich flavor. Mixing the salad and letting it chill helps the flavors blend. A cold salad is refreshing and tasty. Consider adding a splash of vinegar for extra zing. One common mistake is over-seasoning. It’s easy to add too much salt or spice. Start with a little, and taste it first. Another mistake is not chilling the salad long enough. The flavors need time to meld. Lastly, avoid using dry chicken. Always use moist, cooked chicken for a better texture. For the full recipe, check out the Greek Yogurt Chicken Salad with a Twist. {{image_2}} Greek yogurt is a great ingredient for this salad. It is thick and creamy. It has less sugar and more protein than regular yogurt. This means it helps you feel full longer. Greek yogurt also has probiotics. These good bacteria can aid digestion. Using Greek yogurt instead of mayo makes the dish healthier. It cuts down on fat while adding flavor. Plus, it adds calcium, which is good for bones. Each serving of Greek yogurt chicken salad gives you balanced nutrition. Here’s what you get: - Calories: About 300 - Protein: Around 30 grams - Fat: About 15 grams - Carbohydrates: Roughly 20 grams - Fiber: 2 grams The chicken provides lean protein. The yogurt adds healthy fats. The fruits and veggies offer fiber and vitamins. This makes it a nutritious choice for lunch or dinner. Traditional chicken salad often uses mayo. This adds more fat and calories. In contrast, Greek yogurt chicken salad is lighter. It has less saturated fat and more protein. This means it is better for your heart. You can enjoy it without feeling guilty. Greek yogurt chicken salad also has a fresh taste. It’s a fun twist on a classic dish. You get all the flavor without the heaviness. Try this recipe [Full Recipe] for a refreshing meal! You can change up your Greek yogurt chicken salad by adding more veggies. Try these options for a fresh twist: - Cucumbers: Diced cucumbers add crunch and hydration. - Bell Peppers: Use red, yellow, or green for color and sweetness. - Carrots: Grated carrots add a nice texture and a hint of sweetness. - Spinach: Chopped spinach can boost the nutrition and flavor. Mixing in different vegetables will keep your salad exciting and tasty. You can swap the chicken for other proteins too. Here are some ideas: - Turkey: Use shredded turkey for a leaner option. - Chickpeas: For a vegetarian choice, add canned chickpeas. They’re full of protein. - Tuna: Try canned tuna for a seafood twist. It pairs well with Greek yogurt. - Hard-Boiled Eggs: Chopped hard-boiled eggs can add creaminess and protein. These changes can make your dish unique and fun. Experimenting with flavors can elevate your Greek yogurt chicken salad. Here are some tasty combinations: - Curry Powder: Add a teaspoon for a warm and spicy kick. - Honey Mustard: Mix in a tablespoon for sweetness and tang. - Smoked Paprika: A pinch can add depth and a smoky flavor. - Fresh Herbs: Experiment with parsley, basil, or cilantro for freshness. These combinations can make your salad more exciting and delicious. For the full recipe, check out the Greek Yogurt Chicken Salad with a Twist. Yes, you can make Greek yogurt chicken salad ahead of time. This salad tastes even better after chilling. The flavors mix well when it sits. I suggest making it a day before you plan to serve it. Just keep it in the fridge until you're ready. You can serve Greek yogurt chicken salad in many ways. Here are some great ideas: - On a bed of leafy greens - In whole grain wraps - With whole-grain crackers - Alongside fresh veggies Each option adds a nice touch to your meal. Store any leftover Greek yogurt chicken salad in an airtight container. It can last up to three days in the fridge. If you see any signs of spoilage, like an off smell or change in texture, toss it out. Always check before eating to stay safe. For the best taste, enjoy it fresh! For the full recipe, check above. In this post, we explored the best ingredients for Greek yogurt chicken salad, differentiating between fresh and dried options. I shared step-by-step instructions for preparation. You learned tips for shredding chicken and chilling before serving. We discussed ways to season and enhance flavors, plus common mistakes to avoid. This salad is a healthy choice, thanks to Greek yogurt. With numerous variations, you can customize it to your taste. Now, you can create a delicious and nutritious meal that everyone will love. Enjoy your cooking!](https://dailydishlab.com/wp-content/uploads/2025/06/31d756a5-2ed8-48b3-ac28-3df00374ee45-768x768.webp)


