
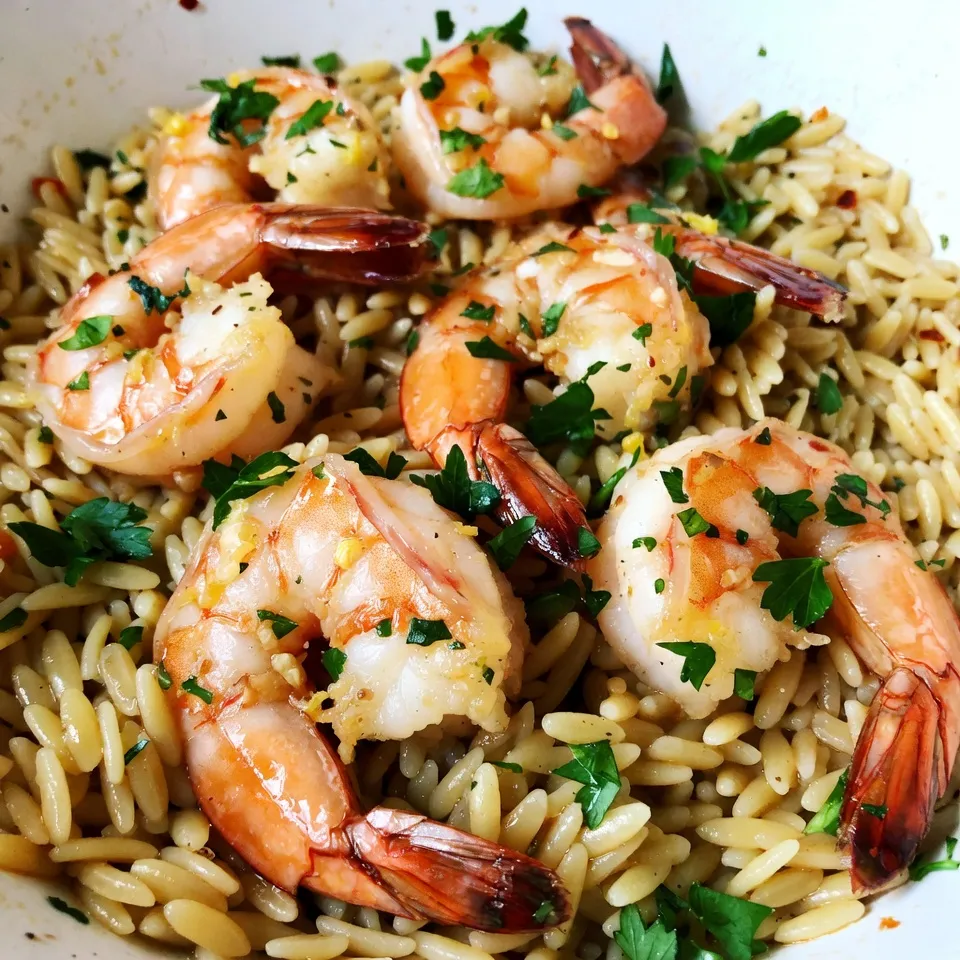
If you love seafood and bright flavors, you’ll adore this Lemon Garlic Shrimp Orzo recipe! It’s a simple dish that packs a punch. With tender shrimp, zesty lemon, and fluffy orzo, this meal is sure to impress. Plus, it comes together quickly, perfect for busy nights. Let’s dive in and discover how to make this vibrant, easy dish that will keep you coming back for more!
Why I Love This Recipe
- Quick and Easy: This dish comes together in just 25 minutes, making it perfect for a weeknight dinner.
- Fresh Flavors: The combination of lemon and garlic creates a light and refreshing taste that brightens up the shrimp and orzo.
- One-Pan Wonder: Minimal cleanup is required since everything is cooked in one skillet, letting you enjoy your meal without the hassle.
- Customizable: You can easily adapt the recipe by adding your favorite vegetables or adjusting the spice level.
Ingredients
Main Ingredients
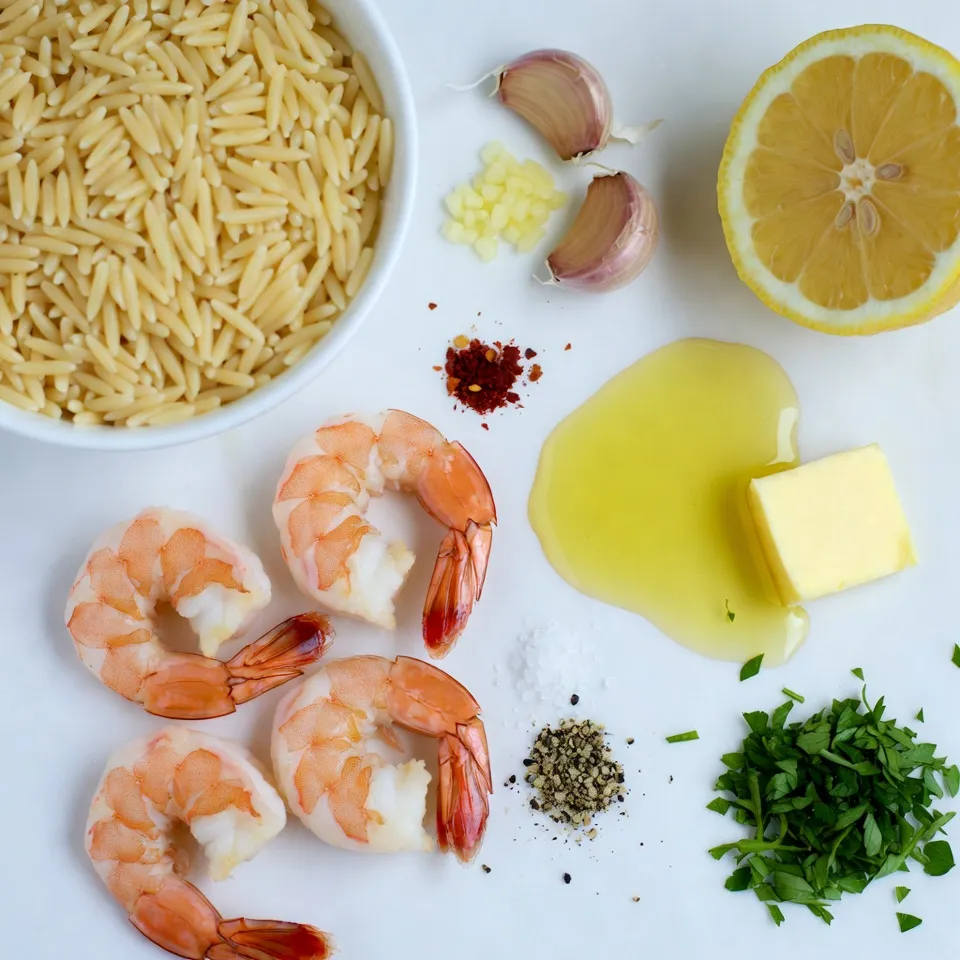
– 1 pound large shrimp, peeled and deveined
– 1 cup orzo pasta
Flavor Enhancers
– 4 garlic cloves, minced
– 1 lemon (zested and juiced)
Cooking Essentials
– 2 cups vegetable broth
– 2 tablespoons olive oil
– 1 tablespoon butter
– 1 teaspoon red pepper flakes (optional)
– Salt and pepper to taste
– Fresh parsley for garnish
This dish starts with one pound of large shrimp. I love using shrimp because they cook quickly and taste great. The orzo pasta is next, and it adds a nice bite to the meal. You need one cup of orzo to soak up all those delicious flavors.
Next, we have the flavor enhancers. Four minced garlic cloves give a strong taste. Garlic brings warmth and depth to the dish. A lemon, zested and juiced, adds bright flavor. The zest gives it a fresh kick, while the juice adds tang.
Now, let’s look at the cooking essentials. You will need two cups of vegetable broth. This broth cooks the orzo and keeps it moist. For cooking, we use two tablespoons of olive oil and one tablespoon of butter. These fats help the garlic and shrimp sauté beautifully.
If you want a little heat, you can add one teaspoon of red pepper flakes. Salt and pepper help bring out the other flavors. Lastly, fresh parsley is perfect for garnish. It adds color and a fresh taste when serving.
Each ingredient plays an important role in making this lemon garlic shrimp orzo a standout dish.
Step-by-Step Instructions
Preparing the Orzo
First, grab a medium saucepan. Pour in two cups of vegetable broth and bring it to a boil. Once boiling, add one cup of orzo pasta. Cook it according to the package instructions until it is al dente. This usually takes around 8-10 minutes. After cooking, drain the orzo and set it aside. This step is key for a tasty base.
Cooking the Shrimp
Now, take a large skillet and heat it over medium heat. Add two tablespoons of olive oil and one tablespoon of butter. Let them melt together. Next, toss in four minced garlic cloves. Sauté them for about 1-2 minutes until they smell great. Then, add one pound of peeled and deveined shrimp to the skillet. Season with salt, pepper, and red pepper flakes if you like it spicy. Cook for 2-3 minutes on one side, then flip. Cook for another 2-3 minutes until the shrimp turn pink and are fully cooked.
Combining Ingredients
Once the shrimp is done, pour in the juice and zest of one lemon. Stir it well to coat the shrimp in that bright flavor. Let it simmer for about a minute. Then, add the cooked orzo to the skillet. Gently toss everything together until the shrimp, orzo, and sauce mix well. Taste your dish and adjust the seasoning if needed. You want it just right!
Tips & Tricks
Perfecting the Dish
To cook shrimp just right, watch their color. They should turn pink and opaque. This takes about 4 to 6 minutes. Overcooked shrimp can become tough, so keep an eye on them. For seasoning, taste as you go. Add salt and pepper to suit your palate. You can also adjust the red pepper flakes for heat. A little zing goes a long way!
Make Ahead Tips
You can prep this dish before serving. Cook the orzo and shrimp ahead of time. Store them in separate containers in the fridge. When ready to eat, just heat up the shrimp and orzo together. Add the lemon juice and zest right before serving. This keeps the flavors fresh.
Serving Suggestions
This dish shines on its own but pairs well with a simple side salad. A crisp green salad adds crunch and freshness. You could also serve it with garlic bread for a warm touch. If you want a heartier meal, consider a side of steamed veggies. Enjoy it however you like!
Pro Tips
- Choose Quality Shrimp: Opt for fresh or frozen shrimp that are large and sustainably sourced for the best flavor and texture.
- Don’t Overcook the Shrimp: Cook shrimp just until they are pink and opaque to avoid a rubbery texture; they will continue to cook slightly after removing from heat.
- Use Homemade Broth: If possible, use homemade vegetable broth for a richer flavor compared to store-bought options.
- Garnish for Freshness: Adding fresh parsley just before serving brightens the dish and adds a pop of color, enhancing both presentation and flavor.
Variations
Protein Alternatives
You can swap shrimp for chicken or tofu. Chicken gives a hearty bite. Cut chicken into small pieces and cook like shrimp. Tofu adds a nice twist. Use firm tofu and cube it. Cook it until golden brown for flavor.
Adding Vegetables
Adding vegetables can make this dish even better. Spinach is a great choice. Just toss it in at the end until it wilts. Tomatoes add a fresh taste. You can use cherry tomatoes or diced ones. Asparagus is another tasty option. Cut it into small pieces and sauté until tender.
Different Flavor Profiles
Feel free to change the flavor profile. Herbs can make a big difference. Try adding basil or cilantro for freshness. You can also use thyme or rosemary for a warm taste. For spice lovers, mix in cayenne pepper or smoked paprika. These changes keep the dish exciting and new.
Storage Info
Refrigeration
After you enjoy your Lemon Garlic Shrimp Orzo, store any leftovers in an airtight container. Make sure to cool the dish to room temperature first. This helps keep the shrimp fresh. In the fridge, it will last for up to three days. If you plan to eat it later, do not add the parsley until you reheat it. This keeps the garnish fresh and bright.
Freezing
You can freeze Lemon Garlic Shrimp Orzo if you want to save some for later. First, let it cool completely. Then, place it in a freezer-safe container. Make sure to remove as much air as possible to avoid freezer burn. You can freeze it for up to three months. When you are ready to eat it, thaw it in the fridge overnight before reheating.
Reheating
To reheat your Lemon Garlic Shrimp Orzo, you have a few options. The best way is to use a skillet. Heat a little olive oil over medium heat. Add the orzo and shrimp mixture, stirring gently until warmed through. You can add a splash of vegetable broth or water to help it stay moist. You can also use a microwave. Place it in a microwave-safe dish, cover it, and heat in short bursts, stirring in between. Make sure it is hot all the way through before serving.
FAQs
Can I use frozen shrimp for this recipe?
Yes, you can use frozen shrimp. Just make sure to thaw them first. Place the shrimp in cold water for about 15-20 minutes. Then, pat them dry before cooking. This way, they will cook evenly and absorb all the flavors.
How do I make the dish spicier?
To add heat, sprinkle in more red pepper flakes. Start with half a teaspoon and taste as you go. You can also add diced jalapeños or a dash of hot sauce. These will give the dish a nice kick without overpowering the lemon and garlic.
What can I substitute for orzo pasta?
If you don’t have orzo, use another small pasta like ditalini or couscous. Quinoa or rice can also work well. Just adjust the cooking time based on what you choose. This keeps the dish tasty and satisfying.
How long will the leftovers last in the fridge?
Leftovers will stay fresh for about 3-4 days in the fridge. Store them in an airtight container to keep them flavorful. When you’re ready to eat, just reheat in a skillet or microwave until warm. Enjoy it again!
This article covered how to make a tasty shrimp orzo dish. You learned about the main ingredients and how to cook them perfectly. I shared tips for making the dish your own and ideas for storage. Remember, you can swap shrimp for chicken or tofu, and add your favorite veggies. Experiment with flavors to keep things fun. Enjoy this dish for a quick weeknight meal or impress guests with your new skill


