
If you’re looking for a dinner that’s quick, tasty, and full of flavor, Lemon Garlic Shrimp Pasta is the answer. This dish combines succulent shrimp with zesty lemon and aromatic garlic, all tossed with your favorite pasta. You can put it together in just a few minutes! Join me as we explore the simple steps and tips to make this delicious meal that everyone will love. Let’s get cooking!
Why I Love This Recipe
- Quick and Easy: This dish can be prepared in just 20 minutes, making it perfect for busy weeknights.
- Fresh Flavors: The combination of lemon, garlic, and parsley creates a vibrant and refreshing taste.
- Healthy Option: Packed with protein from the shrimp and healthy fats from the olive oil, this pasta is a nutritious choice.
- Customizable: You can easily adjust the spice level or add your favorite vegetables to make it your own.
Ingredients
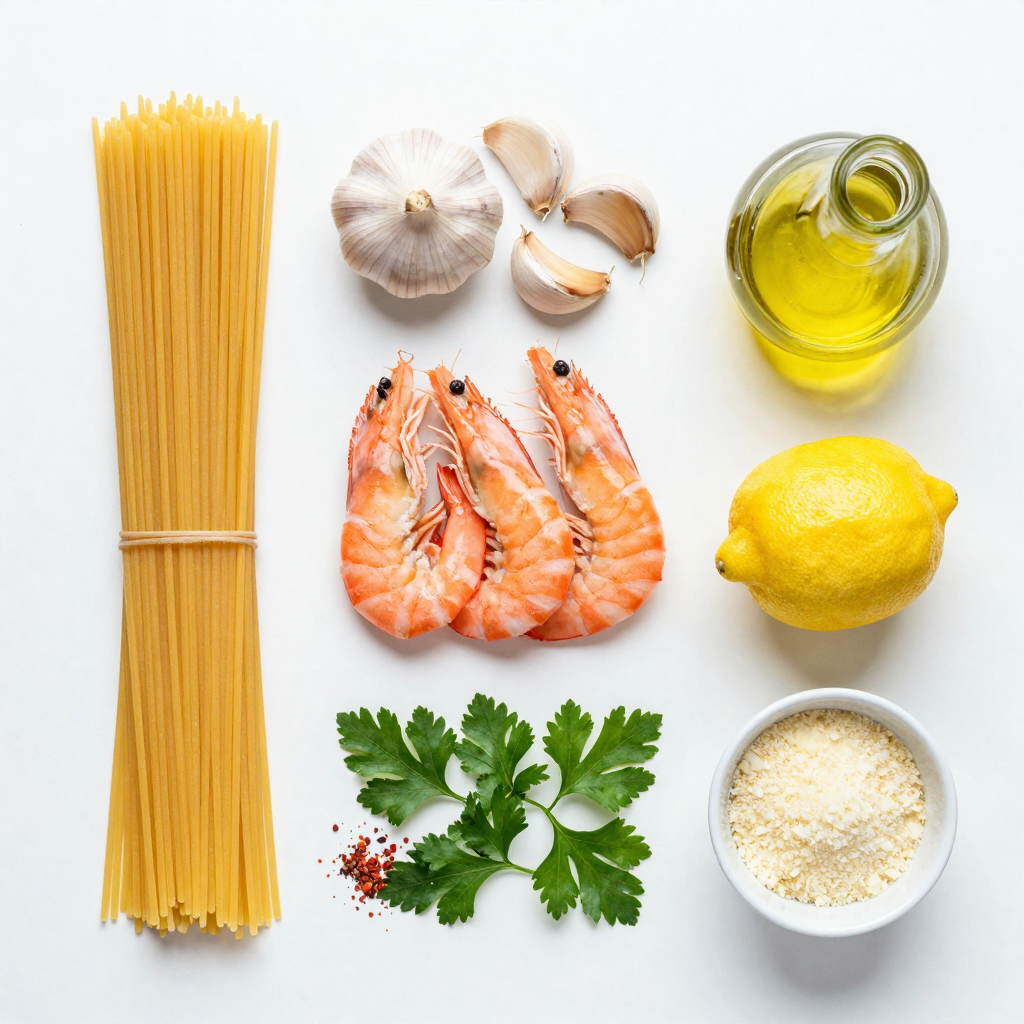
Main Ingredients for Lemon Garlic Shrimp Pasta
– 8 oz spaghetti or linguine
– 1 lb large shrimp, peeled and deveined
– 4 cloves garlic, minced
Additional Ingredients
– 1/4 cup olive oil
– 1 lemon (zested and juiced)
– 1/4 cup fresh parsley, chopped
– 1/2 teaspoon red pepper flakes (optional)
– Salt and pepper to taste
– Grated Parmesan cheese for serving
When I make Lemon Garlic Shrimp Pasta, I start with the main ingredients. The pasta is key. I choose either spaghetti or linguine. Both have the right texture. The shrimp adds protein and flavor. Large shrimp work best. Their size means they cook well and absorb the taste.
Next, I grab garlic. Fresh, minced garlic gives the dish a punch of flavor. It’s one of my favorite parts. With these main ingredients, we’re well on our way to a great meal.
Now, I gather the additional ingredients. First, I pour in some olive oil. It helps cook the garlic and shrimp. Then, I zest and juice a lemon. The citrus brightens up the dish and adds freshness.
I also chop fresh parsley. It adds color and flavor. If you like heat, add red pepper flakes. They bring a nice kick. Don’t forget salt and pepper. They are essential for seasoning.
Finally, I always keep grated Parmesan cheese on hand. It makes a great topping that melts into the warm pasta. These ingredients come together for a dish that is simple yet packed with flavor.
Step-by-Step Instructions
Preparing the Pasta
To start, bring a large pot of salted water to a boil. Add 8 ounces of spaghetti or linguine. Cook the pasta until it is al dente, following the package instructions. This usually takes about 8 to 10 minutes. Once done, reserve about 1/2 cup of the pasta water before draining the rest. Set the pasta aside in a large bowl.
Cooking the Shrimp
Next, grab a large skillet and heat 1/4 cup of olive oil over medium heat. Add 4 cloves of minced garlic to the skillet. Sauté the garlic for about 1 minute. Keep an eye on it, so it doesn’t burn. After the garlic becomes fragrant, add 1 pound of large shrimp, peeled and deveined. Cook the shrimp for 2 to 3 minutes on each side. They will turn pink when done. Season the shrimp with salt, pepper, and optional red pepper flakes for some heat.
Combining Ingredients
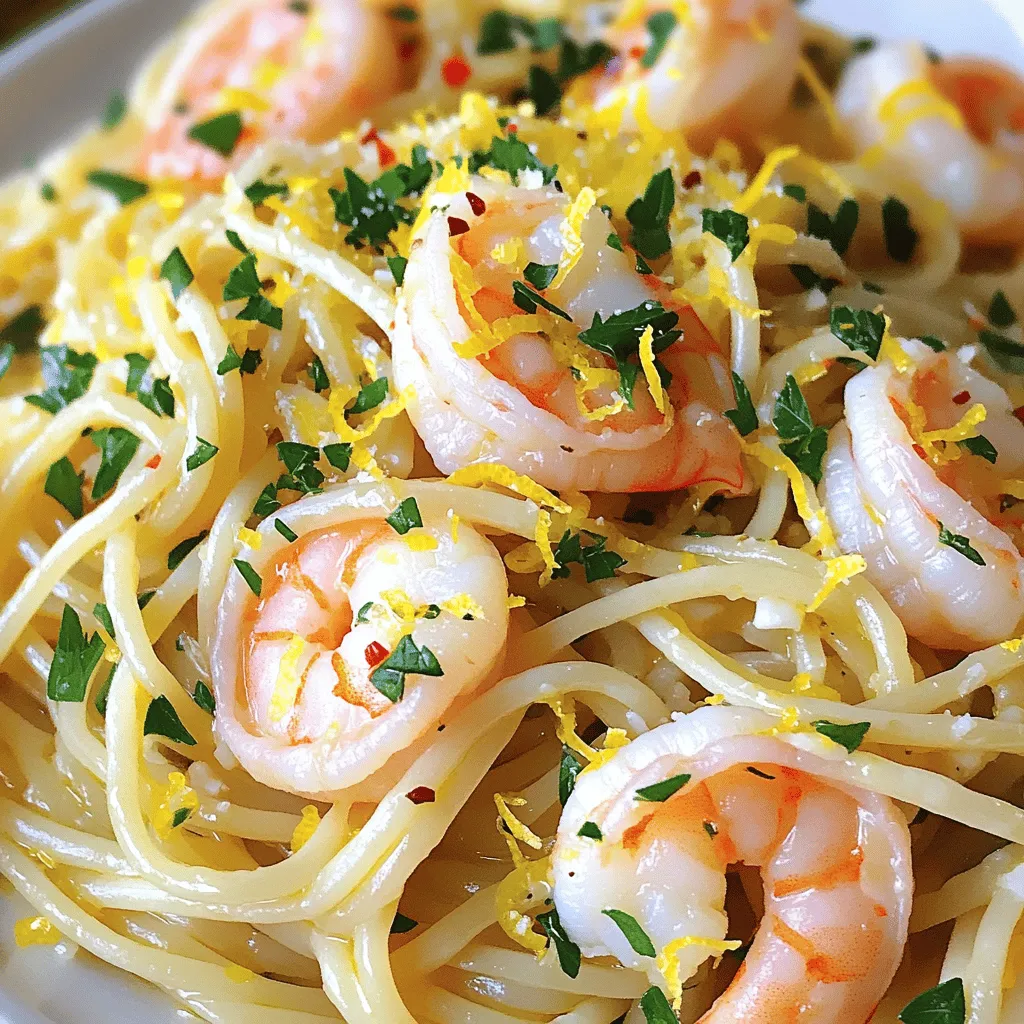
Once the shrimp are cooked, it’s time to mix everything. Add the cooked pasta to the skillet with the shrimp. Pour in the juice and zest from 1 lemon. Toss everything well to combine. If the pasta looks dry, add a little of the reserved pasta water. This will help achieve the right consistency. Finally, stir in 1/4 cup of chopped fresh parsley. Adjust the seasoning if needed and serve immediately. For a finishing touch, sprinkle some grated Parmesan cheese on top. Enjoy your delicious meal!
Pro Tips
- Fresh Shrimp is Best: Always choose fresh shrimp if possible, as they have a sweeter flavor and better texture than frozen shrimp.
- Reserve Pasta Water: Don’t forget to save some pasta water before draining. It’s great for adjusting the sauce consistency.
- Don’t Overcook the Shrimp: Cook shrimp just until they turn pink and opaque. Overcooking can make them rubbery.
- Customize Your Heat: Adjust the amount of red pepper flakes to suit your spice preference; you can even omit them for a milder dish.
Tips & Tricks
Perfecting the Pasta
To cook your pasta just right, aim for al dente. This means the pasta should be firm yet tender. Cook it according to the package, but check a minute early. This helps keep a good bite.
Don’t forget to reserve some pasta water before draining. This water is starchy and helps bind the sauce. If your dish seems dry, just add a splash of this water to get the right texture.
Enhancing the Flavor
Season your dish well. Use salt and pepper to bring out the flavors. For extra zing, add red pepper flakes. They add warmth without overpowering the dish.
To really boost the garlic flavor, sauté it gently. Cook it until it’s fragrant but not burnt. This way, the garlic infuses the oil with a rich taste, enhancing the shrimp and pasta.
Serving Suggestions
Make your dish look great when serving. Sprinkle fresh parsley on top for a pop of color. You can also add a generous amount of grated Parmesan cheese. It adds a nice finish and rich flavor.
Pair Lemon Garlic Shrimp Pasta with a crisp salad or some garlic bread. These sides bring balance and make your meal feel complete.
Variations
Ingredient Swaps
You can change the pasta type to fit your taste. Use whole wheat or gluten-free pasta. Both options work well with the dish. If you want a unique twist, try using fettuccine or penne. They all absorb the flavors nicely.
If shrimp isn’t your favorite, swap in other proteins. Chicken or scallops are great alternatives. You can even use tofu for a plant-based meal. Just adjust cooking times to ensure everything cooks evenly.
Flavor Enhancements
Adding vegetables boosts both flavor and nutrition. Spinach wilts down nicely and adds color. Cherry tomatoes burst with juice and sweetness. You can add these veggies when cooking the shrimp.
Herbs and spices can transform this dish. Basil or oregano pair well with lemon. For heat, consider using crushed red pepper flakes. Fresh herbs like basil or cilantro add a pop of freshness. Experiment with what you love!
Dietary Modifications
Gluten-free eaters can enjoy this dish too. Use gluten-free pasta instead of traditional options. Make sure to check the label for safe ingredients.
For a vegan version, skip the shrimp and Parmesan. Use chickpeas or mushrooms for texture. Nutritional yeast can give a cheesy flavor without the dairy. This way, everyone can enjoy a delicious meal!
Storage Info
Storing Leftovers
To store your Lemon Garlic Shrimp Pasta, place it in an airtight container. This helps keep it fresh. You can store it in the fridge for up to three days. If you want to enjoy it later, make sure it cools down first before sealing the container.
Reheating Instructions
When you’re ready to eat the pasta again, there are a few easy ways to reheat it. You can use the microwave or heat it on the stove. If you microwave it, add a splash of water to keep it moist. If you use the stove, warm it over low heat and stir gently. This helps keep the shrimp tender and the pasta tasty.
Freezing Options
If you want to keep the Lemon Garlic Shrimp Pasta longer, freezing works great. First, let it cool completely. Then, pack it in a freezer-safe container or bag. It can last up to three months in the freezer. To reheat, thaw it overnight in the fridge. Then, warm it on the stove or microwave as mentioned above. Enjoy your delicious meal later with ease!
FAQs
How long does it take to prepare Lemon Garlic Shrimp Pasta?
Preparing Lemon Garlic Shrimp Pasta takes about 10 minutes for prep and 10 minutes for cooking. You can have this dish ready in just 20 minutes. This quick time makes it perfect for busy weeknights or a cozy dinner.
Can I use frozen shrimp for this recipe?
Yes, you can use frozen shrimp. Just thaw the shrimp before cooking. Place frozen shrimp in a bowl of cold water for about 15-20 minutes. This method works well and keeps shrimp firm. Once thawed, peel and devein them if needed.
What sides go well with Lemon Garlic Shrimp Pasta?
Lemon Garlic Shrimp Pasta goes well with many sides. Here are some great options:
– A simple green salad with lemon vinaigrette.
– Garlic bread for a crunchy bite.
– Steamed asparagus or broccoli for some veggies.
– A light tomato salad to balance the dish’s flavors.
These sides add freshness and texture to your meal, making it even more enjoyable.
Lemon Garlic Shrimp Pasta combines fresh flavors and simple steps. We covered ingredients, cooking methods, and helpful tips. Remember to reserve pasta water for the best texture. You can also customize with veggies or different proteins. This dish is quick and enjoyable for any meal. Try it next time you cook. It’s easy, tasty, and sure to impress! Enjoy sharing or savoring this meal with loved ones.


