
Looking for a bright and tasty dish that’s easy to make? This Lemon Herb Quinoa Pilaf checks all the boxes! Packed with fresh veggies, fragrant herbs, and zesty lemon, this recipe is both healthy and delicious. Whether you want a quick weeknight dinner or a side dish for special occasions, you’ll love this flavorful quinoa dish. Let’s dive into the easy steps to create your new favorite meal!
Why I Love This Recipe
- Fresh and Flavorful: This quinoa pilaf is bursting with the bright flavors of lemon and fresh herbs, making it a delightful addition to any meal.
- Nutritious and Filling: Quinoa is a complete protein, packed with nutrients, and combined with vegetables, it makes a wholesome dish that keeps you satisfied.
- Quick and Easy: This recipe comes together in just 30 minutes, perfect for busy weeknight dinners or meal prep.
- Versatile Side Dish: Pair it with grilled chicken, fish, or serve it as a vegetarian main; it complements a variety of dishes beautifully.
Ingredients
Main Ingredients
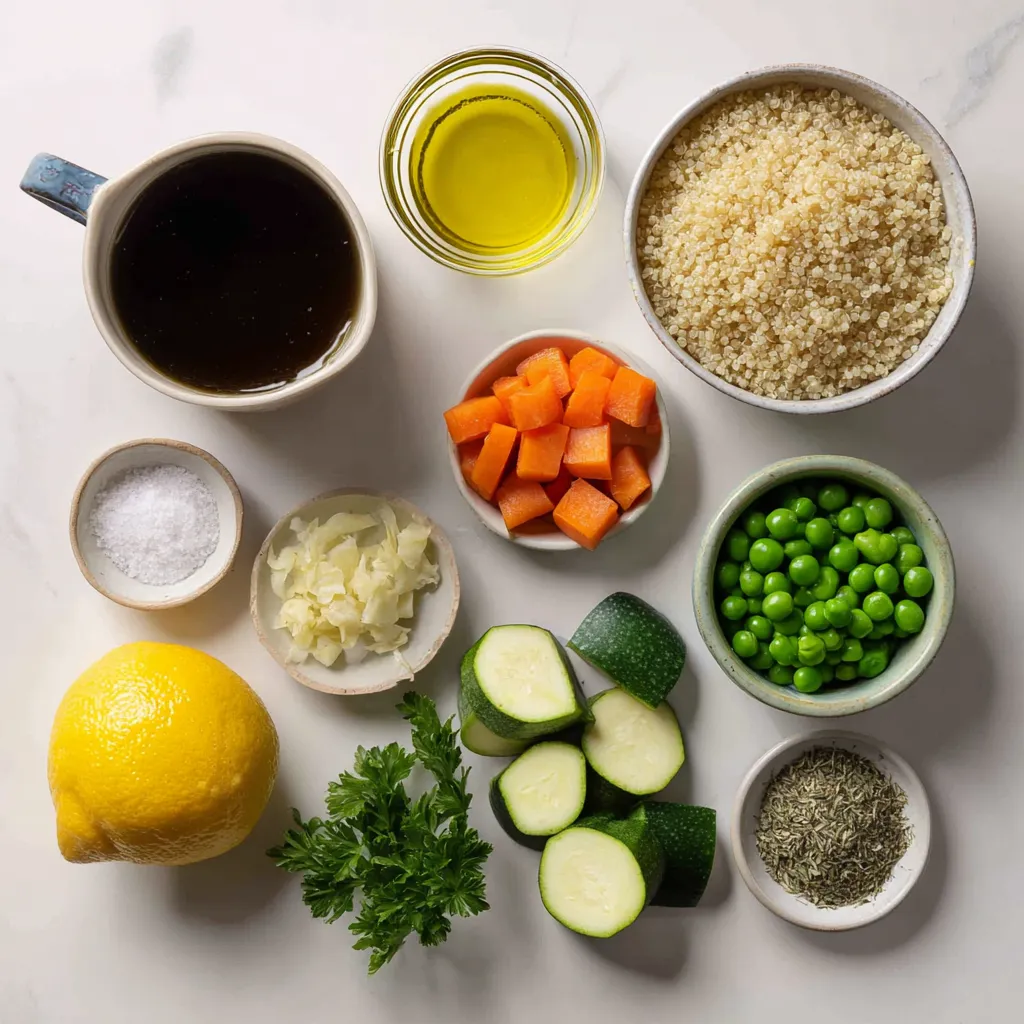
– 1 cup quinoa, rinsed
– 2 cups vegetable broth (or water)
– 1 tablespoon olive oil
– 1 small onion, finely chopped
– 2 garlic cloves, minced
Vegetables and Herbs
– 1 carrot, diced
– 1 small zucchini, diced
– 1 cup frozen peas
– Juice and zest of 1 lemon
– 1 teaspoon dried oregano
– 1 teaspoon dried thyme
Seasoning and Garnish
– Salt and pepper
– Fresh parsley, chopped (for garnish)
The first step in making Lemon Herb Quinoa Pilaf is gathering your ingredients. Quinoa is the star of the dish. It brings a nutty flavor and a fluffy texture. Make sure to rinse it well. This helps remove any bitter taste.
Next, you need vegetable broth or water. Using broth adds depth to the flavor. Olive oil adds richness to the dish. The onion and garlic create a great base. They give the pilaf a nice aroma and taste.
For veggies, I love adding diced carrot and zucchini. They add color and crunch. Frozen peas bring sweetness and a pop of green. Finally, lemon juice and zest brighten the dish. Oregano and thyme add earthy notes.
Don’t forget salt and pepper. These seasonings help bring all the flavors together. Fresh parsley is the finishing touch. It adds a burst of color and freshness. With these ingredients, you are ready to make a tasty Lemon Herb Quinoa Pilaf!
Step-by-Step Instructions
Preparing the Base
– Sauté the onion: In a medium saucepan, heat 1 tablespoon of olive oil over medium heat. Once hot, add the finely chopped onion. Stir and cook until the onion turns soft and clear, about 3-4 minutes.
– Add garlic and carrot: Next, stir in 2 minced garlic cloves and 1 diced carrot. Cook these for 2 more minutes. The garlic should smell great, and the carrot should start to soften.
– Incorporate zucchini: Now, add 1 diced small zucchini to the mix. Cook for another 3 minutes. The zucchini should be slightly soft, mixing well with the onion, garlic, and carrot.
Cooking Quinoa
– Toast the quinoa: After the veggies are ready, pour in 1 cup of rinsed quinoa. Stir it for about 1 minute. This step helps to bring out the nutty flavor of the quinoa.
– Add broth and seasonings: Now, pour in 2 cups of vegetable broth. Also, add the juice and zest of 1 lemon, 1 teaspoon of dried oregano, 1 teaspoon of dried thyme, and salt and pepper to taste. Mix it well.
– Bring to a boil and simmer: Increase the heat to high and bring it to a boil. Once boiling, reduce the heat to low, cover the pan, and let it simmer for 15 minutes. The quinoa should absorb all the liquid and become fluffy.
Final Touches
– Stir in frozen peas: During the last 5 minutes of cooking, add 1 cup of frozen peas to the pot. They will heat up nicely, adding color and taste.
– Let sit and fluff the quinoa: Once the cooking time is up, remove the pan from heat. Let it sit, covered, for 5 minutes. This resting time makes the quinoa even fluffier. After that, use a fork to fluff it gently.
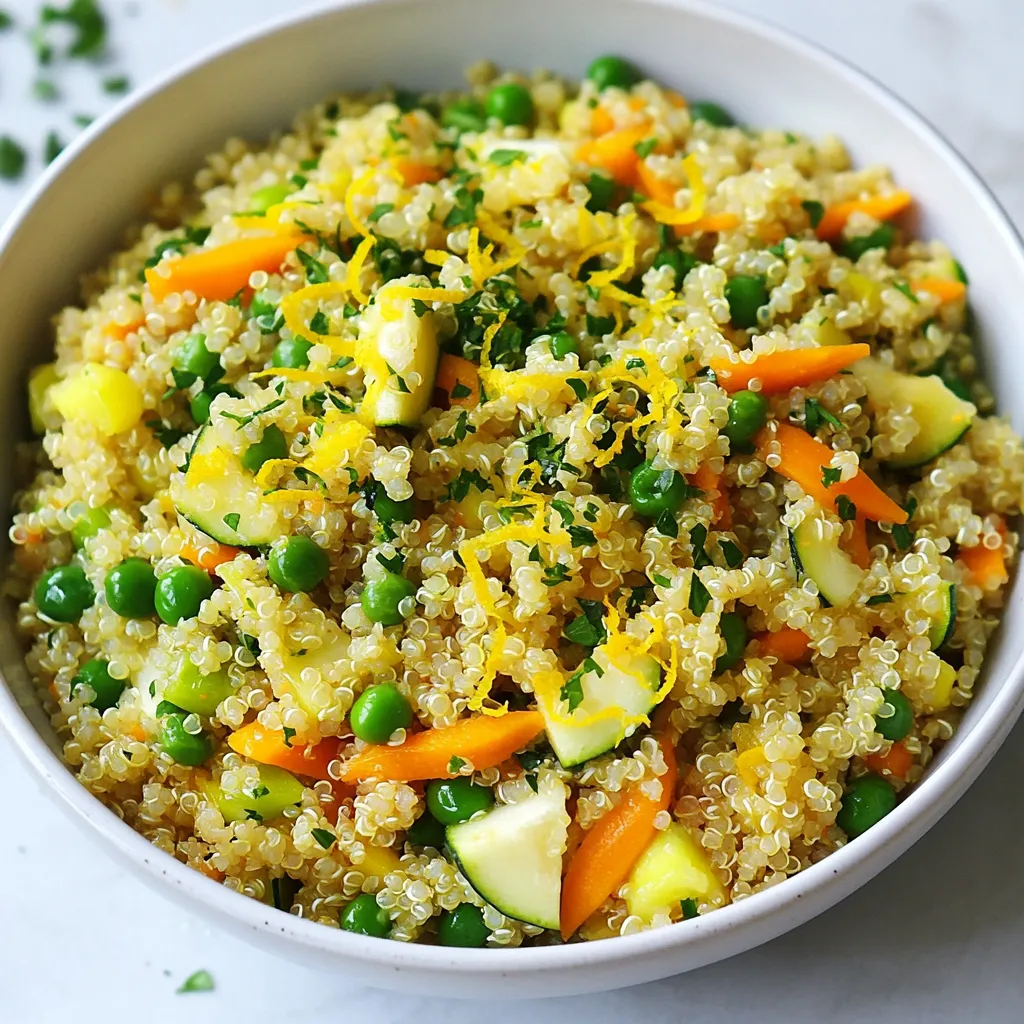
– Garnish and serve: Finally, serve the quinoa warm. Top it with fresh, chopped parsley for a nice touch. Enjoy your Lemon Herb Quinoa Pilaf!
Tips & Tricks
Achieving Perfectly Fluffy Quinoa
– Rinsing the quinoa: Always rinse your quinoa before cooking. This step removes the bitter coating called saponin. Just place the quinoa in a fine-mesh strainer and rinse under cold water for a few minutes. This makes it taste better and helps achieve a fluffy texture.
– Proper cooking liquid ratio: The best ratio for cooking quinoa is two parts liquid to one part quinoa. If you use one cup of quinoa, add two cups of vegetable broth or water. This ensures the quinoa cooks evenly and absorbs the right amount of moisture.
Flavor Enhancements
– Additional herbs and spices: You can easily boost the flavor of your pilaf. Try adding fresh basil or dill for a fresh twist. A pinch of red pepper flakes can add some heat if you like spice. Feel free to experiment based on what you have at home!
– Using homemade vegetable broth: If you have time, make your own vegetable broth. Homemade broth is richer and more flavorful than store-bought. Use scraps from veggies you already have, like onion peels, carrot tops, and celery leaves. This adds depth to your pilaf.
Presentation
– Serving suggestions: Serve your Lemon Herb Quinoa Pilaf warm in a nice bowl. You can add some lemon slices on top for a pop of color. This makes the dish look appealing and adds extra lemon flavor.
– Best dishes to pair with: This pilaf goes well with grilled chicken, fish, or roasted veggies. It can also be a great side for a hearty stew. The bright flavors of the lemon and herbs complement many main dishes nicely.
Pro Tips
- Rinse the Quinoa: Rinsing quinoa before cooking is essential to remove its natural coating, called saponin, which can impart a bitter taste.
- Customize Your Veggies: Feel free to substitute or add any vegetables you have on hand, such as bell peppers or spinach, to enhance flavor and nutrition.
- Perfectly Fluffy Quinoa: Letting the quinoa sit covered for 5 minutes after cooking allows it to steam and become fluffy, improving the overall texture.
- Herbs for Freshness: For an extra burst of freshness, add chopped fresh herbs like basil or mint just before serving, complementing the lemon and herbs in the dish.
Variations
Protein Additions
You can easily add protein to your Lemon Herb Quinoa Pilaf. Grilled chicken or shrimp works well. Just cook them separately and mix them in at the end. This adds great flavor and makes the dish heartier. If you’re vegan or vegetarian, try plant-based proteins. Chickpeas or black beans are tasty options. They will boost the protein content while keeping the dish filling and nutritious.
Seasonal Variations
This pilaf is also great for seasonal changes. In the summer, swap in fresh vegetables like bell peppers or corn. They add a nice crunch and vibrant color. Adding nuts or seeds can give you extra texture. Try toasted almonds or sunflower seeds for a fun twist. These options keep the dish fresh and exciting throughout the year.
Dietary Modifications
If you need gluten-free options, this recipe is perfect! Quinoa is naturally gluten-free, making it safe for those with gluten allergies. For vegan adaptations, ensure your vegetable broth is plant-based. You can also skip the peas or use a different vegetable if you prefer. This dish is flexible and can fit many dietary needs.
Storage Info
Refrigeration Guidelines
To store leftovers, let the pilaf cool to room temperature first. Place it in an airtight container. This keeps it fresh and tasty. I recommend using glass containers or BPA-free plastic ones. They help prevent spills and flavor loss.
Freezing Instructions
For freezing, divide the pilaf into smaller portions. Use freezer-safe bags or containers. This makes it easy to reheat only what you need. When you’re ready to eat, thaw overnight in the fridge. For reheating, warm it in a microwave or on the stove. Add a splash of water if it seems dry.
Shelf Life
Lemon herb quinoa pilaf lasts about 4-5 days in the fridge. If frozen, it can stay good for up to three months. Signs of spoilage include a sour smell, off-color, or slimy texture. If you notice any of these, it’s best to throw it out.
FAQs
What is quinoa, and why is it healthy?
Quinoa is a small seed that cooks like a grain. It is rich in protein, fiber, and minerals. Each serving has all nine essential amino acids. This makes it a complete protein, great for vegans and vegetarians. Quinoa also has more fiber than rice. It helps with digestion and keeps you full longer.
Choosing quinoa over rice gives you more nutrients. Quinoa has magnesium, iron, and B vitamins. It also has a low glycemic index. This means it won’t spike your blood sugar. This is good for energy levels and weight control.
Can I make this recipe in advance?
Yes, you can make Lemon Herb Quinoa Pilaf ahead of time. It tastes even better the next day. To prep ahead, cook the quinoa and vegetables as the recipe says. After cooking, let it cool completely. Then store it in an airtight container in the fridge.
For best storage, use glass or plastic containers. They keep the quinoa fresh. You can keep it in the fridge for up to four days. If you want to freeze it, portion it into smaller containers. It will last for about three months in the freezer.
How can I customize the flavors?
You can easily change the flavors of this pilaf. Using different herbs is an easy way to do this. Try fresh basil or cilantro for a new taste. You can also use dried herbs like rosemary or parsley.
If you want some heat, add spices. Red pepper flakes or cayenne pepper will give it a kick. You can also mix in some smoked paprika for a warm flavor. Experiment with different blends to find what you love!
This recipe showcases how to cook tasty quinoa using simple steps. You learned about the key ingredients like quinoa, vegetables, and herbs. Preparing the base, cooking the quinoa, and adding toppings are easy. Remember to rinse quinoa for fluffiness and use fresh herbs for extra flavor. You can also switch protein or add seasonal veggies. Store leftovers correctly to enjoy later. Overall, this meal is healthy, versatile, and perfect for any day. Try different flavors and enjoy all its benefit


