Lemon Herb Quinoa Salad Fresh and Flavorful Delight

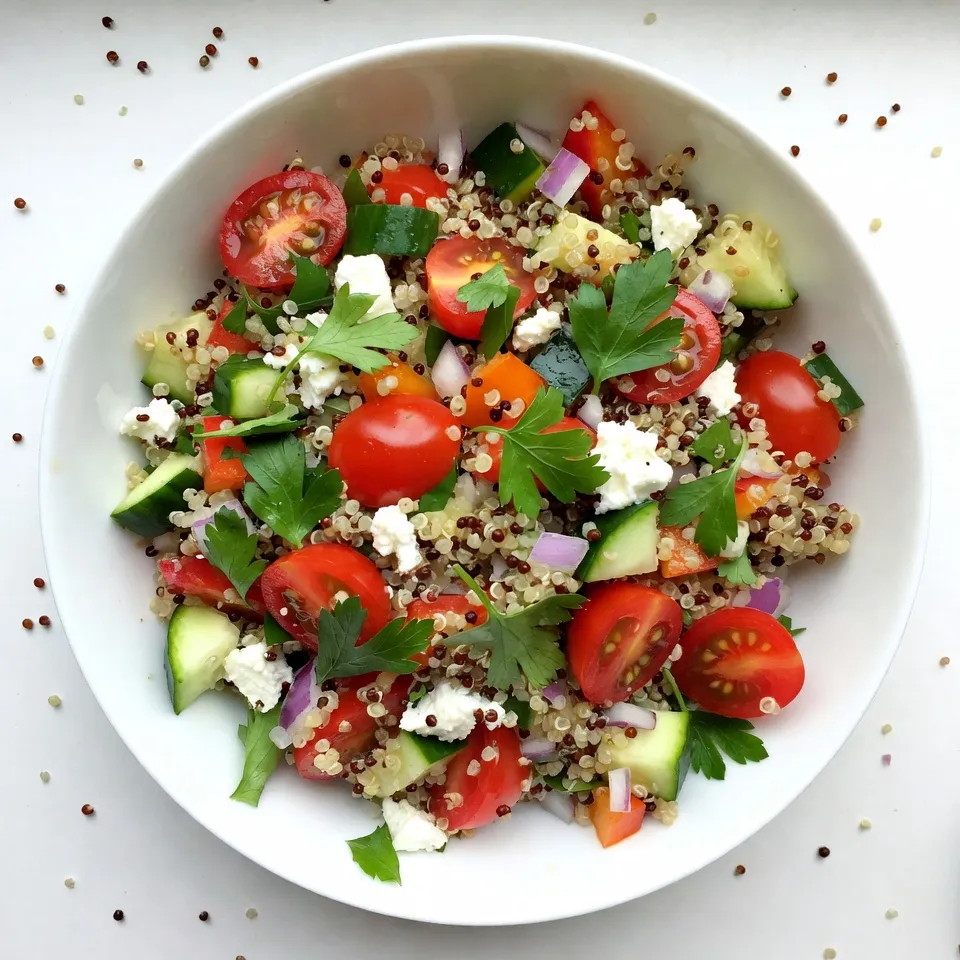
Looking for a fresh, tasty dish that’s easy to make? You’ve found it! My Lemon Herb Quinoa Salad bursts with vibrant flavors and colors. Packed with healthy ingredients like quinoa, fresh veggies, and zesty lemon dressing, this salad is perfect for any occasion. Whether you’re meal prepping or bringing a dish to share, this recipe will delight everyone. Let’s dive into how to make this delicious salad step by step!
Why I Love This Recipe
- Nutritious and Filling: This salad is packed with protein-rich quinoa and fresh vegetables, making it a satisfying meal that fuels your body.
- Refreshing Flavor: The combination of lemon juice and fresh herbs gives this salad a zesty and vibrant taste that’s perfect for any occasion.
- Versatile and Customizable: You can easily swap out vegetables or add your favorite ingredients, making it adaptable to your taste preferences.
- Quick and Easy: With just a few simple steps, you can whip up this delicious salad in under 30 minutes, perfect for busy weeknights.
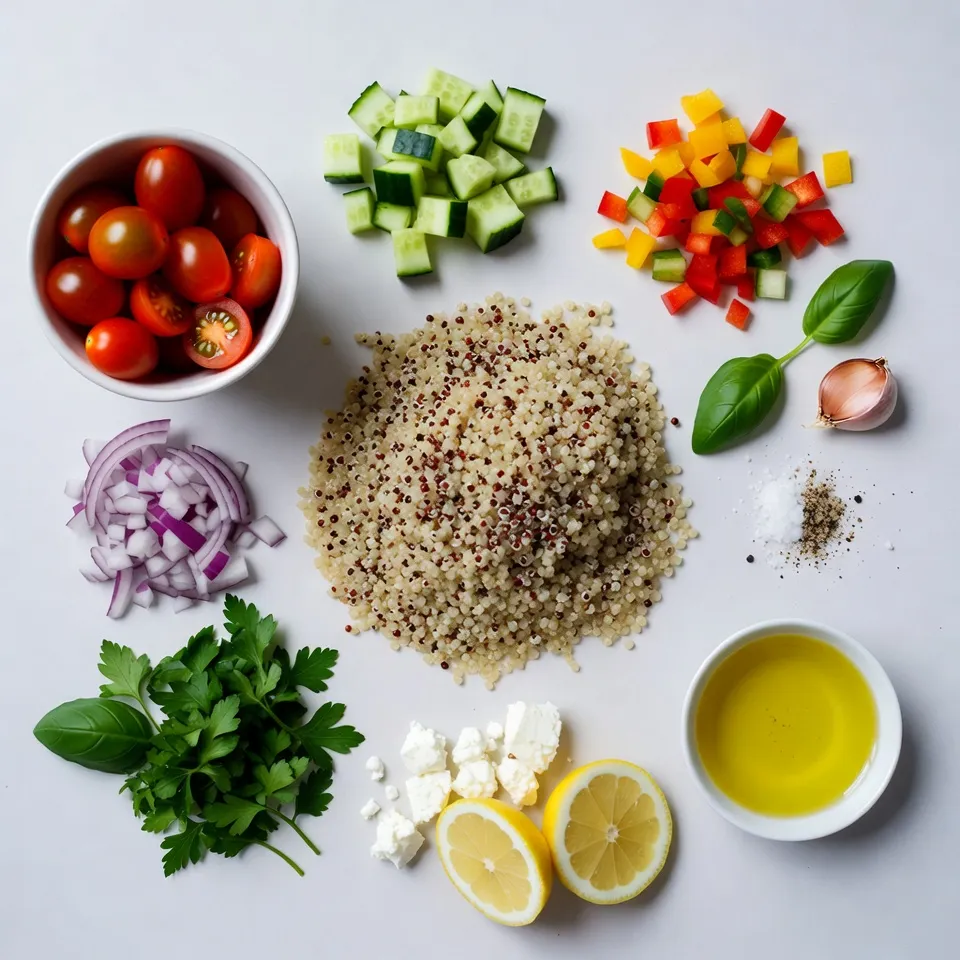
Ingredients
Main Ingredients for Lemon Herb Quinoa Salad
- 1 cup quinoa, rinsed
- 1 cup cherry tomatoes, halved
- 1 cucumber, diced
- 1 bell pepper, diced (any color)
- 1/4 cup red onion, finely chopped
- 1/4 cup fresh parsley, chopped
- 1/4 cup fresh basil, chopped
- 1/4 cup feta cheese, crumbled (optional)
In this salad, quinoa is the star. It has a light, fluffy texture. I use one cup for a balanced base. Fresh vegetables add color and crunch. I love using cherry tomatoes, cucumbers, bell peppers, and red onion. They all bring different tastes and textures. Fresh herbs like parsley and basil add a bright lift. If you like cheese, feta provides a creamy touch. It’s optional, but I highly recommend it for extra flavor.
Dressing Ingredients
- 3 tablespoons lemon juice
- 2 tablespoons olive oil
- 1 clove garlic, minced
- Salt and pepper to taste
The dressing ties everything together. I use fresh lemon juice for a zesty bite. Olive oil adds richness. I also add minced garlic for depth. Salt and pepper balance the flavors. This simple dressing can elevate the whole salad.
Quantity and Measurements
- Servings: 4
- Prep time: 15 minutes
- Total time: 30 minutes
This recipe makes enough for four servings. You can prep it in just 15 minutes. The total time for the salad is about 30 minutes. It’s perfect for a quick meal or a side dish at dinner.

Step-by-Step Instructions
Cooking the Quinoa
To start, you need to cook the quinoa. In a medium saucepan, bring 2 cups of vegetable broth or water to a boil. Add 1 cup of rinsed quinoa and a pinch of salt. Reduce the heat to low, cover the pot, and let it simmer. Cook for about 15 minutes, or until all the liquid is absorbed.
Once it’s done, remove the pot from heat. Let it sit, still covered, for 5 minutes. Then, fluff the quinoa gently with a fork. This helps separate the grains. Allow it to cool completely before mixing it with other ingredients.
Mixing the Salad
Next, it’s time to mix the salad. In a large bowl, combine the cooled quinoa with fresh ingredients. Add 1 cup of halved cherry tomatoes, 1 diced cucumber, 1 diced bell pepper, and 1/4 cup of finely chopped red onion. Don’t forget 1/4 cup each of freshly chopped parsley and basil for great flavor.
Now, let’s make the dressing. In a small bowl, whisk together 3 tablespoons of lemon juice, 2 tablespoons of olive oil, and 1 minced garlic clove. Add salt and pepper to taste. Drizzle the dressing over the salad and toss gently. This helps to coat all the ingredients evenly.
Serving Suggestions
For serving, you can present the salad in a large bowl or on individual plates. Garnish the top with more fresh herbs and lemon wedges for a bright touch. This makes the salad look fresh and inviting. Enjoy your Lemon Herb Quinoa Salad as a delicious dish that shines on any table!
Tips & Tricks
Perfecting the Quinoa
To get the best flavor from your quinoa, rinse it well. Rinsing removes bitter saponins. Place the quinoa in a fine-mesh strainer and rinse under cold water for a minute. This step is easy but makes a big difference.
For the right texture, cook quinoa in vegetable broth or water. Use a 2:1 ratio of liquid to quinoa. Bring it to a boil, then lower the heat. Cover and let it simmer for about 15 minutes. After cooking, let it sit covered for 5 minutes. Fluff it gently with a fork to keep it light.
Dressing Variations
You can change the dressing to suit your taste. The basic dressing uses lemon juice, olive oil, garlic, salt, and pepper. If you like it zestier, add more lemon juice. If you want a creamier dressing, mix in some yogurt or avocado.
For specific diets, swap the olive oil for avocado oil or use a vinegar-based dressing. If you need a vegan option, leave out the feta cheese or use a dairy-free alternative.
Enhancing Flavor
To elevate your salad, consider adding more ingredients. Try nuts like almonds or walnuts for crunch. You can also add beans for protein or extra veggies like spinach or kale for more nutrients.
For storage, keep your salad fresh in an airtight container in the fridge. It lasts about 3 days. To keep it from getting soggy, store the dressing separately and add it just before serving.
Pro Tips
- Rinse Your Quinoa: Rinsing quinoa before cooking helps remove its natural coating, called saponin, which can give a bitter taste to the finished dish.
- Use Fresh Herbs: Fresh herbs elevate the flavor of your salad. Try to use freshly chopped parsley and basil for the best taste and aroma.
- Chill Before Serving: Allow the salad to chill in the refrigerator for at least 30 minutes before serving. This helps the flavors meld together beautifully.
- Customize Your Veggies: Feel free to swap out or add your favorite vegetables. Bell peppers, zucchini, or even corn can add variety and color to the salad.

Variations
Protein Additions
You can make this salad heartier by adding protein. Here are some ideas:
- Chicken: Cook and chop grilled chicken. It adds flavor and fills you up.
- Chickpeas: Use canned or cooked chickpeas for a tasty, plant-based option. They add protein and fiber.
- Tofu: Try cubed and sautéed tofu for a vegan protein boost. It soaks up flavors well.
Flavor Enhancements
You can boost the taste with different herbs and spices. Consider these options:
- Herbs: Swap parsley and basil for mint or cilantro for a fresh twist.
- Spices: Add cumin or paprika for a warm flavor.
- Seasonal Ingredients: In summer, use fresh corn or avocado. In fall, try roasted squash or apples.
Other Allergy-Friendly Options
Make this salad fit for everyone! Here’s how:
- Gluten-Free: Quinoa is naturally gluten-free. It’s a great choice for those with gluten allergies.
- Vegan Substitutes: Instead of feta cheese, use vegan feta or omit it. You still get a delicious salad!
Storage Info
How to Store Leftovers
To keep your Lemon Herb Quinoa Salad fresh, choose the right containers. Use airtight glass or plastic containers. These will help lock in moisture and flavor. Store the salad in the fridge for up to three days. After that, the veggies may lose their crunch and taste.
Reheating or Serving Chilled
If you like warm quinoa, reheat it gently. Use the microwave for quick warming. Heat in short bursts to avoid overcooking. Stir it well to ensure even heating. If you prefer it cold, serve it straight from the fridge. This dish tastes great chilled and is refreshing on hot days.
Meal Prep Ideas
Preparing this salad in advance is a smart choice. Cook a big batch of quinoa and chop the veggies ahead of time. Store them separately to keep them fresh. Portion the salad into small containers for easy meals. This way, you can enjoy a healthy dish throughout the week without the extra effort.
FAQs
What is quinoa and its health benefits?
Quinoa is a tiny seed packed with nutrients. It is a complete protein, which means it has all nine essential amino acids. One cup of cooked quinoa has about 8 grams of protein and 5 grams of fiber. Quinoa is gluten-free, making it great for those with gluten sensitivities. It also contains vitamins and minerals, such as magnesium, phosphorus, and B vitamins. Eating quinoa can help with digestion, weight management, and heart health.
Can I make this salad ahead of time?
Yes, you can make this salad ahead of time. To prep in advance, cook the quinoa and let it cool. Store it in an airtight container in the fridge. You can chop the vegetables a day earlier too. Just add them to the quinoa when you are ready to serve. Keep the dressing separate until serving to keep the salad fresh and crisp.
How do I make this salad vegan?
To make this salad vegan, simply omit the feta cheese. You can add extra veggies or nuts for flavor. You can also use nutritional yeast for a cheesy taste without dairy. Use a plant-based broth if you want to boost the flavor even more.
What to serve with Lemon Herb Quinoa Salad?
This salad pairs well with many dishes. You can serve it alongside grilled chicken or fish for a hearty meal. For a vegetarian option, try it with roasted chickpeas or stuffed peppers. A side of fresh fruit adds a sweet touch and balances the meal.
This Lemon Herb Quinoa Salad is simple to make and delicious. We covered the main ingredients, including quinoa, fresh veggies, and herbs. You learned how to cook quinoa and mix it into a healthy salad.
Remember, you can customize the dressing and add proteins to fit your taste. Store leftovers properly for fresh meals later. Enjoy your cooking and experimenting with flavors! This salad is a fun and healthy option for everyon

Lemon Herb Quinoa Salad
Ingredients
- 1 cup quinoa, rinsed
- 2 cups vegetable broth or water
- 1 cup cherry tomatoes, halved
- 1 whole cucumber, diced
- 1 whole bell pepper, diced (any color)
- 0.25 cup red onion, finely chopped
- 0.25 cup fresh parsley, chopped
- 0.25 cup fresh basil, chopped
- 0.25 cup feta cheese, crumbled (optional)
- 3 tablespoons lemon juice
- 2 tablespoons olive oil
- 1 clove garlic, minced
- to taste salt and pepper
Instructions
- In a medium saucepan, bring the vegetable broth or water to a boil. Add the rinsed quinoa and a pinch of salt. Reduce heat to low, cover, and simmer for 15 minutes or until the liquid is absorbed. Remove from heat and let it sit covered for 5 minutes. Fluff with a fork and allow to cool completely.
- In a large bowl, combine the cooked quinoa, cherry tomatoes, cucumber, bell pepper, red onion, parsley, and basil.
- In a small bowl, whisk together the lemon juice, olive oil, minced garlic, salt, and pepper.
- Pour the dressing over the quinoa salad and toss gently to combine. Adjust seasoning to taste.
- If desired, sprinkle feta cheese on top before serving.


![- 4 large onions, thinly sliced - 4 tablespoons unsalted butter - 1 tablespoon olive oil - 4 cups beef broth (or vegetable broth) - 1 teaspoon sugar - 1 sprig of fresh thyme - 1 bay leaf - 1 teaspoon salt - 1/2 teaspoon black pepper - 1 tablespoon balsamic vinegar - Optional: Fresh parsley for garnish - 4 slices of baguette, toasted - 1 ½ cups grated Gruyère cheese Classic French onion soup needs sweet, rich flavors. The onions bring that sweetness. Onions are the star. You want to slice them thinly for even cooking. Use a heavy pot to help with the caramelization. Butter and olive oil work great together. Butter adds creaminess, while olive oil gives flavor. The broth is the base. Beef broth adds depth. You can also use vegetable broth if you prefer. For seasoning, sugar helps the onions caramelize. Thyme and bay leaf bring herbal notes. Salt and pepper round out the taste. Balsamic vinegar adds a nice tang. For toppings, you need toasted baguette slices. They soak up the soup and add crunch. Gruyère cheese melts beautifully on top, creating a cheesy layer. I recommend checking out the full recipe for detailed steps to make this comforting dish. - Melt butter and oil in a pot. - Add onions and sugar, and cook until caramelized. Start with a heavy pot. I use my trusty Dutch oven for even heat. Melt 4 tablespoons of unsalted butter with 1 tablespoon of olive oil over medium heat. The blend gives a rich flavor. Next, add 4 large, thinly sliced onions and 1 teaspoon of sugar. Stir them well so they coat in the butter and oil. This sugar helps the onions turn a lovely golden brown. Cook them slowly for about 25-30 minutes. Stir often to prevent burning. Be patient, as caramelization brings out the sweet notes in the onions. - Pour in the broth and add seasonings. - Bring to a gentle simmer and cook. Once the onions are caramelized, it's time to add the broth. Pour in 4 cups of beef broth, or use vegetable broth for a lighter taste. Add 1 sprig of fresh thyme, 1 bay leaf, 1 teaspoon of salt, 1/2 teaspoon of black pepper, and 1 tablespoon of balsamic vinegar. These seasonings give depth to the soup. Bring the soup to a gentle simmer. Let it cook uncovered for about 20 minutes. This time allows the flavors to blend well together. It will smell amazing! - Preheat the oven to broil. - Prepare bowls with bread and cheese for broiling. Before finishing, preheat your oven to broil. Remove the thyme sprig and bay leaf from the soup. Ladle the soup into oven-safe bowls. For the topping, place a toasted slice of baguette on each bowl. Then, sprinkle 1 ½ cups of grated Gruyère cheese on top. The cheese should be generous; it melts beautifully and creates a rich layer. Now, place the bowls on a baking sheet and broil them for about 3-5 minutes. Watch closely to avoid burning! You want the cheese to be bubbly and golden. Take them out carefully and let them cool slightly. If you like, garnish with fresh parsley before serving. Enjoy your comforting bowl of French onion soup! For the full recipe, check out the details above. To make great French onion soup, you need to cook the onions slowly. This step is key. Start over medium heat. Stir the onions often to help them cook evenly. Add a pinch of salt to draw out moisture. Be patient. It can take 25 to 30 minutes for the onions to turn golden brown. Watch closely to avoid burning. If you notice browning too fast, lower the heat. A little sugar can help speed up caramelization, but don't let it burn. Broiling the cheese adds a perfect touch. First, preheat your oven to broil. Ladle the soup into oven-safe bowls. Place a slice of toasted baguette on top of each bowl. Then, sprinkle a generous amount of Gruyère cheese on top. Position the bowls on a baking sheet. This makes it easy to remove them from the oven. Broil for 3 to 5 minutes. Keep an eye on the cheese. You want it bubbly and golden, not burnt. Using different broths can change the flavor. Beef broth gives a rich taste, but vegetable broth works well too. For an extra kick, add a splash of white wine. It adds depth and pairs well with the onions. Feel free to experiment! You can even mix broths for a unique flavor. Adding a tablespoon of balsamic vinegar can also brighten the soup. It balances the sweetness of the onions. For more tips and a full recipe, check out the [Full Recipe]. {{image_2}} You can make a vegetarian version of French onion soup. Start by using vegetable broth instead of beef broth. This broth gives the soup a rich flavor without meat. You can also add extra vegetables. Try carrots, celery, or even leeks. These veggies add sweetness and depth to the soup. Cheese plays a big role in this dish. You can try different cheeses for fun. Gruyère is classic, but Comté or Emmental work well too. These cheeses melt nicely and add a creamy texture. Grate your cheese finely for even melting. Each cheese brings a unique flavor to the soup. You can personalize your soup with add-ins. Fresh herbs like basil or oregano can brighten the dish. Just sprinkle them in before serving. You can also add sautéed mushrooms for an umami boost. Mushrooms add earthiness and enhance the soup’s flavor. Mix and match these ideas to make your perfect bowl of comfort. Check out the Full Recipe for more tips! To keep your soup fresh, let it cool first. After it cools, pour it into a clean, airtight container. Seal the lid tightly. Store the soup in the fridge for up to five days. When you are ready to eat, heat it on the stove or in the microwave. Stir well to make sure it warms up evenly. Freezing soup is easy and convenient. First, let the soup cool completely. Then, use freezer-safe containers or bags. Pour the soup into containers, leaving some space at the top. This allows it to expand. You can freeze it for up to three months. To reheat, thaw it overnight in the fridge. Then, heat it on the stove until it’s hot. You can also add a little broth if it seems too thick. Fresh ingredients are key for great soup. Onions last about two weeks if stored in a cool, dark place. Keep them away from potatoes. Butter can last months in the fridge if sealed tight. Broth can stay good for up to a week in the fridge. Always check for any signs of spoilage before cooking. Fresh ingredients lead to the best flavors in your soup. The classic choice is Gruyère cheese. It melts well and has a rich flavor. Emmental cheese is also great. It adds a nutty taste. For a twist, try Comté or Fontina. These cheeses bring depth and creaminess. Mix different cheeses to create your own blend. Yes, you can make French onion soup ahead of time. Cook the soup and store it in the fridge. It stays fresh for about three days. Just reheat it before serving. You can also freeze it for up to three months. Thaw in the fridge overnight before reheating. A toasted baguette is the best choice for French onion soup. It adds crunch and holds the cheese well. You can also use sourdough or ciabatta. These breads give a nice flavor and texture. Avoid soft bread, as it may fall apart in the soup. Look for a deep golden-brown color in the onions. They should be soft and sweet in taste. This process takes about 25 to 30 minutes. Stir them often to avoid burning. If you see dark spots or they smell bitter, reduce the heat. Classic French onion soup combines simple ingredients for rich flavor. Using onions, butter, and broth creates a warm, comforting dish. Remember to caramelize the onions slowly for depth and to broil cheese to perfection. You can also customize the soup with different broths and cheeses for a unique twist. Whether you’re enjoying it on a cold night or sharing with friends, this soup warms the heart. Embrace your creativity and make this recipe your own!](https://dailydishlab.com/wp-content/uploads/2025/06/d4b3c813-7d13-4313-85c6-6f7cc6d3bfc5-768x768.webp)

![To make Buffalo Chicken Zucchini Boats, you need the right ingredients. Here’s what you’ll gather: - 4 medium zucchinis - 2 cups cooked shredded chicken - ½ cup buffalo sauce - 1 cup shredded cheddar cheese - ½ cup cream cheese - 1 tablespoon olive oil - ½ teaspoon garlic powder - ¼ teaspoon onion powder - Salt and pepper to taste - Green onions for garnish These ingredients blend together to create a dish bursting with flavor. The zucchinis serve as the perfect base for the savory buffalo chicken filling. You can easily adjust the buffalo sauce to fit your spice level. If you want a milder taste, use less sauce. Cream cheese adds a rich and creamy texture. It balances the heat from the buffalo sauce. Shredded cheddar cheese on top melts beautifully, adding a delicious finish. Green onions provide a fresh touch and a nice color contrast. By using cooked shredded chicken, you save time. You can use leftovers or rotisserie chicken, making this dish quick to prepare. This recipe is not just tasty; it is simple too. You can find the full recipe to guide you through the cooking steps. Enjoy cooking! 1. Preheat the oven Set your oven to 375°F (190°C). This step warms the oven for baking. 2. Prepare the zucchinis Slice the zucchinis in half lengthwise. Use a spoon to scoop out seeds and flesh. You want to create small boats. Save that zucchini flesh for later. 3. Sauté zucchini flesh Heat one tablespoon of olive oil in a skillet over medium heat. Add the chopped zucchini flesh. Sauté for 2-3 minutes until it softens. This adds flavor and texture to your dish. 1. Combine ingredients in a bowl In a large mixing bowl, add the cooked shredded chicken, buffalo sauce, cream cheese, garlic powder, onion powder, salt, and pepper. Stir well until everything is mixed. 2. Add sautéed zucchini flesh Take the sautéed zucchini flesh you set aside. Add it to the bowl with the chicken mixture. Stir until all ingredients are evenly combined. This makes your filling rich and tasty. 1. Fill zucchini boats Grab your zucchini boats and fill each one with the buffalo chicken mixture. Press down gently to pack it in well. This step ensures every bite is full of flavor. 2. Bake until tender Place the filled zucchini boats on a baking sheet. Sprinkle shredded cheddar cheese on top. Bake for 25-30 minutes until the zucchini is tender and the cheese is bubbly and golden. Enjoy the aroma while it bakes! For the complete recipe, refer to the Full Recipe. - Selecting the best zucchinis: Choose medium-sized zucchinis. They should feel firm and heavy. Look for smooth skin without blemishes. This ensures a great texture and taste. - Adjusting buffalo sauce to taste: Buffalo sauce can be spicy. Start with half a cup and taste the mix. If you want more heat, add more sauce slowly. Balance the flavor as you like. - Optimal baking time: Bake your zucchini boats for 25-30 minutes. This gives them a tender texture and melts the cheese. Keep an eye on them to avoid overcooking. - Checking for doneness: To check if they are done, poke a fork into the zucchini. It should be soft but not mushy. The cheese should be bubbly and slightly golden. {{image_2}} You can change this dish to fit your taste. Here are some fun ideas: - Adding different cheeses: Try mozzarella or pepper jack cheese. Both melt well and add unique flavors. You can even mix cheeses for depth. - Using other sauces: Swap buffalo sauce for barbecue or ranch dressing. Each sauce gives a different twist. Experiment and find your favorite! - Vegetarian option: Use beans or lentils instead of chicken. This makes a hearty and tasty dish for vegetarians. Add more veggies for extra flavor and nutrition. Pair your buffalo chicken zucchini boats with tasty sides. Here are some great combos: - Pairing with sides: Serve with a fresh salad or crunchy coleslaw. These add crispness and balance the spicy flavor. You can also include sweet potato fries for a fun twist. - Garnishing ideas: Top with chopped green onions or cilantro. These herbs add color and a burst of fresh taste. A drizzle of ranch dressing can also cool down the heat! For the complete recipe, check out the [Full Recipe]. To store leftovers, place them in an airtight container. Keep the container in the fridge. The dish stays fresh for up to three days. Make sure to cool the zucchini boats before sealing them. This helps prevent moisture buildup. You can freeze buffalo chicken zucchini boats for later. Wrap each boat tightly in plastic wrap. Then, place them in a freezer-safe bag. They stay good for about two months. To reheat, let them thaw in the fridge overnight. Then, bake at 350°F (175°C) for 15-20 minutes. This keeps them warm and tasty. If you want, top with extra cheese before baking. Enjoy your meal! For the full recipe, check the earlier section. Can I use raw chicken? No, using raw chicken is not safe. Always cook your chicken first. You can use leftover chicken or rotisserie chicken. This saves time and adds flavor to the dish. What can I substitute for buffalo sauce? If you want a milder sauce, use barbecue sauce or ranch dressing. You can also mix hot sauce with butter for a homemade version. Adjust the spice level to fit your taste. How do I know when zucchini boats are done? Zucchini boats are done when they are tender. You can test this with a fork. The cheese should also be bubbly and slightly golden. What to do if the zucchini is too soggy? If your zucchini turns soggy, try salting them before baking. This helps remove excess water. You can also bake them a bit longer to dry them out. Solutions for insufficient cheese melting If your cheese doesn't melt well, check your oven temperature. Make sure it's hot enough. You can also cover the dish with foil for part of the bake time to help it melt evenly. For the full recipe and more tips, check the [Full Recipe]. Zucchini boats are a simple and tasty dish. This recipe combines zucchini, chicken, and buffalo sauce for flavor. You learned how to prepare, fill, and bake zucchini until tender. I shared tips for choosing ingredients and cooking. You can customize with different toppings or sauces. Remember, storing leftovers properly keeps them fresh. Whether you try variations or follow the recipe, enjoy your delicious zucchini boats!](https://dailydishlab.com/wp-content/uploads/2025/06/166bac25-20b4-473a-a87e-2d394f6df926-768x768.webp)